Storage Topology
Path: Left sidebar > Advanced > Storage Topology
When to Use:
After host or OSD topology changes.
Before creating, editing, or deleting CRUSH rules or erasure-code profiles.
Purpose:
This page explains how to validate placement topology and manage the policies that pools use for replica or chunk placement.
Steps:
Open
Advanced > Storage Topology.Review the CRUSH tree and confirm the current topology is correct.
Move to the CRUSH Rules or Erasure Code Profiles section for the target policy change.
Validate the new rule or profile before using it in a pool workflow.
Expected Outcome:
You can confirm the cluster placement model and safely manage the policies that depend on it.
What You See:
The CRUSH tree, CRUSH rule list, erasure-code profile list, and the create/edit/delete workflows for those policies.
What This Screenshot Shows:
The screenshots on this page show the topology tree and the policy forms used to manage CRUSH rules and erasure-code profiles.
Actions in This Screen:
Expand and review the CRUSH tree.
Create, edit, or delete CRUSH rules.
Create or delete erasure-code profiles.
If this fails:
Do not continue if the topology tree already looks incorrect.
Confirm no dependent pool is using the rule or profile you plan to remove.
Re-validate placement behavior in Pools after the topology change.
Storage Topology
The Storage Topology page combines three admin sections on one scrollable page:
CRUSH Tree: visual hierarchy of data-placement topology.CRUSH Rules: placement policies pools use for replica/chunk mapping.Erasure Code Profiles: redundancy profiles for erasure-coded pools.
This page represents the CRUSH map (Controlled Replication Under Scalable Hashing), which Ceph uses to decide which OSDs store each piece of data.
Note
Values and names shown in screenshots are UI references from one environment. Use values that match your own topology and policy.
CRUSH Tree
The CRUSH Tree is an interactive hierarchy showing how Ceph organizes infrastructure for placement decisions.

What This Screenshot Shows: Storage Topology Dashboard (UI Reference; Values Depend On Your Environment).
Purpose:
To verify host/OSD placement before creating rules and pools.
When to Use:
After adding new hosts or OSDs.
Before creating/editing CRUSH rules.
CRUSH Tree Node Types
Node Type |
Badge Label |
What It Represents |
|---|---|---|
Root |
|
Top-level bucket where placement starts |
Region / Datacenter |
|
Optional geographic grouping level above racks/hosts |
Rack |
|
Physical rack grouping |
Host |
|
Individual server node |
OSD |
|
Leaf disk where objects are stored |
Reference Topology Example (From Screenshot)
default [root]
\- dc-us-va-Sterling-karios-staging-01 [datacenter]
\- rack-r87 [rack]
|- i9-storage [host] -- 4 items
| |- osd.2 [osd][ssd] up 0.233 TiB
| |- osd.4 [osd][nvme] up 0.233 TiB
| |- osd.5 [osd][nvme] up 0.233 TiB
| \- osd.6 [osd][hdd] up 0.910 TiB
\- siva-ceph [host] -- 3 items
|- osd.0 [osd][hdd] up 0.437 TiB
\- osd.1 [osd][hdd] up 0.910 TiB
How To Read OSD Leaf Entries
Item |
Meaning |
|---|---|
First badge |
|
Second badge |
Device class ( |
Status indicator |
|
Right-side size |
Raw capacity of that OSD |
Parent item count |
Number of direct children under non-leaf nodes |
How To Use The CRUSH Tree
Open
Advanced > Storage Topology.Expand/collapse nodes with chevron
>.Verify hosts appear under the correct rack/datacenter buckets.
Verify OSD device-class labels are correct.
Verify OSD status is
up; investigate deviations viaInfrastructure > OSDs.
Expected Outcome:
You confirm topology and class mapping are correct for rule-based placement.
Tip
Always validate the CRUSH tree after host/OSD expansion before creating new pools or assigning class-specific rules.
TOOLTIP - Failure Domain And CRUSH Tree:
hostfailure domain separates replicas across hosts.rackfailure domain separates replicas across racks.osdfailure domain separates at disk level only.
CRUSH Rules
CRUSH Rules define data-placement behavior for pools. Every pool references one CRUSH rule.
Purpose:
To verify which placement policy each pool is using.
To validate failure-domain and media-class design before pool changes.
When to Use:
Before creating a new pool.
Before editing an existing pool’s placement policy.
CRUSH Rules List - Column Reference
Column |
What It Shows |
|---|---|
ID |
Internal numeric rule identifier |
Name |
Rule name (for example |
Type |
|
Failure Domain |
Replica/chunk separation level (for example |
Used By |
Pools currently using this rule |
Actions |
Create, Edit, Delete (Edit/Delete only when no pools use the rule) |
CRUSH Rule Actions
Action |
Description |
|---|---|
Create |
Define a new rule with |
Edit |
Change failure domain or device class for an unused rule |
Delete |
Remove an unused rule |
Reference Rules In UI (Example)
ID |
Name |
Type |
Failure Domain |
Used By |
|---|---|---|---|---|
0 |
|
replicated |
host |
default |
1 |
|
replicated |
osd |
default-nvme |
2 |
|
replicated |
osd |
default-ssd |
3 |
|
replicated |
osd |
default-hdd |
TOOLTIP - replicated_rule:
hostfailure domain is the safer default for multi-host resilience.
TOOLTIP - Class Rules:
nvme-ruletargets NVMe OSDs.ssd-ruletargets SSD OSDs.hdd-ruletargets HDD OSDs.
How To Create A CRUSH Rule
Path: Advanced > Storage Topology > CRUSH Rules > + Create
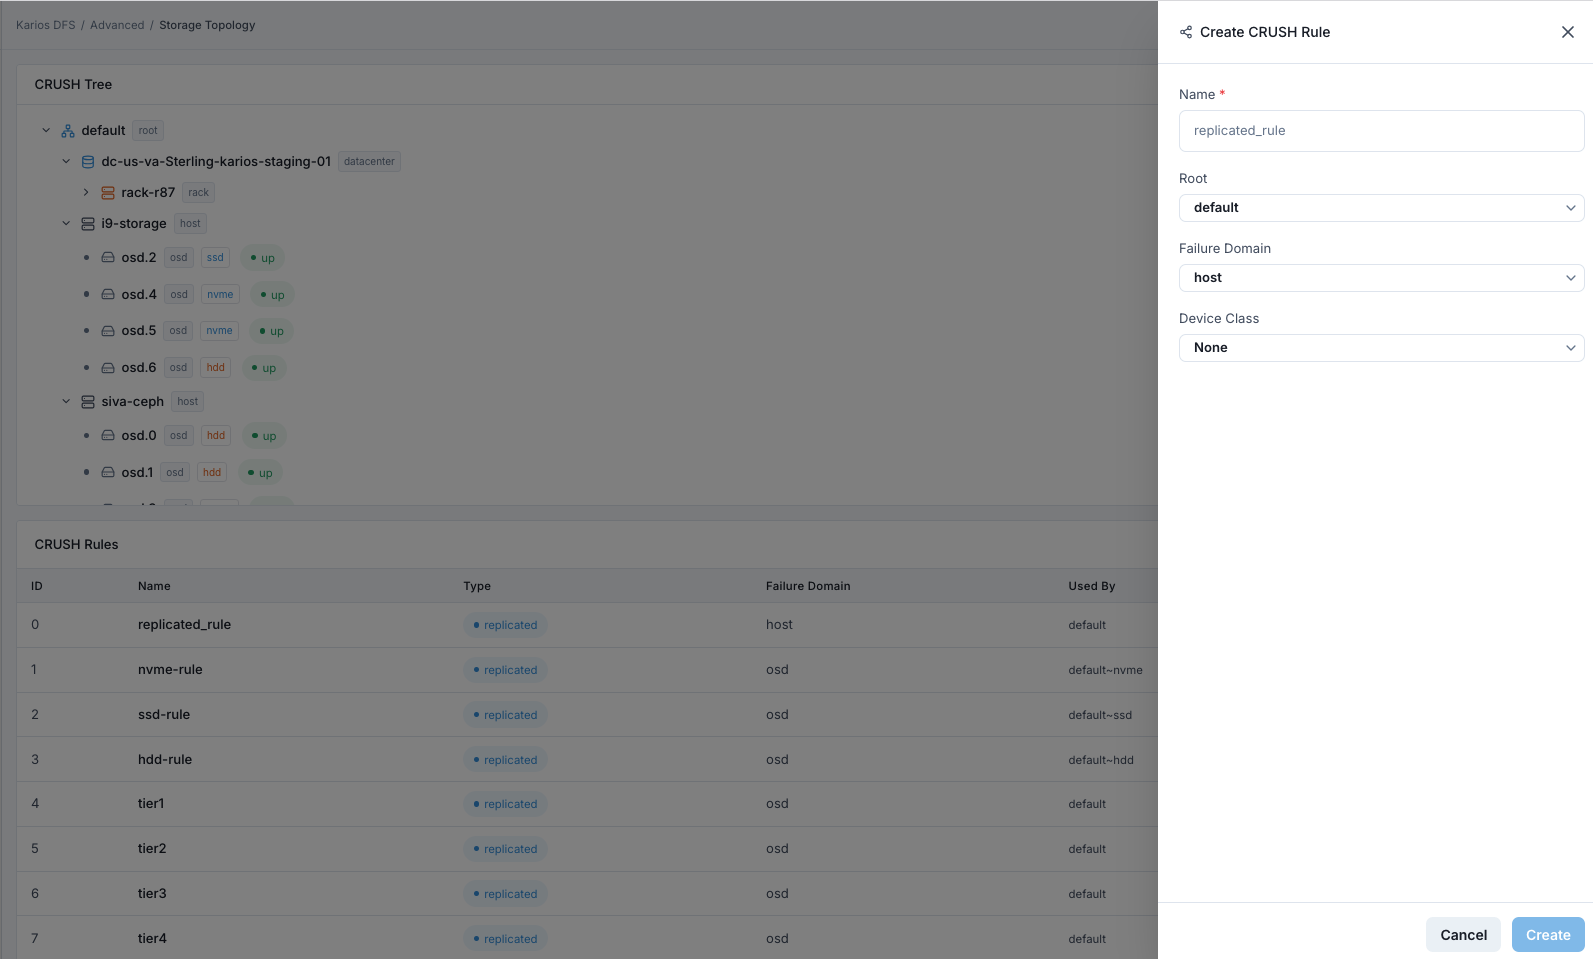
What This Screenshot Shows: Create CRUSH Rule Panel (UI Reference; Values Depend On Your Environment).
Purpose:
To create explicit placement behavior for new or retuned pools.
When to Use:
Before creating a pool or before changing pool placement policy.
Steps:
Scroll to
CRUSH Rulessection.Click top-right
+ Create.Enter
Name.Select
Root.Select
Failure Domain.Select
Device Class(orNonefor mixed media).Click
Create.
Expected Outcome:
Rule appears in the CRUSH Rules list with a new ID.
Rule becomes selectable in
Storage > Pools.
Create CRUSH Rule - Field Reference
Field |
Value / Options |
Description |
|---|---|---|
Name * |
Text |
Unique descriptive rule name |
Root |
Dropdown (for example |
Top-level CRUSH bucket |
Failure Domain |
Dropdown (for example |
Replica/chunk separation boundary |
Device Class |
|
Media filter for tiered placement |
Warning
Delete a CRUSH rule only when Used By is empty. Deleting an in-use rule
can cause pool placement issues.
Tip
Use class-specific rules for tiering: NVMe for hot workloads, SSD for mid-tier, HDD for capacity.
How To Edit A CRUSH Rule
Path: Advanced > Storage Topology > CRUSH Rules > edit action
Purpose:
To update placement behavior for a rule that is not in use.
When to Use:
Before assigning the rule to pools.
When you need to correct failure domain or device-class targeting.
Steps:
In
CRUSH Rules, identify the rule to modify.Confirm the rule is not used by any pool (
Used Byis empty).Open the edit action for that rule.
Update
Failure Domainand/orDevice Class.Save the rule.
Expected Outcome:
The rule definition updates immediately.
The updated rule is available for future pool assignment.
Warning
Do not modify placement policy while recovery is active. Confirm all PGs are
active+clean before topology/rule changes.
How To Delete A CRUSH Rule
Path: Advanced > Storage Topology > CRUSH Rules > trash icon
Purpose:
To remove an obsolete rule that is no longer used by any pool.
When to Use:
After migrating all dependent pools to a different CRUSH rule.
Steps:
In
CRUSH Rules, find the target rule.Confirm
Used Byis empty.Click the trash icon in
Actions.Confirm deletion.
Expected Outcome:
The rule is removed from the list.
The rule is no longer available for pool assignment.
Warning
Never delete a rule that is still used by a pool. Reassign dependent pools first, then delete.
Erasure Code Profiles
Erasure Code Profiles define EC chunking and parity behavior for erasure-coded pools.
Purpose:
To define redundancy efficiency for erasure-coded pools.
To confirm which profile exists before pool creation.
When to Use:
Before creating erasure-coded pools.
During resilience/capacity tuning for object workloads.
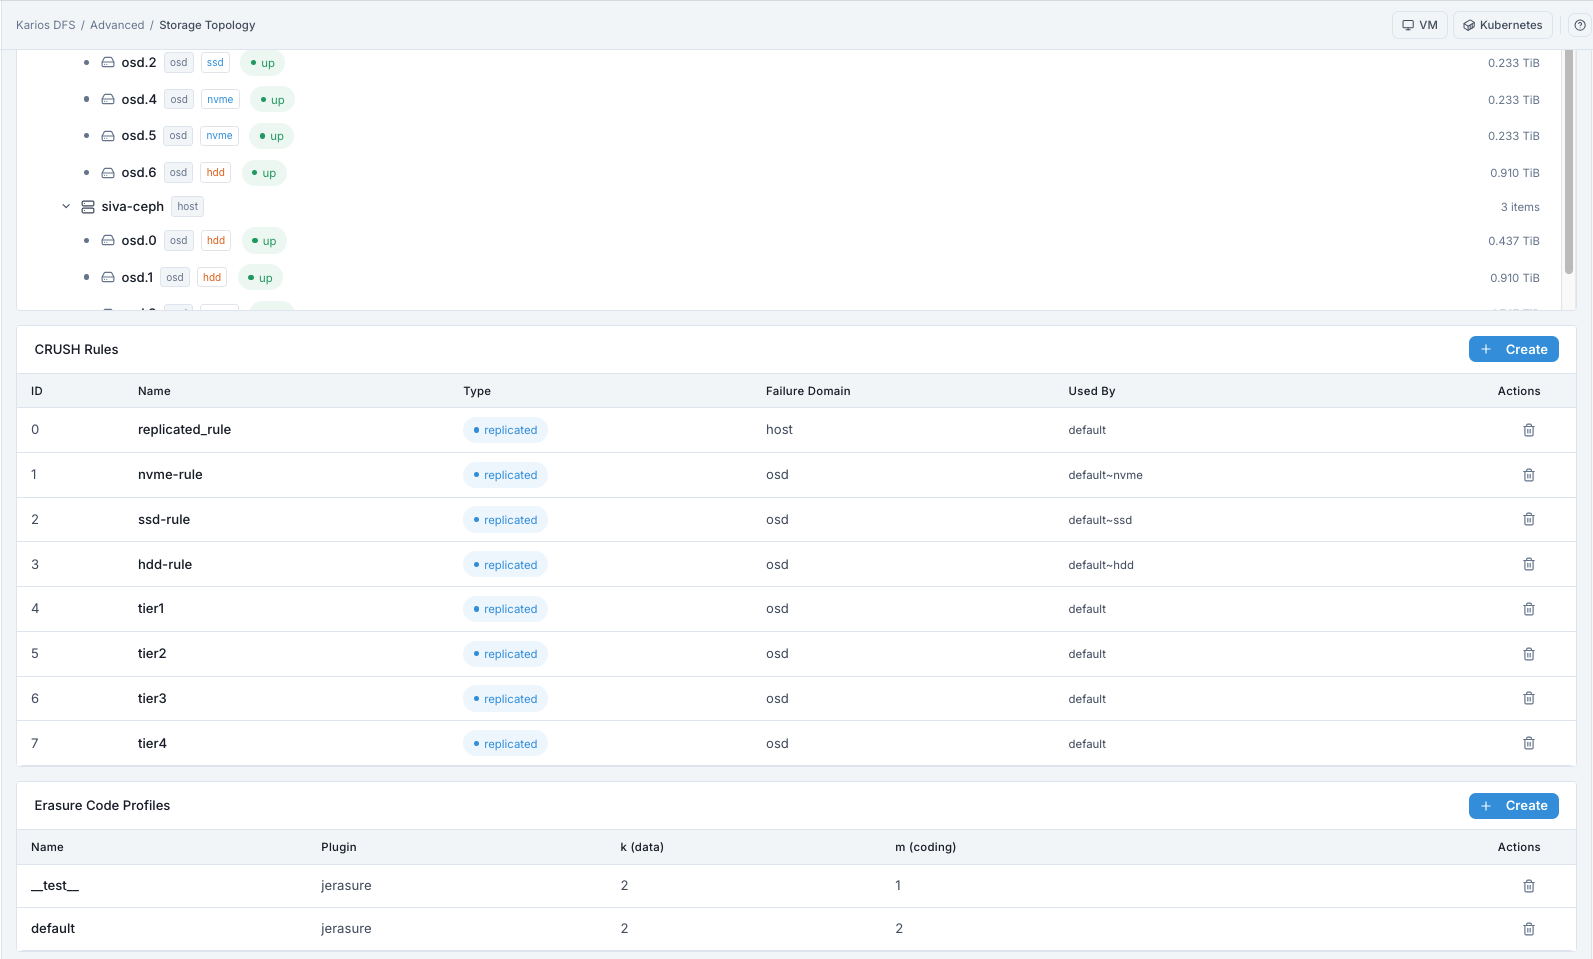
What This Screenshot Shows: Erasure Code Profiles Section (UI Reference; Values Depend On Your Environment).
Erasure Code Profiles - Column Reference
Column |
What It Shows |
|---|---|
Name |
Profile identifier |
Plugin |
EC plugin (for example |
k (data) |
Number of data chunks |
m (coding) |
Number of parity chunks and failure tolerance |
Actions |
Create or Delete (Delete only when profile is unused) |
Profile Actions
Action |
Description |
|---|---|
Create |
Define |
Delete |
Remove an unused profile |
Reference Profiles In UI (Example)
Name |
Plugin |
k (data) |
m (coding) |
|---|---|---|---|
test |
jerasure |
2 |
1 |
default |
jerasure |
2 |
2 |
TOOLTIP - Understanding k And m:
Objects are split into
kdata chunks plusmparity chunks.Profile survives up to
msimultaneous OSD failures.Storage overhead is
(k+m)/k.
Example:
k=4, m=2stores chunks across 6 OSDs, survives 2 OSD failures, and has about1.5xoverhead (vs3xfor 3-replica).
How To Create An Erasure Code Profile
Path: Advanced > Storage Topology > Erasure Code Profiles > + Create
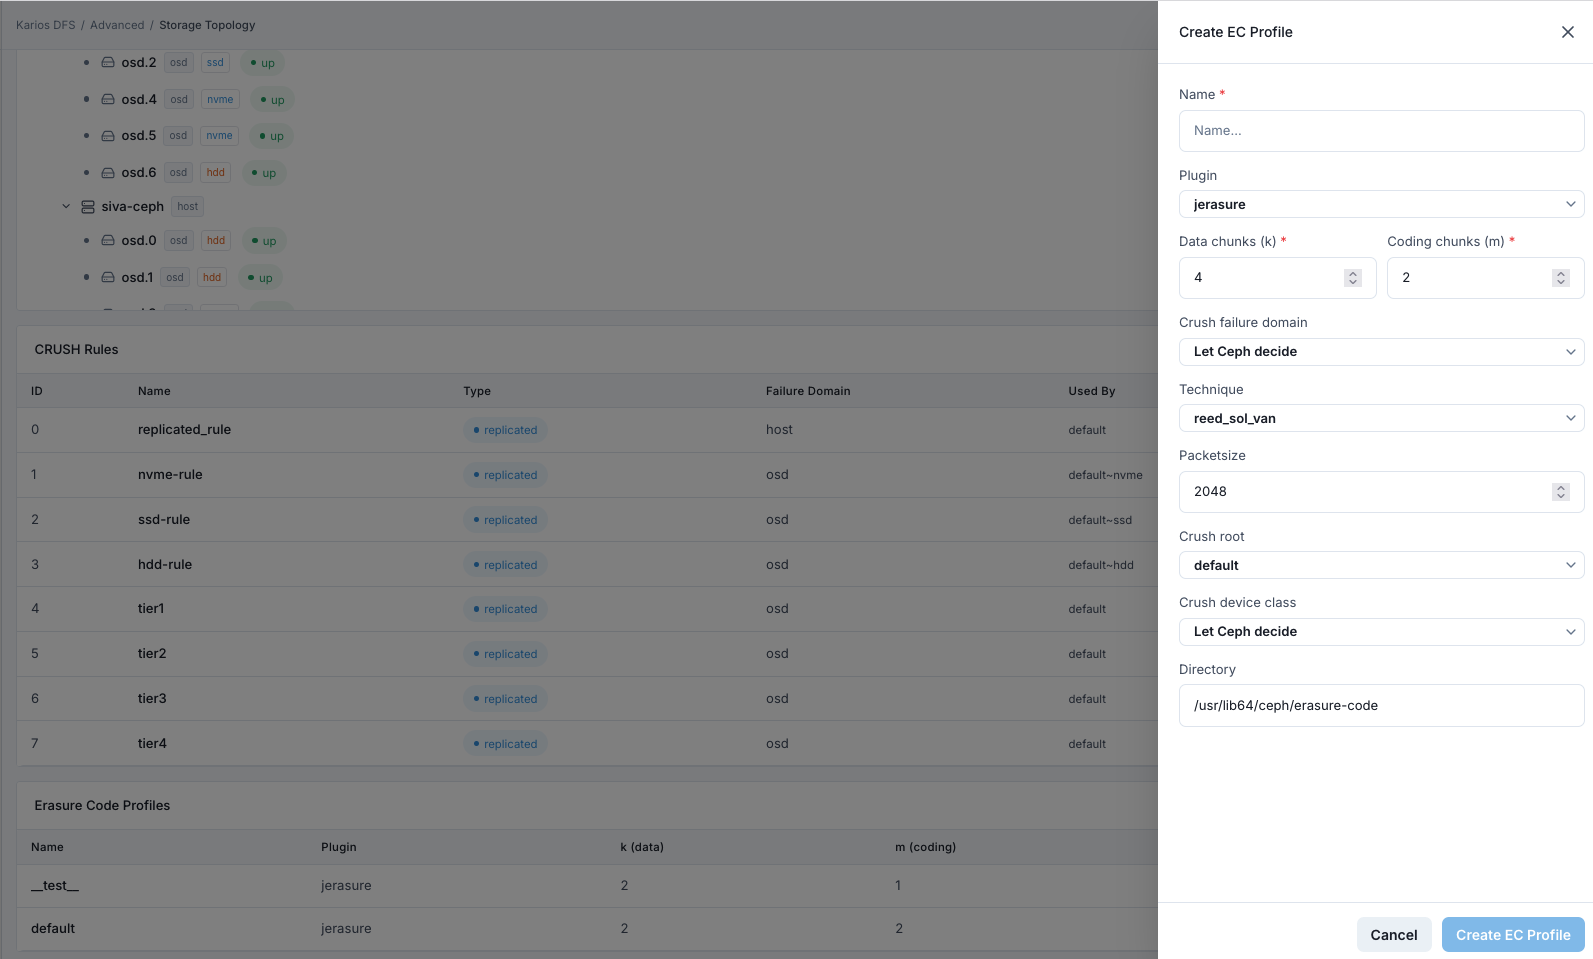
What This Screenshot Shows: Create Erasure Code Profile Panel (UI Reference; Values Depend On Your Environment).
Purpose:
To define efficiency and failure-tolerance model for erasure-coded pools.
When to Use:
Before creating an erasure-coded pool.
Steps:
Scroll to
Erasure Code Profilessection.Click top-right
+ Create.Enter
Name.Select
Plugin.Set
Data chunks (k).Set
Coding chunks (m).Set
Crush failure domain.Set
Technique.Set
Packetsize.Set
Crush rootandCrush device class.Click
Create EC Profile.
Expected Outcome:
Profile appears in list immediately.
Profile becomes available in erasure-coded pool creation workflow.
Create EC Profile - Field Reference
Field |
Value / Options |
Description |
|---|---|---|
Name * |
Text |
Unique profile name |
Plugin |
Dropdown (for example |
EC algorithm |
Data chunks (k) * |
Number |
Data chunk count |
Coding chunks (m) * |
Number |
Parity chunk count |
Crush failure domain |
Dropdown |
Chunk separation boundary |
Technique |
Dropdown (for example |
Mathematical encoding method |
Packetsize |
Number |
Internal EC packet size |
Crush root |
Dropdown |
Root placement bucket |
Crush device class |
Dropdown |
Class target (or automatic selection) |
Directory |
Read-only path |
EC plugin library location |
Warning
EC profiles cannot be modified after creation. Create a new profile when k
or m requirements change.
Tip
Use replicated pools for simpler operations unless EC efficiency is required for large, capacity-focused datasets.
How To Delete An Erasure Code Profile
Path: Advanced > Storage Topology > Erasure Code Profiles > trash icon
Purpose:
To remove an unused EC profile that is no longer needed.
When to Use:
After confirming no pool references the profile.
Steps:
In
Erasure Code Profiles, locate the profile.Confirm no erasure-coded pool uses this profile.
Click the trash icon in
Actions.Confirm deletion.
Expected Outcome:
The profile is removed from the list.
It cannot be selected for new pool creation.
Warning
EC profiles in use by pools cannot be deleted. Remove dependent pools first.
Troubleshooting - Storage Topology
Problem You See |
Most Likely Cause |
What To Do |
|---|---|---|
Host or OSD missing in CRUSH Tree |
Host/OSD not registered or deployed |
Verify |
OSD appears under wrong host |
Hostname/bucket mapping issue at provisioning |
Escalate for CRUSH bucket correction |
Cannot delete CRUSH rule |
Rule still referenced by a pool |
Reassign pool to different rule, then delete |
Cannot delete EC profile |
Profile still referenced by EC pool |
Remove dependent pool first |
New rule missing in pool dropdown |
UI not refreshed |
Refresh Pools page and reopen create/edit flow |
OSD class appears incorrect |
Provisioning class detection mismatch |
Recheck class assignment with administrator |
Note
If issues persist, raise a support ticket via Monitoring > Alerts or the
Karios Support.