NFS Shares
Path: Left sidebar > Storage > NFS Shares
The NFS page lets you create and manage NFS exports so standard NFS clients can mount cluster-backed file shares over the network.
NFS Shares
NFS Exports let you expose CephFS paths or RGW buckets over the NFS protocol to any standard NFS client.
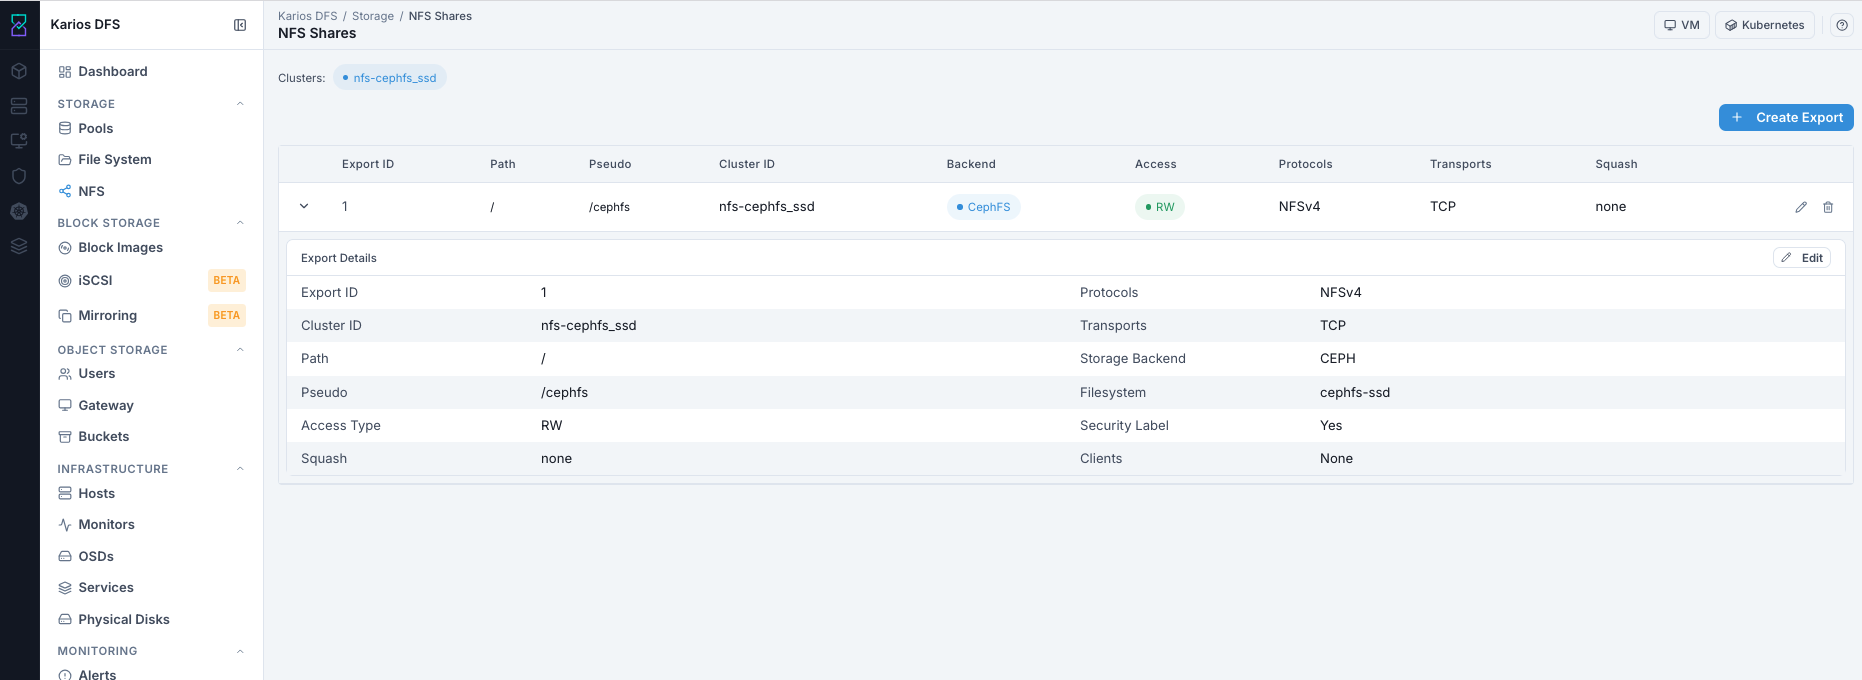
What This Screenshot Shows: NFS page dashboard in a reference environment.
Prerequisite Check
Before creating exports, confirm:
A file system exists in File System.
An NFS cluster is deployed (Clusters tag visible at top of NFS page).
If no cluster tag is visible, NFS service is not running and exports cannot be created.
Important
If you see cluster tag but no exports, that is normal for new deployments.
Click + Create Export to create your first share.
Actions in This Screen
Control |
Action |
Result |
|---|---|---|
Clusters tag |
Shows active NFS cluster |
Indicates which cluster serves new exports |
|
Opens export creation panel |
Configure and create NFS share |
Expanded Row
Export Details
Full export configuration in a two-column grid: FSAL type, CephFS filesystem name, user ID, security label, path, pseudo path, access type, and all protocol settings.
Client Blocks
Per-client access rules that override export defaults. Individual IP addresses or CIDR blocks can have different access, squash, and protocol settings.
Common Tasks
Create An Export: Click
+ Create Export. Select the NFS cluster, choose backend (CephFS or RGW), set pseudo path and access type, then optionally add per-client rules.Edit An Export: Modify access type, squash, or per-client rules. Protocol and backend cannot be changed after creation.
Delete An Export: Removes the export configuration. Underlying data is not affected.
Key Concepts
Pseudo Path: The path a client mounts (example:
/exports/data). Multiple exports can share the same NFS cluster but must use distinct pseudo paths.Squash: Controls how root on the client is mapped on the server.
root_squashmaps root to nobody (safer).no_root_squashpreserves root access (trusted clients only).NFS Cluster: A Ceph-orchestrated group of NFS-Ganesha daemons. All daemons in a cluster share export configuration via RADOS-backed config storage for HA.
Action Decision Guide (Why, Impact, When To Act)
Action |
Why User Does This |
Impact |
When To Do It |
|---|---|---|---|
Create Export |
Publishes filesystem path for client mounts. |
Makes data reachable to NFS clients based on export policy. |
Do this when clients need network share access to DFS data. |
Edit Export |
Adjusts access, squash, or per-client restrictions. |
Policy changes apply immediately and can cause brief client reconnect. |
Do this when security, compatibility, or access policy requirements change. |
Delete Export |
Removes an access path that is no longer needed. |
Client access stops immediately while backend filesystem data remains. |
Do this during decommission or when replacing export configuration. |
Expand Export Details |
Verifies effective settings and mounted-path mapping. |
Reduces misconfiguration risk before troubleshooting or audits. |
Do this after create/edit and during client mount failures. |
How to Create an NFS Export
Use environment-specific values for cluster name, export path, pseudo path, client restrictions, and access controls. Available backend/source options can differ by deployment and enabled services.
Open
Storage > NFS Shares.Confirm cluster tag is visible.
Click
+ Create Export.Select the Cluster used by your environment.
Select Storage Backend from the options available in your system. Examples include
CephFS(file-system path export) orRGW(object bucket export).Set the source path based on selected backend:
For file-system backends: select Volume and set export path
For object backends: select the target bucket/source exposed by your UI
Set NFS Protocol based on client requirements.
NFSv4is recommended for most environments.Set Pseudo path using your chosen share name (must be unique in the cluster).
Set Access Type based on business need (
RWorRO).Set Squash mode based on your trust/security model.
Set transport protocol per policy. Keep both TCP/UDP only if required.
Optionally add Clients restrictions using approved IP/CIDR values.
Review your inputs, then click Create NFS Export.
Tooltips (Create Form)
Backend: Use the backend options available in your deployment. Match the backend to your workload type and source data.
Pseudo: This is the client mount path and must be unique in the NFS cluster.
Squash: Choose the mode based on your trust model and access policy.
Clients: Leaving this empty can allow any reachable host to attempt mount access.
Expected Outcome After Create
Export appears in the NFS Shares table with an
Export ID.Clients can mount using the configured pseudo path and protocol.
Expanded row shows effective export configuration and client blocks.
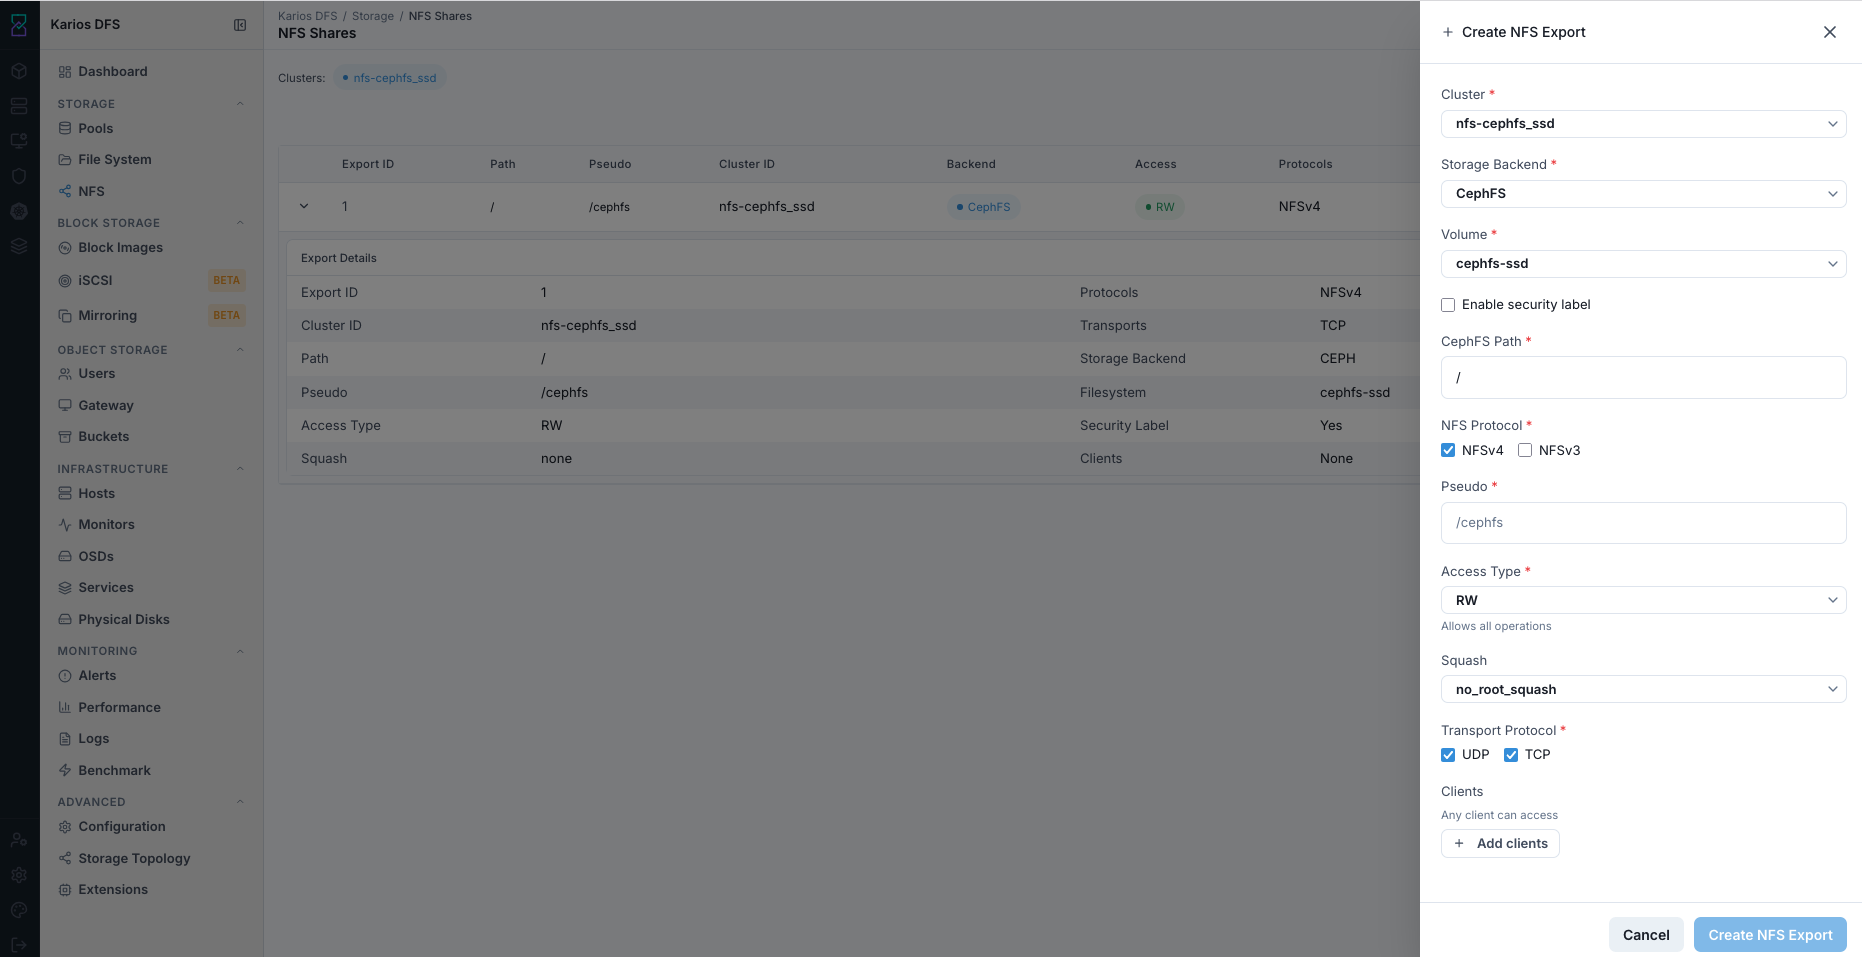
What This Screenshot Shows: Create NFS Export panel in a reference environment.
Mount example:
mount -t nfs4 <nfs-server-ip>:<pseudo-path> /local/mountpoint
Create NFS Export - Field Reference
Field |
Value / Options |
Description |
|---|---|---|
Cluster |
Dropdown |
Target NFS cluster serving this export |
Storage Backend |
|
Data source backend for the export |
Volume |
Filesystem dropdown |
Source filesystem to expose |
Enable security label |
Checkbox |
SELinux-style labeling when required |
CephFS Path |
|
Backend path/source exported through NFS |
NFS Protocol |
NFSv4 (recommended), NFSv3 optional |
Version compatibility setting |
Pseudo |
Example: |
Client-facing mount path; must be unique |
Access Type |
|
Write access policy |
Squash |
|
Root/identity mapping behavior |
Transport Protocol |
TCP/UDP |
Network transport options |
Clients |
Optional IP/CIDR list |
Allow-list for client mount sources |
Squash Settings Reference
Squash Value |
What It Does |
When to Use |
|---|---|---|
|
Client root retains root privileges |
Trusted internal admin/backup hosts |
|
Client root mapped to unprivileged identity |
Shared or partially trusted clients |
|
All users mapped to unprivileged identity |
Highly restricted/untrusted environments |
Warning
Leaving Clients empty can allow any reachable host to mount the export. For sensitive data, always configure explicit client restrictions.
How to Edit an NFS Export
Click row pencil icon, or expand row and click Edit.
Modify fields such as Access Type, Squash, or client restrictions.
Click Save.
Tooltips (Edit Export)
Access: Use
ROfor read-only consumers andRWfor writers.Client Blocks: Per-client rules can override export defaults for specific IP/CIDR entries.
Squash: Choose based on trust model and least-privilege requirements.
Changes apply immediately; clients can briefly reconnect.
Expected Outcome After Edit
Updated policy is applied to the export configuration.
Connected clients can briefly reconnect and then continue access.
Export row and expanded details reflect the new values.
Note
Protocol and backend cannot be changed after creation. Recreate the export if those must change.
How to Delete an NFS Export
Warning
Deleting an export causes immediate access loss for connected clients.
Before deleting:
Notify users and request unmounts.
Verify active client usage where possible.
Steps:
Click row trash icon.
Confirm deletion.
Tooltips (Delete Export)
Delete removes only export configuration, not underlying CephFS or RGW data.
Confirm client communication before deletion to avoid unexpected access interruption.
After deletion:
Export is removed immediately.
Connected clients lose access.
Underlying filesystem and data remain intact.
Client recovery commands for stale mounts:
umount -f /mountpoint
umount -l /mountpoint
Export Details Panel Reference
Expand row chevron > to view full export configuration.
Field |
Meaning |
|---|---|
Export ID |
Auto-assigned numeric export identifier |
Cluster ID |
Serving NFS cluster |
Path |
Internal filesystem path being exported |
Pseudo |
Client mount path |
Access Type |
Read-write or read-only policy |
Squash |
Root identity mapping mode |
Protocols |
Enabled NFS versions |
Transports |
Enabled transport protocols |
Storage Backend |
Backend data source (CEPH or RGW) |
Filesystem |
Source filesystem volume |
Security Label |
Whether labels are enabled |
Clients |
Allow-list (or unrestricted if empty) |
Troubleshooting - NFS
Problem |
Most Likely Cause |
What to Do |
|---|---|---|
No Clusters tag in header |
NFS service not deployed |
Deploy/verify NFS Ganesha via Infrastructure > Services |
Cluster visible but no exports |
Fresh deployment |
Create first export |
|
Permission limitation or service absent |
Check role and NFS service status |
Client cannot mount |
Firewall/path/restriction mismatch |
Verify port 2049, pseudo path, and client allow-list |
Mounted share is read-only |
Access Type is |
Edit export and set |
Root permission denied |
|
Change squash only for trusted clients |
NFSv3 client fails |
NFSv3 disabled or portmapper blocked |
Enable NFSv3 and verify required ports |
Stale mount after deletion |
Client did not unmount beforehand |
Run forced/lazy unmount commands |
Pseudo path already in use |
Duplicate pseudo path |
Use unique pseudo path |
Note
If issues persist, open a support ticket via Alerts workflow or Karios Support.