User Management
1. Document Purpose
This guide provides essential guidance for managing users, roles, and access control in the Karios platform. It is designed for administrators and team leads responsible for user provisioning and access management.
2. Document Scope
User accounts
Role assignment
Security configuration
License overview and activation flow
License summary
A new installation runs on a free tier of 10 sockets under a time-limited NFR (Not For Resale) Evaluation License, for non-production use only. To license it for production, open User -> License and activate one of two ways:
Subscription (online): a recurring license. Get a
KAR-license key from the Karios service portal, then paste it in to activate.Prepaid (Air-Gapped, offline): a one-time, fixed-seat license. Generate this installation’s token, create the installation in the Karios service portal to get a license, then download and upload that license to activate the sockets you purchased.
For the full step-by-step flow, see 10. License.
3. Important First Login Context
The administrator should first log in using credentials provided during Bootstrap.
Tip
First-time user path: start with 1. Document Purpose, 2. Document Scope, 3. Important First Login Context, and 4. Quick Start (First 10 Minutes) before jumping into the task-focused sections.
4. Quick Start (First 10 Minutes)
Confirm your own permissions in
My Profile.Create one test user in
User Management.Assign a limited role (not System Admin) and save.
Ask test user to logout/login once, then confirm only expected modules are visible.
Document what was assigned and why.
Note
Single-admin environment: validate test-user login in an incognito/private window or a separate browser profile/session.
Start Here by Goal (Fast Routes)
Use this shortcut if you do not need the full page in one pass:
Verify your own access posture first: go to 6.1. Step: Review My Profile.
Need to add a user quickly: go to 8.1. Workflow 1: Create New User.
Add or edit users quickly: go to 8. User Lifecycle Workflows.
Build or update role definitions: go to 9. Role Management.
Review or activate your license (Subscription or Air-Gapped): go to 10. License.
Resolve common blockers fast: go to 12.2. Quick Fixes.
Quick Task Pages
If you only need a specific operation, use the task-focused page first:
4.1. New User Runbook (Required Order)
Canonical first-time path (single workflow path):
Validate your own access in 6.1. Step: Review My Profile.
Create the account in 8.1. Workflow 1: Create New User.
Assign minimum roles in 8.5. Workflow 3: Assign Roles.
Apply account controls in 8.3. Workflow 2: Edit User Settings.
Validate login and module visibility using the 8.2. Workflow 1 Validation Checklist, 8.6. Workflow 3 Validation Checklist, and 8.10. Workflow 5 Validation Checklist checklists as needed.
If licensing is in scope, complete 10. License.
Note
Operational steps are maintained only in 8. User Lifecycle Workflows to avoid duplicated instructions.
4.2. Pass/Fail Criteria
Pass: user create, role assign, and login visibility checks all succeed.
Fail: user cannot login, wrong modules are visible, or role/security settings do not persist.
4.3. Quick Troubleshooting Entry Points
Symptom |
First checks |
|---|---|
User Management tab missing |
Confirm |
User cannot login |
Check account |
Wrong module access |
Re-validate assigned role and permission mapping |
Role assignment not saving |
Confirm admin scope and retry shield workflow |
6. My Profile
6.1. Step: Review My Profile
When to Use:
Use this page to confirm your account identity, security status, and assigned access scope.
Purpose:
Validate your own user posture before creating users, assigning roles, or troubleshooting missing access.
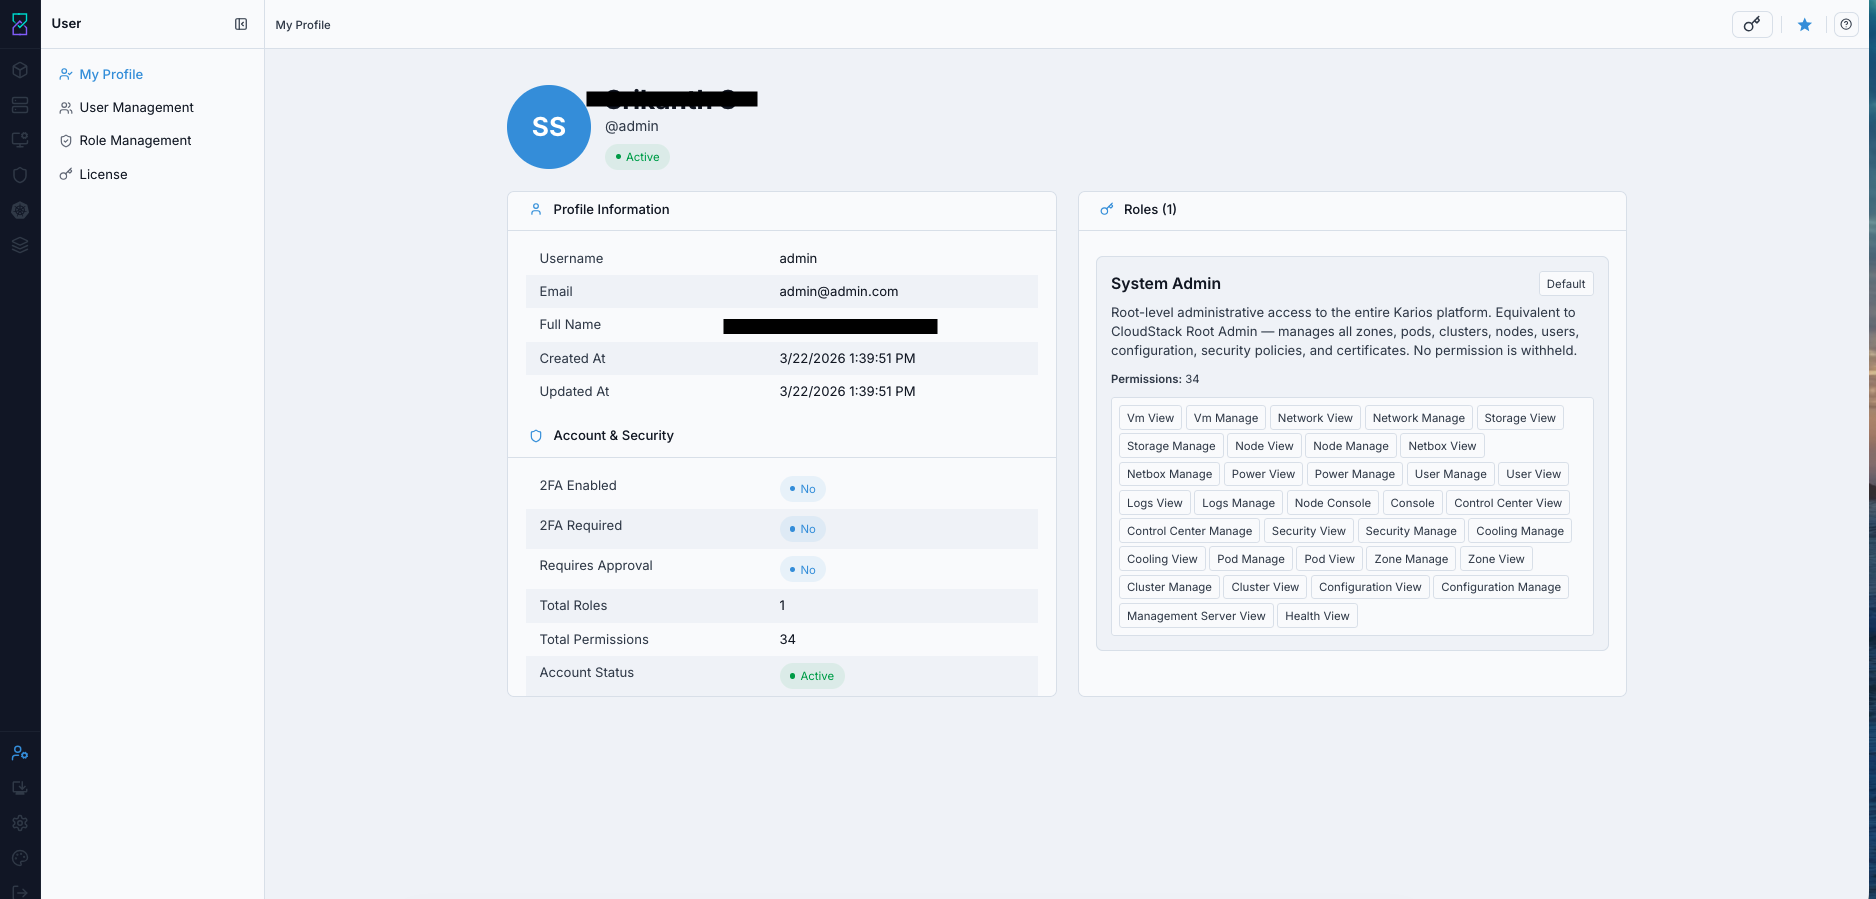
My Profile page with profile information, security status, and assigned roles.
Steps:
Open
My Profile.Verify account fields:
Username,Email,Full Name,Created At,Updated At.Review security badges:
2FA Enabled,2FA Required, andRequires Approval.Review each role card and permission tags.
If expected access is missing, compare required permission tags with your assigned roles.
Expected Outcome:
Your identity fields are correct.
Security requirements for your account are clear.
Assigned role scope matches your job function.
If this fails:
Capture the missing field/permission evidence from
My Profile.Contact your administrator for role or security-policy update.
Re-login after role/security changes to refresh session permissions.
6.2. Profile Information
This section shows your account identification and contact details.
Field |
Description |
|---|---|
Username |
Your unique login identifier used to access the Control Center. Read-only. |
Your registered email address. Used for notifications and account recovery. |
|
Full Name |
Your complete name as displayed in the system. |
Created At |
Timestamp when your user account was created. |
Updated At |
Timestamp of the last modification to your profile. |
Tip
Username is permanent. Keep Email current for notifications and recovery workflows.
6.3. Security Settings
6.3.1. 2FA Enabled
Display: Yes or No status badge.
Description: whether Two-Factor Authentication is enabled on your account.
Enabled: requires a second factor in addition to password.
Disabled: password-only login.
6.3.2. 2FA Required
Display: Yes or No status badge.
Description: whether Two-Factor Authentication is mandatory for your account.
Required: you must complete 2FA to sign in.
Not Required: 2FA is optional per policy.
Warning
If 2FA Required is enabled and you lose access to your authenticator device, contact an administrator for account recovery.
6.3.3. Requires Approval
Display: Yes or No status badge.
Description: whether sensitive operations on your account require administrative approval.
Required: selected actions need approval workflow.
Not Required: actions proceed without approval workflow.
6.4. Roles and Permissions
Each assigned role appears as a card in My Profile.
Element |
Description |
|---|---|
Role Name |
Assigned role name (for example: |
Default Badge |
Indicates default role for operations. |
Description |
Role scope and purpose. |
Permissions Count |
Number of permissions in the role. |
Permission Tags |
Individual permission names (for example: |
For complete default-role catalog and scope, use 9.4. Role Types.
6.6. Understanding Effective Permissions
Role assignment is administrator-driven.
Effective access is additive: your permission set is the union of all assigned role permissions.
Zone/Pod/Cluster scope restrictions still apply even when role access is broad.
Least-privilege review should be part of regular account audits.
6.7. What You Can and Cannot Do
You can:
View your profile information and assigned roles.
See permission tags assigned through your roles.
Validate whether your current scope matches expected access.
You cannot (from My Profile):
Change your username.
Add or remove your own roles.
Disable mandatory security requirements.
Bypass approval requirements enforced by policy.
7. User Management
7.1. Step: Review Users Management Dashboard
When to Use:
Use this page to manage user access, monitor account status, and review role and security posture.
Purpose:
Get a centralized operational view of all users in the Control Center.
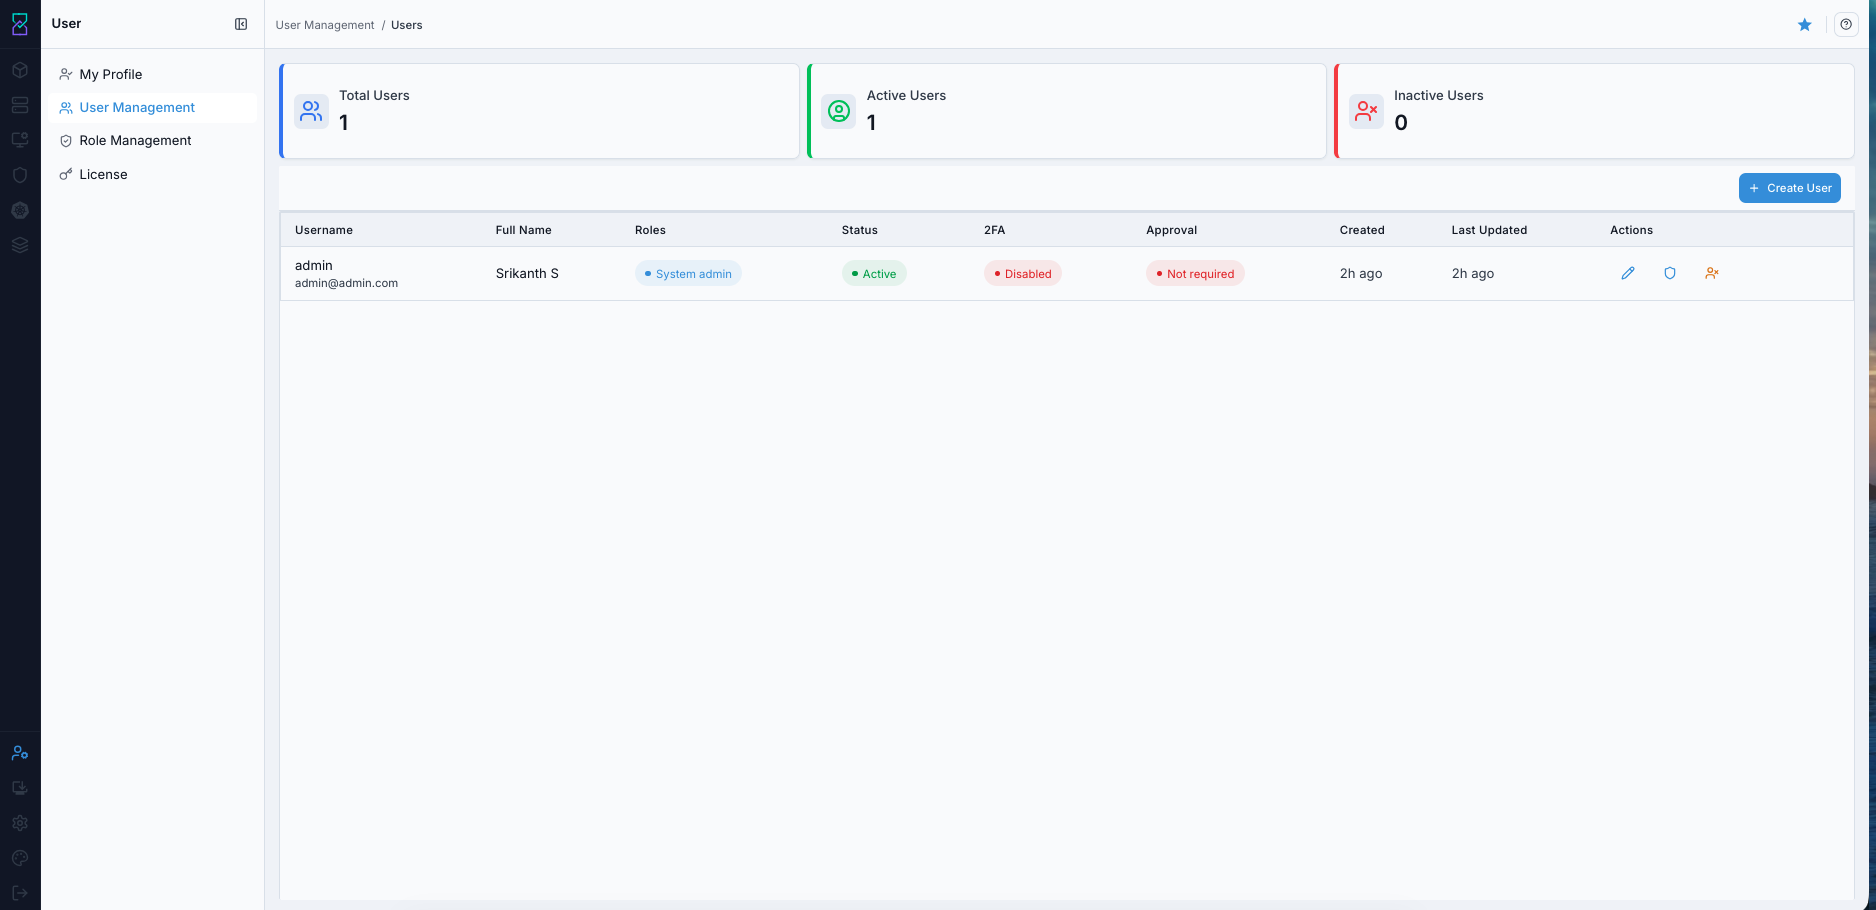
Users Management Dashboard showing account metrics, user table, and row-level actions.
Steps:
Open
User Managementfrom the left navigation.Review summary cards:
Total Users,Active Users, andInactive Users.Review table columns for target user:
Full Name,Roles,Status,2FA,Approval,Created,Last Updated.Use row action icons to manage the selected user.
Use search and filters to narrow audit scope.
Expected Outcome:
You can identify account state and security posture quickly.
You can locate and manage target users from a single page.
If this fails:
Verify your account includes
USER_MANAGE.Confirm the account is in the correct domain/scope.
Contact an administrator if the page or actions are unavailable.
7.2. Summary Cards
Card |
Description |
|---|---|
Total Users |
Total number of user accounts in the system. |
Active Users |
Users with active status who can currently access the system. |
Inactive Users |
Users with inactive status who cannot currently access the system. |
Tip
Review Inactive Users regularly to identify accounts that should be removed after retention policy is met.
7.3. Users Table
Column |
Description |
|---|---|
Full Name |
User’s complete name. Click the user row/name to open profile-level details. |
Roles |
Assigned roles; can collapse with |
Status |
|
2FA |
Two-Factor Authentication status. |
Approval |
Whether sensitive actions require approval. |
Created |
Account creation age in relative format. |
Last Updated |
Last account modification age in relative format. |
Actions |
Row-level controls for user operations. |
7.4. Status, 2FA, and Approval
Status:
Active: user can sign in and use permitted functions.Inactive: user cannot sign in.
2FA:
Enabled: second authentication factor is required at login.Disabled: password-only authentication.
Approval:
Required: selected sensitive actions require approval workflow.Not Required: actions execute directly within permission scope.
Warning
Administrative accounts should use 2FA Enabled and follow your approval policy for sensitive operations.
7.5. Quick Actions
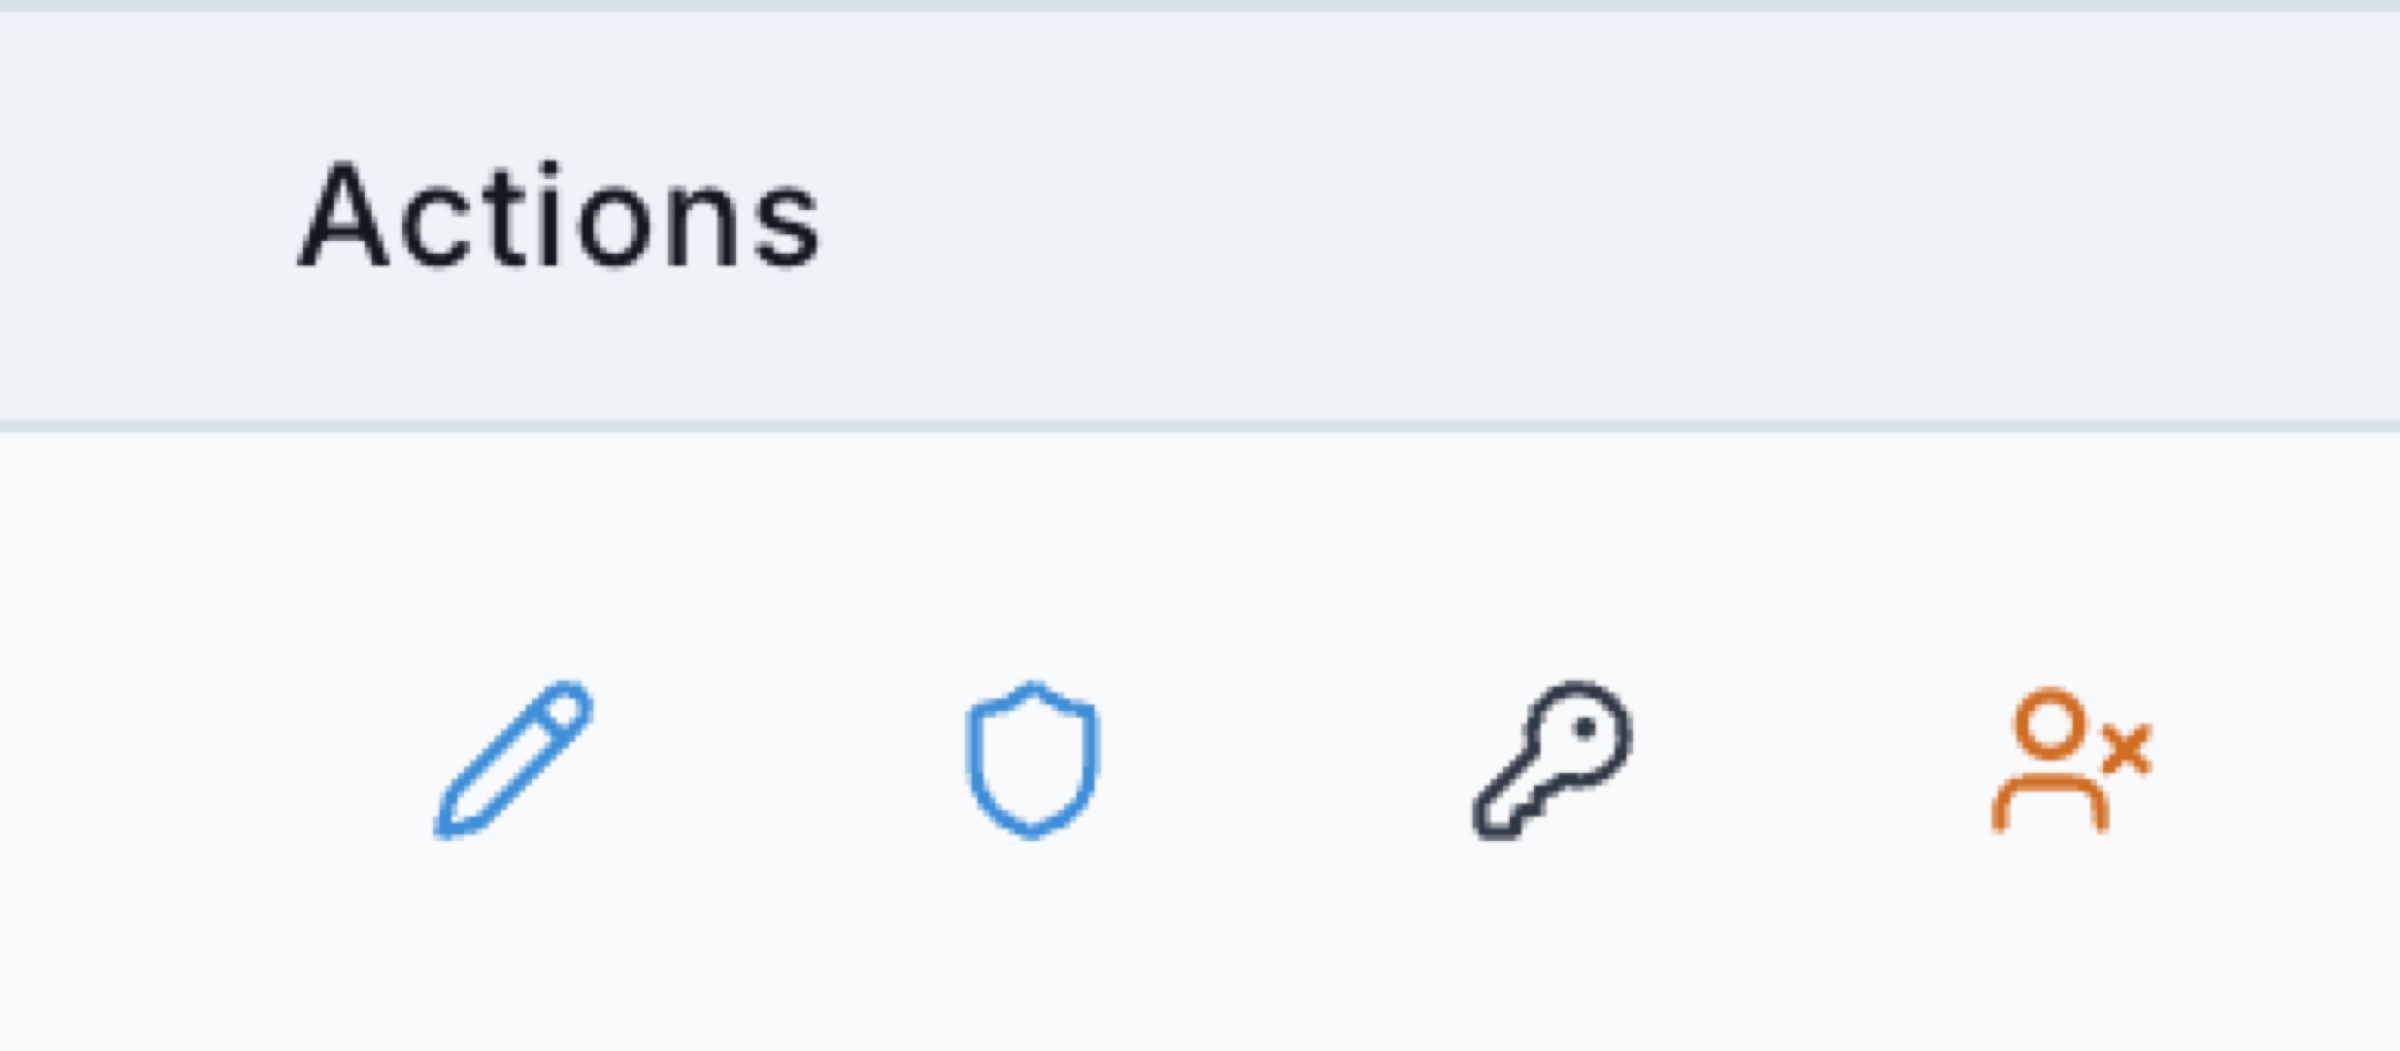
Row action icons used for user management operations.
Action |
Icon |
Description |
|---|---|---|
Edit |
Pencil |
Modify user information and selected account settings. |
Assign Roles |
Shield |
Assign or revoke roles and permissions. |
Reset Password |
Key |
Set a new temporary password for the user account. |
Deactivate |
Person-with-X (orange) |
Disable account login access. |
To open full user details:
Click the target user row (name).
Review profile information, security status, approvers, and assigned roles on the details page.
7.6. Step: Create New User
When to Use:
Use this when starting user onboarding from the dashboard.
Purpose:
Open the create flow entry point from User Management.
Steps:
Click
+ Create User.Continue with 8.1. Workflow 1: Create New User for complete field, validation, and post-create steps.
Expected Outcome:
Create-user drawer opens and workflow handoff is clear.
If this fails:
Confirm
+ Create Userbutton visibility and access scope.If action is unavailable, verify
USER_MANAGEwith administrator.
7.7. Filtering and Search
Use filters and search to run targeted audits:
Filter by
Statusto review active or inactive accounts.Filter by
2FAto identify accounts requiring security hardening.Search by name or username to find a specific user.
Use combined filters for account review, offboarding checks, and security audits.
7.8. Role Assignment Context
Roles shown on the dashboard should follow least-privilege design:
Assign only roles required for the user job function.
Remove unused roles during periodic audits.
Use 6. My Profile for role definitions and permission-tag meaning.
7.9. User Lifecycle Overview
User lifecycle operations in this dashboard:
Onboarding: create user, assign roles, validate access.
Active management: update details, review roles, monitor 2FA and approval.
Offboarding: set user inactive and remove unnecessary role access.
Detailed step-by-step procedures are in 8. User Lifecycle Workflows.
7.10. Security and Audit Best Practices
Enforce strong passwords and 2FA for privileged accounts.
Audit accounts and role assignments periodically.
Deactivate or remove unused accounts.
Keep user identity data (name/email) current.
Maintain an audit trail for role and status changes.
8. User Lifecycle Workflows
8.1. Workflow 1: Create New User
When to Use:
Use this when onboarding a new user account.
Purpose:
Create a user account, apply minimum required access, and validate first-login scope.
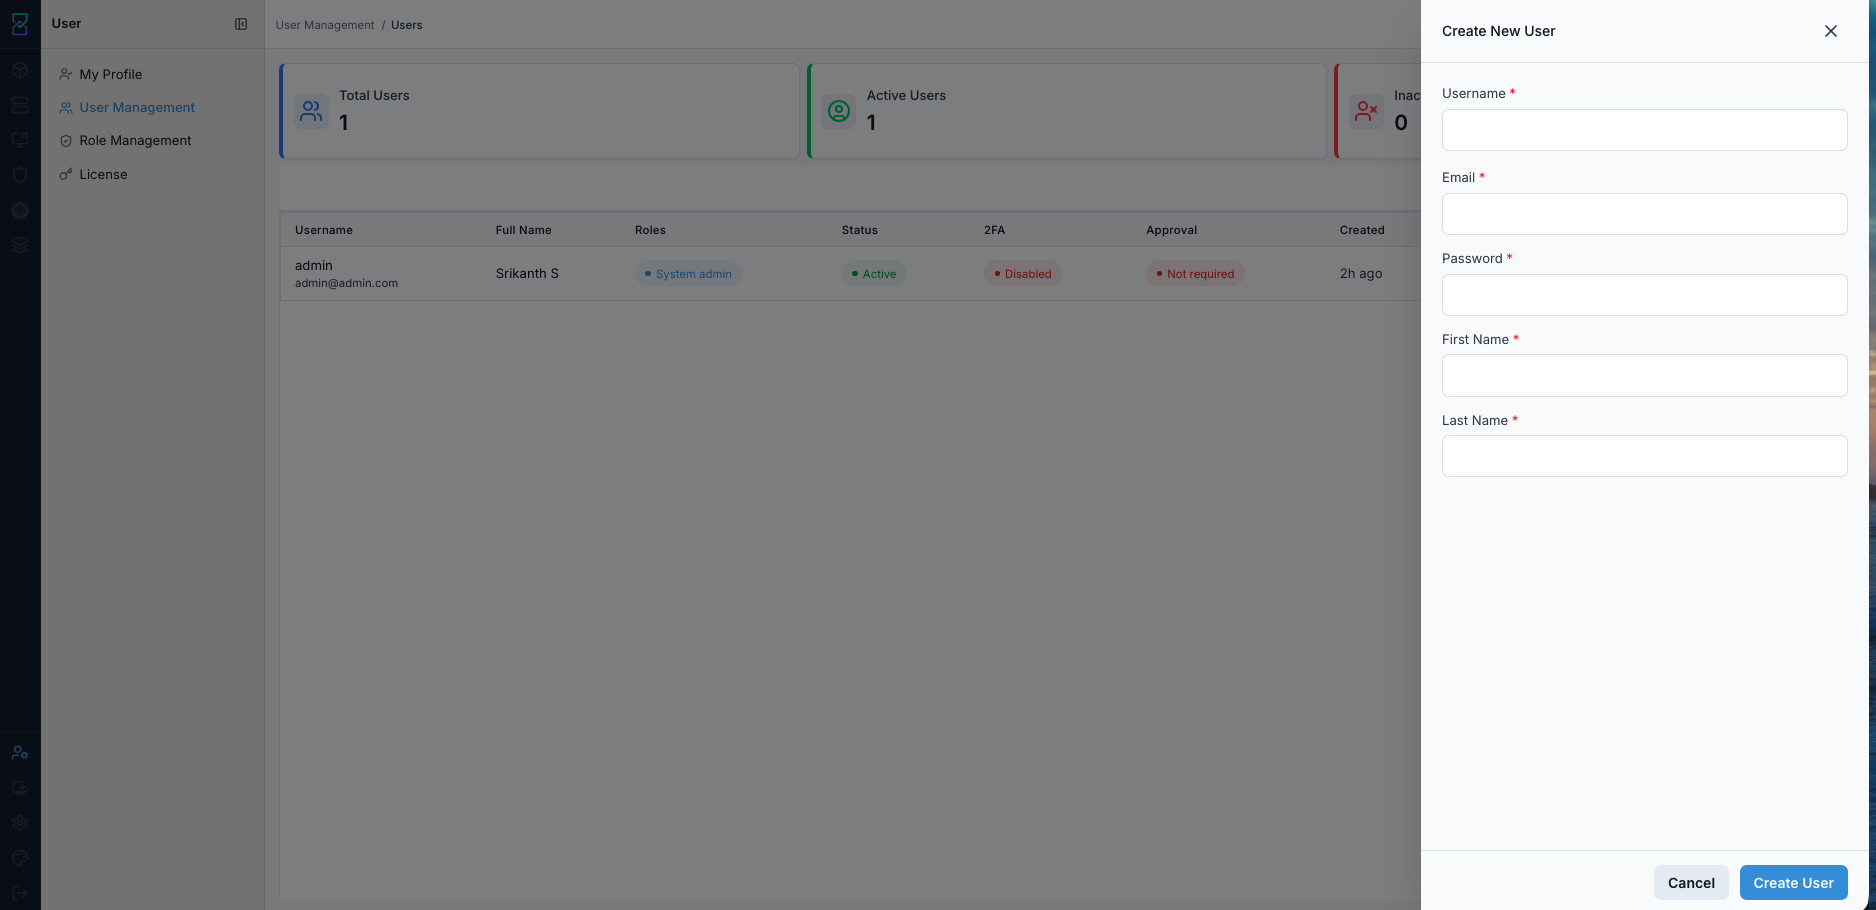
Create New User drawer. Complete all required fields before submitting.
Required Fields
Field |
What to Enter |
Validation / Rule |
|---|---|---|
Username |
Permanent login ID (example: |
Must be unique; should follow org naming standard |
User’s active mailbox (prefer corporate email) |
Must be valid format ( |
|
Password |
Strong temporary password for first login |
Minimum |
First Name |
User’s given name |
Required |
Last Name |
User’s family name |
Required |
Password Policy (Current Baseline)
Use this baseline when creating or resetting passwords in User Management:
Minimum length:
12charactersInclude at least one uppercase letter
Include at least one lowercase letter
Include at least one number
Include at least one special character
Tip
For privileged accounts, use a password manager-generated value instead of a human-chosen password whenever policy allows it.
Steps:
Open
User Management.Click
+ Create User(top-right).Fill all required fields in the drawer.
Click
Create User.Confirm the user appears in the list.
Click shield icon (
Assign Roles) and grant minimum required role(s).If governance requires it, click pencil icon (
Edit User) and enableRequires Approval.Securely hand off credentials and require password change at first login.
Validate module visibility after user logout/login.
Expected Outcome:
User account is created and visible in
User Management.Role assignment and security settings are applied.
User can access only intended modules.
If this fails:
Confirm username/email uniqueness and required fields.
Re-check password policy compliance.
Verify role assignment was saved.
Retry with corrected values and re-test logout/login.
Total time: 3-4 minutes.
Note
Username is permanent. Plan a naming standard before onboarding large teams.
Tip
New users start with no roles by default. Account creation alone does not grant access.
8.2. Workflow 1 Validation Checklist
User appears in
User ManagementlistRole is assigned
Login succeeds with updated password
User can access only intended modules
8.3. Workflow 2: Edit User Settings
When to Use:
Use this when account state, approval requirement, or 2FA requirement must be updated.
Purpose:
Apply account-control changes from the user edit drawer.

Edit User drawer for account and security controls.
Setting |
Options |
Effect |
|---|---|---|
Account Status |
Active enabled/disabled |
Enable or disable login |
Approval Settings |
Requires Approval enabled/disabled |
User actions need approval |
Steps:
Open
User Management.Click pencil icon on the target user row.
Update
Account Statusas required.Update
Requires ApprovalandRequire Two-Factor Authenticationbased on policy.Click
Save Changes.Confirm changes persist after refresh or re-login.
Expected Outcome:
Account and security settings are updated for the selected user.
Updated controls remain consistent after session refresh.
If this fails:
Re-open edit drawer and verify selected toggle states.
Confirm you have permission to edit user settings.
Save again and re-test with a fresh login session.
Tip
Use Requires Approval for sensitive operator accounts where change oversight is needed.
8.4. Workflow 2 Validation Checklist
Updated settings are visible after save
User logout/login reflects new approval behavior
8.5. Workflow 3: Assign Roles
When to Use:
Use this when a user needs new access scope or role cleanup.
Purpose:
Assign least-privilege role sets from the role-assignment drawer.

Assign Roles drawer used to add or remove role memberships.
Steps:
Open
User Management.Find the target user row.
Click shield icon (
Assign Roles).Unselect roles no longer required.
Select minimum roles needed for the user job.
Click
Save Changes.Ask user to logout/login once to refresh session permissions.
Role selection baseline:
Use 6.4. Roles and Permissions as the role-scope reference.
Use 9. Role Management for role-definition and permission-design checks.
Expected Outcome:
Role badges update on the user row immediately
User menu visibility matches assigned role scope
Restricted pages return access denied for unauthorized modules
If this fails:
Re-open
Assign Rolesand verify checkbox state.Check for overlapping roles that broaden access unexpectedly.
Confirm session refresh (logout/login) was completed.
Re-test required page visibility.
Warning
Avoid assigning System Admin unless full platform control is explicitly required.
8.6. Workflow 3 Validation Checklist
Selected role badges are visible for the user after save
User can access allowed modules and cannot access restricted modules
Role changes are documented with owner and reason
8.7. Workflow 4: Reset Password
When to Use:
Use this when a user cannot log in due to a forgotten or unknown password. The reset requires coordination between an administrator and the user. The administrator generates a one-time password (OTP) and shares it with the user out-of-band. The user then completes the reset from the login screen.
Step 1 (Admin): Generate OTP
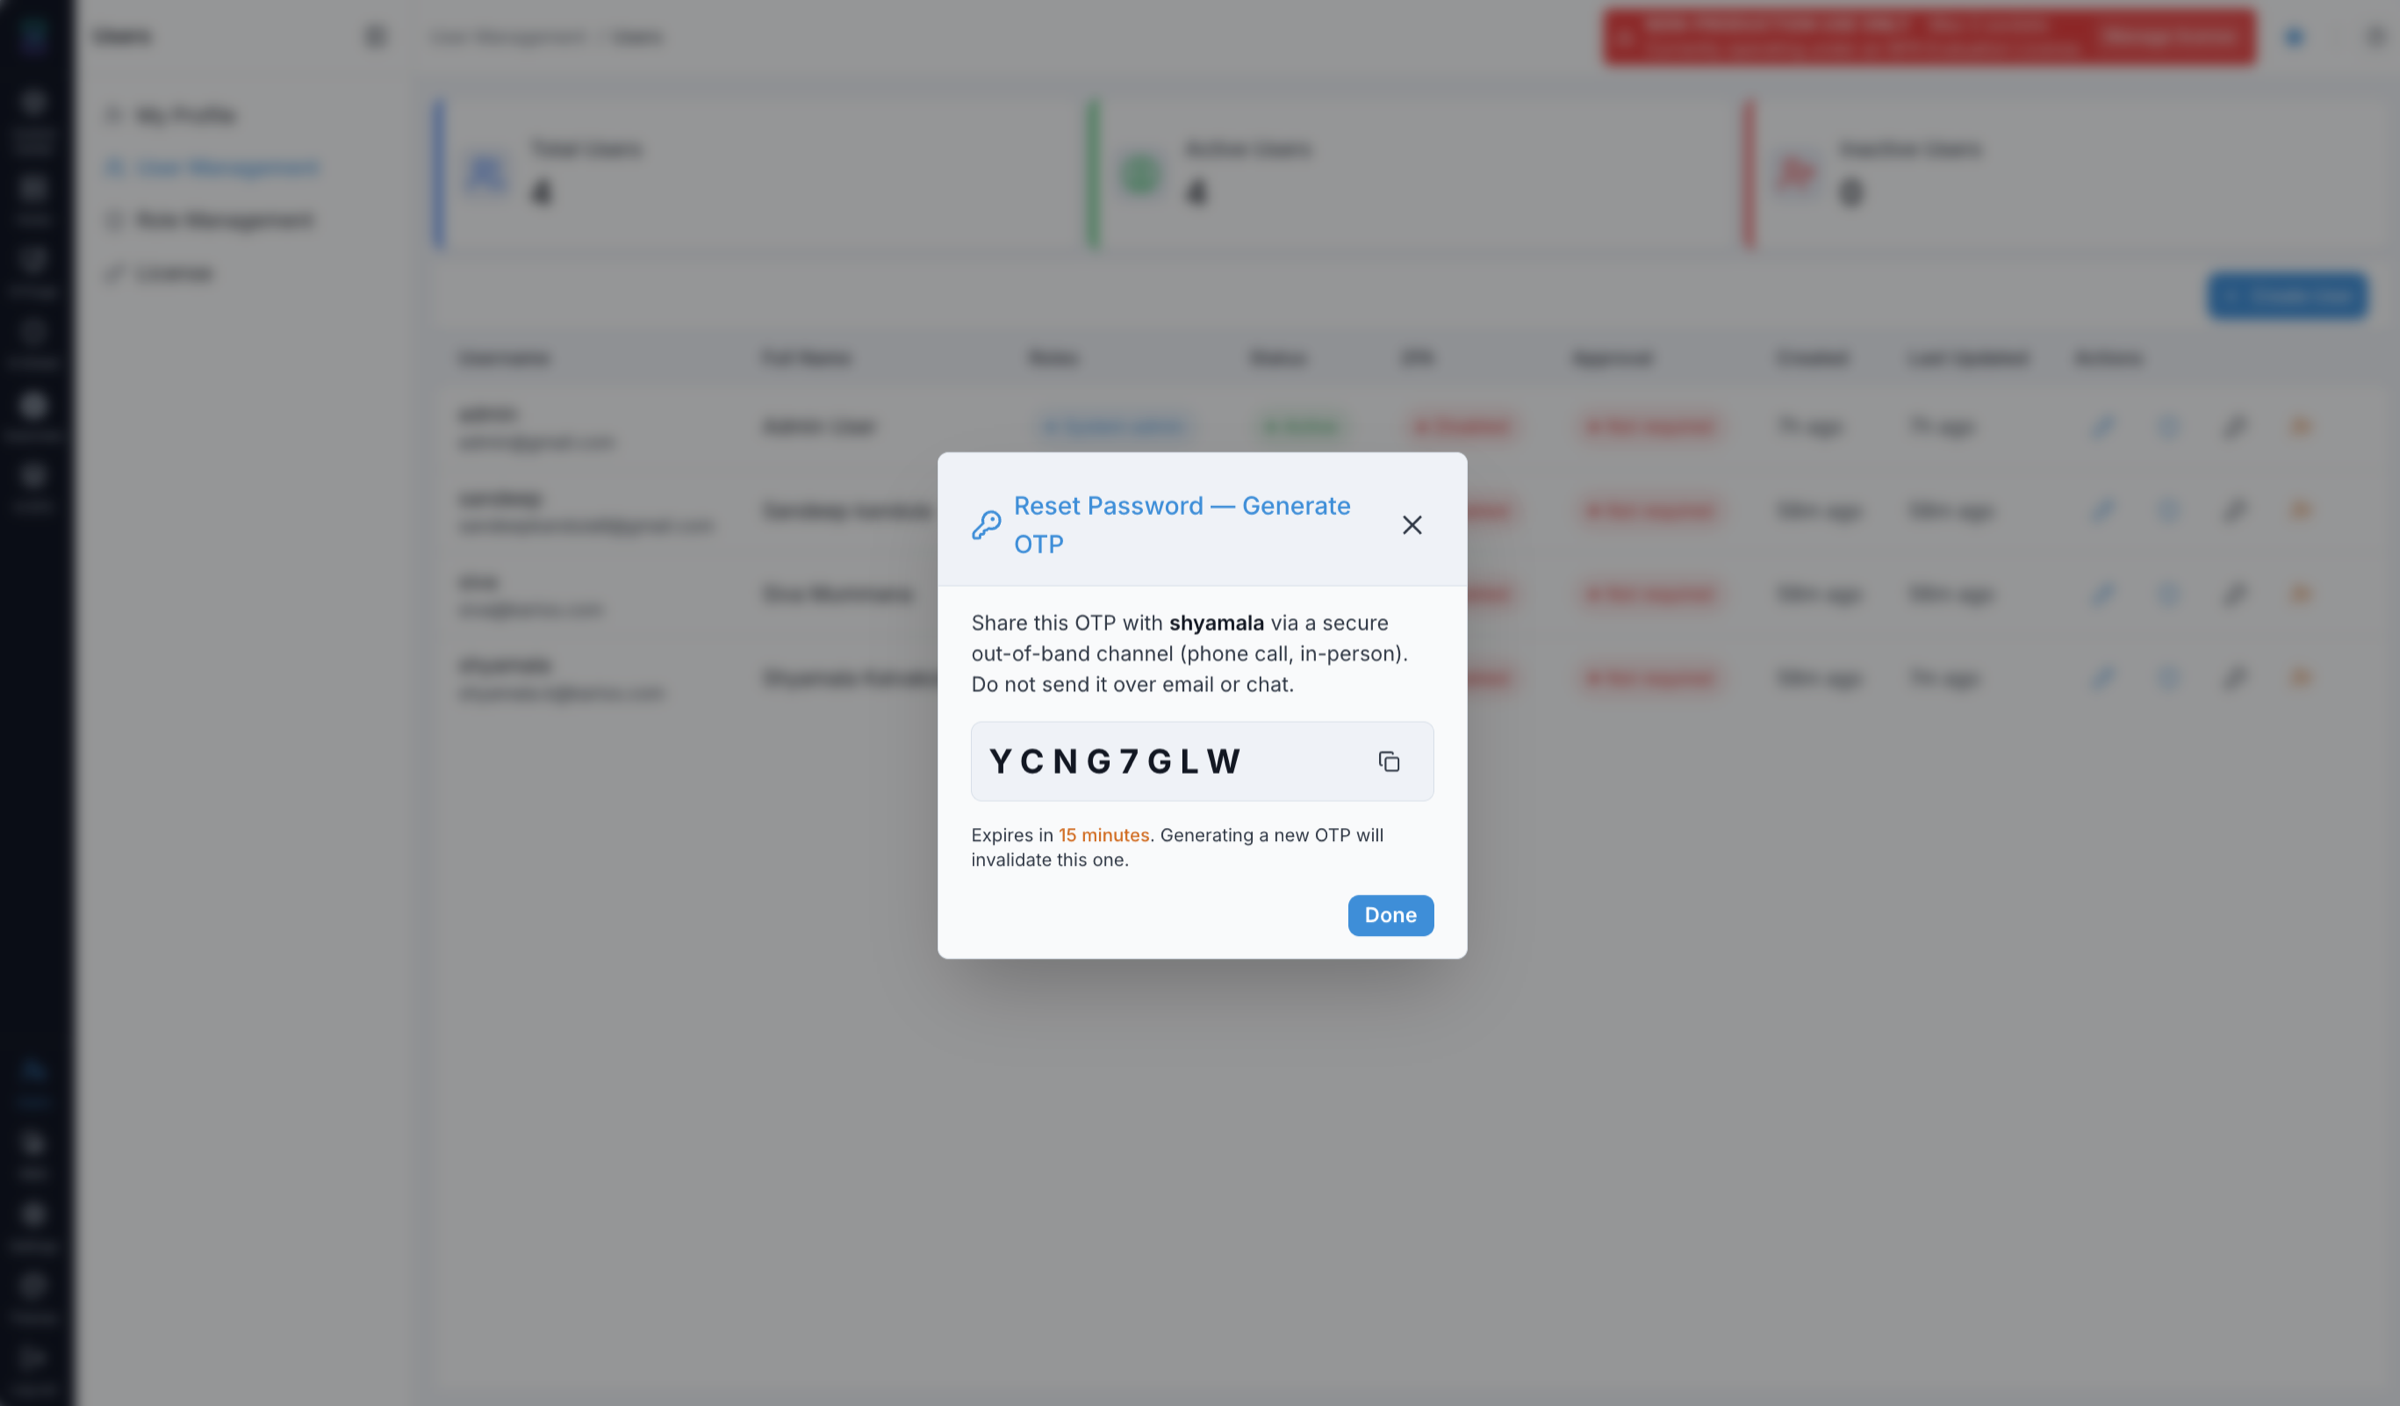
Admin-side OTP generation dialog. Share the OTP via a secure out-of-band channel only.
Open
User Managementand locate the target user.Click the key icon (
Reset Password) on the user row.The
Reset Password — Generate OTPdialog appears with a one-time password.Share the OTP with the user via a secure out-of-band channel (phone call or in-person).
Warning
Do not send the OTP over email or chat. The OTP expires in 15 minutes. Generating a new OTP invalidates the previous one.
Click
Doneto close the dialog.
Step 2 (User): Complete Reset from Login Screen
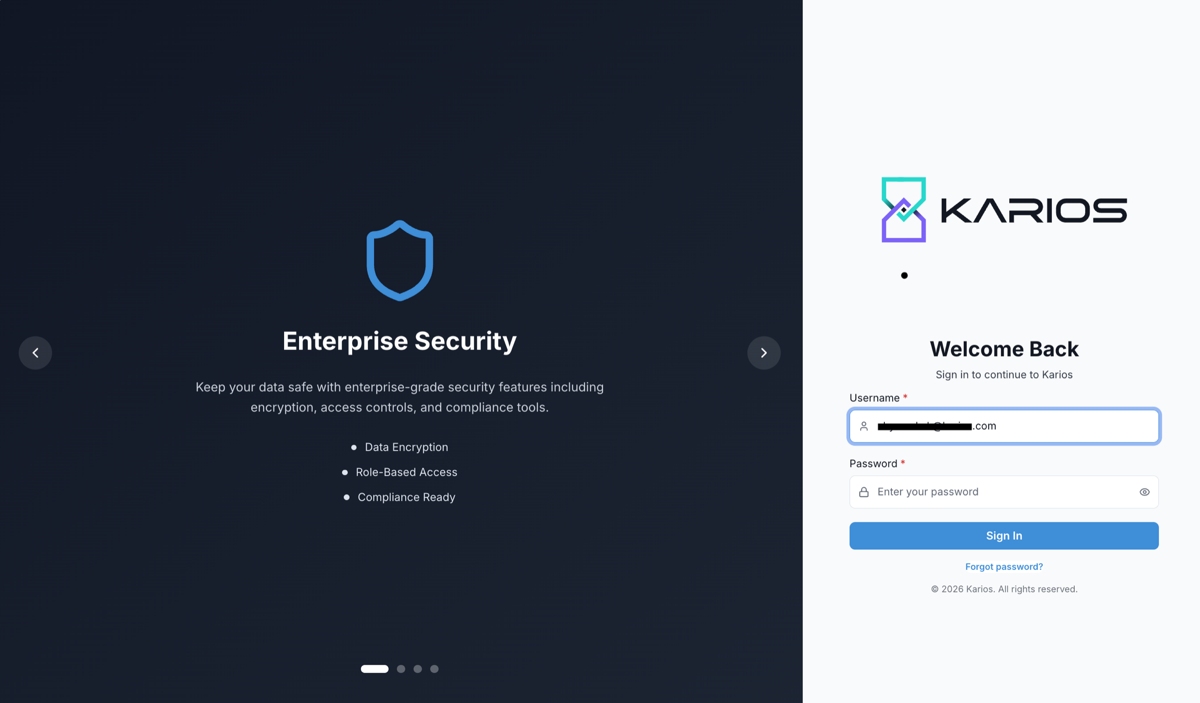
Login screen — click Forgot password? to start the reset flow.
Open the Control Center login screen.
Click
Forgot password?below theSign Inbutton.
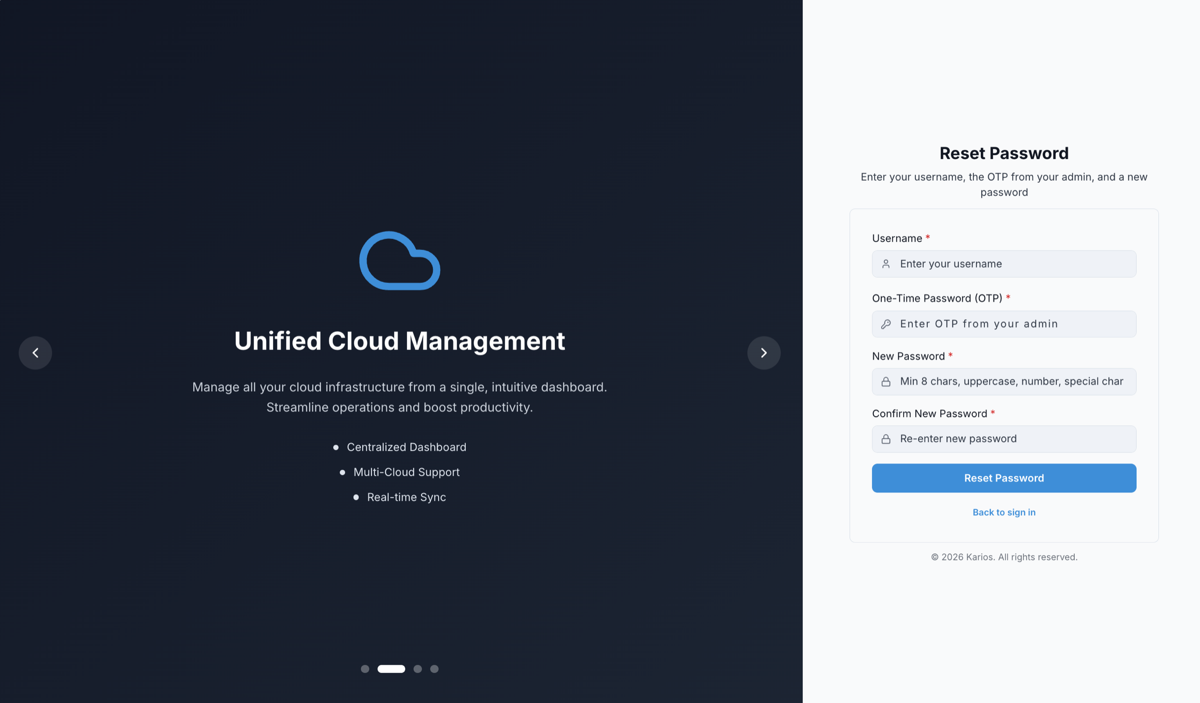
Reset Password form — enter username, OTP from admin, and new password.
On the
Reset Passwordpage, enter:
Username — your account username.
One-Time Password (OTP) — the OTP received from your administrator.
New Password — minimum 8 characters, must include uppercase, number, and special character.
Confirm New Password — re-enter the new password.
Click
Reset Password.
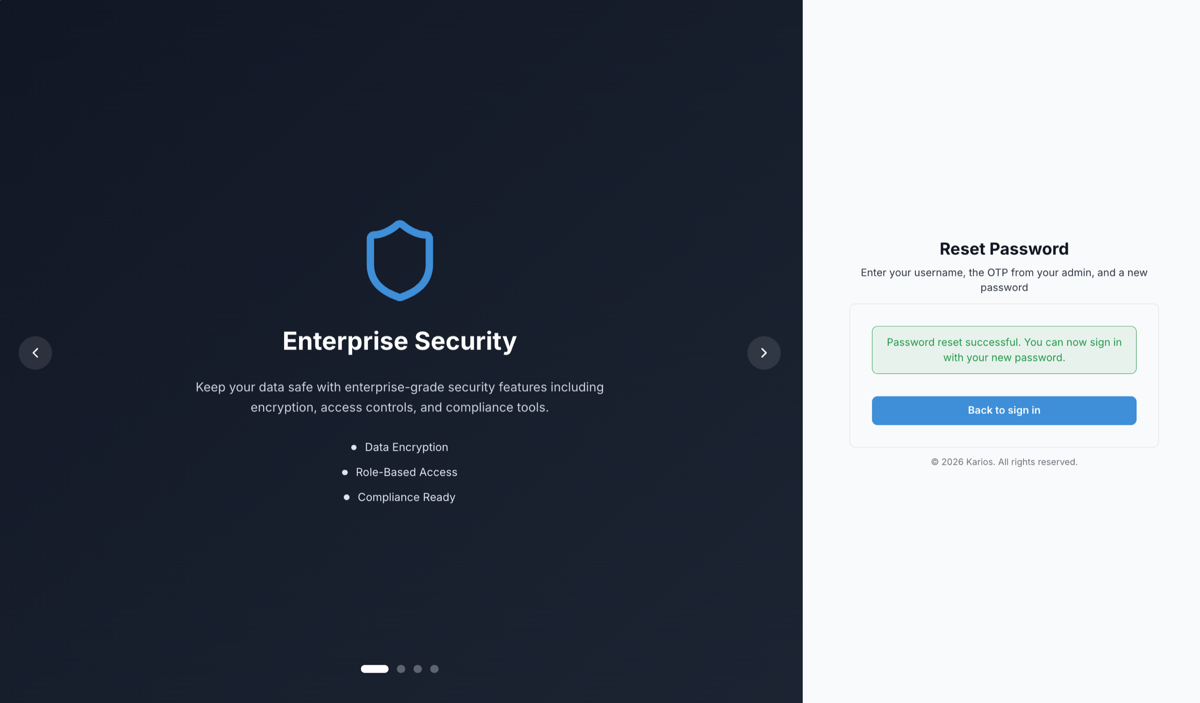
Success confirmation — password has been reset and login is now available.
Confirm the success message: “Password reset successful. You can now sign in with your new password.”
Click
Back to sign inand log in with the new password.
Expected Outcome:
Password is updated and the user can log in immediately with the new credentials.
Previous password no longer works.
If this fails:
Confirm the username entered matches the registered account exactly.
Check that the OTP has not expired (15-minute window). Ask admin to generate a new one if needed.
Confirm the new password meets the minimum complexity requirements shown on the form.
If the reset page is inaccessible, escalate to the administrator for an alternate recovery path.
Note
For recovery when no working admin session is available, follow
Appendices under Credential Recovery Workflow.
8.8. Workflow 4 Validation Checklist
Admin OTP dialog appeared after clicking the key icon
OTP was shared via a secure out-of-band channel (not email or chat)
User completed the reset form and saw the success confirmation
User can log in with the new password
Previous password no longer grants access
8.9. Workflow 5: Deactivate User
When to Use:
Use this when user access must be stopped (for example offboarding or temporary suspension).
Purpose:
Disable account login access while preserving account records.

Deactivate confirmation dialog before access is revoked.
Steps:
Open
User Managementand locate the target user.Click the person-with-X icon (
Deactivate) on the user row.When the confirmation dialog appears, verify the username and click
Deactivate.Confirm the user row status changes to inactive.
Expected Outcome:
Access terminated immediately
Data preserved
Reversible action
If this fails:
Confirm you are not trying to deactivate the last active admin account.
If the person-with-X icon is unavailable, click the pencil icon (
Edit) and setAccount Statusto inactive.Re-open the user row to confirm latest status.
Time: 30 seconds.
Warning
Never deactivate the last active System Admin account.
8.10. Workflow 5 Validation Checklist
User status is shown as inactive
User login is blocked
Deactivation reason and timestamp are recorded
8.11. Workflow Troubleshooting
Workflow Symptom |
Likely Cause |
Immediate Fix |
|---|---|---|
User created but cannot do any action |
No role assigned |
Open shield dialog and assign minimum required role |
Role saved but UI access unchanged |
Session cache still active |
Ask user to logout/login and re-test |
Password reset key icon not visible |
Insufficient permission or feature not enabled |
Confirm |
Deactivate blocked |
Attempting to disable last critical admin |
Assign backup admin first, then retry |
9. Role Management
9.1. Step: Review Roles Management Dashboard
When to Use:
Use this page to review role inventory, permission scope, and custom-role governance.
Purpose:
Manage role definitions centrally and ensure role design remains aligned with least-privilege policy.
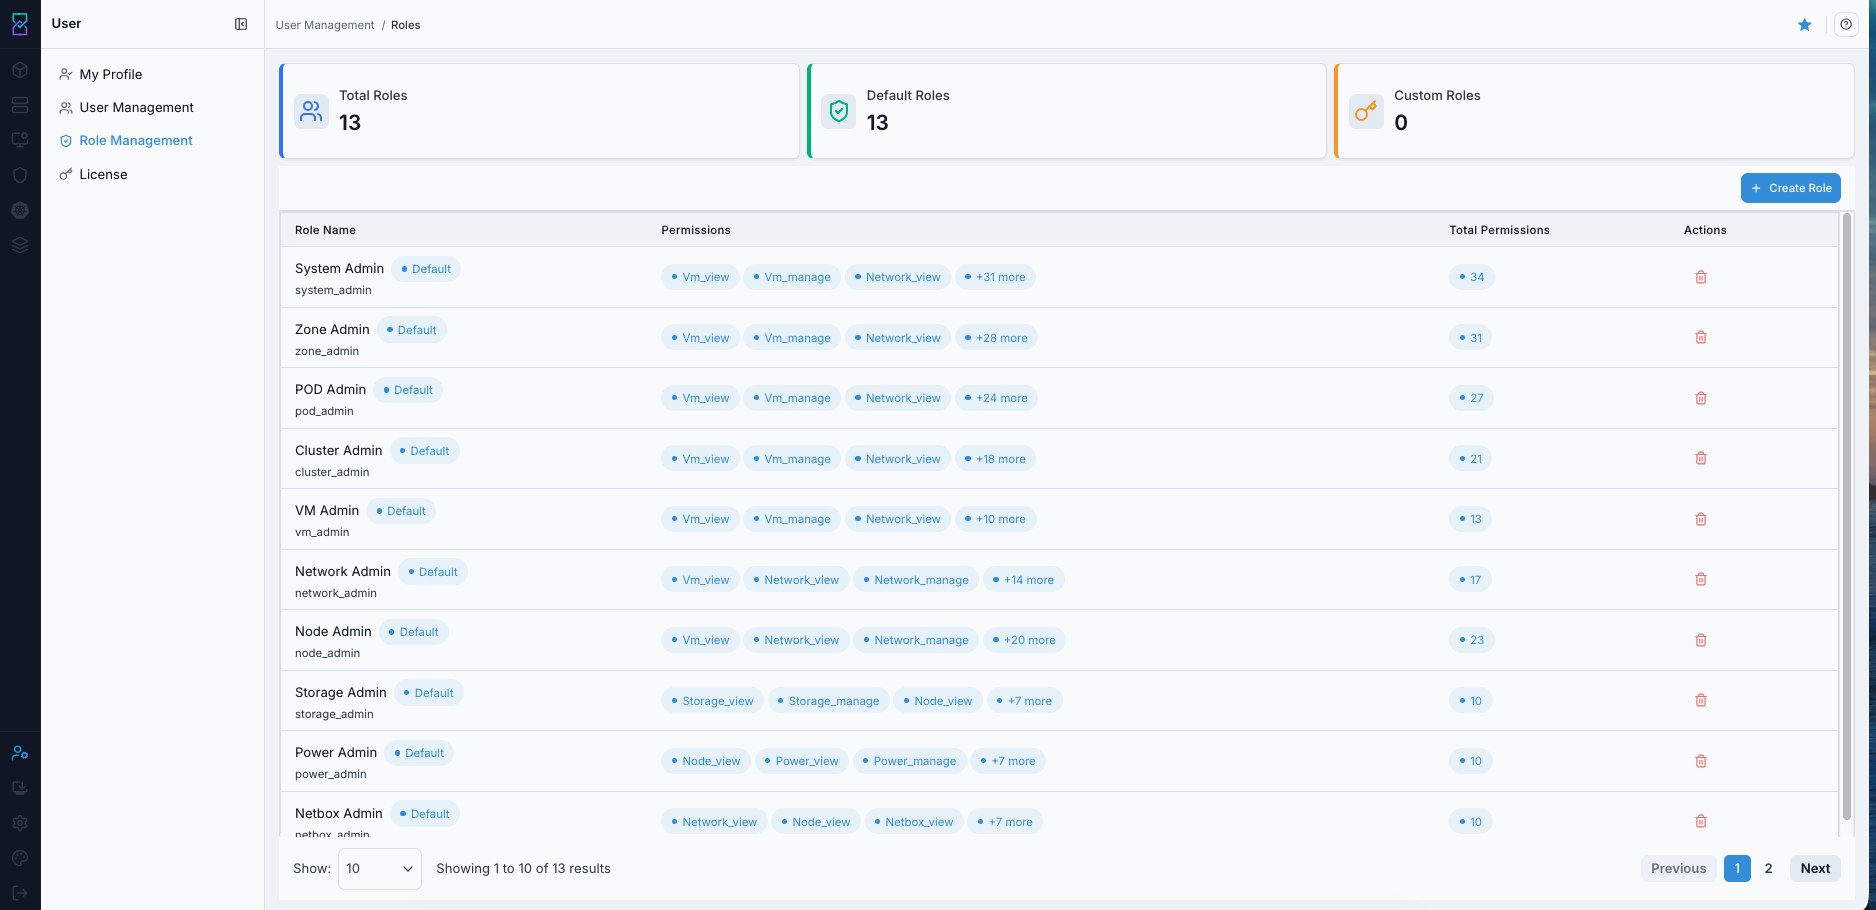
Roles Management dashboard with summary cards and role list.
Steps:
Open
Role Management.Review summary cards:
Total Roles,Default Roles, andCustom Roles.Review table fields:
Role Name,Permissions,Total Permissions, andActions.Open role details for role-level review.
Create or delete custom roles as required by policy.
Expected Outcome:
Role inventory and scope are visible from one dashboard.
You can distinguish system roles from custom roles.
You can run role cleanup and role creation workflows safely.
If this fails:
Verify your account has
USER_MANAGE.Confirm role-management visibility in your current domain/scope.
Escalate to an administrator if dashboard actions are unavailable.
9.2. Summary Cards
Card |
Description |
|---|---|
Total Roles |
Total number of roles in the system (default + custom roles). |
Default Roles |
Pre-defined system roles (for example: System Admin, Zone Admin, VM Admin). |
Custom Roles |
User-created roles for organization-specific needs. |
Tip
Use default roles first. Create custom roles only when default scope does not satisfy a real job-function requirement.
9.3. Roles Table
Column |
Description |
|---|---|
Role Name |
Role name and technical identifier; |
Permissions |
Preview of permission tags; can collapse as |
Total Permissions |
Total permission count granted by the role. |
Actions |
Role management action (delete available for custom roles). |
9.4. Role Types
9.4.1. Default/System Roles
Characteristics:
System-provided baseline roles.
Not editable.
Not deletable.
Designed for common administrative and operational functions.
Available default roles:
Role |
Scope |
Typical Permissions |
|---|---|---|
System Admin |
Full system administration |
36 |
ZONE Admin |
Zone-level administration |
13 |
POD Admin |
Pod-level administration |
11 |
Cluster Admin |
Cluster-level administration |
12 |
VM Admin |
Virtual machine management |
8 |
Network Admin |
Network configuration management |
5 |
Node Admin |
Comprehensive infrastructure management |
24 |
Power Admin |
Power and facility management |
5 |
Netbox Admin |
Network inventory/IPAM management |
5 |
Storage Admin |
Storage configuration and management |
5 |
9.4.2. Custom Roles
Characteristics:
Created by administrators.
Editable and deletable.
Intended for specific organizational job functions.
When to create custom roles:
Specialized job functions not covered by default roles.
Restricted vendor/contractor scopes.
Read-only or compliance-focused access patterns.
Granular access control requirements.
9.5. Permission Categories
Permissions are grouped by functional categories such as USER, VM, NETWORK, STORAGE, NODE, and SECURITY.
For the full category and permission matrix, use 15. Appendix: Permission Reference.
9.6. Step: Create Custom Role
When to Use:
Use this when an approved job function requires scope not covered by default roles.
Purpose:
Create a role with only required permissions for that function.
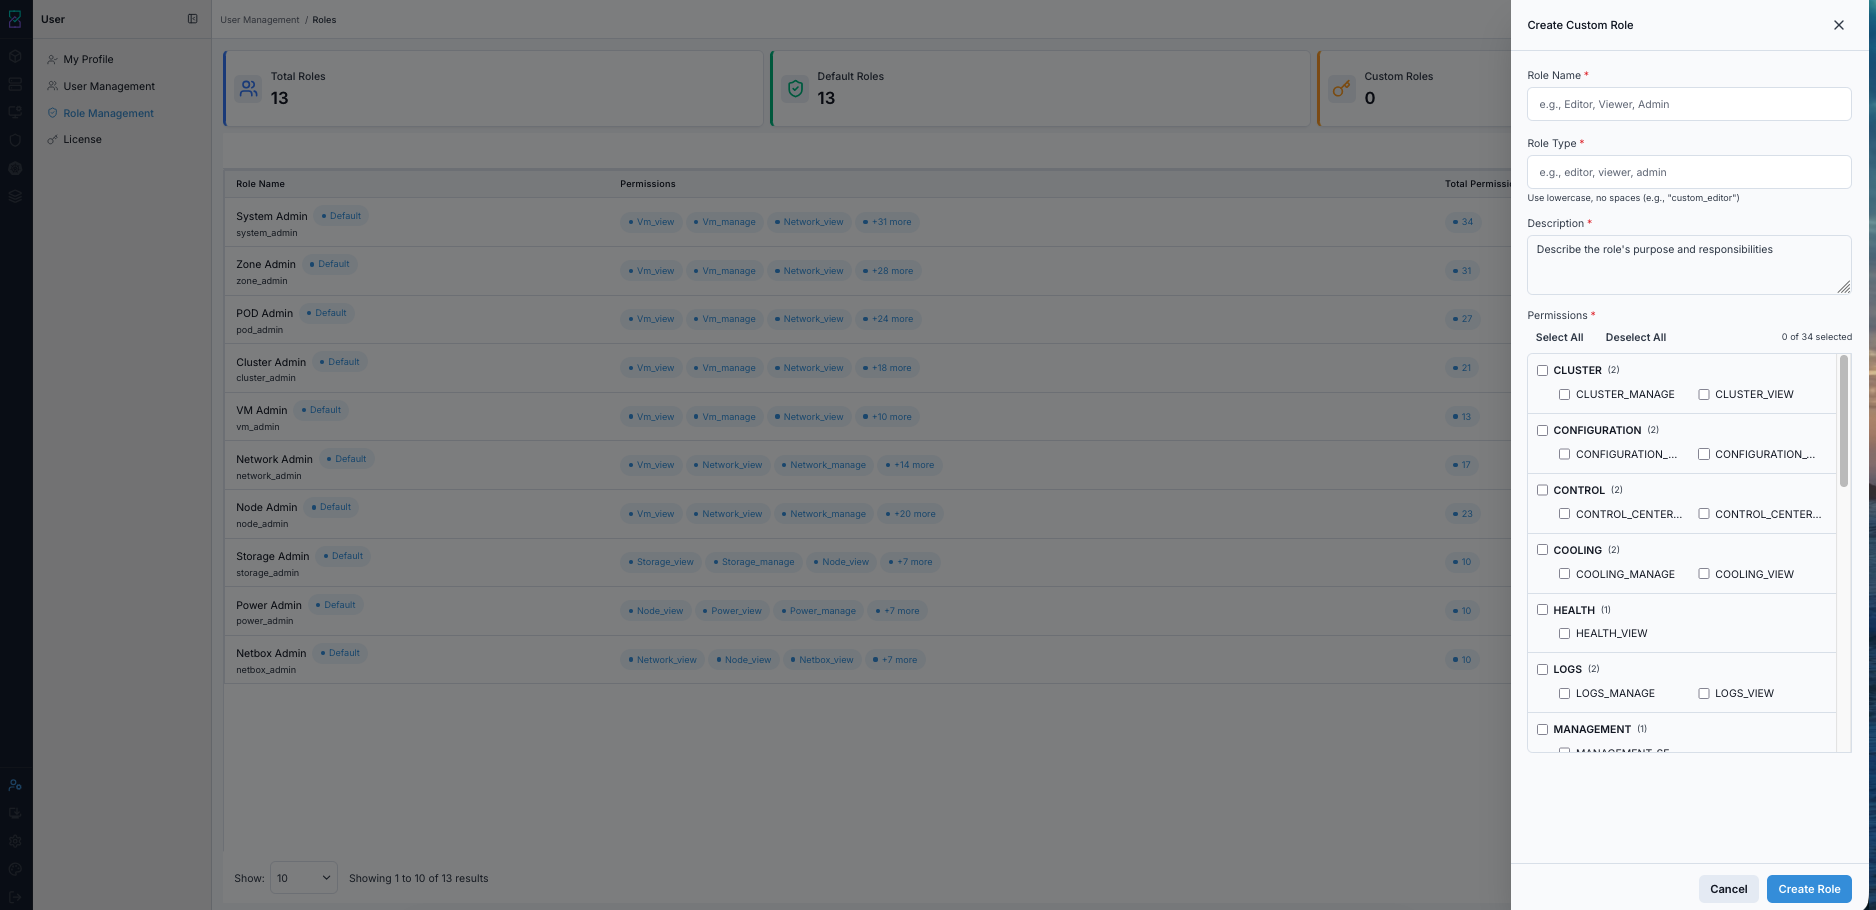
Create Custom Role drawer for role creation.
Steps:
Click
+ Create.Enter
Role Name.Enter
Role Type.Add
Descriptionfor role purpose and use case.Select required permissions.
Click
Create Role.
Expected Outcome:
Role appears in the dashboard as a custom role.
Role is available for immediate assignment in user-permission workflows.
If this fails:
Check for duplicate role name/type.
Validate required fields and permission selection.
Retry after correcting validation errors.
9.7. Role Operations
View role details:
Click role name to review complete permissions and role context.
Edit custom roles:
Open custom role.
Update metadata or permissions.
Save changes.
Delete custom roles:
Use delete action for custom role.
Confirm deletion.
Verify no active user dependency before deletion.
Warning
Deleting a custom role removes that permission set from users assigned to that role.
Assign roles to users:
Open
User Management.Select target user.
Click shield icon (
Assign Roles).Select role(s) and save.
9.8. Permission Combination Model
Permissions are cumulative across assigned roles.
Effective user permission set is the union of all assigned role permissions.
Combine roles only when required by job function.
9.9. Best Practices
Keep role names meaningful and standardized.
Avoid creating many overlapping custom roles.
Document purpose and ownership for each custom role.
Review and audit role usage regularly.
Apply least privilege for both role design and role assignment.
9.10. Troubleshooting
User cannot access expected resource:
Verify assigned role(s).
Verify role includes required permission tags.
Assign missing role/permission scope.
Too many similar custom roles:
Audit current custom roles.
Consolidate overlapping role definitions.
Reassign users to consolidated roles.
Delete redundant roles.
10. License
The License page has two tabs: Overview (license state and activation) and
Nodes (per-node socket registrations). A fresh installation runs on a free tier of
10 sockets under a time-limited NFR (Not For Resale) Evaluation License, shown in the
banner at the top of the page. To license the installation for production, activate it
from the Overview tab in one of two ways:
Subscription (online): a monthly, recurring license activated with a
KAR-license key.Prepaid (Air-Gapped, offline): a one-time, fixed-seat license issued from a request token, for clusters with no internet access.
10.1. Step: Review the License Overview
When to Use:
Use this to check the current license state and choose how to activate.
Purpose:
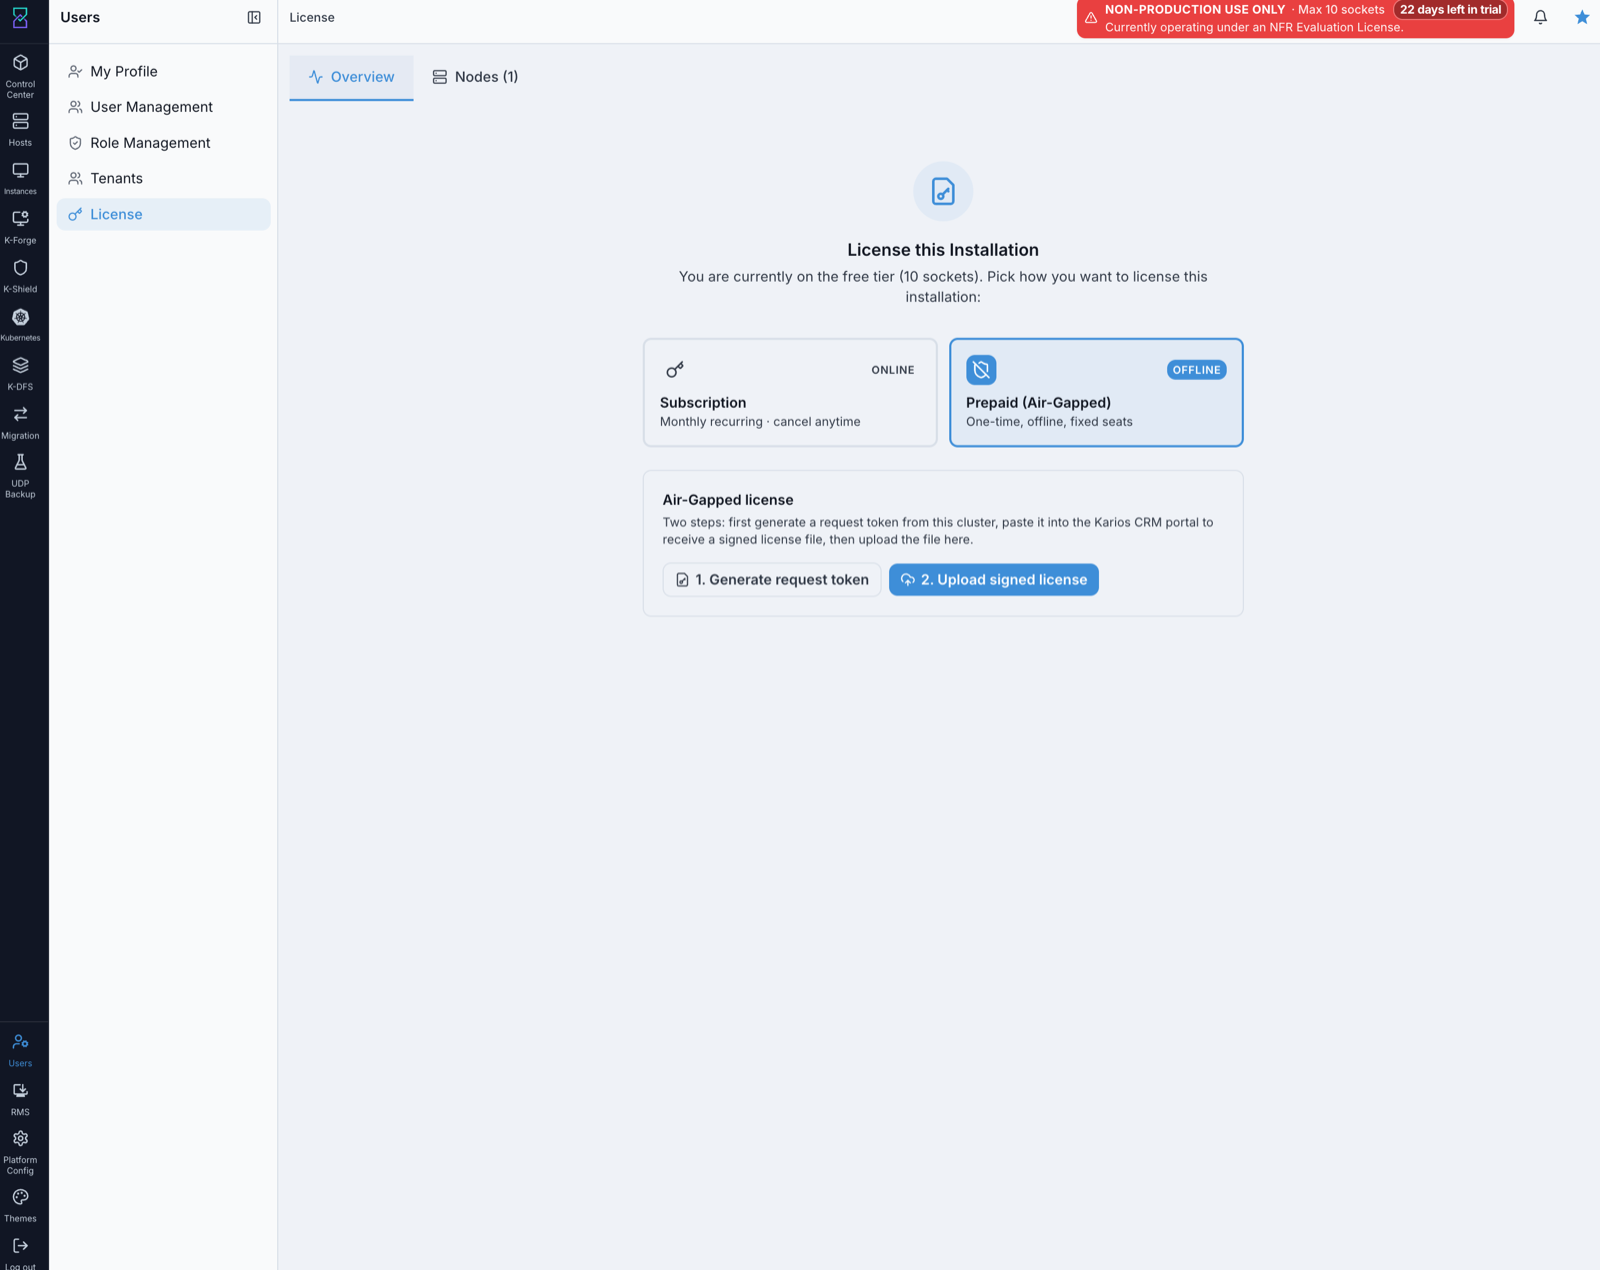
Review the License overview and identify the two activation options.
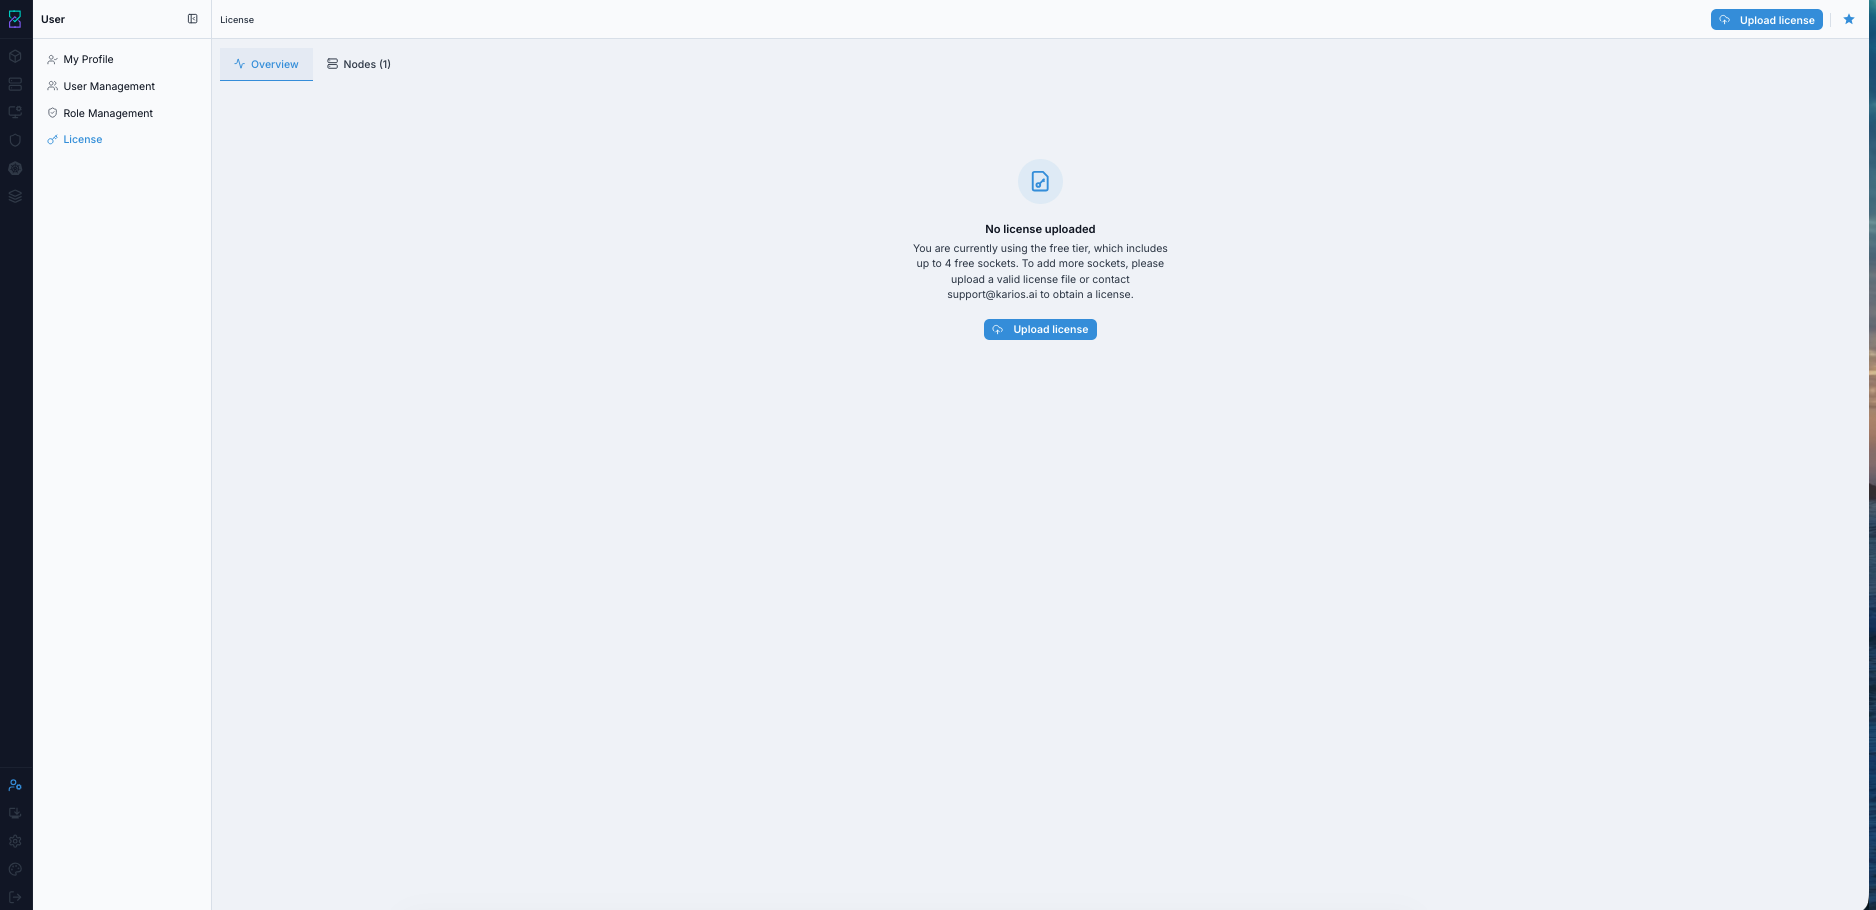
License overview with the Subscription and Prepaid (Air-Gapped) activation options.
Steps:
Open
User -> License.Keep the
Overviewtab selected.Read the current state (for example,
You are currently on the free tier (10 sockets)).Note the banner showing
NON-PRODUCTION USE ONLY, the socket cap, and the days left in the trial.Choose an activation option:
Subscription(online) orPrepaid (Air-Gapped)(offline).
Expected Outcome:
The current license state and remaining trial period are clear.
You can start activation from the same screen.
If this fails:
Refresh the page and re-open
User -> License.If the page still does not load, capture the error and contact your administrator.
10.2. Step: Understand the Licensing Model
When to Use:
Use this to decide which license type to activate and what the trial allows.
Purpose:
Understand the free-tier limits and the two production license types.
Steps:
On install, the product starts on the free tier under an NFR Evaluation License.
The free tier allows up to
10 socketsand is forNON-PRODUCTION USE ONLY.The banner shows the days remaining in the evaluation period.
For production, activate a paid license before the evaluation period ends:
Choose
Subscriptionif the cluster has internet access and you want a recurring license.Choose
Prepaid (Air-Gapped)if the cluster is offline or you need a one-time, fixed-seat license.
Obtain the credential (a
KAR-subscription key, or a signed license file) from the Karios service portal.
Expected Outcome:
You can choose correctly between the Subscription and Prepaid (Air-Gapped) options.
Socket-based limits are interpreted as
sockets(not hosts).
If this fails:
Re-check the options in this section.
Escalate any policy mismatch to the licensing owner before acting.
Note
If on-screen text differs from this section, confirm the current entitlement policy with your licensing administrator or sales before acting.
10.3. Step: Activate a Subscription (Online)
When to Use:
Use this when the cluster has internet access and you want a recurring subscription.
Purpose:
Activate a recurring subscription license with a license key.
Steps:
Go to the Karios service portal and complete the steps in the highlighted section below to get your subscription license key.
Steps in the Karios Service Portal
Perform these steps in the Karios service portal (open it in a browser with internet access):
Open
My Installations.Copy the
KAR-XXXX-XXXX-XXXX-XXXXsubscription license key shown for your installation.
In Karios, on the
Overviewtab, select theSubscriptioncard (markedONLINE).In the
Activate subscriptionpanel, paste the copiedKAR-key into theLicense keyfield.Click
Activate.Wait for activation to complete.
Expected Outcome:
The subscription activates and the installation moves off the free tier.
The license state updates to the active subscription.
If this fails:
Confirm the key is the latest one from the service portal and is copied in full.
Confirm the cluster has outbound internet access (subscription activation is online).
Retry, or contact sales if the key is rejected.
10.4. Step: Activate a Prepaid (Air-Gapped) License (Offline)
When to Use:
Use this when the cluster has no internet access and you need a one-time, fixed-seat license.
Purpose:
Generate this installation’s token, create the installation in the service portal to get a license, then download and upload that license to activate the sockets purchased.
Prepaid (Air-Gapped) activation is a two-step flow: generate a request token, then upload the signed license.
Steps:
On the
Overviewtab, select thePrepaid (Air-Gapped)card (markedOFFLINE).Click
1. Generate request token. TheRequest licensedialog opens and shows this cluster’s installation token (created when Karios was installed from the ISO).

The Request license dialog shows the cluster’s installation token and the portal next steps.
Click
Copy tokento copy the installation token.Go to the Karios service portal and complete the steps in the highlighted section below to exchange the token for a license file.
Steps in the Karios Service Portal
Perform these steps in the Karios service portal (open it in a browser with internet access):
Open
My Installationsand clickAdd Installation.Paste the installation token you copied into the
Paste tokenfield, then clickCreate installation.The license is generated and appears on the
My Installationspage.Download the generated license file (transfer it to the air-gapped machine if that machine has no browser access).
Back in Karios, click
2. Upload signed license.
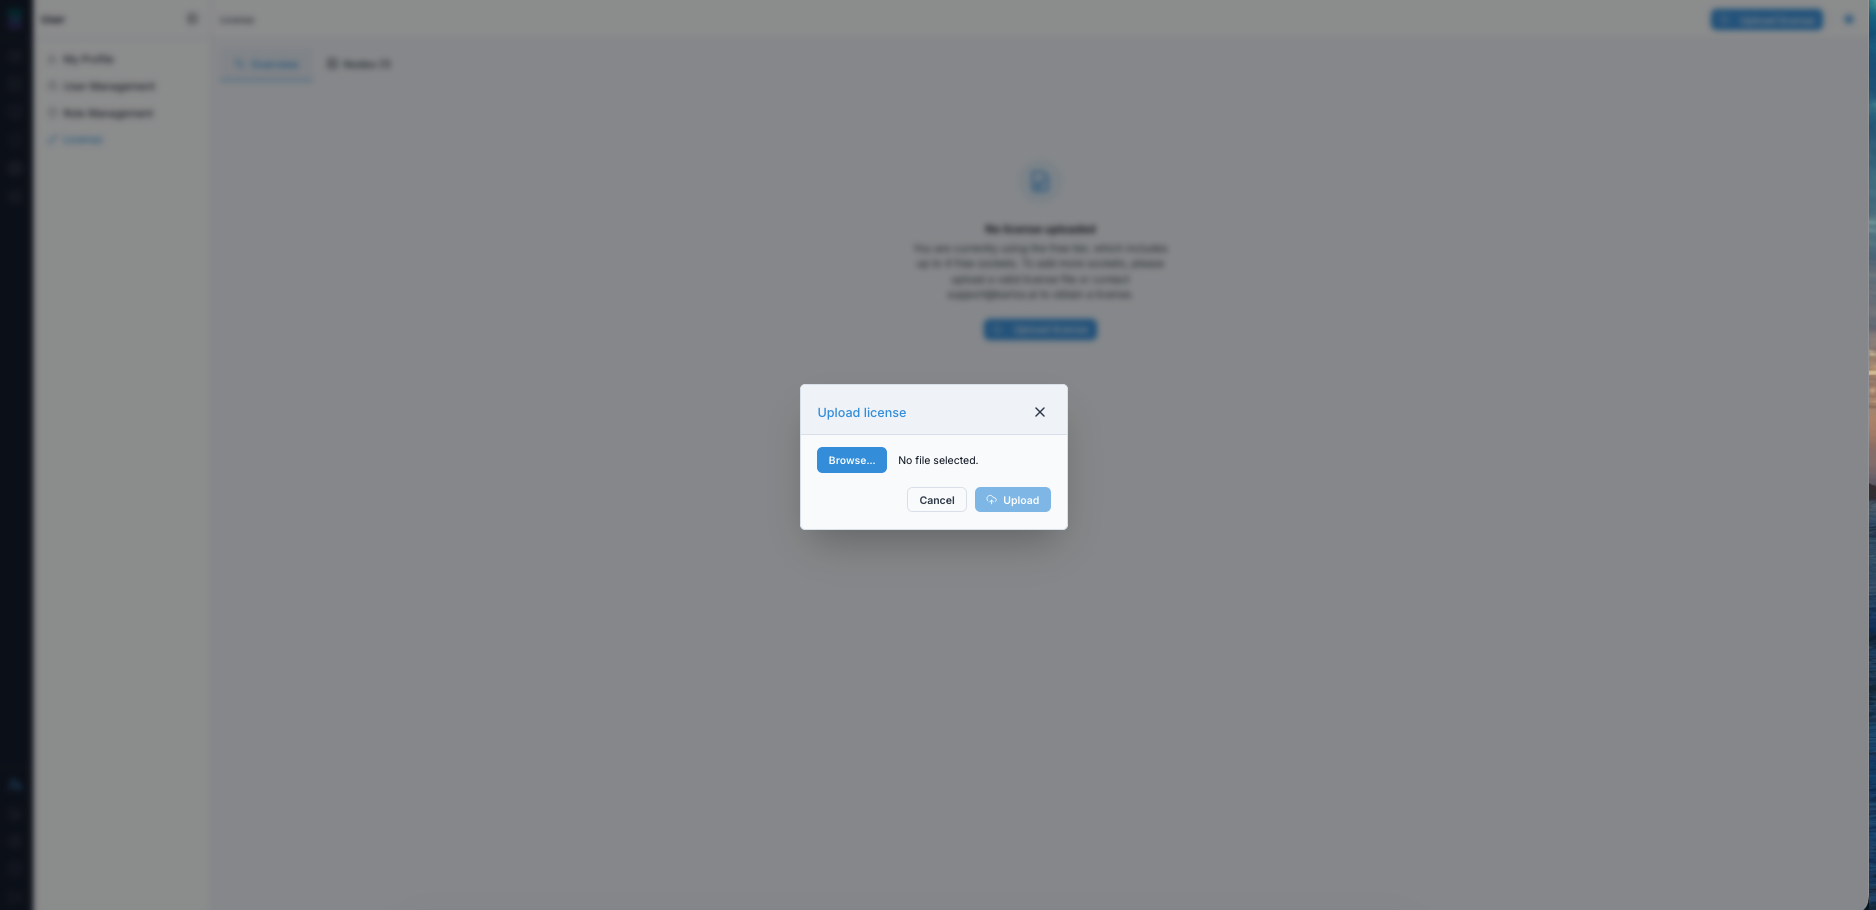
Select the downloaded license file and upload it.
Click
Browse..., select the downloaded license file, and clickUpload.Wait for the activation result. The software activates for the number of sockets you purchased.
Expected Outcome:
The license activates and the installation moves off the free tier.
The software is licensed for the number of sockets purchased.
Registered sockets appear on the
Nodestab.
If this fails:
Confirm you uploaded the signed file that matches this cluster’s request token.
If the token is stale, re-open the dialog and click
Refresh token, then repeat the portal step.If the file is rejected, request a new signed license from the portal or sales.
10.5. Step: Review Node Socket Registrations
When to Use:
Use this to validate per-node socket registration details for the current license.
Purpose:
Verify node-level socket registration records from the License page.
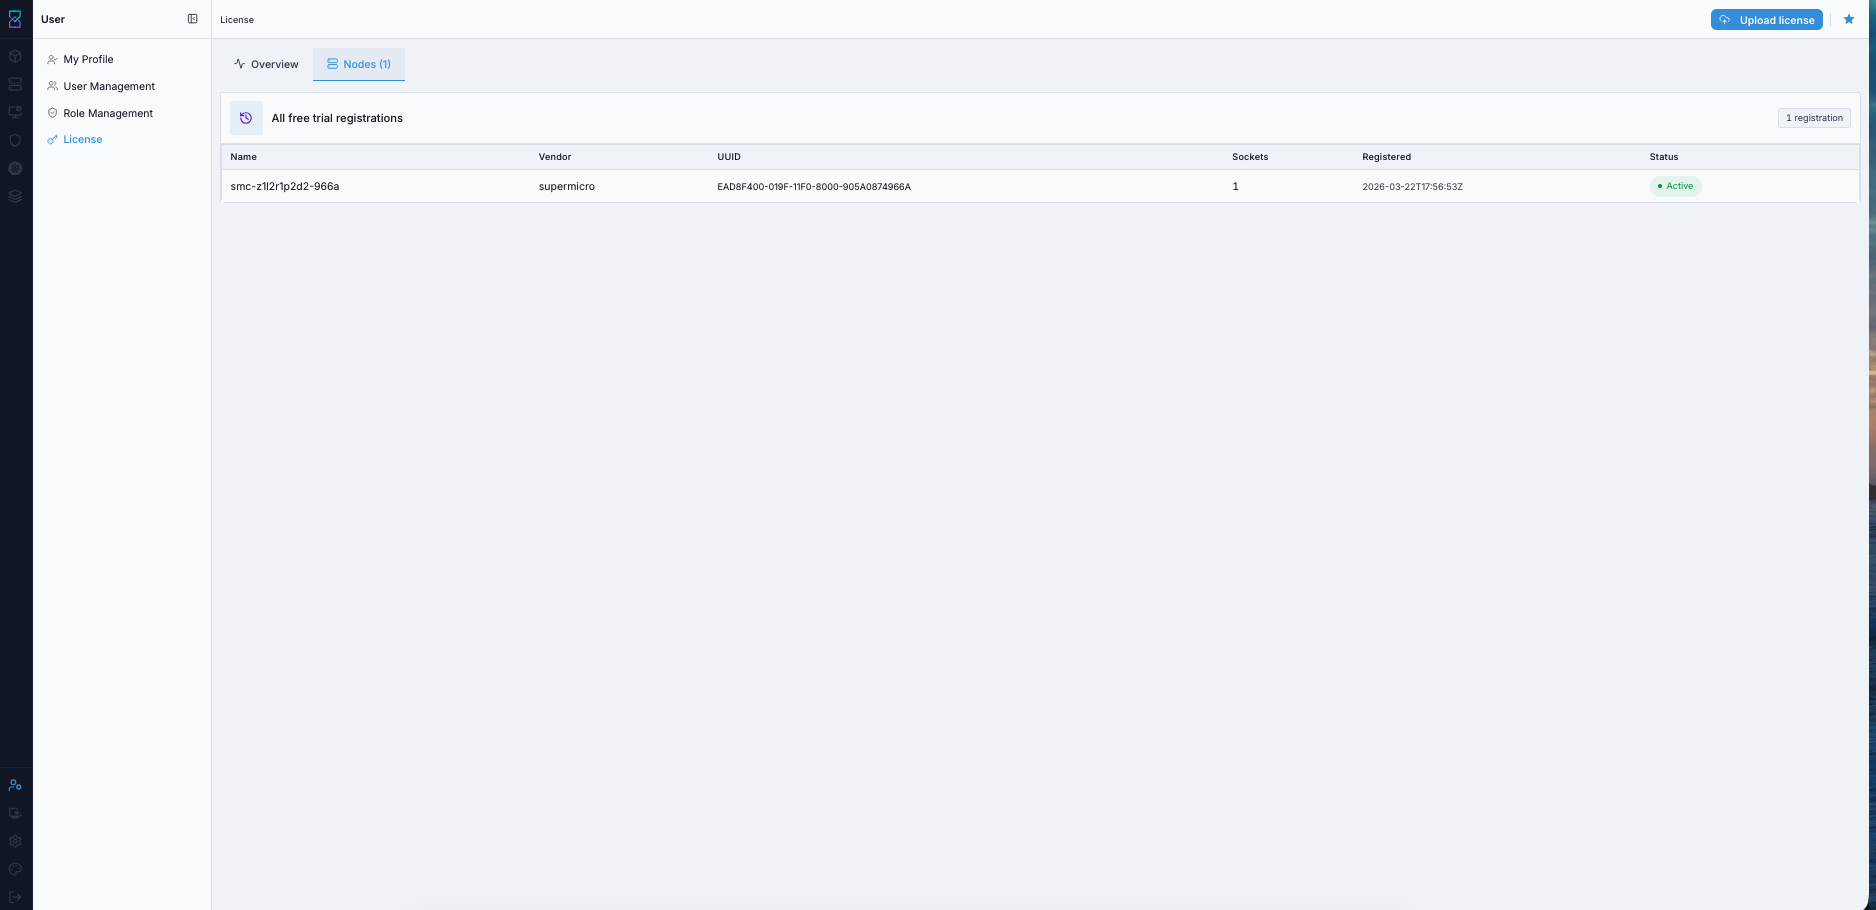
The Nodes tab lists each node’s socket registration and status.
Steps:
Open
User -> License.Click the
Nodestab.Review the registration table columns:
Name,Vendor,UUID,Sockets,Registered, andStatus.Confirm the registration count badge (for example,
1 registration) and that each node showsActive.Compare the registered socket counts with your expected license state.
Expected Outcome:
You can see node registration records and socket counts.
You can validate whether registered sockets align with the current license state.
If this fails:
Refresh the page and re-open the
Nodestab.If the registration list is missing or stale, capture screenshot evidence and escalate to support.
Note
If you have any questions or queries, contact or email support@karios.com and the team will assist you.
11. Security Best Practices
11.1. Account Security Matrix
User Type |
Approval Requirement |
Review Frequency |
Max Roles |
|---|---|---|---|
System Admin |
Recommended |
Monthly |
1-2 |
Department Admin |
Recommended |
Quarterly |
2-3 |
Standard User |
Optional |
Quarterly |
1-2 |
Service Account |
N/A |
Monthly |
1 |
11.2. Access Control Principles
Least privilege
Assign minimum necessary roles
Quarterly access reviews
Immediate deactivation on departure
Document all changes
11.3. User Creation Checklist
Final validation references:
8.10. Workflow 5 Validation Checklist (if deactivation/offboarding is part of the run)
12.2. Quick Fixes for immediate remediation paths
Note
Verification means confirming both login success and correct permission boundaries (not just access).
11.4. First-Time Admin Validation Checklist
Can you create a user without errors?
Can you assign and update roles?
Can you validate approval requirements for an admin account?
Can you deactivate and reactivate a non-critical user?
Is each change documented with owner and reason?
12. Troubleshooting Guide
12.1. Common Issues Decision Flow
If user cannot log in:
Check account status (Inactive -> enable account).
Check role assignment (No roles -> assign role).
Check credential accuracy and account state updates.
If issue persists, review logs and contact support.
Tip
Most login failures are caused by inactive accounts, missing roles, or stale sessions.
Note
Use administrator-driven password reset through User Management.
For recovery when no working admin session exists, follow
Appendices under Credential Recovery Workflow.
12.2. Quick Fixes
Problem |
Solution |
Time |
|---|---|---|
Password reset needed |
Use admin-driven reset in |
1-5 min |
User cannot log in |
Check Active status and enable |
30 sec |
Insufficient permissions |
Assign appropriate role via shield icon |
1 min |
Role not effective |
User logout/login to refresh session |
1 min |
Cannot deactivate user |
Check if last System Admin |
2 min |
User cannot see expected menu |
Verify assigned role includes matching |
1 min |
12.3. Post-Restart Verification Checklist
Run this checklist after a full app restart:
Login with an admin account and open
User Management.Confirm user counts load (Total, Active, Inactive) without errors.
Open
Role Managementand confirm default/custom role lists render.Open one non-critical test user and save a no-risk edit (for example, toggle a non-production setting and revert).
Validate role assignment flow by opening the shield dialog and confirming roles are selectable.
Confirm updated permissions are applied only after user logout/login.
Done criteria:
No UI errors across user and role pages
Read/write user management actions complete successfully
Permission boundaries remain intact
12.4. Escalation Data to Collect
When raising an issue to platform administrators or support, collect:
Username affected and account status (Active/Inactive)
Role assignments before and after the issue
Exact failing action and timestamp
Whether issue persists after logout/login
Relevant error text from UI
Whether approval is enabled for the account
13. Quick Reference
13.1. Essential Actions
Task |
Navigation |
Canonical Procedure |
|---|---|---|
Create User |
User Management -> |
|
Assign Roles |
User Management -> Shield |
|
Reset Password |
User Management -> Key icon |
|
Deactivate User |
User Management -> Person-with-X icon |
|
Create Custom Role |
Role Management -> |
13.2. Status Indicators
Symbol |
Meaning |
Context |
|---|---|---|
Active/Enabled |
Operational |
Account status |
Required |
Action pending |
Approval needed |
Inactive/Disabled |
Not operational |
Account disabled |
Default Role |
System-provided role |
Role list |
Custom Role |
User-created role |
Role list |
13.3. Permission Quick Reference
Permission Pattern |
Example |
Meaning |
|---|---|---|
RESOURCE_VIEW |
VM_VIEW |
Read-only access |
RESOURCE_MANAGE |
VM_MANAGE |
Full control |
RESOURCE_CLIENT_TYPE |
STORAGE_CLIENT_NFS |
Specific client access |
13.4. Role Assignment Guide
Infrastructure Admin -> System Admin
Zone Manager -> ZONE Admin
VM Operations -> VM Admin
Network Engineer -> Network Admin
Storage Engineer -> Storage Admin
Hardware Tech -> Node Admin
Security Auditor -> Custom (view permissions)
Backup Operator -> Custom (storage permissions)
13.5. Common New-User Pitfalls
Creating users but forgetting role assignment (user can log in but cannot do work)
Assigning overly broad roles instead of least privilege
Deactivating accounts without documenting reason and owner
14. Key Points Summary
14.1. User Management Essentials
Create users with unique credentials and corporate email
Assign minimum necessary roles (least privilege)
Deactivate immediately upon employee departure
Review access quarterly for compliance
14.2. Role Management Essentials
Use default roles when possible
Create custom roles only for unique requirements
Document role purpose clearly
Test custom roles before production assignment
Review permissions after system updates
Security Essentials
Strong passwords (minimum 12 characters with complexity)
Immediate deactivation for security incidents
Access reviews every 90 days
Audit trail for all access changes
15. Appendix: Permission Reference
Category |
VIEW |
MANAGE |
Additional |
|---|---|---|---|
ACCOUNT |
ACCOUNT_VIEW |
ACCOUNT_MANAGE |
|
CLUSTER |
CLUSTER_VIEW |
CLUSTER_MANAGE |
|
CONTROL |
CONTROL_CENTER_VIEW |
CONTROL_CENTER_MANAGE |
|
COOLING |
COOLING_VIEW |
COOLING_MANAGE |
|
DOMAIN |
DOMAIN_VIEW |
DOMAIN_MANAGE |
|
LOGS |
LOGS_VIEW |
LOGS_MANAGE |
|
MANAGEMENT |
MANAGEMENT_SERVER_VIEW |
||
NETBOX |
NETBOX_VIEW |
NETBOX_MANAGE |
|
NETWORK |
NETWORK_VIEW |
NETWORK_MANAGE |
|
NODE |
NODE_VIEW |
NODE_MANAGE |
NODE_CONSOLE |
POD |
POD_VIEW |
POD_MANAGE |
|
POWER |
POWER_VIEW |
POWER_MANAGE |
|
SECURITY |
SECURITY_VIEW |
SECURITY_MANAGE |
|
STORAGE |
STORAGE_VIEW |
STORAGE_MANAGE |
STORAGE_CLIENT_ISCSI, STORAGE_CLIENT_MFS, STORAGE_CLIENT_NFS, STORAGE_CLIENT_S3, STORAGE_CLIENT_SMB |
USER |
USER_VIEW |
USER_MANAGE |
|
VM |
VM_VIEW |
VM_MANAGE |
|
ZONE |
ZONE_VIEW |
ZONE_MANAGE |
Permission totals vary by deployment and enabled modules. Validate live totals in the role details page before audit decisions.
Success Checkpoint
After this section, you should be able to:
create, edit, and deactivate users safely
assign roles based on least privilege
enforce core access controls (approvals and least privilege)
troubleshoot common user and role problems
→ Next: Karios Forge