Users
Path: Left sidebar > Object Storage > Users
When to Use:
When onboarding object-storage access for users, applications, or automation.
When rotating credentials, adjusting quotas, or reviewing account state.
Purpose:
This page explains how to create users and roles, retrieve credentials, and manage user-level quotas and access state.
Steps:
Open
Object Storage > Users.Review the
UsersorRolestab based on the task.Create or expand the target user or role.
Validate credentials, quota settings, and account state after the change.
Expected Outcome:
You can create or update the required object-storage identity and confirm it is ready for use.
What You See:
User and role tables, create panels, expanded tabs for details and keys, and quota actions.
What This Screenshot Shows:
The screenshots on this page show the create-user, role, and expanded user-detail workflows in a reference environment.
Actions in This Screen:
Create users and roles.
Expand users to review keys, quotas, and capabilities.
Edit, suspend, or quota-manage existing accounts.
If this fails:
Confirm the required owner, tenant, or quota prerequisite exists first.
Retrieve and store credentials immediately if the key pair is newly created.
Re-open the expanded row or create panel if the UI state did not refresh.
Users Overview
The Users page manages all S3 and Swift user accounts that can access object storage. Every client application that reads or writes objects needs a user account with valid credentials.
The page has two tabs: Users and Roles.
Users List - Column Reference
Column |
What It Shows |
|---|---|
Username |
The unique user ID used as the S3 access-key owner identifier |
Full Name |
The display name for this account |
Email address associated with the account |
|
Suspended |
Whether this account is locked. |
Max Buckets |
Maximum number of buckets this user can create |
Capacity Limit |
Whether a storage quota is enforced. |
Note
Use the status text values (for example No, Enabled, Disabled)
as authoritative. Dot colors can vary by UI theme.
Tip
Suspended means the account cannot make new S3/Swift requests. Existing
data, buckets, and keys are preserved. Re-enable by editing the user and
unchecking Suspended.
How To Create A User
Path: Object Storage > Users > + Create User
Open
Object Storage > Users.Click
+ Create User.In
User ID, enter a unique identifier (lowercase, hyphens, numbers).Leave
Show Tenantunchecked for standard deployments.Enter
Full Name.Enter
Email(optional).Set
Max Bucketsto the limit required by your team policy.Leave
Suspendedunchecked for a new active account.Keep
S3 Key > Auto-generate keychecked.Keep
User QuotaandBucket Quotadisabled unless limits are needed.Review values and click
Create User.
Expected Outcome:
User appears in the list with
Suspended = No.S3 Access Key and Secret Key are generated.
Expand row
>and openKeystab to retrieve credentials.
Important
Do not uncheck Auto-generate key unless you explicitly need
user-supplied keys.
Warning
Secret Key is masked in the Keys tab. Use the reveal icon,
copy it immediately, and store it securely. If lost, generate a new key pair.
Note
In the create panel, Create User saves the account and X closes the
panel without creating the user.
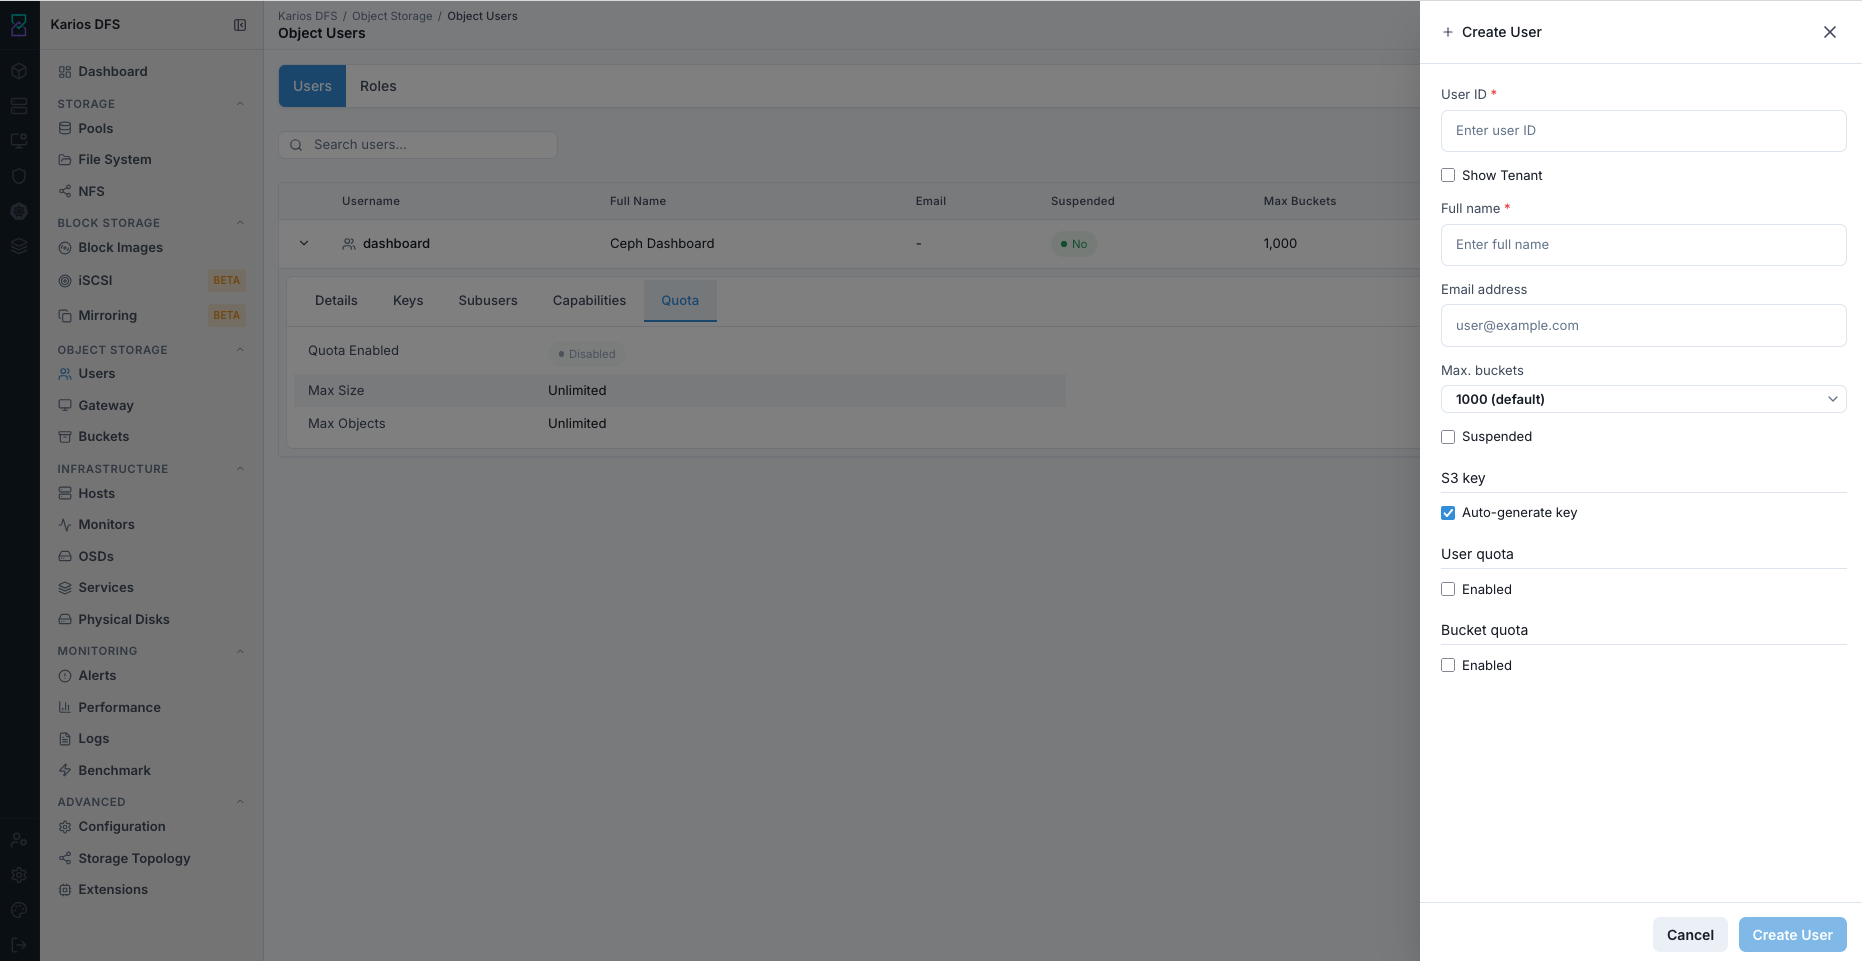
What This Screenshot Shows: Create User Panel (UI Reference; Values Depend On Your Environment).
Create User - Field Reference
Field |
Value / Options |
Description |
|---|---|---|
User ID * |
Text input |
Required. Unique. Lowercase with hyphens. S3 account identifier. |
Show Tenant |
Optional checkbox |
For multi-tenant RGW setups. Leave unchecked for standard deployments. |
Full Name * |
Text input |
Required display name. Does not change API identity. |
Email address |
Optional text input |
Reference only. Does not affect authentication. |
Max buckets |
Dropdown |
Maximum bucket count this user can create. |
Suspended |
Checkbox |
Creates account in locked state if checked. |
S3 Key > Auto-generate key |
Checkbox |
Generates Access Key and Secret Key automatically. |
User quota > Enabled |
Checkbox |
Enforces total storage limit across all this user’s buckets. |
Bucket quota > Enabled |
Checkbox |
Enforces per-bucket limit for all buckets this user creates. |
User Detail Tabs
Expand a user row using chevron >. Five tabs appear.
Top-right actions in expanded panel: Edit and Quota.
Details Tab
Field |
What It Shows |
|---|---|
User ID |
Unique user identifier used for S3 requests and bucket ownership |
Display Name |
Human-readable full name |
Email on file. |
|
Max Buckets |
Maximum bucket count this user can own |
Suspended |
Current account state. |
Note
In this expanded view, Edit updates user properties and Quota opens
the quota form for this same user.
After you click Edit User in the edit panel, changes are saved
immediately for that user.
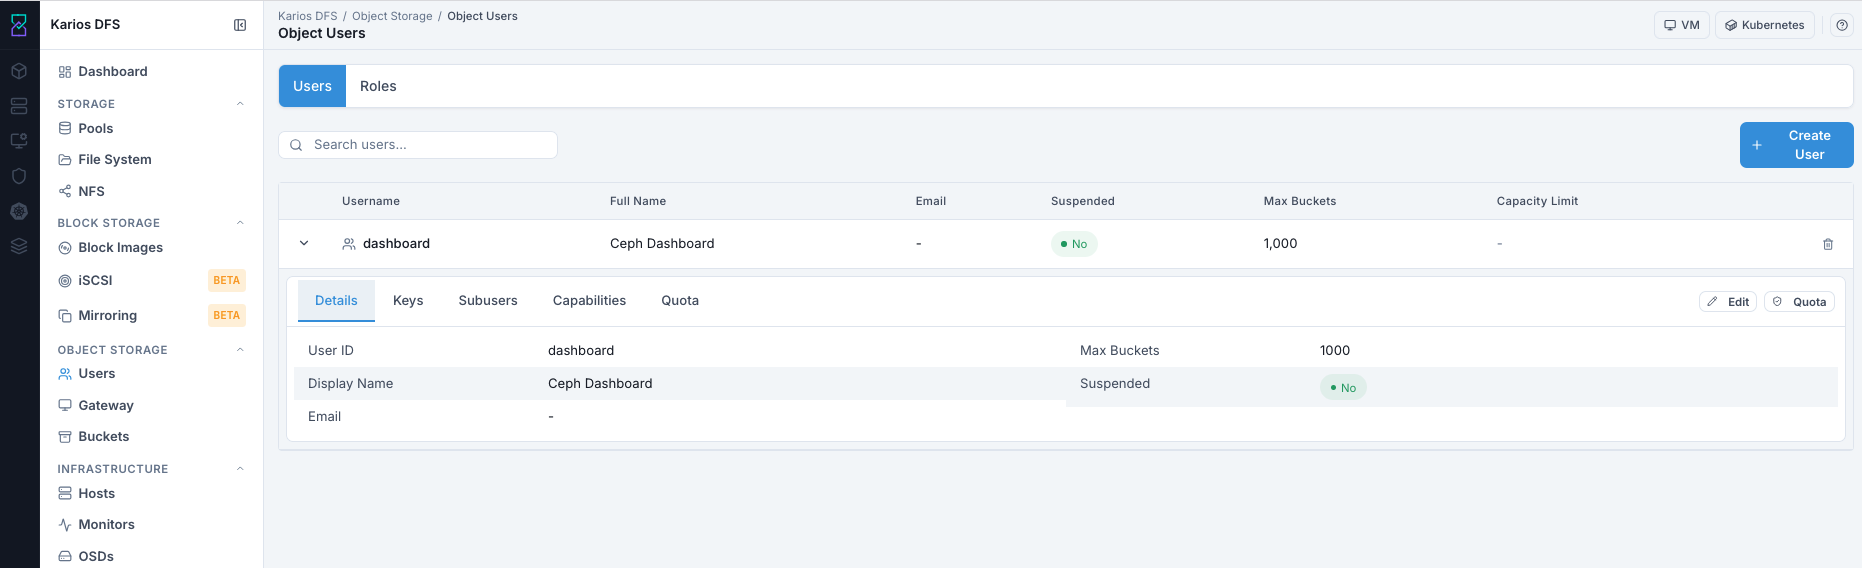
What This Screenshot Shows: Users Expanded Row - Details Tab (UI Reference; Values Depend On Your Environment).
Keys Tab
Field |
What It Shows |
|---|---|
User |
The user ID this key belongs to |
Access Key |
Public Access Key ID used by clients |
Secret Key |
Masked in the list view. Reveal icon shows full value. |
Note
The expanded panel action buttons (Edit and Quota) remain available
while you are on the Keys tab. Clicking Edit opens the user edit
panel; after Edit User, updated user fields apply immediately.
How to retrieve S3 credentials after user creation:
Expand user row
>.Click
Keystab.Copy
Access Key.Reveal and copy
Secret Key.Store both in a password manager or secrets vault.
Tip
You can use multiple key pairs per user for zero-downtime credential rotation.
Warning
If a secret is compromised, delete that key pair immediately and create a new one.
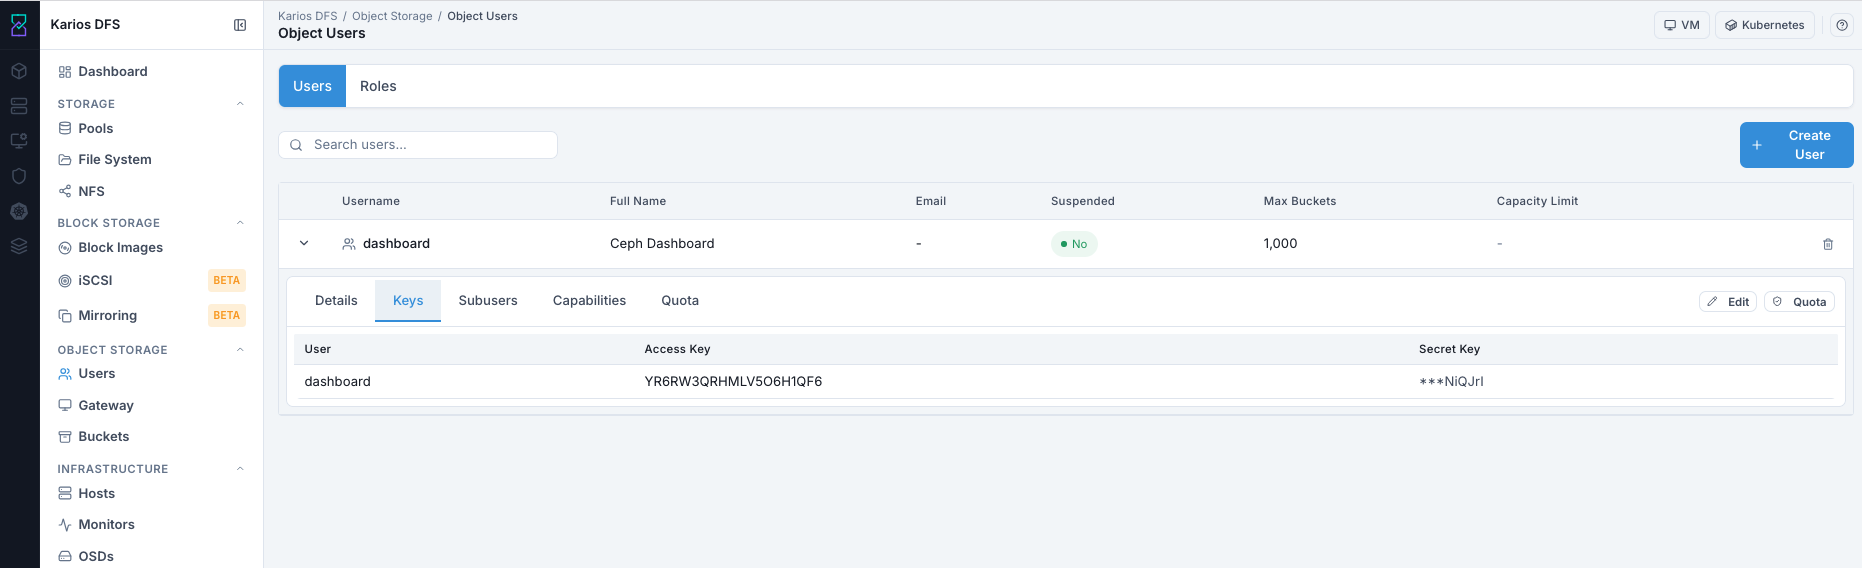
What This Screenshot Shows: Users Expanded Row - Keys Tab (UI Reference; Values Depend On Your Environment).
Subusers Tab
Shows Swift sub-user accounts under the main user.
Empty state (No subusers found) is normal for S3-only deployments.
Note
Edit and Quota remain available in the expanded panel while viewing
Subusers. Clicking Edit opens the user edit panel; after
Edit User, updated user fields apply immediately.
Subuser Access Level |
What It Allows |
|---|---|
read |
Read-only via Swift API |
write |
Write-only via Swift API |
read-write |
Read and write via Swift API |
full |
Full Swift operations including admin functions |

What This Screenshot Shows: Users Expanded Row - Subusers Tab (UI Reference; Values Depend On Your Environment).
Capabilities Tab
Shows fine-grained RGW admin API capabilities for this user.
Empty state (No capabilities found) is the recommended starting state for standard
storage users.
Note
Edit and Quota remain available in the expanded panel while viewing
Capabilities. Clicking Edit opens the user edit panel; after
Edit User, updated user fields apply immediately.
Capability |
What It Allows |
|---|---|
users |
Read/write user management via admin API |
buckets |
Read/write bucket management via admin API |
metadata |
Cluster metadata access |
usage |
Usage statistics access |
zone |
Zone configuration access |
Warning
Capabilities grant administrative power beyond a user’s own data. Standard user accounts should have zero capabilities.
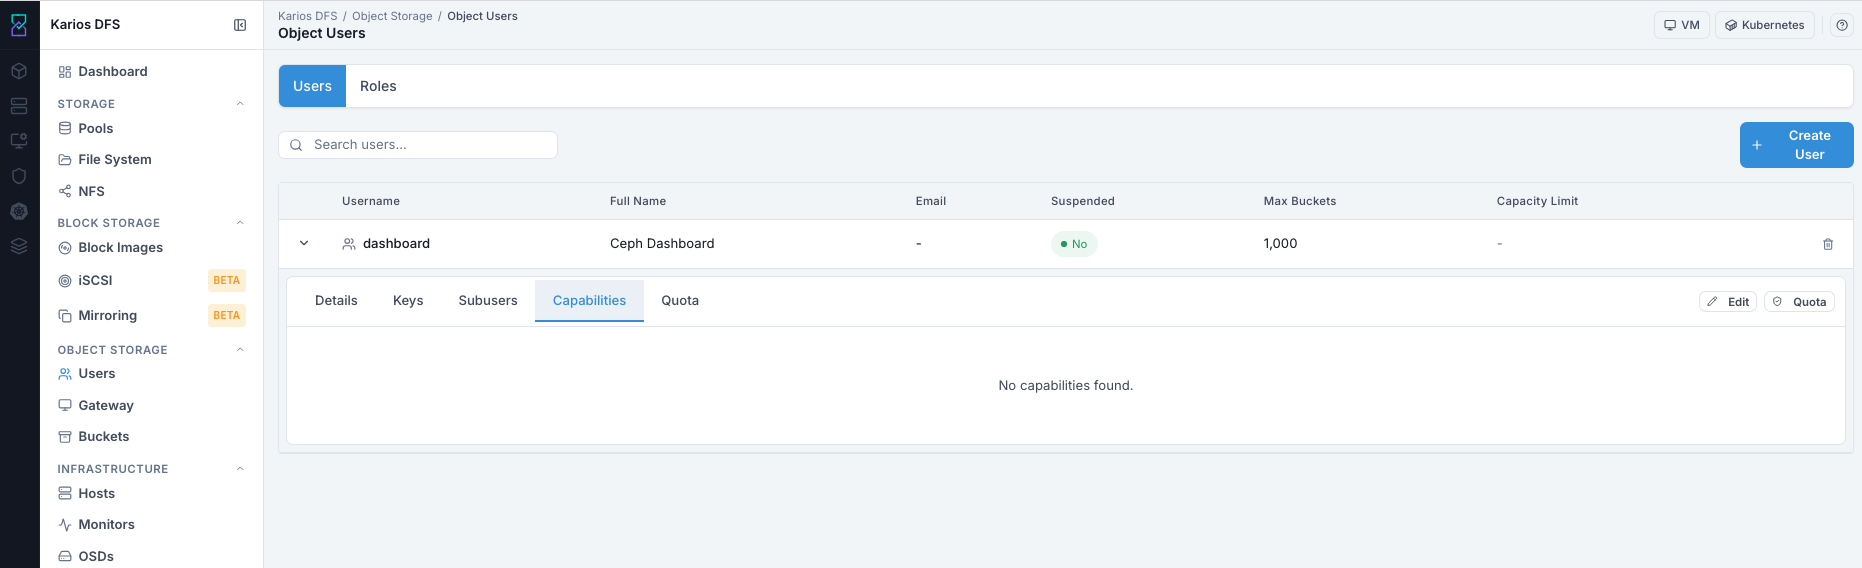
What This Screenshot Shows: Users Expanded Row - Capabilities Tab (UI Reference; Values Depend On Your Environment).
Quota Tab
Shows current quota settings for this user.
Field |
What It Shows |
|---|---|
Quota Enabled |
|
Max Size |
Maximum total storage across all user buckets; |
Max Objects |
Maximum total object count; |
How to change quota settings:
Expand user row
>and openQuotatab.Click
Quotabutton in expanded panel.Enable quota toggle.
Enter
Max Size(KB) and/orMax Objects.Click
Save.
Note
When quota is reached, further uploads are rejected. Existing objects remain readable/deletable until space is freed or limits are raised.
Note
In this view, Quota opens the quota edit form and Edit opens user
account editing for the same user. After Edit User, updated user fields
apply immediately.
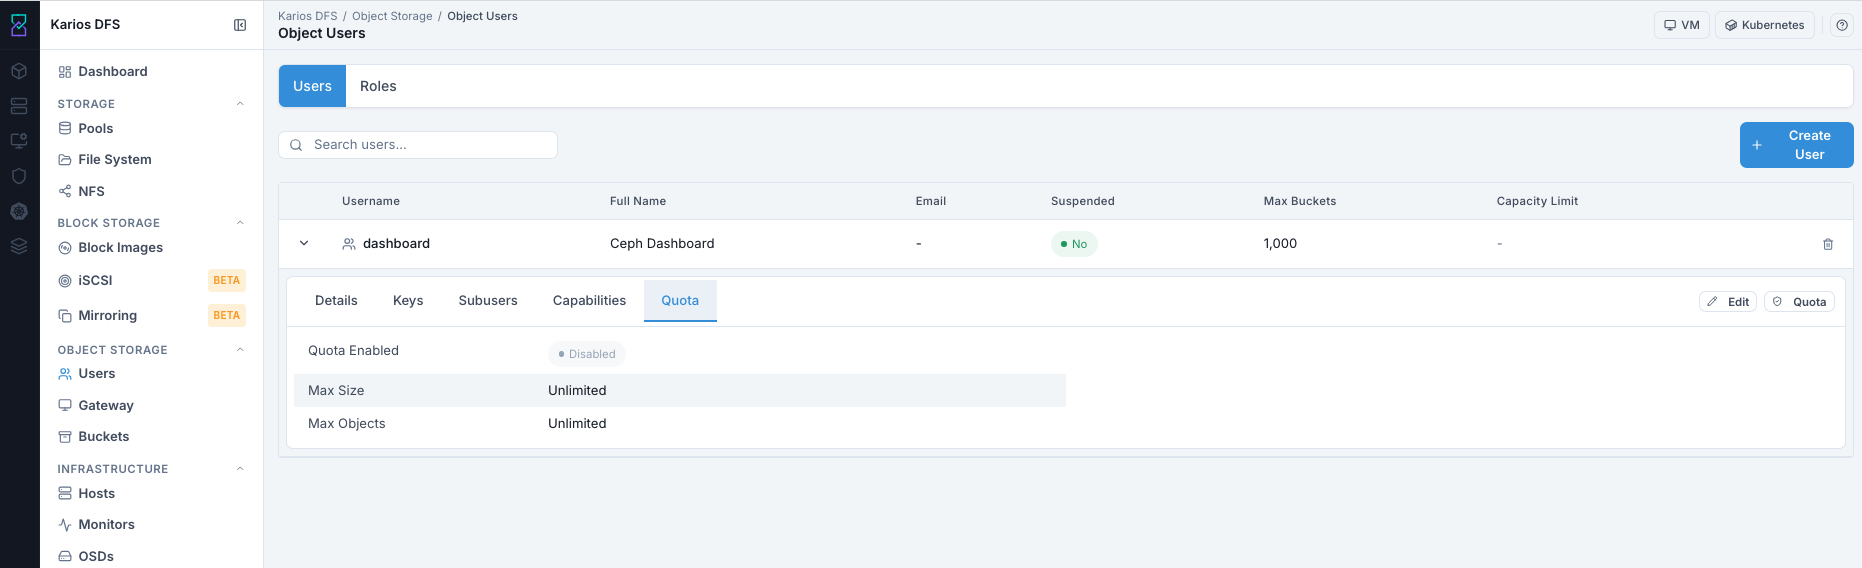
What This Screenshot Shows: Users Expanded Row - Quota Tab (UI Reference; Values Depend On Your Environment).
User Actions
Edit User
How to access:
Expand user row and click
Edit.
What you can change:
Full Name
Email
Max Buckets
Suspended state
User Quota
Bucket Quota
What you cannot change:
User ID (permanent)
Steps:
Expand user row.
Click
Edit.Update fields.
Click
Edit User.
Expected Outcome:
Changes apply immediately. Suspending blocks API access within seconds.
Existing data and credentials remain preserved.
When to suspend a user:
Team member departed and access must be blocked without data deletion.
Credential compromise investigation requires temporary lock.
Service account must be paused during maintenance.
Delete User
How to access:
Click trash icon on the user row.
Before you delete (mandatory check):
Deleting a user does not delete their buckets or objects. Buckets remain ownerless unless reassigned/deleted first.
Steps:
Open
Object Storage > Buckets.Find buckets owned by this user.
Delete buckets or reassign owner to another active user.
Return to
Object Storage > Users.Click trash icon on user row.
Confirm deletion.
Expected Outcome:
User account and access keys are permanently removed.
Any client using those credentials loses access immediately.
Warning
Deleting a user is permanent. User ID cannot be reused.
Troubleshooting - Users
Problem You See |
Most Likely Cause |
What To Do |
|---|---|---|
|
Viewer role |
Request Operator or Administrator role |
Cannot retrieve Secret Key |
Key not captured or not revealed |
Open |
Invalid credentials from client |
Wrong key pair or deleted key |
Verify client key against |
S3 requests rejected for this user |
Account suspended |
Check |
User cannot create more buckets |
Max Buckets limit reached |
Increase Max Buckets in Edit |
Uploads failing for this user |
User quota reached |
Check Quota tab; delete objects or increase quota |
Note
If issue persists, raise a support ticket via Monitoring > Alerts or
Karios Support.
Roles Tab
Path: Object Storage > Users > Roles
The Roles tab manages IAM-style roles for federated identity access to object storage. Roles define what an assumed identity can do using a JSON trust policy without issuing permanent S3 credentials.
Empty state (No IAM roles found) is normal for new deployments.
Note
Use + Create Role in the top-right area to open the role creation panel.

What This Screenshot Shows: Roles Tab (UI Reference; Values Depend On Your Environment).
Roles List - Column Reference
Columns in this section are visible after at least one role exists. In new
deployments, the Roles page shows the No IAM roles found empty
state.
Column |
What It Shows |
|---|---|
Role Name |
Unique role identifier |
Path |
Organizational prefix (for example |
ARN |
Unique Amazon Resource Name for the role |
Create Date |
Timestamp when the role was created |
How To Create An IAM Role
Path: Object Storage > Users > Roles > + Create Role
Open
Object Storage > Users.Click
Rolestab.Click
+ Create Role.Enter
Role Name.Set
Path(optional).Enter
Assume Role Policy DocumentJSON.Click
Create.
Policy template shown in the form:
{"Version":"2012-10-17","Statement":[{"Effect":"Allow","Principal":{"AWS":["*"]},"Action":["sts:AssumeRole"]}]}
For production, replace * with specific allowed principals.
Expected Outcome:
Role appears in Roles list with name, path, and ARN.
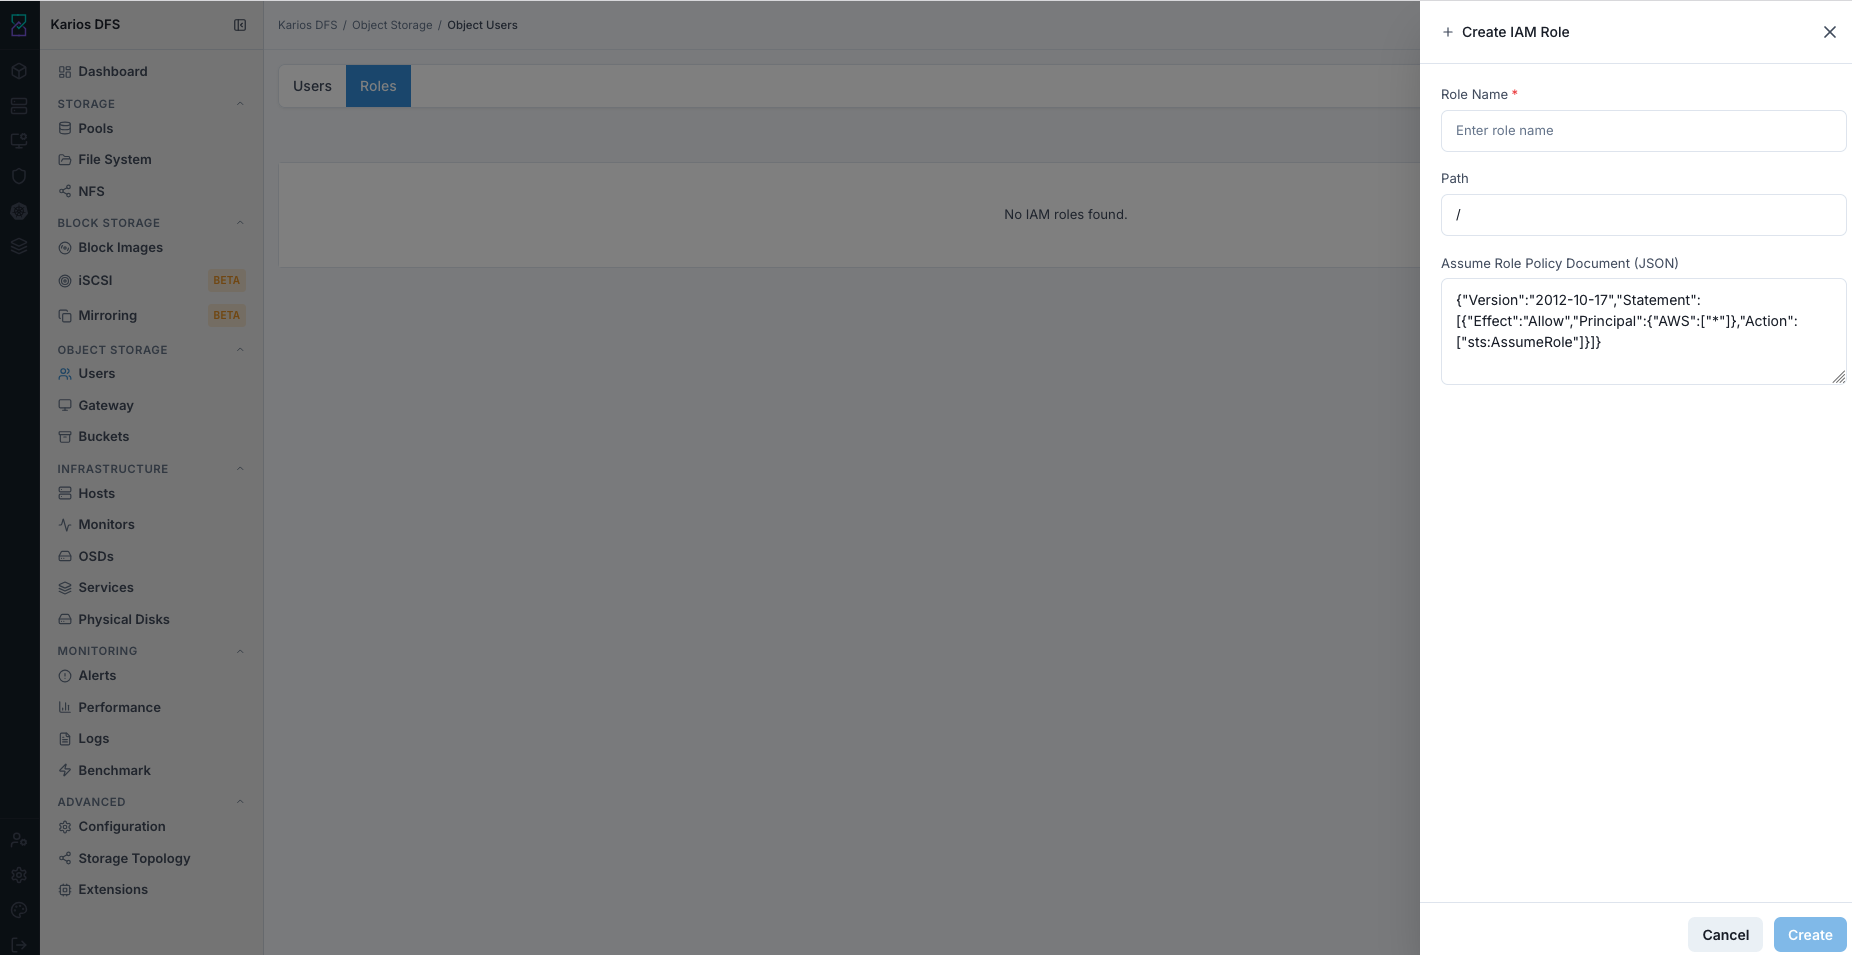
What This Screenshot Shows: Create IAM Role Panel (UI Reference; Values Depend On Your Environment).
Note
In the role panel, Create saves the role and X closes the panel
without creating it.
Note
Roles are an advanced federated-identity feature. Standard team and service access should use Users with S3 credentials.