OSDs
Path: Left sidebar > Infrastructure > OSDs
When to Use:
Before OSD maintenance, replacement, or balancing work.
During degraded PG, recovery, or disk-health investigations.
Purpose:
This page explains how to control cluster-wide OSD behavior, inspect OSD state, and run safe per-OSD actions.
Steps:
Open
Infrastructure > OSDs.Review cluster-wide flags and the OSD list state.
Use the row
...menu or expanded tabs for the target OSD.Confirm the status and health signals update after the action.
Expected Outcome:
You can safely identify the target OSD, apply the required action, and validate the resulting state.
What You See:
Cluster-wide flags, OSD state columns, row actions, and expanded tabs for attributes, metadata, device health, and performance.
What This Screenshot Shows:
The reference screenshots on this page show the OSD list, row actions, and expanded diagnostic tabs used for OSD operations.
Actions in This Screen:
Toggle maintenance-related OSD flags.
Mark OSDs in or out and run scrub-related actions.
Expand an OSD row to inspect health and performance details.
If this fails:
Check Dashboard and Alerts for cluster impact before repeating the action.
Confirm the host and underlying disk are healthy enough for the requested operation.
Wait for PG recovery or state refresh before applying another disruptive change.
OSD Overview
An OSD daemon manages one disk in the cluster. It stores data, replicates it to peer OSDs, and reports health to the monitors.
Purpose:
To validate disk-level health and placement readiness before storage changes.
To run controlled OSD operations (mark out/in, reweight, scrub) safely.
When to Use:
Before maintenance on OSD hosts or disks.
During
HEALTH_WARN/HEALTH_ERRinvestigations involving degraded PGs.When balancing uneven usage across OSDs.
Cluster-Wide Flags
Use the Flags panel to toggle cluster-wide OSD behavior.
Purpose:
To control cluster behavior during planned maintenance or recovery.
When to Use:
Immediately before planned OSD/host work.
During targeted troubleshooting where automatic behavior must be temporarily paused.
Steps:
Open
Infrastructure > OSDs.In the
FLAGSrow, enable only the flag required for your operation.Complete the maintenance/troubleshooting task.
Clear temporary flags as soon as the task is complete.
Expected Outcome:
OSD cluster behavior is controlled for the operation window.
Normal recovery/placement behavior resumes after flags are cleared.
Flag |
What It Does When Set |
|---|---|
noout |
Prevents OSDs from being automatically marked out when they go down |
noin |
Prevents OSDs from being marked in when they come back up |
noup |
Prevents OSDs from marking themselves up |
nodown |
Prevents OSDs from being marked down |
noscrub |
Disables scheduled scrub operations |
nodeep_scrub |
Disables scheduled deep scrub operations |
nobackfill |
Prevents backfill operations |
norebalance |
Prevents rebalance on CRUSH changes |
norecover |
Prevents recovery operations |
pause |
Halts all client I/O (maintenance use only, if available) |
Note
Flags shown can vary by Ceph version, policy, and current cluster state. Some deployments can not expose every flag in the UI at all times.
Warning
Setting noout during maintenance is common practice, but forgetting to
clear it will prevent automatic recovery after a disk failure.
Warning
pause halts client I/O cluster-wide. Use only for controlled maintenance
and clear immediately after validation.
OSD List - Column Reference
Column |
What It Shows |
|---|---|
ID |
Unique numeric OSD identifier |
Status |
Combined up/in state (see status table below) |
Host |
Hostname where this OSD runs |
Device Class |
Storage media type - |
PGs |
Number of placement groups mapped to this OSD |
Size / Weight |
Raw disk size and CRUSH weight (influences data distribution) |
Usage |
Percentage of disk space used (progress bar) |
State |
Active daemon flags (for example |
Read / Write |
Cumulative I/O operations since daemon start |
Actions |
Three-dot per-OSD operations menu |
OSD Status meanings:
Status |
Meaning |
|---|---|
up + in |
Healthy - serving client I/O and holding PGs |
up + out |
Running but excluded from data placement (for example manually marked out) |
down + in |
Daemon not running, PGs degraded, recovery in progress |
down + out |
Daemon not running and fully excluded, data re-replicated elsewhere |
OSD Row Actions - ... Menu
Purpose:
To safely drain, recover, rebalance, or retire an OSD.
When to Use:
Before disk replacement, during failure recovery, or while balancing load.
Action |
What It Does |
|---|---|
Mark Out |
Removes OSD from placement and triggers rebalance |
Mark In |
Returns OSD to data placement |
Mark Down |
Forces OSD daemon to stop |
Reweight |
Adjusts CRUSH weight to shift data distribution |
Scrub |
Lightweight data checksum verification |
Deep Scrub |
Full bit-level data verification (I/O intensive) |
Purge |
Removes OSD from CRUSH map and references |
Destroy |
Marks OSD destroyed so ID can be reused |
Delete |
Removes OSD entry (shown in some deployments) |
Tip
Available row actions can change based on current OSD state. Example:
Mark In appears when an OSD is out, while already up + in OSDs can
not show that action.
Steps:
Open the target OSD row action menu (
...).Select the required action.
Confirm dialogs and monitor PG/health impact.
Validate completion in OSD row state and Dashboard health.
Expected Outcome:
The selected OSD operation is applied and reflected in status/state columns.
Warning
Mark Out triggers rebalance and heavy I/O. In production, mark out one
OSD at a time unless instructed otherwise.
Warning
Deep Scrub is I/O intensive. Schedule during low activity windows.
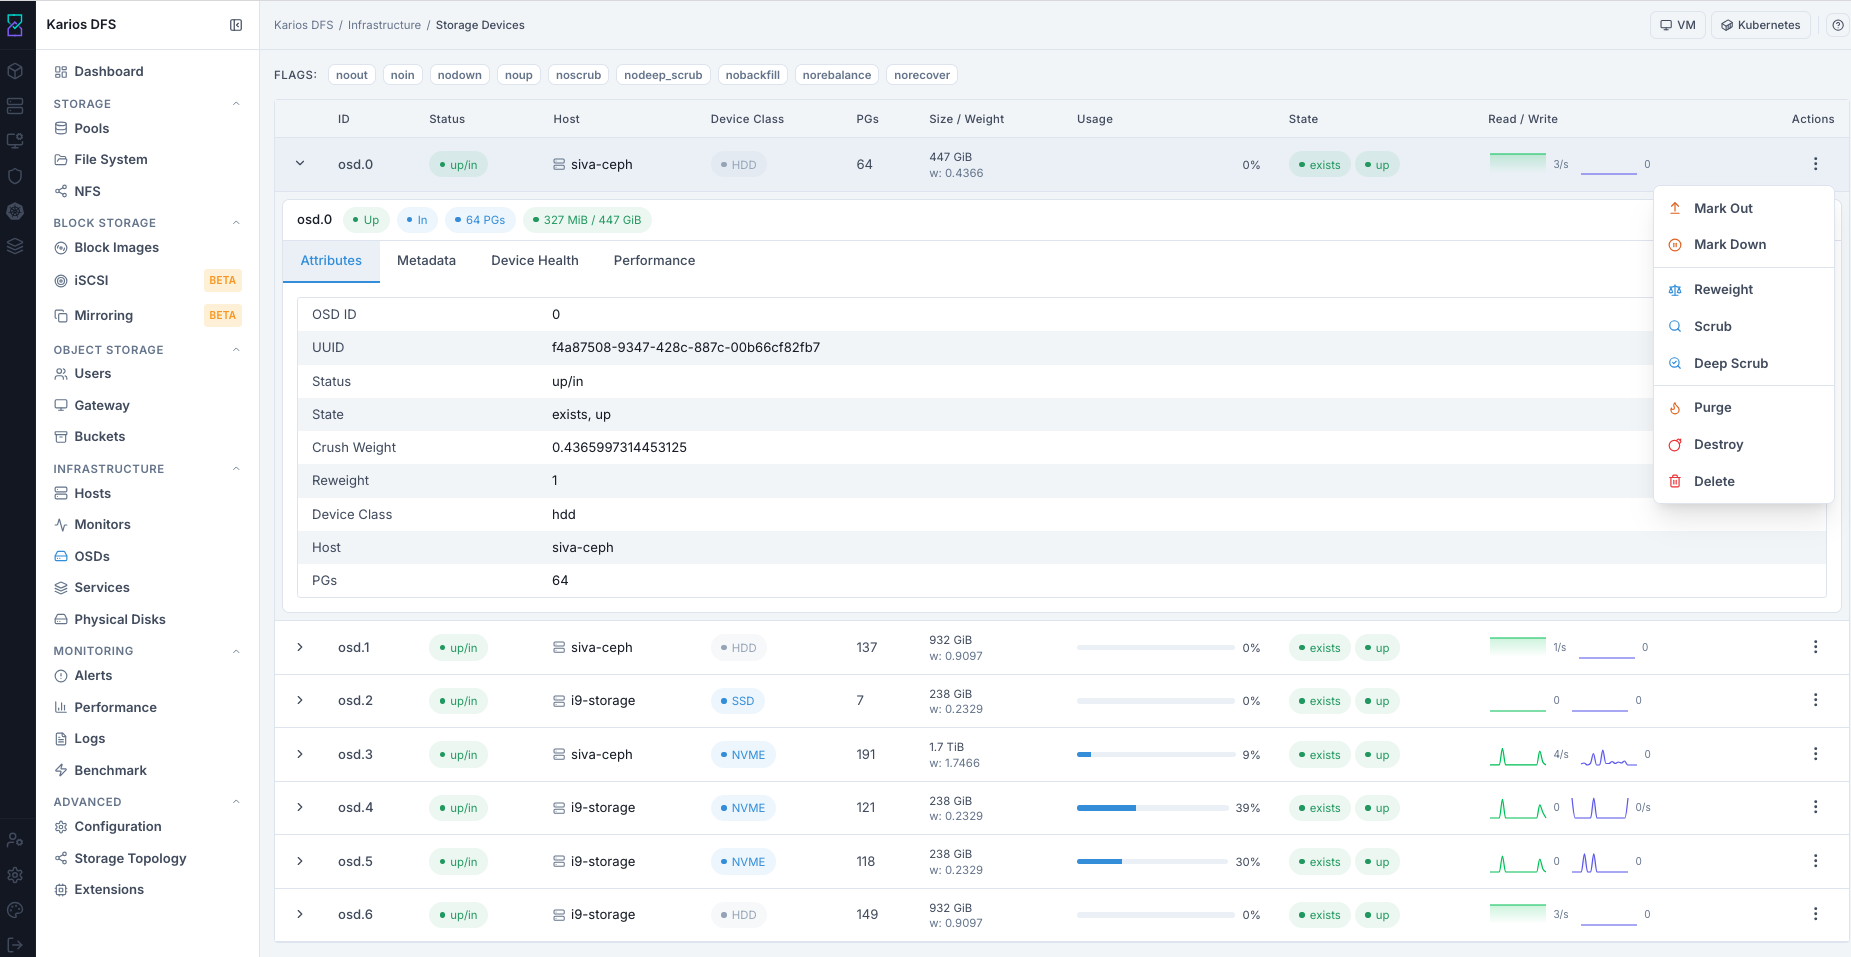
What This Screenshot Shows: OSDs Dashboard And Row Actions (UI Reference; Values Depend On Your Environment).
OSD Detail Tabs
Click chevron > on an OSD row to open detail panel.
Attributes Tab
OSD-level CRUSH weight, class, flags, and heartbeat configuration.
Typical fields include identity, placement, state flags, and weighting values.
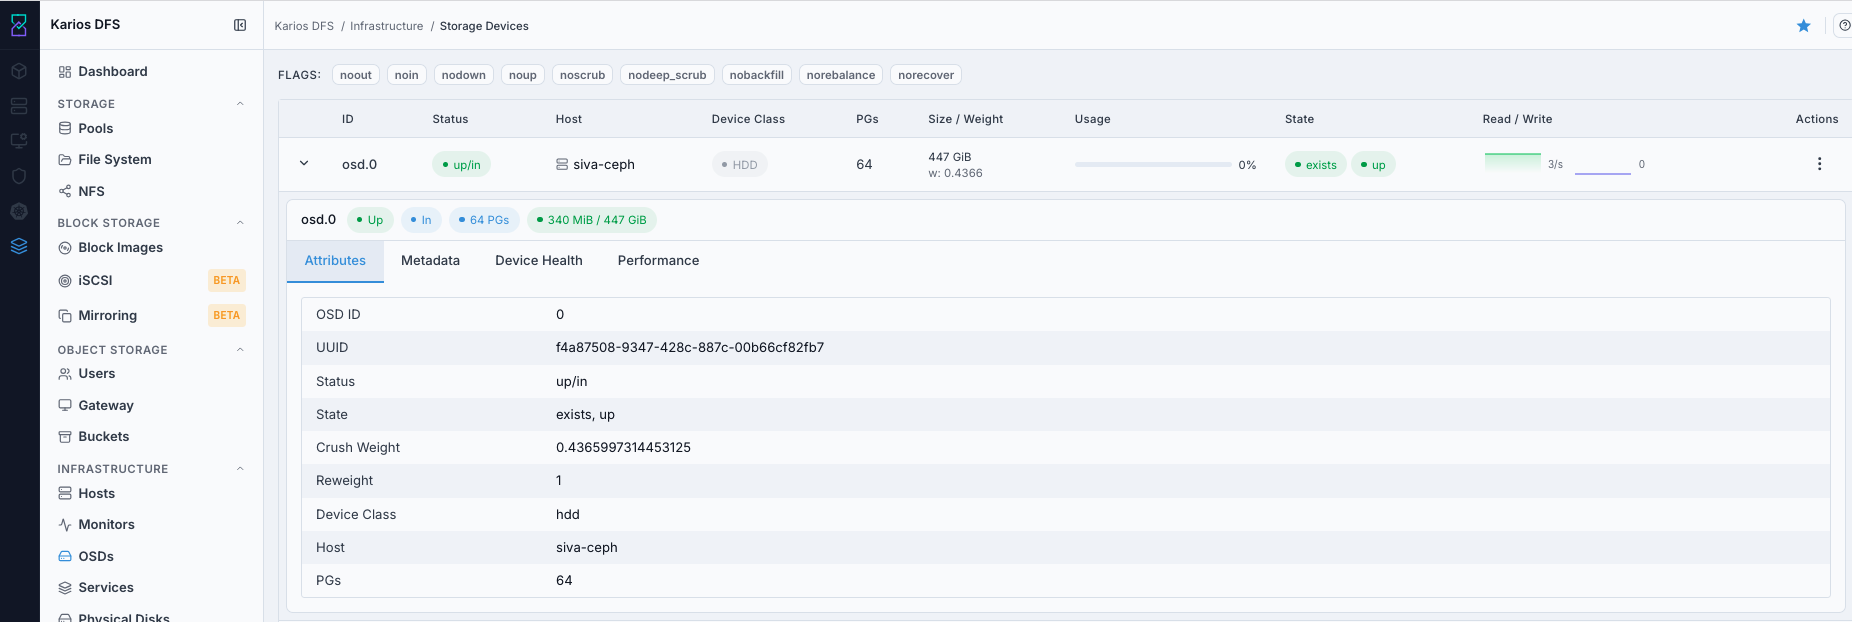
What This Screenshot Shows: OSD Expanded Row - Attributes Tab (UI Reference; Values Depend On Your Environment).
Metadata Tab
Device path, kernel block device name, filesystem/objectstore details, and journal/WAL/DB device metadata.
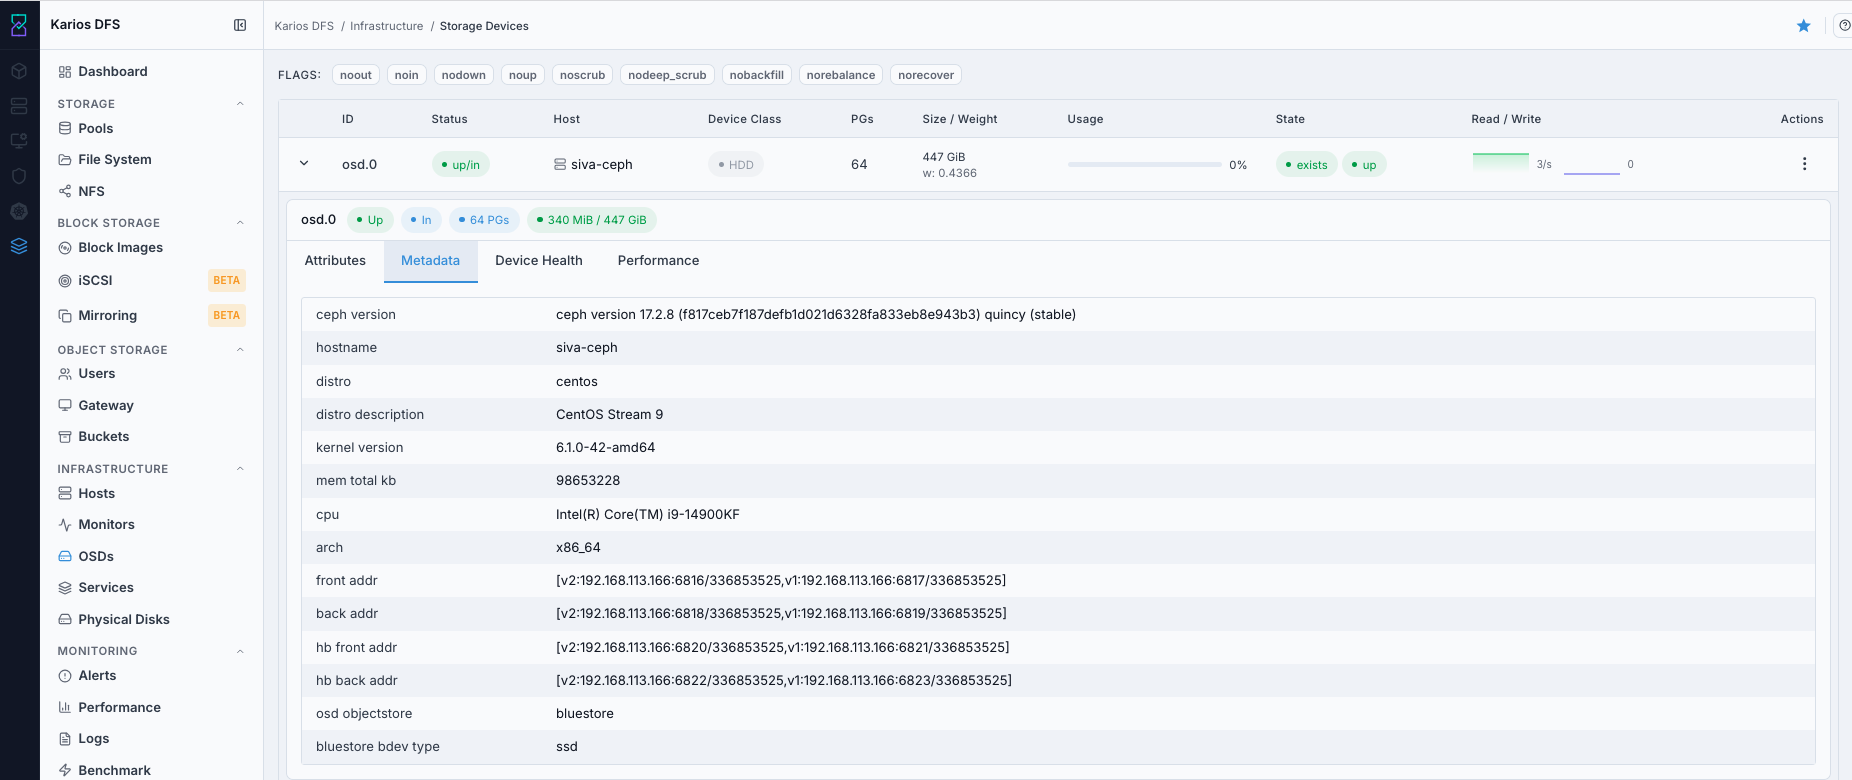
What This Screenshot Shows: OSD Expanded Row - Metadata Tab (UI Reference; Values Depend On Your Environment).
Device Health Tab
SMART data from the underlying disk: power-on hours, reallocated sectors, temperature, and wear-level indicator (NVMe). Failing SMART attributes are highlighted in red.
Steps:
Expand OSD row.
Open
Device Healthtab.Verify
Health = PASSED.Review power-on hours, temperature, reallocated sectors, and wear indicators.
Warning
If health is not PASSED or temperature is abnormally high, mark OSD out and plan disk replacement immediately.
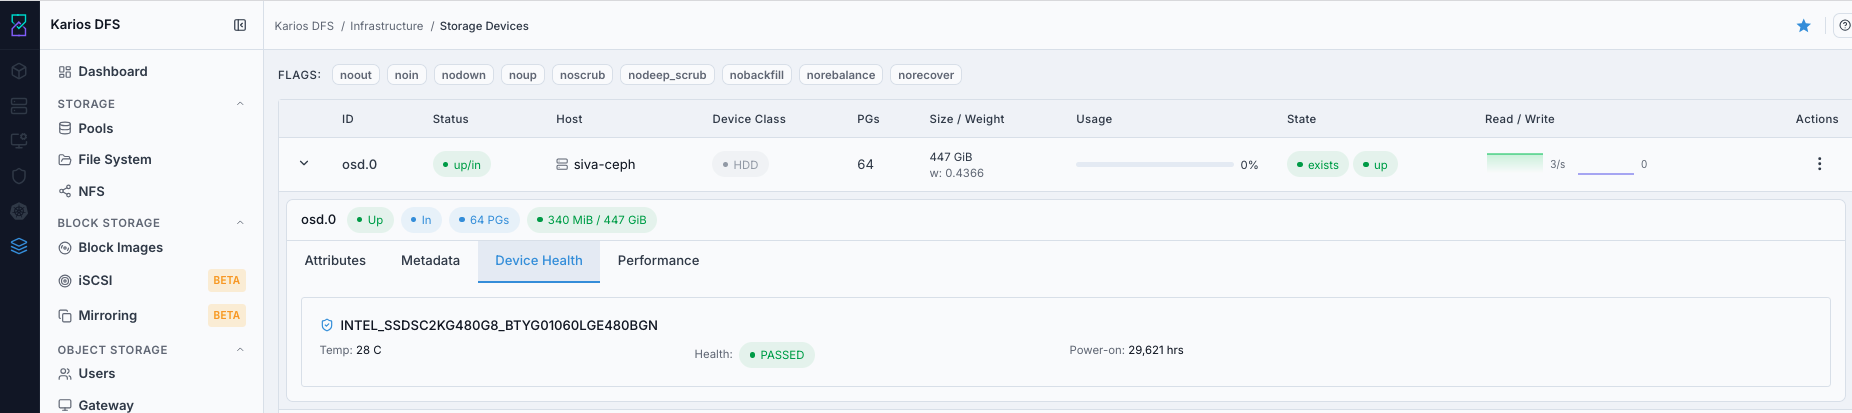
What This Screenshot Shows: OSD Expanded Row - Device Health Tab (UI Reference; Values Depend On Your Environment).
Performance Tab
In this UI, the Performance tab shows live per-OSD stat cards:
Read Ops
Write Ops
Read Bytes
Write Bytes
Some deployments can additionally show detailed latency/throughput charts.
Steps:
Expand OSD row.
Open
Performancetab.Compare Ops/Bytes activity against expected load.
If an OSD is overloaded or idle unexpectedly, inspect weight/reweight.
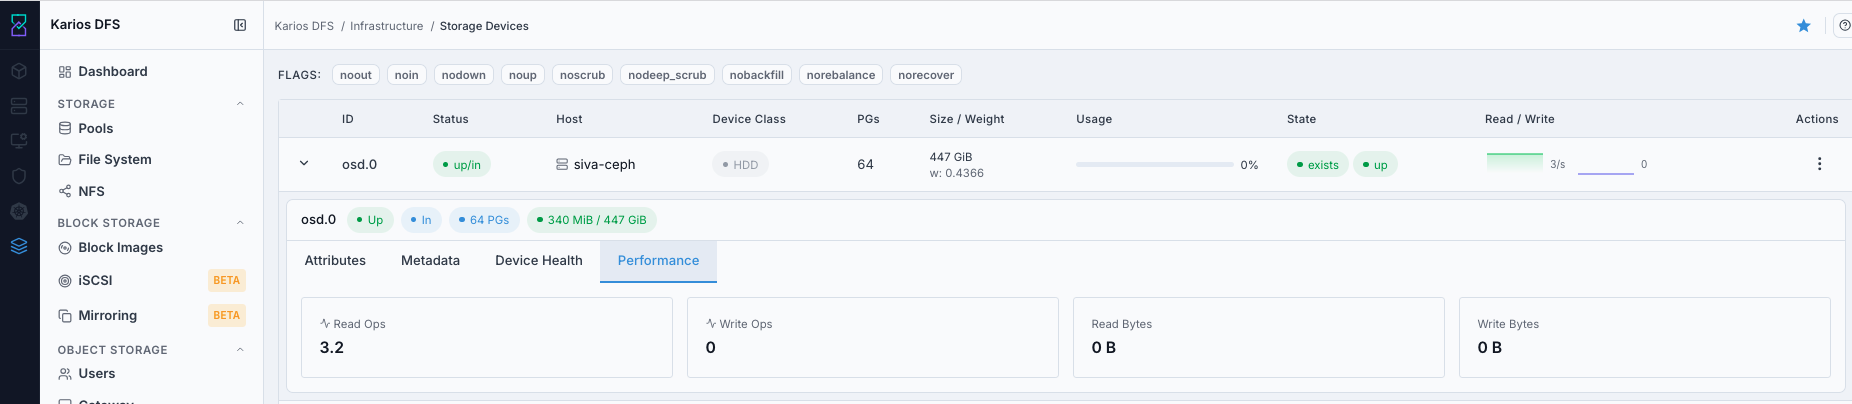
What This Screenshot Shows: OSD Expanded Row - Performance Tab (UI Reference; Values Depend On Your Environment).
Troubleshooting - OSDs
Problem You See |
Most Likely Cause |
What To Do |
|---|---|---|
OSD shows down/in |
Daemon stopped or disk issue |
Check Device Health, host daemon state, and cluster alerts |
OSD shows down/out |
Auto-out after prolonged downtime |
Restore/replace disk and mark in after daemon recovery |
High usage on one OSD |
Uneven distribution or undersized device |
Reweight or add OSDs to distribute data |
HEALTH_WARN about noout |
noout flag left set after maintenance |
Clear noout in FLAGS row |
Deep Scrub takes long |
Large disk or high cluster load |
Allow completion and schedule future scrubs off-peak |
OSD is unexpectedly up + out |
OSD was manually marked out or auto-out policy applied |
Verify reason, then use |
Client I/O appears halted cluster-wide |
|
Clear |
OSD cannot be deleted |
PGs still assigned |
Mark out and wait for migration, then purge/delete |
Delete action is unavailable or fails |
OSD still has dependencies or state is not ready for removal |
Complete mark-out/purge/destroy flow first, then retry deletion |
Note
If any issue persists, raise a support ticket via Monitoring > Alerts or
Karios Support.