Pools
Path: Left sidebar > Storage > Pools
When to Use:
Before creating file systems, block images, or object workloads.
When you need to create, validate, edit, or safely delete a pool.
Purpose:
This page explains the end-to-end pool workflow, including first-pool creation, validation, tuning, and retirement.
Steps:
Open
Storage > Pools.Review existing pool health and PG state.
Use
+ Create Poolor the row actions for the target pool.Validate the pool tabs before attaching workloads to it.
Expected Outcome:
You can create or modify a pool and confirm it is healthy enough for dependent DFS features.
What You See:
Pool list rows, grid/list toggles, create and row actions, and expanded tabs for details, performance, and configuration.
What This Screenshot Shows:
The screenshots on this page show the main Pools landing page, the create-pool workflow, and the expanded validation tabs.
Actions in This Screen:
Create a pool.
Expand a pool row to validate health and configuration.
Edit or delete a pool from the row actions.
If this fails:
Return to Dashboard and confirm the cluster is healthy enough for pool changes.
Stop if PGs remain non-clean or raw capacity is already too high.
Resolve application-tag or placement issues before retrying the action.
A pool is the base storage unit in Karios DFS. You must have a ready pool before using File System, Block Images, or Object Storage buckets.
If you are new to DFS storage, this page gives you the exact sequence to create, validate, edit, and safely delete pools.
What a Pool Controls
A pool defines:
how many copies of data are kept (replica behavior)
where data is placed (CRUSH/failure-domain behavior)
capacity policy (optional quotas)
workload intent (application tag)
Pool Type Quick Choice
Pool Type |
How It Works |
Best For |
|---|---|---|
Replicated |
Stores N full copies across different disks/nodes. |
Most workloads. Use this when unsure. |
Erasure Coded |
Splits data into chunks + parity. |
Capacity-optimized large sequential workloads. |
Tip
Recommended default for new users: Replicated with Replica Size = 3.
You can use a different value if your environment policy requires it.
Follow 2.2.1 Erasure Coded Pool Creation Path when your workload requires
Type = Erasure Coded.
Before You Create Any Pool
Run this checklist first from Dashboard:
Cluster status is
OK(or non-blockingWARN).OSD values show matching
upandincounts.Monitor quorum is healthy.
Raw capacity is below 80% used.
If any check fails, resolve infrastructure health first.
Page Orientation (What You See)
On Storage > Pools page:
Top-right:
+ Create PoolbuttonNext to it: grid/list view toggle icons
Table columns:
Name,Data Protection,Applications,PGs,PG Status,Usage,Read/Write,ActionsPer-row actions (
⋮):Edit PoolandDelete PoolPer-row chevron (
>): expands tabsDetails,Performance,Configuration
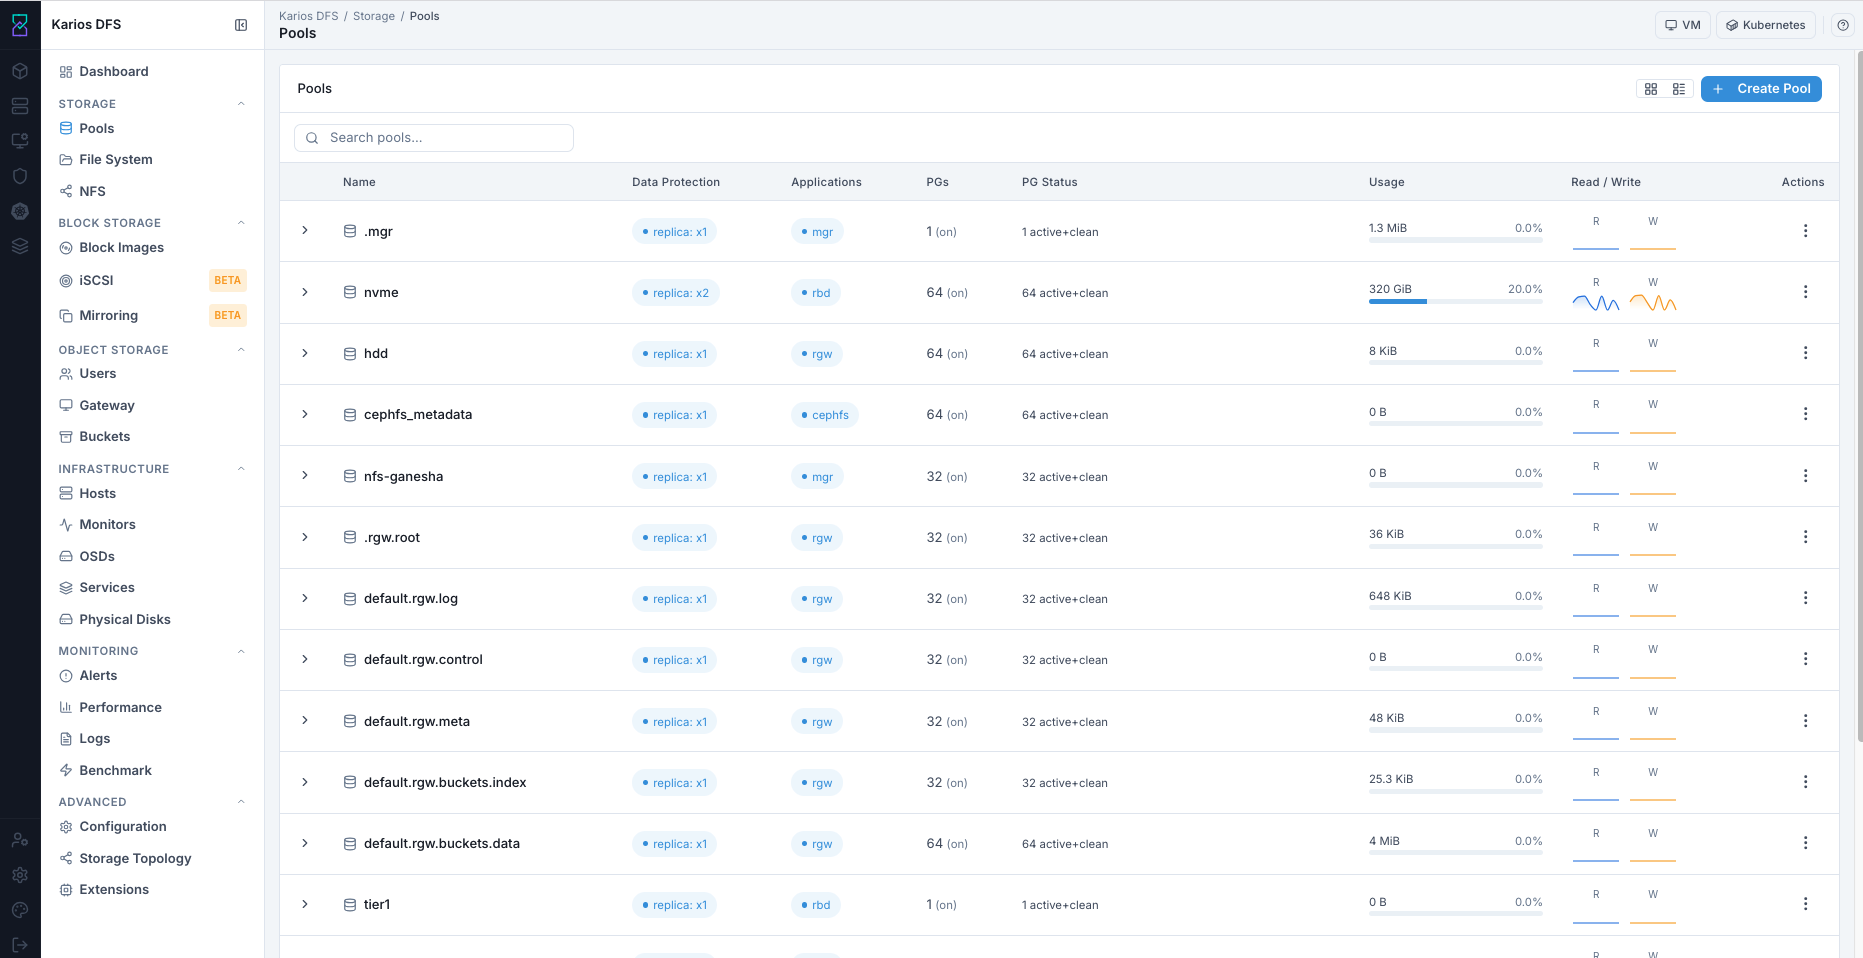
Storage > Pools landing page (reference example values from a sample workspace).
Pool Actions - Why, Impact, And When To Act
Action |
Why User Does This |
Impact |
When To Do It |
|---|---|---|---|
Create Pool |
Creates a dedicated storage target for a workload. |
Adds a new placement domain with its own protection and quota policy. |
Do this before creating file system, block image, or object workload data. |
Expand Row And Validate Tabs |
Confirms the pool is healthy and correctly configured. |
Prevents attaching workloads to a misconfigured or non-clean pool. |
Do this immediately after create, after edits, and during alerts. |
Edit Pool |
Aligns protection, quota, or compression settings to workload changes. |
Can trigger temporary rebalancing and short non-clean PG transitions. |
Do this when workload policy changes or capacity/protection alerts appear. |
Delete Pool |
Retires unused storage and returns capacity to cluster. |
Permanently destroys all objects in that pool. |
Do this only after all dependencies are removed and backups are confirmed. |
Create Your First Pool (New-User Runbook)
Recommended Starter Profile
Use this as a reference profile for a safe first pool. Replace values with your environment and workload requirements.
Field |
Recommended Value |
Why |
|---|---|---|
Type |
|
Broad compatibility and predictable behavior. |
Application |
|
Enables correct workload behavior/optimization. |
Replica Size |
|
Production-safe default resilience. |
Min Size |
|
Allows writes with one replica temporarily unavailable. |
PG Autoscale |
|
Lets cluster adjust PGs over time. |
Compression |
|
Avoids surprise CPU overhead until workload is known. |
Step-by-Step Create Flow
Open
Storage > Pools.Click
+ Create Pool.In Pool Name, enter your environment-specific name using lowercase + hyphen style (example only:
cephfs-data-01).In Type, select the option that matches your workload policy.
Replicatedis the recommended first-run option.In Application, select one of:
cephfsFor File System Metadata/Data WorkloadsrbdFor Block Image WorkloadsrgwFor Object Gateway Workloads
Set Replica Size based on your resilience requirement. If unsure, use
3as the recommended starting value.Set Min Size based on your write-availability policy. Common starting value is
2when replica size is3.Keep PG Count at the system default unless platform guidance says otherwise.
Set PG Autoscale per policy. Recommended setting is
On.Keep Crush Rule at environment default unless architecture requires custom rule.
Set Compression Mode based on workload profile.
Noneis a safe first-run choice.Set Quotas only if you need hard limits now. Leave empty for no limit.
Review your values, then click Create Pool.

What This Screenshot Shows: Create Pool panel in a reference environment.
Important
Do not leave Application as None. Untagged pools trigger a
WARN health state and make intent unclear for future operations.
Erasure Coded Pool Creation Path
Use this path when Type = Erasure Coded.
Prerequisite:
At least one EC profile exists in Advanced > Storage Topology.
Steps:
Open
Storage > Poolsand click+ Create Pool.Set
TypetoErasure Coded.Select the required EC profile.
Set
Applicationfor intended workload (for examplergwor environment-specific policy value).Review values and click
Create Pool.Monitor
PG Statusuntil pool reachesactive+clean.
Expected outcome:
Pool row appears with EC data protection profile and reaches
active+cleanstate.
If this fails:
Confirm selected EC profile exists and is valid.
Recheck cluster health and OSD availability.
Retry creation after resolving profile or health errors.
What You Should See After Create
Immediately after submit:
Pool Row Appears In The Table
PG Statuscan show transitional states briefly
Normal convergence path:
Transitional/Initial State ->
active+clean
Target readiness:
Pool Reaches
active+cleanWithin About 1-2 Minutes
If not ready in 5+ minutes:
Check
Infrastructure > OSDsCheck
Monitoring > Alerts
First-Pool Pass/Fail Check
Pass:
Row Is Visible
Application Tag Is Correct
PG Statusisactive+cleanNo New Critical Alert Appears
Fail:
Pool Row Absent After Create
Wrong Application Tag
PG Statusstuck non-clean > 5 minutesCluster Moves To Blocking Error State
View and Interpret Pool Details
Expand Pool Row
Click the row chevron
>on the target pool.Confirm the row expands into a detail panel directly under that pool.
Use the expanded header chips (for example
<PG Count> PGs,<Object Count> objects, and<Used Capacity> used) for a quick health summary. The numbers shown in screenshots are reference examples only.Open tabs:
Details,Performance,Configuration.
Expanded Row Field Guide
Use this table to understand each visible row field before opening tabs.
Field |
What It Indicates |
How A New User Should Use It |
|---|---|---|
|
Pool identifier used by dependent services |
Verify this matches your intended workload name. |
|
Replica/EC profile (for example |
Confirm protection level before storing production data. |
|
Pool application tag ( |
Ensure tag matches the workload type you plan to run. |
|
Placement Group count for the pool |
Use as a capacity/placement indicator; keep autoscale enabled unless directed otherwise. |
|
Current placement/health state |
Target state is |
|
Space consumed by objects in the pool |
Confirm usage trend aligns with expected data growth. |
|
Current IO activity signal |
Use for quick confirmation that workload IO is reaching the pool. |
|
Row action menu |
Use for edit/delete operations only after validation checks. |
Expanded Tabs Guide
Details: Validate Identity, Protection, Application, And Capacity Fields.Performance: Validate Throughput/IOPS Signals During Active Workloads.Configuration: Review Internal Parameters; Modify Only With Platform Guidance.

Pool Details tab.
Details Tab (What to Validate)
Check these values first:
Pool Name Matches Intended Workload
Type And Replica Settings Are Correct
Application Tag Is Correct
Usage Is Reasonable For Expected Stage
Performance Tab (What to Validate)
Use as quick health/traffic signal:
Read/Write Throughput Present When Workload Is Active
IOPS/Throughput Not Pinned At Abnormal Zero During Known Traffic
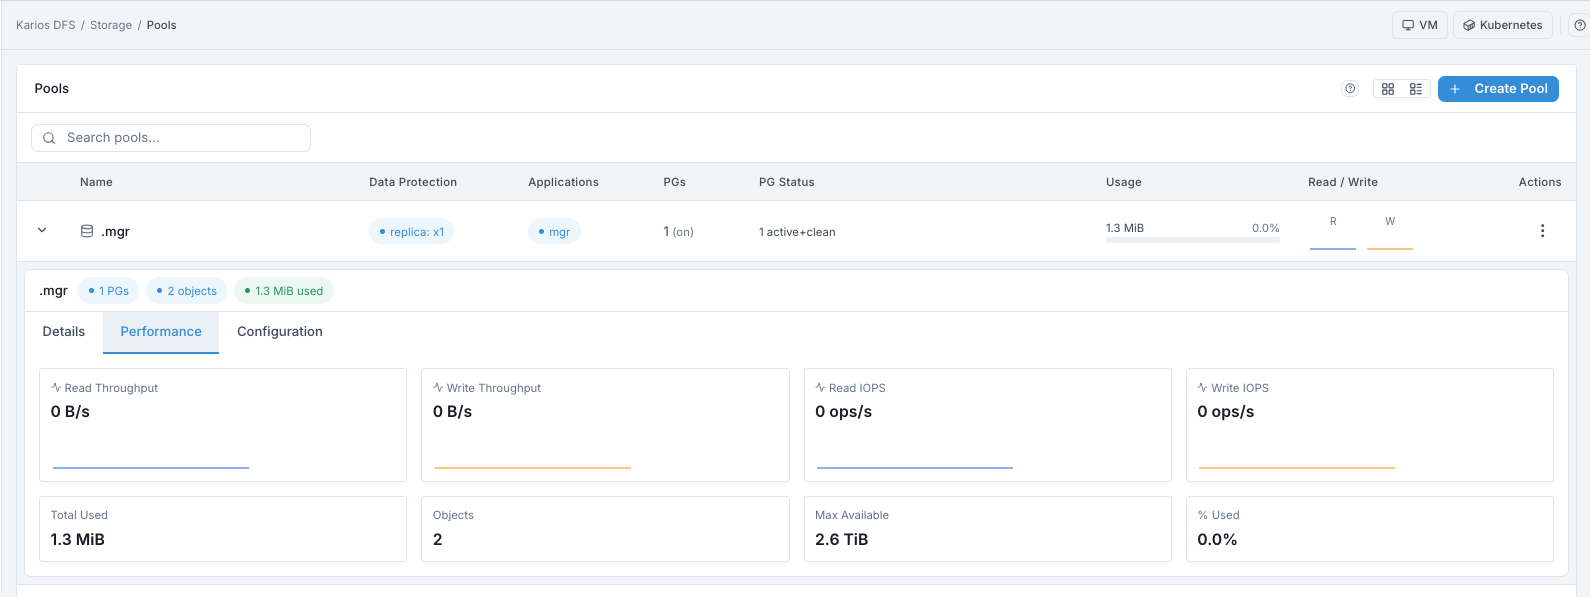
Pool Performance tab.
Configuration Tab (What to Validate)
Use this tab to validate internal pool properties before and after edits. For new users, treat this as a verification screen, not a tuning screen.
Configuration Validation Checklist
Confirm the table loads with
Property,Value, andSourcecolumns.Confirm there are no unexpected empty values for core properties.
Confirm Any Value You Changed In Edit Flow Is Reflected Correctly Here.
Confirm there are no unplanned overrides introduced since last known-good state.
Confirm post-change pool health still returns to
active+cleanin the row header.
How to Read the Columns
Property: Internal Configuration Key Name.Value: Effective Runtime Value Currently Applied.Source: Where The Effective Value Came From In Config Precedence.
What To Do If Something Looks Wrong
Do not apply more changes immediately.
Capture the property name and current value.
Compare with your last planned change set.
Re-check
PG StatusandMonitoring > Alerts.Escalate to platform administrator before further tuning.
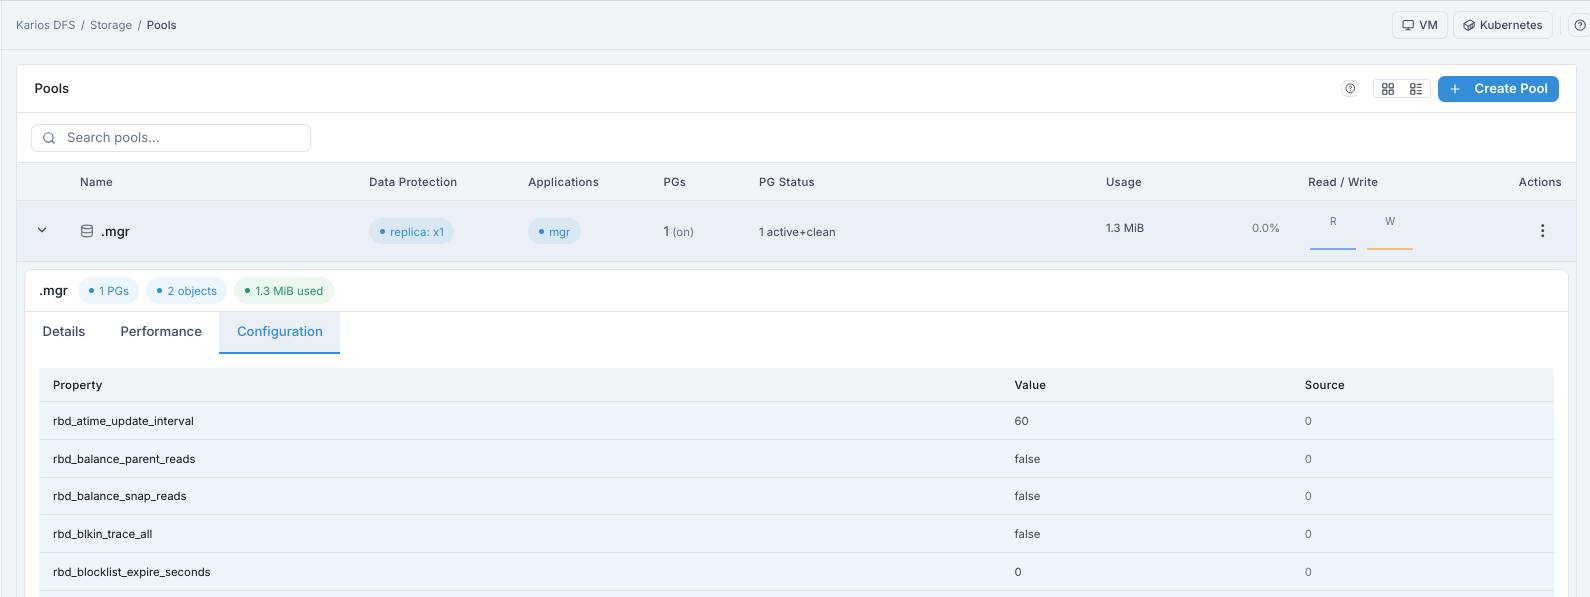
Pool Configuration tab.
Edit Pool Safely
How to Open Edit
In pool row, click
⋮underActions.Select
Edit Pool.
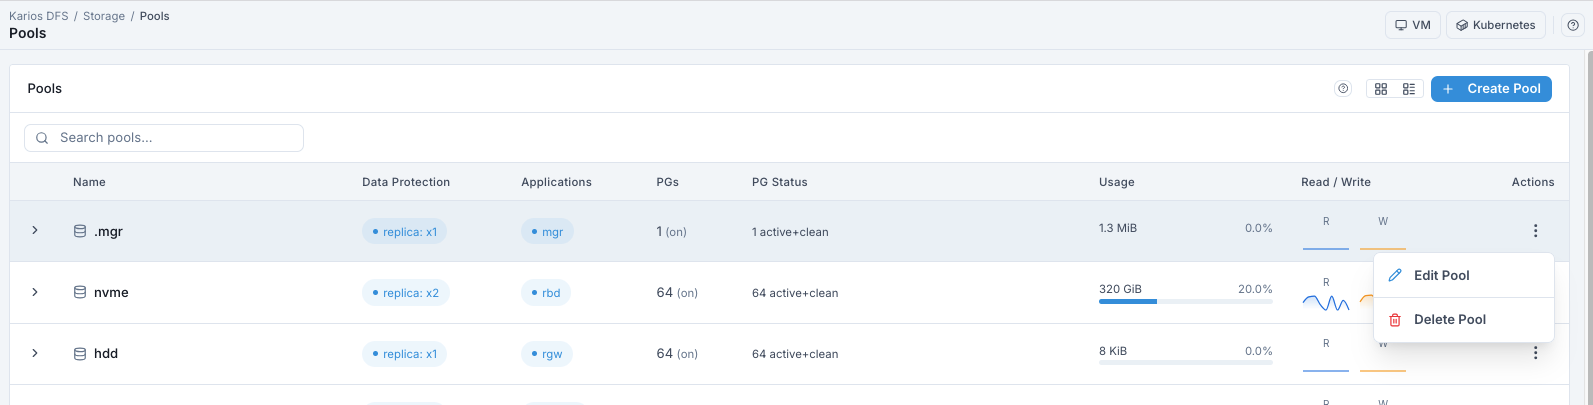
Pool row actions menu.
Safe vs High-Impact Changes
safe (with normal caution):
Name updates
Quota values
Compression mode updates
Higher impact (plan maintenance window):
Replica/min size changes (can trigger rebalance/recovery)
Autoscale behavior changes at scale
Expected behavior after save:
Change Is Applied Quickly
Short Temporary PG Activity Changes Can Appear
Pool Should Return To
active+clean
Note
Pool type cannot be changed after creation. To change type, create a new pool and migrate workload data.
Delete Pool (Data-Destructive)
Warning
Deleting a pool permanently destroys all data in that pool.
Dependency Check Before Delete
Before deleting, confirm no active dependencies:
Storage > File System: Pool Is Not Used As Metadata/Data PoolBlock Storage > Block Images: No Image Depends On This PoolObject Storage > Buckets: No Bucket Path Depends On This Pool
Delete Steps
Click row
⋮.Click
Delete Pool.Read dependency warning.
Type exact pool name in confirmation field.
Confirm deletion.
After delete:
Row Is Removed
Raw Capacity Is Returned
Short Temporary
WARNDuring Cleanup Can Be Normal
Grid/List and Search Tips
Use List view for operational checks (status columns visible).
Use Grid view for high-level browsing.
Use search box to quickly locate target pool by name.
Troubleshooting - Pools
Problem |
Most Likely Cause |
What to Do |
|---|---|---|
Pool not visible after create |
Create action failed or permission issue |
Re-check role, retry create, review alerts |
|
OSD/network/placement issue |
Check |
Pool shows |
One or more OSDs unavailable |
Recover down OSDs first |
|
Missing/incorrect application tag |
Edit pool and set correct application |
Pool usage reaches limit |
Quota reached or cluster full |
Adjust quota or add capacity |
Cannot edit/delete |
Insufficient role permission |
Request Operator/Administrator role |
Note
If issue persists after checks, escalate using Monitoring > Alerts and
your support workflow.