Block Storage
Use this page to create, attach, detach, and remove VM block disks.
Block Storage
UI path: Control Center -> Storage -> Block Storage
Purpose
The Volumes Dashboard provides a centralized view of all storage volumes in Control Center. Use it to monitor status, track VM attachments, manage storage, and perform volume operations.
When to Use Block Storage
Use this module when you need to:
A VM needs additional persistent disk capacity.
You are migrating data and must detach an old disk after cutover.
You are decommissioning a workload and need safe disk cleanup.
Overview
Block Storage manages the full lifecycle of VM root and data volumes. Use it to validate state, attachment, storage location, and utilization before lifecycle actions.
Expected Outcome:
You can create, attach, detach, resize, and safely delete volumes with clear state validation.
Completion Criteria
You can create a disk and see it in the dashboard.
You can identify delete/detach actions and when to use each.
You can read utilization/state fields for risk triage.
Volumes Table
The main table displays all storage volumes with the following columns:
Column |
Description |
|---|---|
|
Unique identifier for the volume. Click to view volume details. |
|
Volume type ( |
|
Storage capacity allocated to the volume. |
|
Current state of the volume (for example |
|
Name of the VM this volume is attached to, or |
|
Current state of the attached VM (for example |
|
Storage location or pool where the volume is stored. |
|
Current usage or performance indicator, or |
|
Delete button and row |
Volume States
State badges:
State |
Meaning |
|---|---|
|
Volume is healthy and available for attachment or use. |
|
Volume has been allocated but is not yet attached to a VM. |
|
Volume is pending deletion. |
|
Volume is inaccessible or has connectivity issues. |
VM state context:
VM State |
Meaning |
|---|---|
|
Attached VM is powered on and operating normally. |
|
Attached VM is powered off or not running. |
|
Volume is not currently attached to any VM. |
Volume Types
ROOT
Root (system) volumes contain the operating system and system files.
Characteristics:
one per VM.
Contains OS installation and core system files.
Required for VM operation.
Size varies by OS and deployment profile.
Tips:
ROOT volumes cannot be detached without stopping the VM.
Monitor root volume space to avoid OS-level performance issues.
DATADISK
Data volumes store persistent application data.
Characteristics:
Multiple data disks can be attached to one VM.
Supports persistent application and service data.
Can be detached and reattached to other VMs based on policy/workflow.
Size depends on application requirements.
Tips:
Use multiple data disks where I/O separation is required.
Back up critical data disks regularly.
Quick Actions
Click the trash icon or row Actions menu (⋮) for volume operations:
Action |
Description |
|---|---|
|
Remove the volume. Detached volumes can be deleted immediately; attached volumes require detach workflow first. |
|
Open the volume details page. |
|
Attach an unattached volume to a VM (when available). |
|
Detach an attached volume from its VM (when available). |
|
Create a point-in-time snapshot (when available). |
Filtering and Search
Use browser search (
Ctrl+F/Cmd+F) to find volume names quickly.Filter by storage location or VM name when those controls are available.
Sort using column headers to organize large volume lists.
Volume Management Tips
Volumes with
VM Name=-are unattached and can be attached or deleted.If the
Storagecolumn shows a shared endpoint (for example192.168.115.16), volumes are centralized on that backend.Monitor size and utilization trends for capacity planning.
Use snapshots and backups before destructive lifecycle actions.
For high-performance workloads, validate backend availability and profile fit.
Delete unused volumes to reclaim storage capacity.
If a volume is attached to a running VM, stop or safely quiesce workload before detach/delete operations.
Use extra caution when modifying ROOT volumes to avoid boot failures.
Step: Understand Block Storage Terms and Actions
When to Use:
Use this when performing Understand Block Storage Terms and Actions in the active storage workflow.
Purpose:
Execute Understand Block Storage Terms and Actions and confirm the expected UI/state outcome for this storage resource.
Steps:
Use this map before detach or delete operations:
Control or field |
What it means |
What happens when used |
|---|---|---|
|
Disk provisioning workflow |
Opens create form; after submit, a new volume row is added. |
Link-break icon |
|
Removes VM attachment but keeps disk data and volume record. |
Trash icon |
|
Permanently removes the volume after confirmation. |
|
Volume lifecycle indicator |
Shows whether the disk is ready for attach/use or needs triage. |
|
Consumed capacity signal |
Helps identify volumes that need expansion or cleanup planning. |
Expected Outcome:
Task completes and the related storage view updates as expected.
If this fails:
Verify backend health and available capacity for the target storage resource (pool/store/endpoint and zone scope).
Check blocking dependencies for this action (attachments, snapshots, templates, buckets, object locks, or maintenance state).
Review Observability Events/Alerts for the storage object and retry only after resolving the root cause.
Step: Review Block Storage Dashboard
When to Use:
Use this when performing Review Block Storage Dashboard in the active storage workflow.
Purpose:
Execute Review Block Storage Dashboard and confirm the expected UI/state outcome for this storage resource.
Steps:
Open
Control Center -> Storage -> Block Storage.Review row values for state, VM attachment, and utilization.
Identify disks that are full, detached, or in non-ready states.
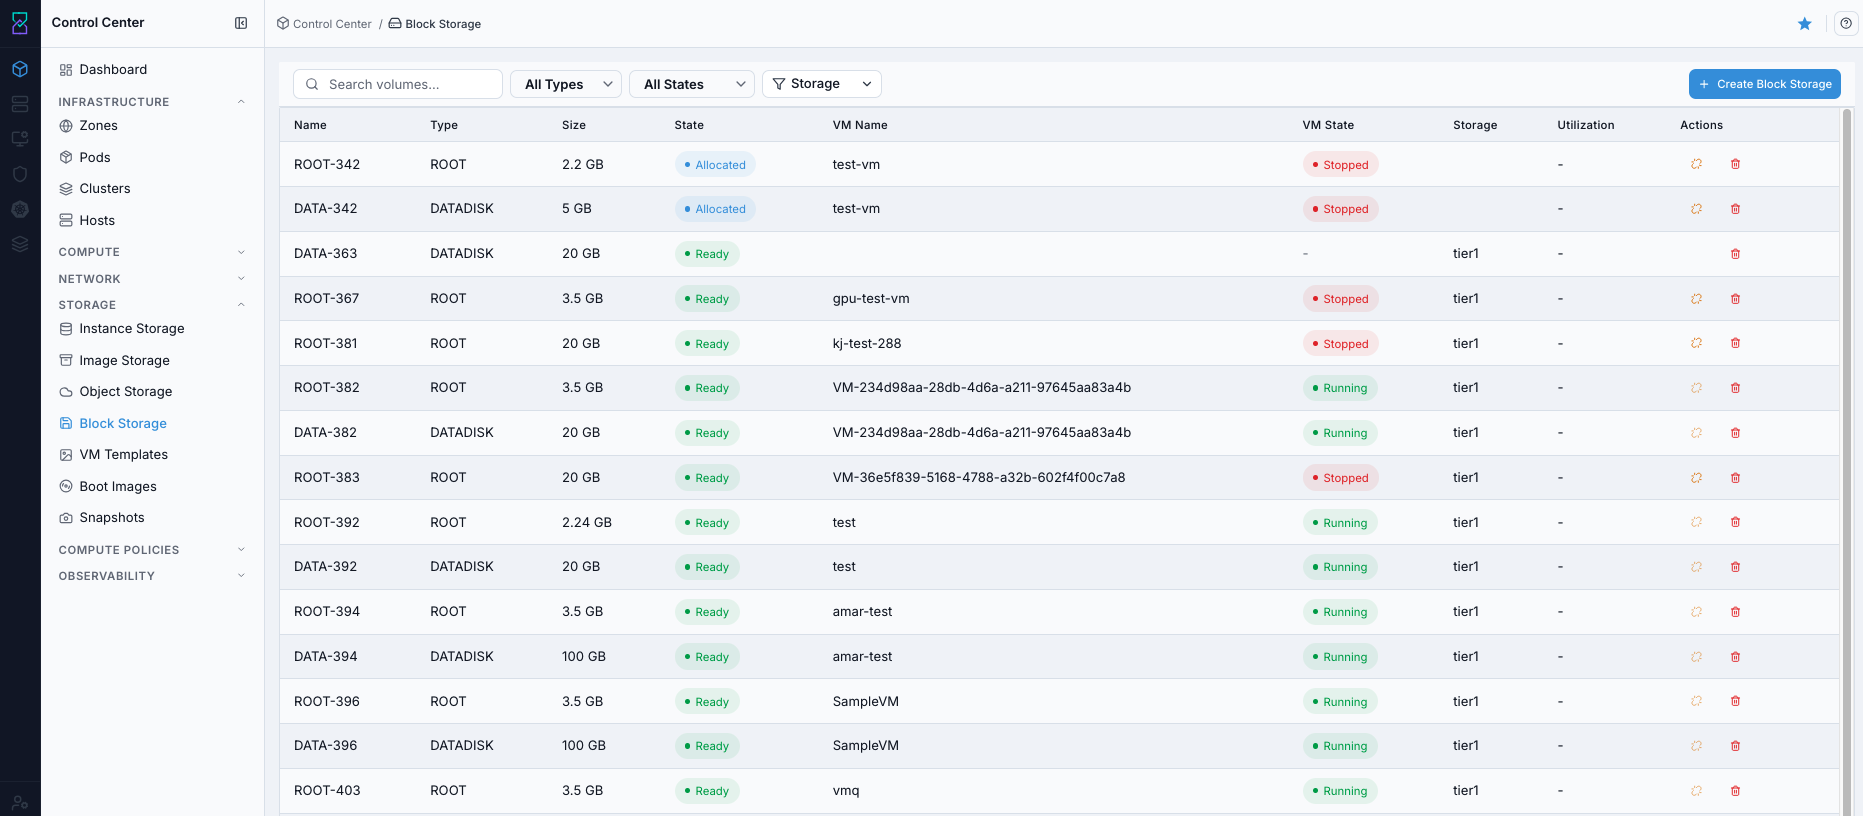
Block Storage dashboard.
Expected Outcome:
You can identify actionable volume rows by state, attachment, and storage context.
If this fails:
Verify backend health and available capacity for the target storage resource (pool/store/endpoint and zone scope).
Check blocking dependencies for this action (attachments, snapshots, templates, buckets, object locks, or maintenance state).
Review Observability Events/Alerts for the storage object and retry only after resolving the root cause.
Step: Open Block Storage Help Panel
When to Use: Use this after opening Block Storage when you need field definitions and control guidance.
Purpose: Open contextual help separately from dashboard review and filtering tasks.
Steps:
Open
Control Center -> Storage -> Block Storage.Click the help icon in the top-right corner.
Review help content for dashboard fields and volume actions.
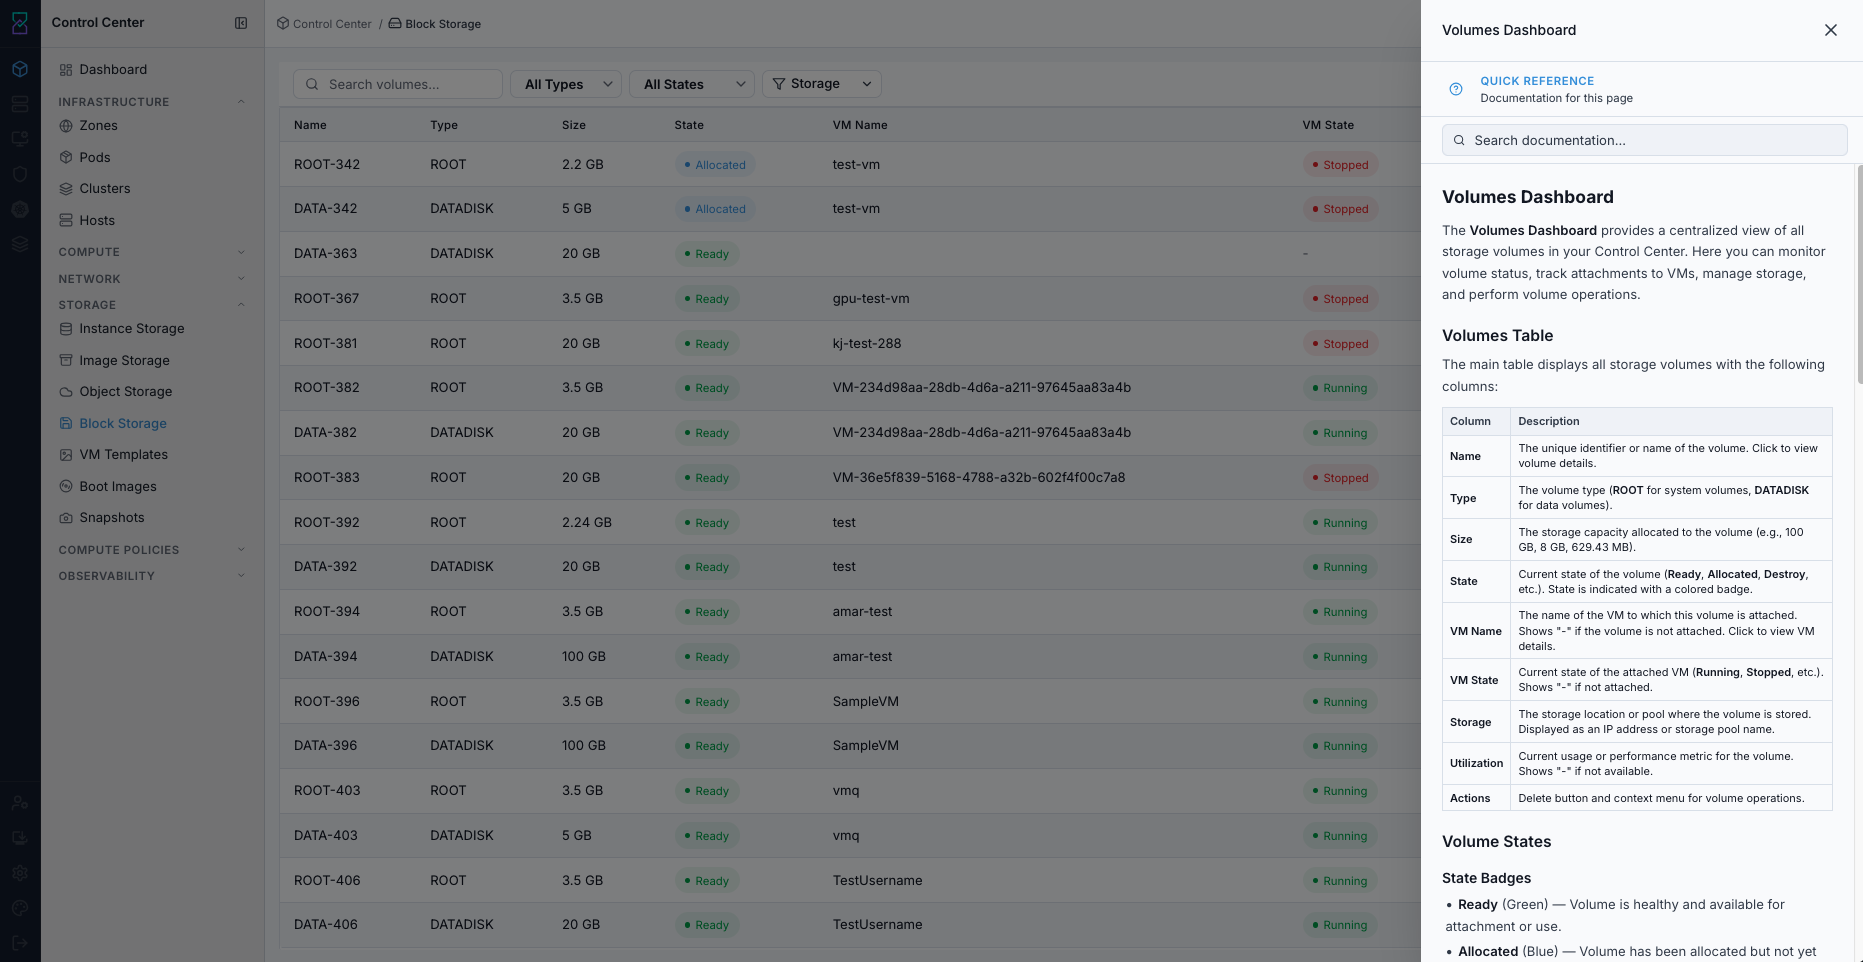
Block Storage help panel.
Expected Outcome:
The Block Storage help panel opens with page-specific guidance.
If this fails:
Verify backend health and available capacity for the target storage resource (pool/store/endpoint and zone scope).
Check blocking dependencies for this action (attachments, snapshots, templates, buckets, object locks, or maintenance state).
Review Observability Events/Alerts for the storage object and retry only after resolving the root cause.
Step: Use Block Storage Filters
When to Use: Use this when you need to narrow Block Storage results to specific disks or states.
Purpose: Reduce the working set to only relevant volume rows before taking actions.
Steps:
Open
Control Center -> Storage -> Block Storage.Use available filter controls to narrow the volume list.
Combine filters with search when needed.
Confirm only the target rows remain visible.

Block Storage dashboard filters.
Expected Outcome:
The table updates to show only rows matching filter/search criteria.
If this fails:
Verify backend health and available capacity for the target storage resource (pool/store/endpoint and zone scope).
Check blocking dependencies for this action (attachments, snapshots, templates, buckets, object locks, or maintenance state).
Review Observability Events/Alerts for the storage object and retry only after resolving the root cause.
Step: Create and Attach Disk
When to Use:
Use this when performing Create and Attach Disk in the active storage workflow.
Purpose:
Execute Create and Attach Disk and confirm the expected UI/state outcome for this storage resource.
Steps:
Click
+ Create Volume.Fill required fields:
Name
Zone
Volume Profile
Optional: select
Virtual Machineto attach during creation.Click
Create.Verify the new disk row appears.
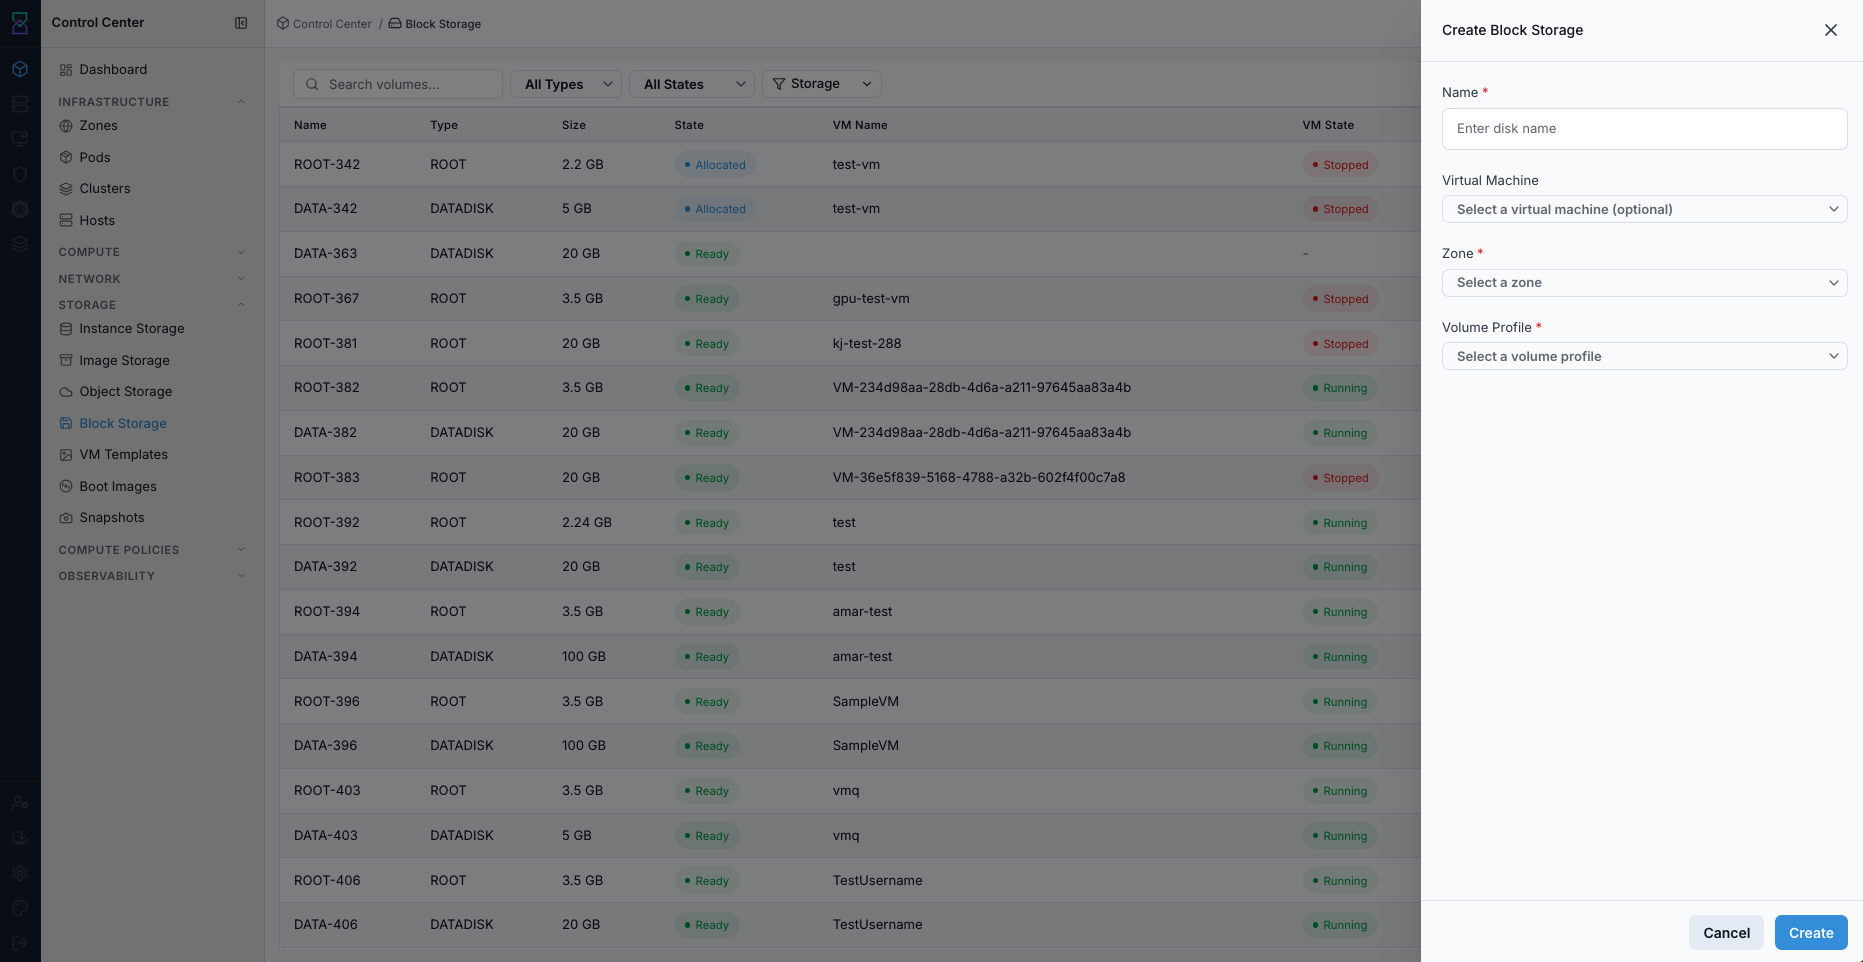
Create and Attach Disk form.
Expected Outcome:
New volume row appears with selected size/profile context.
If VM was selected, the disk is attached to that VM.
If this fails:
Verify backend health and available capacity for the target storage resource (pool/store/endpoint and zone scope).
Check blocking dependencies for this action (attachments, snapshots, templates, buckets, object locks, or maintenance state).
Review Observability Events/Alerts for the storage object and retry only after resolving the root cause.
Step: Review Block Volume Details
When to Use:
Use this when performing Review Block Volume Details in the active storage workflow.
Purpose:
Execute Review Block Volume Details and confirm the expected UI/state outcome for this storage resource.
Steps:
Click a volume name from the Block Storage dashboard.
Review
Basic InformationandAssociated Virtual Machineto confirm the disk is linked to the expected workload.Validate
Size & CapacityandInfrastructurevalues (zone, pool, hypervisor, utilization).Use this details view before deciding to detach, delete, or resize.
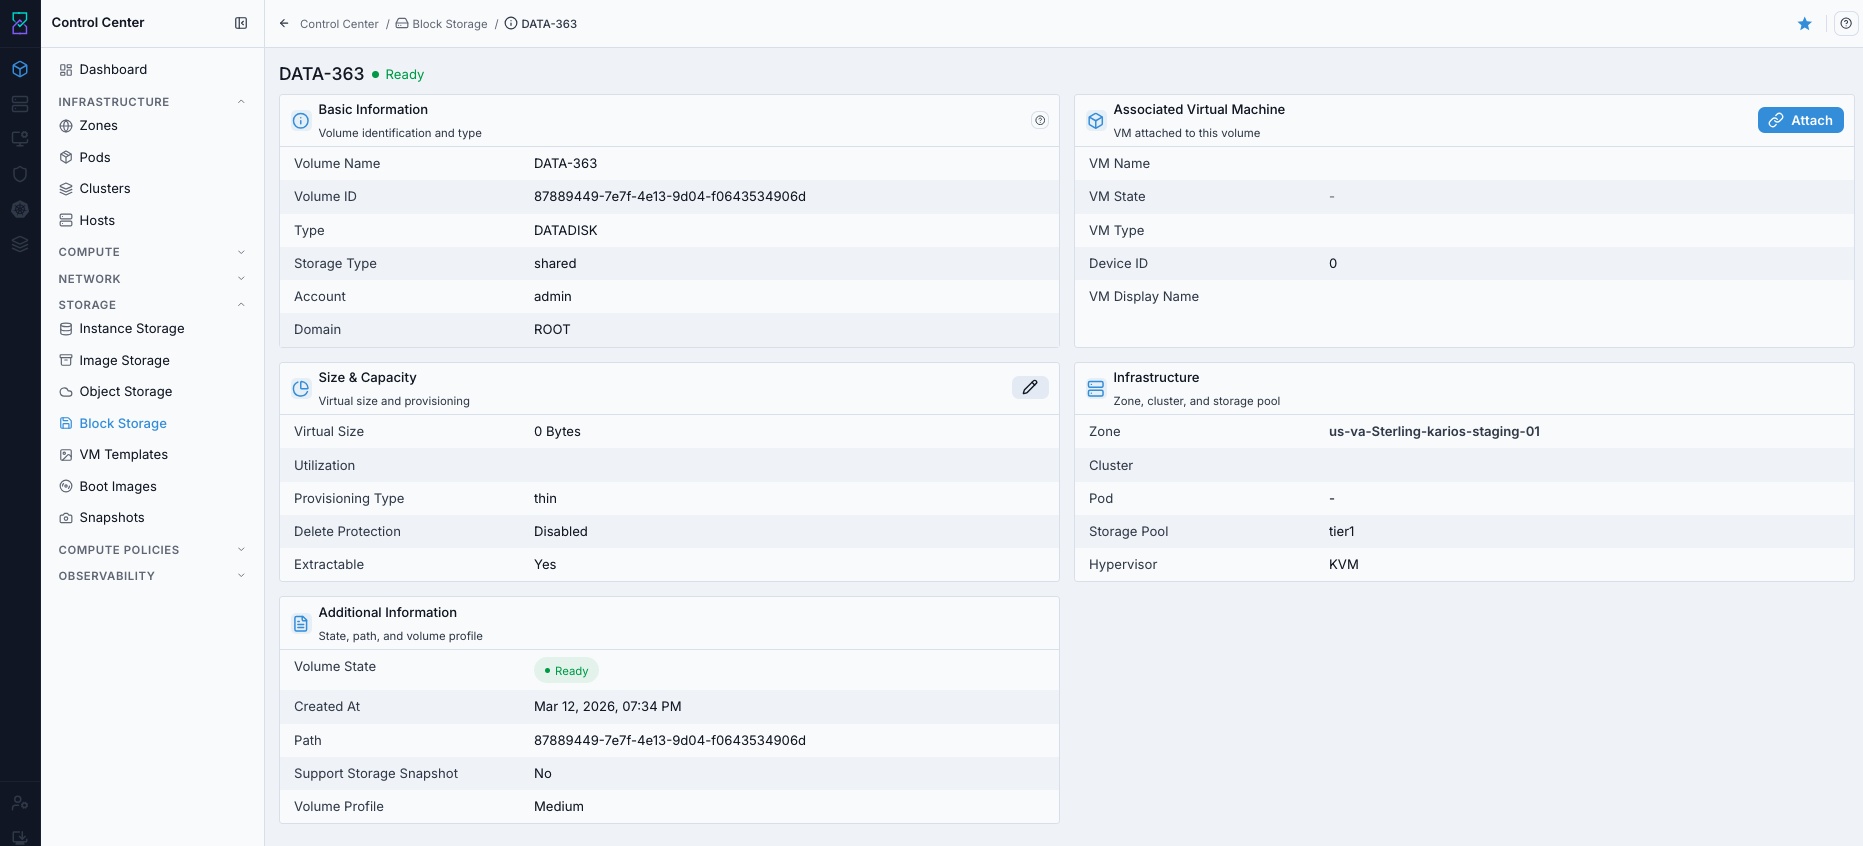
Block volume details page.
Expected Outcome:
You can confirm ownership, location, and current health of the selected volume before any lifecycle action.
If this fails:
Verify backend health and available capacity for the target storage resource (pool/store/endpoint and zone scope).
Check blocking dependencies for this action (attachments, snapshots, templates, buckets, object locks, or maintenance state).
Review Observability Events/Alerts for the storage object and retry only after resolving the root cause.
Step: Attach Existing Volume (When Available)
When to Use:
Use this when performing Attach Existing Volume (When Available) in the active storage workflow.
Purpose:
Execute Attach Existing Volume (When Available) and confirm the expected UI/state outcome for this storage resource.
Steps:
In the Block Storage dashboard, locate an unattached volume (
VM Name=-).Open row actions and select
Attach.Select target VM and confirm the attach action.
Verify
VM NameandVM Statecolumns update correctly.
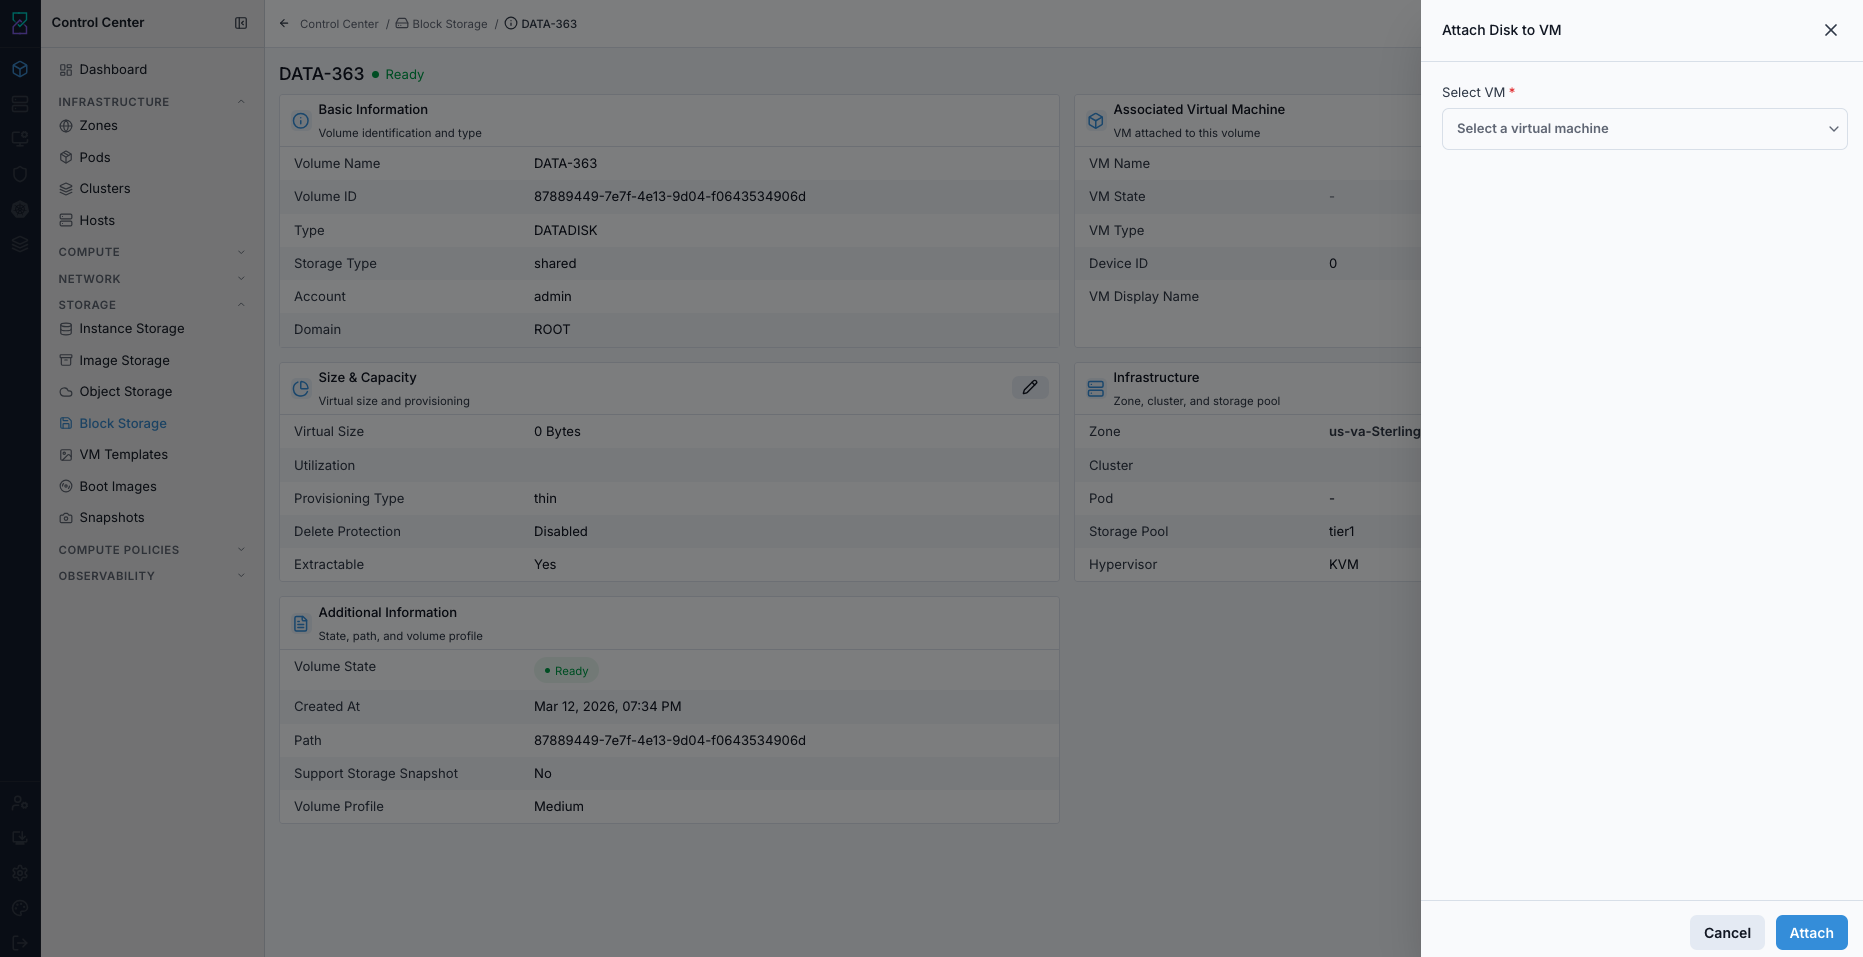
Attach disk to VM action in block storage details.
Expected Outcome:
Volume is attached to the selected VM and appears in the VM storage context.
Tip
Attach is in the same row Actions column shown in the Block Storage dashboard screenshot above.
Note
If Attach is not shown in your UI, use the VM disk management workflow instead.
If this fails:
Verify backend health and available capacity for the target storage resource (pool/store/endpoint and zone scope).
Check blocking dependencies for this action (attachments, snapshots, templates, buckets, object locks, or maintenance state).
Review Observability Events/Alerts for the storage object and retry only after resolving the root cause.
Step: Create Volume Snapshot (When Available)
When to Use:
Use this when performing Create Volume Snapshot (When Available) in the active storage workflow.
Purpose:
Execute Create Volume Snapshot (When Available) and confirm the expected UI/state outcome for this storage resource.
Steps:
Locate the target volume row in Block Storage.
Open row actions and select
Snapshot.Provide snapshot name/details if prompted and confirm.
Validate the new entry in Snapshots.
Expected Outcome:
Snapshot record is created for the selected volume and appears in snapshot inventory.
Tip
Snapshot is in the same row Actions column used for detach/delete operations.
Note
If Snapshot is not available in the row actions, use VM snapshot workflow from Virtual Machines.
If this fails:
Verify backend health and available capacity for the target storage resource (pool/store/endpoint and zone scope).
Check blocking dependencies for this action (attachments, snapshots, templates, buckets, object locks, or maintenance state).
Review Observability Events/Alerts for the storage object and retry only after resolving the root cause.
Step: Delete or Detach Disk
When to Use:
Use this when performing Delete or Detach Disk in the active storage workflow.
Purpose:
Execute Delete or Detach Disk and confirm the expected UI/state outcome for this storage resource.
Steps:
In the dashboard
Actionscolumn, locate the target disk row.Choose action by intent:
Use detach when the disk can be reused, investigated, or reattached later.
Use delete only when data is no longer required and recovery coverage is confirmed.
Use the link-break icon for detach (if shown) or trash icon for delete.
If deleting, complete Pre-Delete Safety Checklist (Use Before Any Delete) before confirmation.
Confirm the action and verify row state updates.
If the wrong action was taken, reattach the disk immediately (for detach) or start snapshot/backup restore (for delete).
Expected Outcome:
Detach preserves disk data for reuse; delete removes the disk record after confirmation.
If this fails:
Verify backend health and available capacity for the target storage resource (pool/store/endpoint and zone scope).
Check blocking dependencies for this action (attachments, snapshots, templates, buckets, object locks, or maintenance state).
Review Observability Events/Alerts for the storage object and retry only after resolving the root cause.
Step: Update Disk Size (When Available)
When to Use:
Use this when performing Update Disk Size (When Available) in the active storage workflow.
Purpose:
Execute Update Disk Size (When Available) and confirm the expected UI/state outcome for this storage resource.
Steps:
Open the target volume details.
Select disk-size update action where available.
Enter the new size and confirm.
Verify updated size in volume details/dashboard.
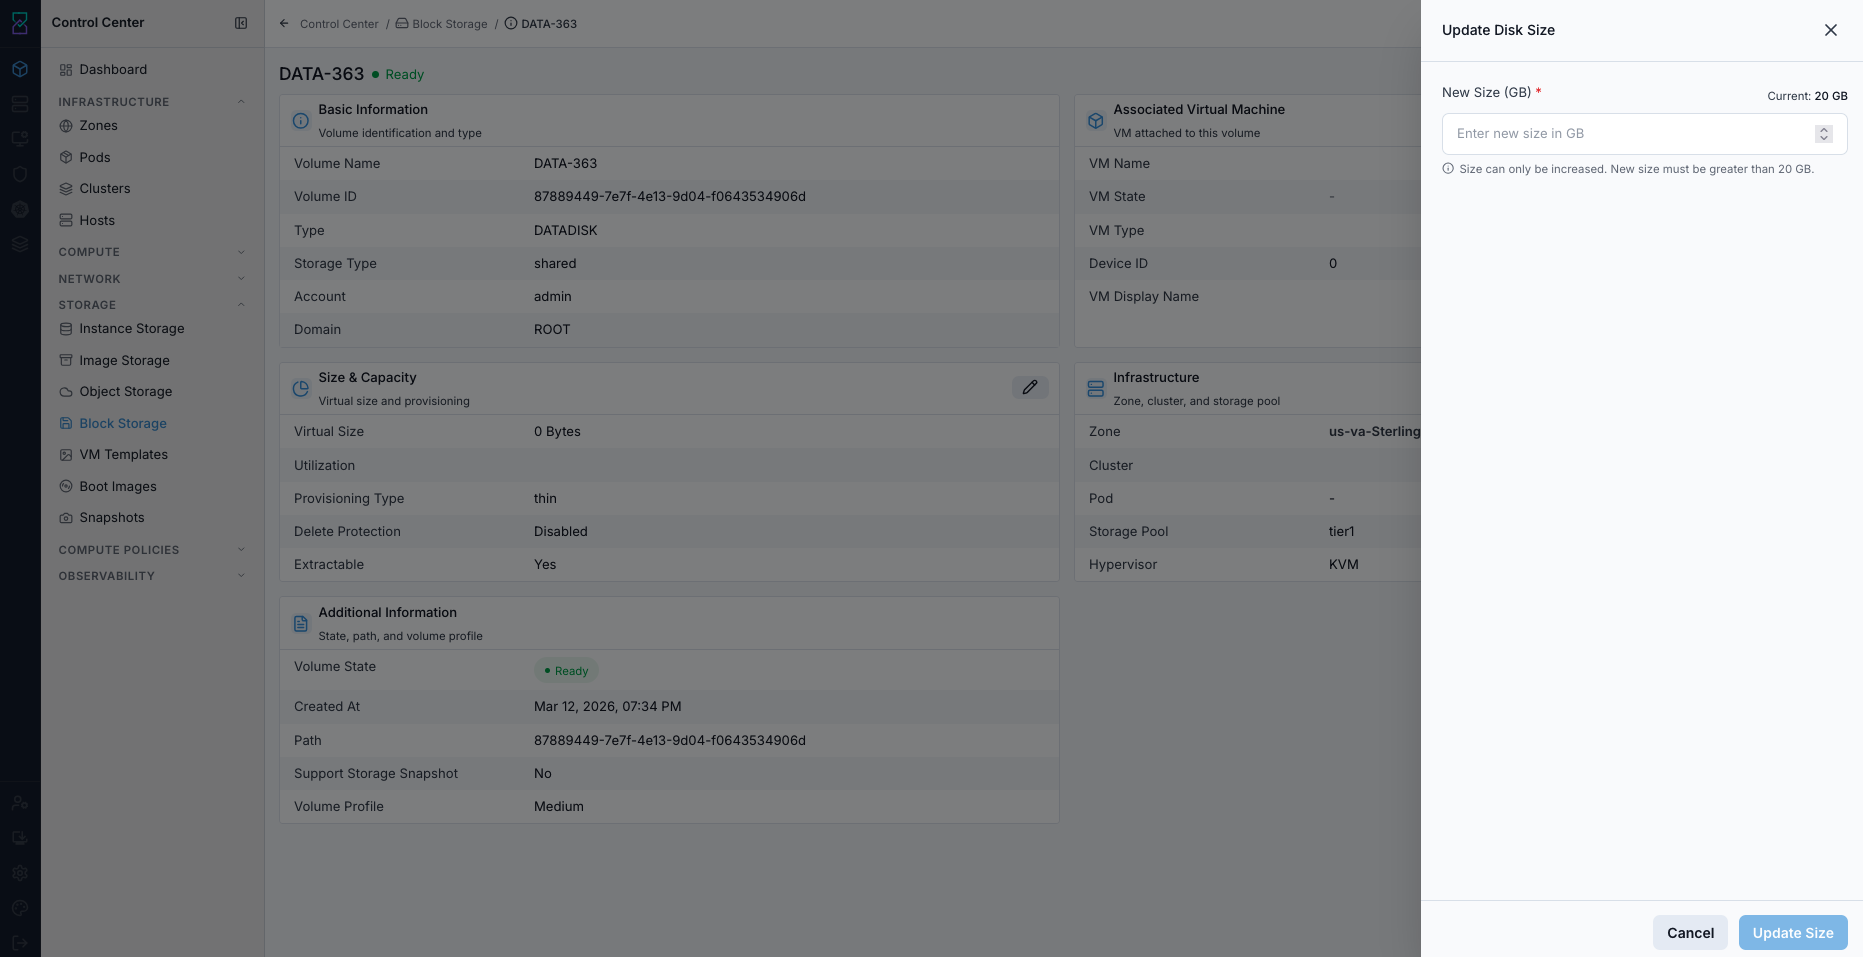
Update disk size action in block storage details.
Expected Outcome:
Volume size reflects the updated value after successful resize workflow.
If this fails:
Verify backend health and available capacity for the target storage resource (pool/store/endpoint and zone scope).
Check blocking dependencies for this action (attachments, snapshots, templates, buckets, object locks, or maintenance state).
Review Observability Events/Alerts for the storage object and retry only after resolving the root cause.
Tool Tips
Use naming that identifies VM or service ownership.
Filter by
Statebefore cleanup actions.
Warnings
Never delete disks attached to active workloads unless data has been migrated.
Verify backups/snapshots before destructive disk operations.
If this fails:
If volume create fails, validate zone capacity and volume profile availability.
If detach/delete is blocked, stop workload safely and retry.
If utilization is high, plan expansion and run in-guest filesystem checks.