Storage Management
Storage Overview
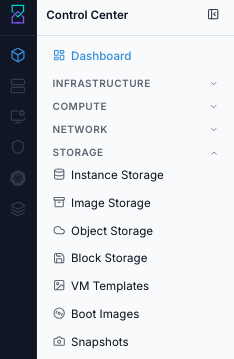
The Storage sidebar contains seven modules:
Instance Storage
Image Storage
Object Storage
Block Storage
VM Templates
Boot Images
Snapshots
Common screen checks
Use these checks when a Storage page, sidebar module, or dashboard view does not load as expected:
Confirm you are in the correct site/environment context.
Verify your role exposes the required Storage module.
Re-open the target module only after the sidebar and page shell finish loading.
Step: Review Storage Navigation
When to Use: Use this first when orienting new users to the Storage section.
Purpose: Confirm the available Storage modules before starting module-level workflows.
Steps:
Open the Control Center left sidebar.
Expand
Storage.Verify all seven modules are visible in the expected order.
Storage navigation panel showing all seven Storage modules.
Expected Outcome:
You can identify the correct Storage module for the task you need to perform next.
If this fails:
See Common screen checks before retrying this view.
Section Objective
This section helps a new user understand and execute end-to-end storage onboarding in Karios:
where runtime VM disks live (Instance + Block Storage)
where VM template/boot image/snapshot artifacts live (Image Storage)
how object endpoints and buckets are integrated (Object Storage)
how VM template/boot image catalogs are prepared for VM deployment
how snapshot health is monitored for data protection
Section Outcome
By the end of this section, you should be able to create required storage resources, validate they are usable, and detect failures early.
Section Completion Criteria
At least one healthy instance storage pool is available.
At least one healthy image store is reachable and browsable.
Object storage endpoint and bucket operations are validated.
Block storage create/attach and safe delete/detach actions are understood.
Required VM templates and boot images are in usable state.
Snapshot dashboard is reviewed and error rows are triaged.
Storage Decision Guide (When, Why, and What It Is Used For)
Use this to decide which Storage module to open first:
Module |
Use it when |
Why it matters |
Used for |
|---|---|---|---|
Instance Storage |
You need new VM disk capacity in a zone, or a pool is unhealthy/under maintenance. |
VM disk placement depends on healthy pools. |
Hosting VM root/data disks at pool level. |
Image Storage |
You are onboarding VM templates/boot images/snapshots, or imports fail due to path/content issues. |
Catalog artifacts must be reachable from a valid image store. |
Storing template, Boot Image, and snapshot image artifacts. |
Object Storage |
You need S3-compatible buckets for backups, logs, archives, or app object data. |
Buckets require endpoint registration, auth, and policy controls. |
Managing object buckets, quota, and security policy. |
Block Storage |
A VM needs an extra disk, or an old disk must be detached/deleted safely. |
VM data capacity and lifecycle depend on correct disk operations. |
Creating, attaching, detaching, and deleting VM disks. |
VM Templates |
You need repeatable base images for fast VM provisioning. |
Standardized templates reduce deployment errors and build time. |
Golden OS/application images for VM creation. |
Boot Images |
You need installation/recovery media instead of a template. |
Boot Image readiness and visibility control install workflows. |
Boot/install media for VM provisioning or recovery. |
Snapshots |
You need to verify backup health or triage failed protection jobs. |
Snapshot state shows whether recent data protection succeeded. |
Monitoring point-in-time backup status by volume. |
Initial Validation Sequence
Open
Control Center -> Storage -> Instance Storageand confirm at least one pool isUp.Open
Image Storageand confirm at least one image store is listed.If your environment uses bucket/object workflows, open
Object Storageand verify endpoint rows and actions are visible.Open
Block Storageand confirm volume rows and states are visible.Open
VM TemplatesandBoot Imagesto confirm assets areReadybefore VM creation.Open
Snapshotsto verify backup state visibility.
Tip
Use this execution order for first-time verification:
Instance -> Image -> (Object when used) -> Block -> VM Templates -> Boot Images -> Snapshots.
RBAC Quick Check (Before Running Any Task)
Role names vary by environment. Validate that your account has the required capability before proceeding:
Action type |
Minimum capability |
Typical role owner |
If missing access |
|---|---|---|---|
View dashboards/details |
Read/list permission for storage resources |
Read-only operator, auditor |
Request read access for required scope/zone. |
Create/edit storage resources |
Create/update permission in target zone/account |
Storage operator, platform admin |
Request delegated write access for onboarding window. |
Delete, detach, disable, maintenance |
Destructive or maintenance permission plus change approval |
Senior operator, platform admin |
Escalate through change process; do not proceed without approval. |
Credentials, policies, encryption/locking |
Secrets/policy administration permission |
Security-approved storage admin |
Coordinate with security owner for controlled execution. |
Action Trigger Thresholds (Default for New Users)
Use these trigger points unless your team policy defines stricter values:
Module |
Trigger to act |
Why now |
Recommended first action |
|---|---|---|---|
Instance Storage |
Pool free capacity below 20 percent, or production pool not |
Prevent placement failures and provisioning delays. |
Add/repair pool, then re-check state and capacity. |
Image Storage |
Template or Boot Image import remains non-ready for a sustained period, or |
Artifact workflows likely blocked by endpoint/path issue. |
Validate URL, backend mapping, and browse contents. |
Object Storage |
Bucket usage exceeds 80 percent of quota, or repeated auth failures appear. |
Capacity and access failures can block backup/app writes. |
Create/expand bucket or fix credentials/policy. |
Block Storage |
Disk utilization exceeds 80 percent, or detached disks remain unused more than 7 days. |
Avoid service risk and reduce orphaned cost. |
Add/expand disk, or detach/delete after safety checks. |
VM Templates and Boot Images |
Asset status remains not |
Non-ready assets are not reliable for provisioning. |
Run readiness troubleshooting and check events. |
Snapshots |
Any |
Indicates protection gap and higher recovery risk. |
Start triage with impacted volume and storage backend checks. |
Rollback Quick Actions (If You Clicked the Wrong Action)
Accidental action |
Immediate rollback path |
|---|---|
Disabled or put wrong pool into maintenance |
Use the same pool actions menu to reverse the state change, then verify pool |
Deleted image/object store registration |
Re-register the endpoint with the same URL/zone/provider (and credentials for object storage), then validate dependent workflows. |
Detached wrong disk |
Reattach volume to the original VM immediately and validate in-guest disk visibility. |
Deleted wrong disk |
Recover from latest snapshot/backup, then reattach recovered volume and document potential recovery-point gap. |
Deleted VM template or boot image in use |
Re-register the same artifact (or use boot-image upload when needed) and wait for |
Pre-Delete Safety Checklist (Use Before Any Delete)
Complete this checklist before deleting any store, disk, endpoint, Boot Image, or related storage object:
Confirm the resource is not actively used by running workloads.
Confirm backup/snapshot coverage exists for data that must be retained.
Confirm you are in the correct zone/account context.
Confirm whether downstream objects depend on this resource.
Confirm change window approval if this can impact production traffic.
Warning
Skipping this checklist can cause service interruption or permanent data loss.
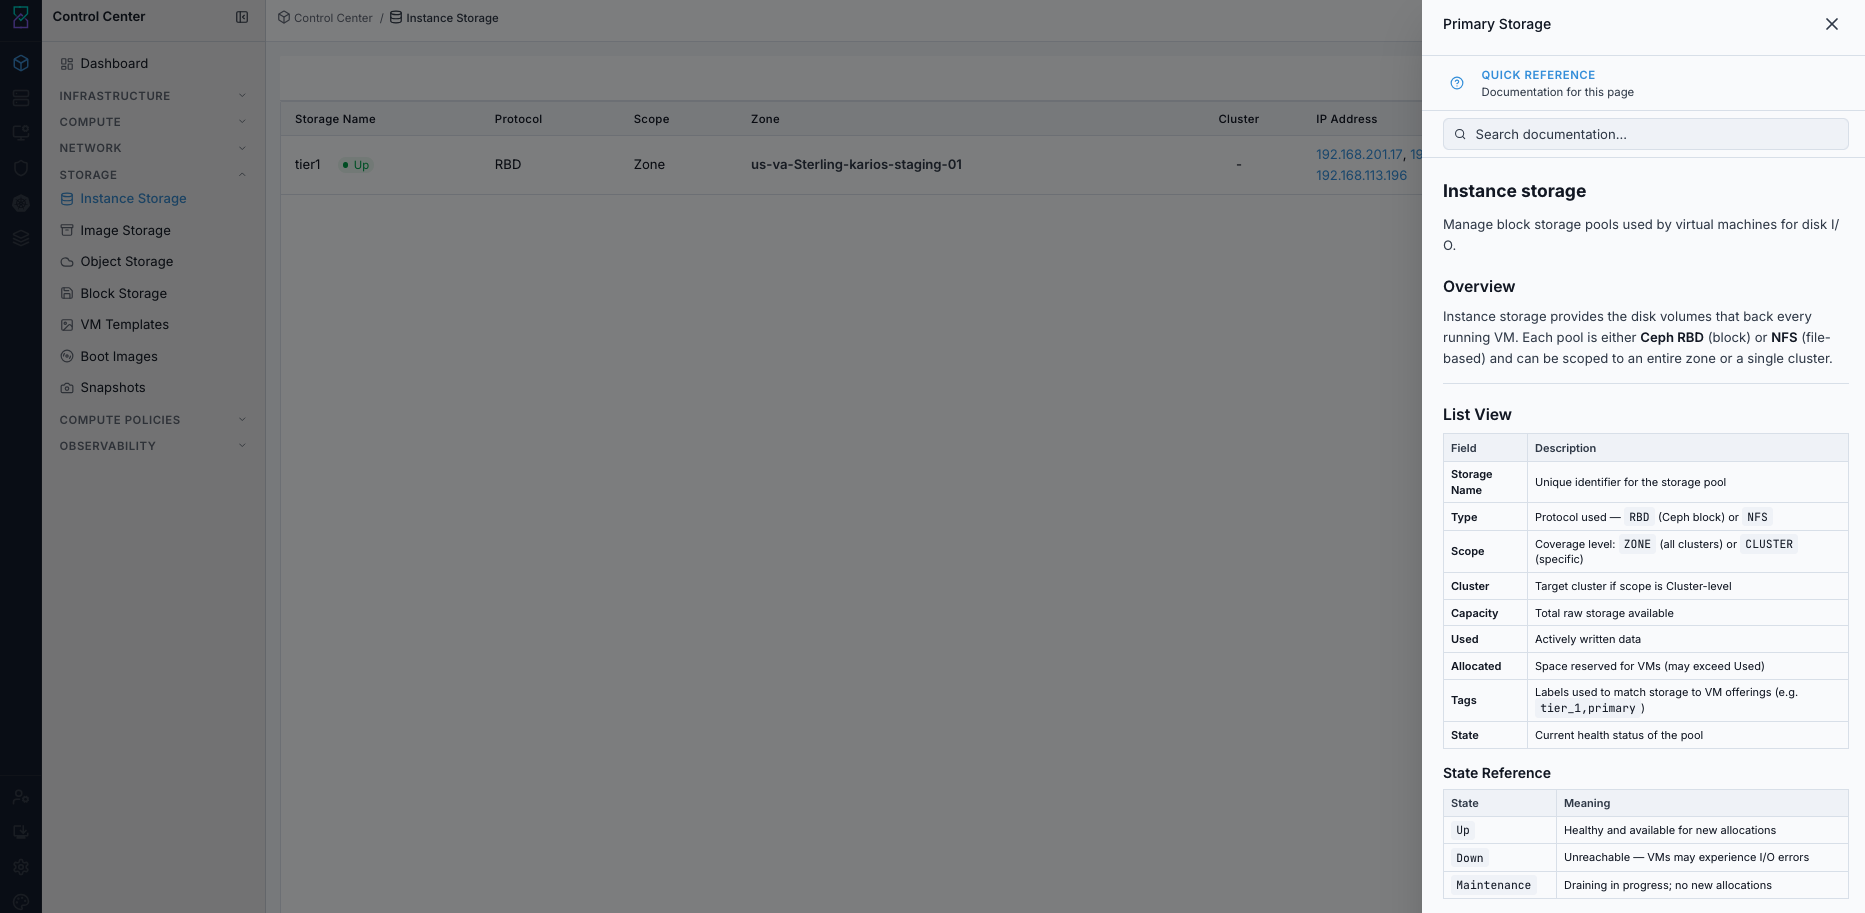
Instance Storage
UI path: Control Center -> Storage -> Instance Storage
Purpose
Manage block storage pools used by virtual machines for disk I/O.
When to Use Instance Storage
Use this module when you need to:
Check pool capacity and health before provisioning VMs.
Register Ceph RBD or NFS pools for workload placement.
Review scope assignment (zone-wide or cluster-specific) for pool usage.
Diagnose placement or I/O issues related to pool state.
Overview
Instance storage provides the disk volumes that back every running VM. Each pool is either Ceph RBD (block) or NFS (file-based) and can be scoped to an entire zone or a single cluster.
Common pool types:
RBD: Ceph block storage.NFS: File-based storage export.
Common scope behavior:
ZONE: Pool can serve clusters across the full zone.CLUSTER: Pool is limited to one target cluster.
List View
The instance storage list shows each pool and its allocation state:
Field |
Description |
|---|---|
|
Unique identifier for the storage pool. |
|
Protocol used: |
|
Coverage level: |
|
Target cluster if scope is cluster-level. |
|
Total raw storage available. |
|
Actively written data. |
|
Space reserved for VMs; can be higher than |
|
Labels used to match storage to VM offerings (for example |
|
Current health status of the pool. |
Note
In the storage pool details page, ID is the unique identifier for that pool.
State Reference
State |
Meaning |
|---|---|
|
Healthy and available for new allocations. |
|
Unreachable; VMs can experience I/O errors. |
|
Draining in progress; no new allocations. |
Step: Review Instance Storage Dashboard
When to Use: Use this first when validating pool health and capacity before any storage action.
Purpose: Establish a baseline view of pool state, scope, protocol, and capacity.
Steps:
Open
Control Center -> Storage -> Instance Storage.Review pool rows and confirm the
Statecolumn.Check protocol, scope, zone, and capacity for each pool.
Confirm actions menu is available for each row.

Instance Storage dashboard.
Expected Outcome:
Instance Storage dashboard opens with pool rows and actions visible.
You can identify the target pool and current health state before proceeding.
If this fails:
Verify backend health and available capacity for the target storage resource (pool/store/endpoint and zone scope).
Check blocking dependencies for this action (attachments, snapshots, templates, buckets, object locks, or maintenance state).
Review Observability Events/Alerts for the storage object and retry only after resolving the root cause.
Step: Open Instance Storage Help Panel
When to Use: Use this after opening the dashboard when you need field definitions and page guidance.
Purpose: Open contextual help without mixing help flow into the main dashboard review steps.
Steps:
Open
Control Center -> Storage -> Instance Storage.Click the help icon in the top-right corner.
Review the help panel content for dashboard fields and actions.
Instance Storage help panel.
Expected Outcome:
Instance Storage help panel opens with relevant page guidance.
If this fails:
Verify backend health and available capacity for the target storage resource (pool/store/endpoint and zone scope).
Check blocking dependencies for this action (attachments, snapshots, templates, buckets, object locks, or maintenance state).
Review Observability Events/Alerts for the storage object and retry only after resolving the root cause.
Step: Review Instance Storage Actions
When to Use:
Use this when performing Review Instance Storage Actions in the active storage workflow.
Purpose:
Execute Review Instance Storage Actions and confirm the expected UI/state outcome for this storage resource.
Steps:
In the dashboard row, open the
Actionsmenu.Review available operations:
Disable pool
Enable maintenance
View Volumes
View VM Templates
View Boot Images
Edit tags
If needed, click the pool name to open its details page and continue with the next task.
Decision guidance:
Use Disable pool to stop new placements while keeping existing workloads running.
Use Enable maintenance only during approved backend maintenance windows.
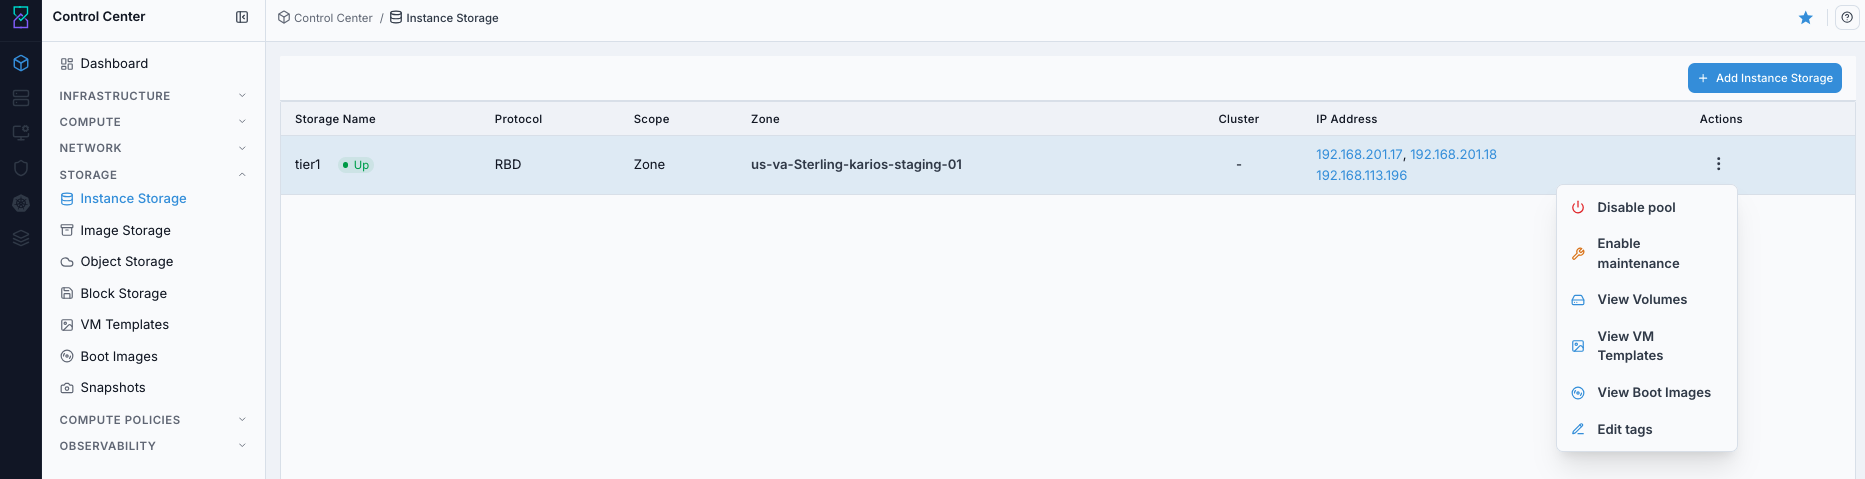
Instance Storage row actions menu.
Expected Outcome:
Action icons and menu options open the correct destination module or apply the selected pool action.
Pool lifecycle actions are available only when your role and current pool state allow them.
If this fails:
Verify backend health and available capacity for the target storage resource (pool/store/endpoint and zone scope).
Check blocking dependencies for this action (attachments, snapshots, templates, buckets, object locks, or maintenance state).
Review Observability Events/Alerts for the storage object and retry only after resolving the root cause.
Step: Understand What Each Instance Storage Action Does
When to Use:
Use this when performing Understand What Each Instance Storage Action Does in the active storage workflow.
Purpose:
Execute Understand What Each Instance Storage Action Does and confirm the expected UI/state outcome for this storage resource.
Steps:
Use this as a first-time operator reference before running lifecycle actions:
Action |
What it represents |
What happens when clicked |
|---|---|---|
|
VM disks associated with this storage context |
Opens the block-disk inventory view so you can inspect disk state, utilization, and attachment. Continue with Block Storage. |
|
Template artifacts available in this storage context |
Opens VM templates inventory so you can verify |
|
Boot-image artifacts available in this storage context |
Opens boot-image inventory so you can verify readiness, visibility, and bootable settings. Continue with Boot Images. |
|
Placement stop control |
Prevents new workload placement on this pool while existing workloads continue to run. |
|
Controlled maintenance state |
Marks the pool for maintenance workflows during approved change windows. |
|
Placement metadata update |
Opens tag edit flow; updated tags affect policy-based storage targeting. |
Tip
Hover icon-only actions to confirm tooltip text before clicking.
Note
If an action is missing or blocked, verify role permissions and current pool state first.
Expected Outcome:
Task completes and the related storage view updates as expected.
If this fails:
Verify backend health and available capacity for the target storage resource (pool/store/endpoint and zone scope).
Check blocking dependencies for this action (attachments, snapshots, templates, buckets, object locks, or maintenance state).
Review Observability Events/Alerts for the storage object and retry only after resolving the root cause.
Step: Add New Storage Pool
When to Use:
Use this when performing Add New Storage Pool in the active storage workflow.
Purpose:
Execute Add New Storage Pool and confirm the expected UI/state outcome for this storage resource.
Steps:
Click
+ Add Storage Pool.In
Add New Storage Pool, fill required fields:
Scope
Zone
Name
Protocol
Server
Path
Provider
Optional fields shown in the form:
NFS mount options
Storage tags
Add New Storage Pool form.
Example values:
Scope:ZoneZone:us-va-Sterling-karios-staging-01Name:tier1-nfsProtocol:nfsServer:192.168.201.18Path:/dataProvider:DefaultPrimary
Click
Add Storage Pool.Verify the new pool appears in the dashboard and reaches
Up.
Expected Outcome:
A new row appears in Instance Storage with the chosen name, zone, and protocol.
Statetransitions toUpafter backend validation completes.
If this fails:
Verify backend health and available capacity for the target storage resource (pool/store/endpoint and zone scope).
Check blocking dependencies for this action (attachments, snapshots, templates, buckets, object locks, or maintenance state).
Review Observability Events/Alerts for the storage object and retry only after resolving the root cause.
Step: Open Instance Storage Details
When to Use: Use this after creating or selecting a pool when you need pool-level metrics, configuration, and detail-page actions.
Purpose: Review pool-specific details and use the top-right action buttons in the details view.
Steps:
Open
Control Center -> Storage -> Instance Storage.In the storage table, click the target
Storage Namerow.Review details for the selected pool:
Storage metrics (used, allocated, unallocated)
General information (name, zone, state, scope, created, tags)
Storage configuration (type, provider, hypervisor, IP, path)
In the top-right button bar of the details page, use the action icons:
View Volumes: opens Block Storage volume context.
View VM Templates: opens VM Templates context.
View Boot Images: opens Boot Images context.
Disable pool: blocks new allocations on this pool.
Enable maintenance: places the pool in maintenance flow.
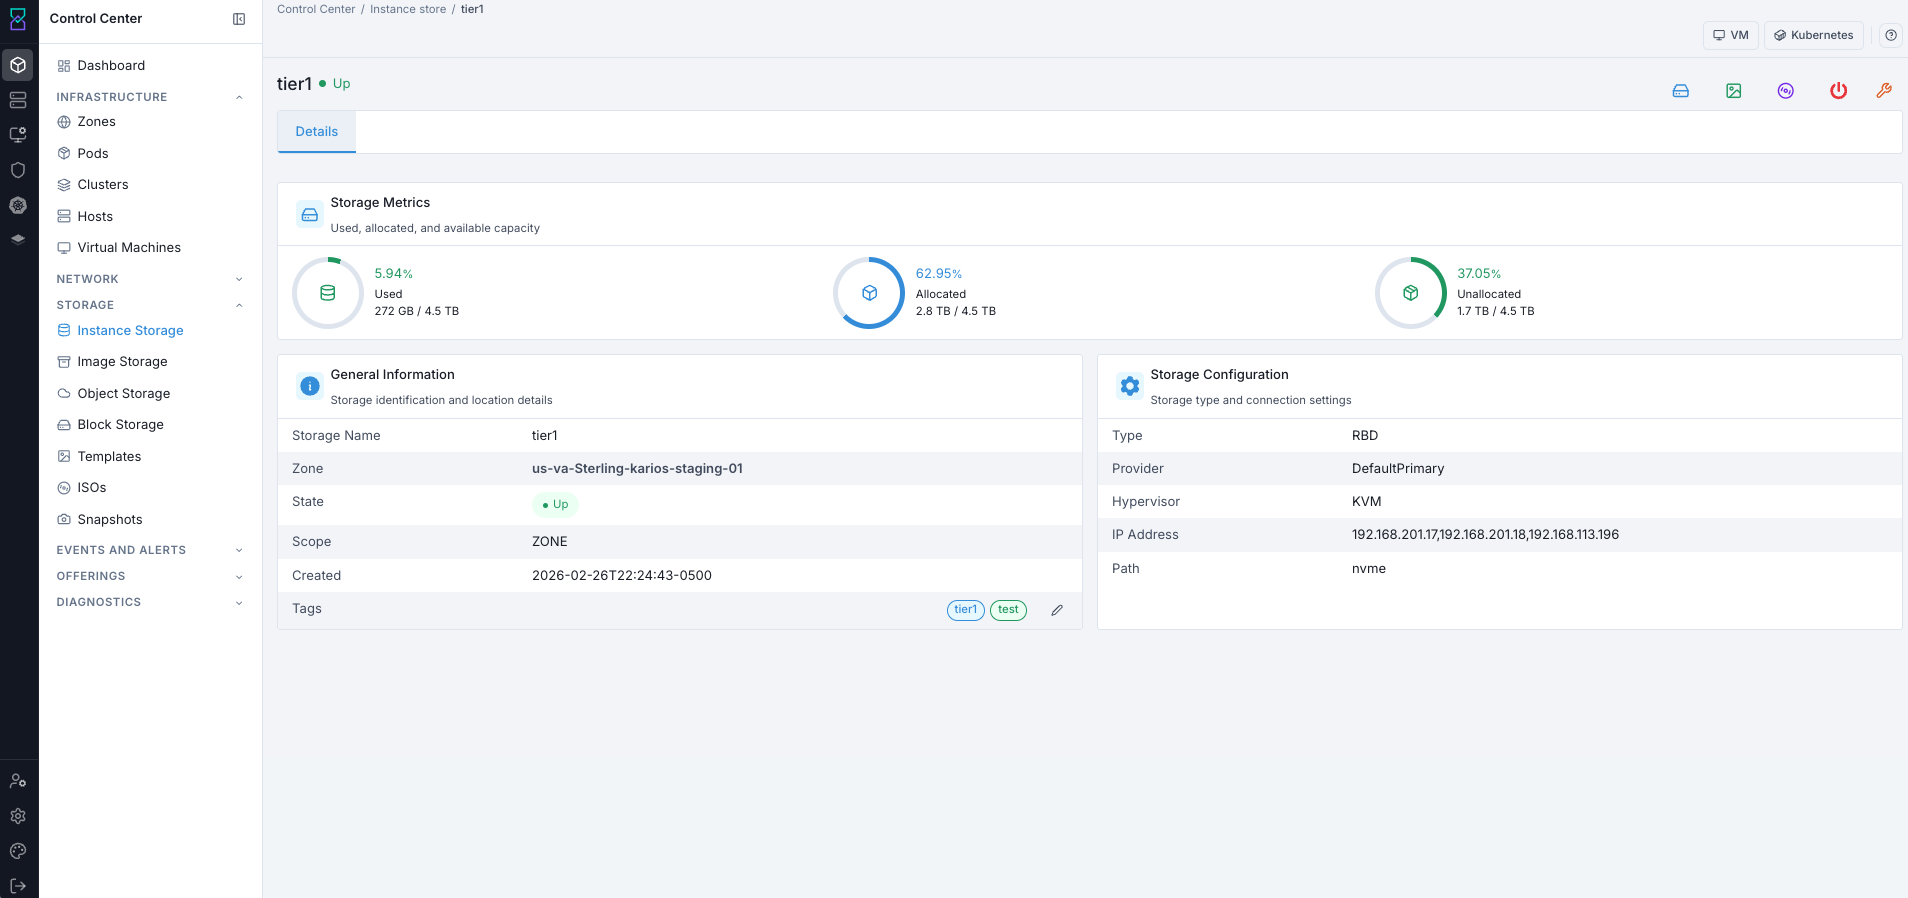
Instance Storage details page.
Expected Outcome:
The details page opens for the selected pool with metrics and configuration visible.
Top-right action buttons execute the expected navigation or pool lifecycle action.
If this fails:
Verify backend health and available capacity for the target storage resource (pool/store/endpoint and zone scope).
Check blocking dependencies for this action (attachments, snapshots, templates, buckets, object locks, or maintenance state).
Review Observability Events/Alerts for the storage object and retry only after resolving the root cause.
Tool Tips
Keep pool names environment-specific (for example:
zone-a-rbd-01).Apply
Storage tagsonly when placement policy needs explicit targeting.
Warnings
Do not click
Disable poolduring active provisioning windows.Enable maintenance only during controlled change windows.
If this fails:
If pool state is not
Up, verify backend reachability and protocol settings.If add-pool action fails, re-check
Server,Path,Zone, andProvidervalues.If pool is visible but unavailable for workloads, validate scope and storage-tag alignment.
Image Storage
UI path: Control Center -> Storage -> Image Storage
Purpose
Stores templates, Boot Images, snapshots, and VM backups. NFS-backed.
When to Use Image Storage
Use this module when you need to:
Register or validate the zone image store used by templates, Boot Images, snapshots, and backups.
Troubleshoot template, Boot Image, or snapshot transfer issues.
Confirm the correct store URL, zone scope, and provider before image lifecycle operations.
Overview
Image storage holds the read-only and archival data that powers your cloud: OS templates, uploaded Boot Images, volume snapshots, and VM backups. System VMs (SSVM) manage data transfer between image storage and hypervisor hosts.
List View
Field |
Description |
|---|---|
|
Identifier for this image store. |
|
Storage type, |
|
Transfer protocol used (for example |
|
Mount path (for example |
|
Zone this store serves. |
|
|
Actions
Action |
Description |
|---|---|
|
Update the store name or URL. |
|
Remove the store. Allowed only when no active templates, Boot Images, or snapshots depend on it. |
Warning
Deleting an image storage store is irreversible. Ensure all required data has been migrated or is no longer needed before proceeding.
System VM Dependency (SSVM)
Each image storage store is served by an Image Storage VM (SSVM). The SSVM handles:
Template downloads and caching
Snapshot uploads and restores
Boot Image streaming to VMs
SSVM State |
Impact |
|---|---|
|
Normal operations. |
|
No template or snapshot operations are possible. |
|
Check system VM logs and recover SSVM health. |
How to Verify SSVM State
Open
Control Center -> Compute -> Virtual Machines.Filter to system VMs and locate the Image Storage VM (SSVM) for the target zone.
Confirm VM
StateisRunningbefore template, snapshot, or Boot Image transfer operations.If state is not healthy, check Observability for related failures.
First Recovery Actions (SSVM Stopped or Error)
Start or restart the SSVM using VM actions.
Wait for VM state to return to
Runningand re-check image-store operations.If recovery fails, collect event evidence and escalate to platform operations.
Filtering & Search
Filter by
Zoneto isolate target environment.Filter by
Provider(NFS).Search by
NameorURL.
Step: Understand Image Storage Controls (What Each Click Does)
When to Use:
Use this when performing Understand Image Storage Controls (What Each Click Does) in the active storage workflow.
Purpose:
Execute Understand Image Storage Controls (What Each Click Does) and confirm the expected UI/state outcome for this storage resource.
Steps:
Use this quick map before changing or deleting an image store:
Control |
What it is |
What happens when clicked |
|---|---|---|
Storage name |
Entry point for one image store |
Opens the details page where you validate capacity, configuration, and tabs. |
Row |
Dashboard operation menu |
Provides |
|
Directory/file view of backend path |
Shows folders and files available at the configured URL/path for validation. |
Browse row action icons |
File/folder operations in |
Download icon fetches a file; folder icon opens that directory level. |
Tip
If VM template/boot image imports fail, check Browse first to confirm expected paths and files exist.
Expected Outcome:
Task completes and the related storage view updates as expected.
If this fails:
Verify backend health and available capacity for the target storage resource (pool/store/endpoint and zone scope).
Check blocking dependencies for this action (attachments, snapshots, templates, buckets, object locks, or maintenance state).
Review Observability Events/Alerts for the storage object and retry only after resolving the root cause.
Step: Review Image Storage Dashboard
When to Use:
Use this when performing Review Image Storage Dashboard in the active storage workflow.
Purpose:
Execute Review Image Storage Dashboard and confirm the expected UI/state outcome for this storage resource.
Steps:
Open
Control Center -> Storage -> Image Storage.Confirm at least one row is present.
Verify
Protocol,Scope,Zone, andURLvalues.Confirm row-level
Actionsis available.
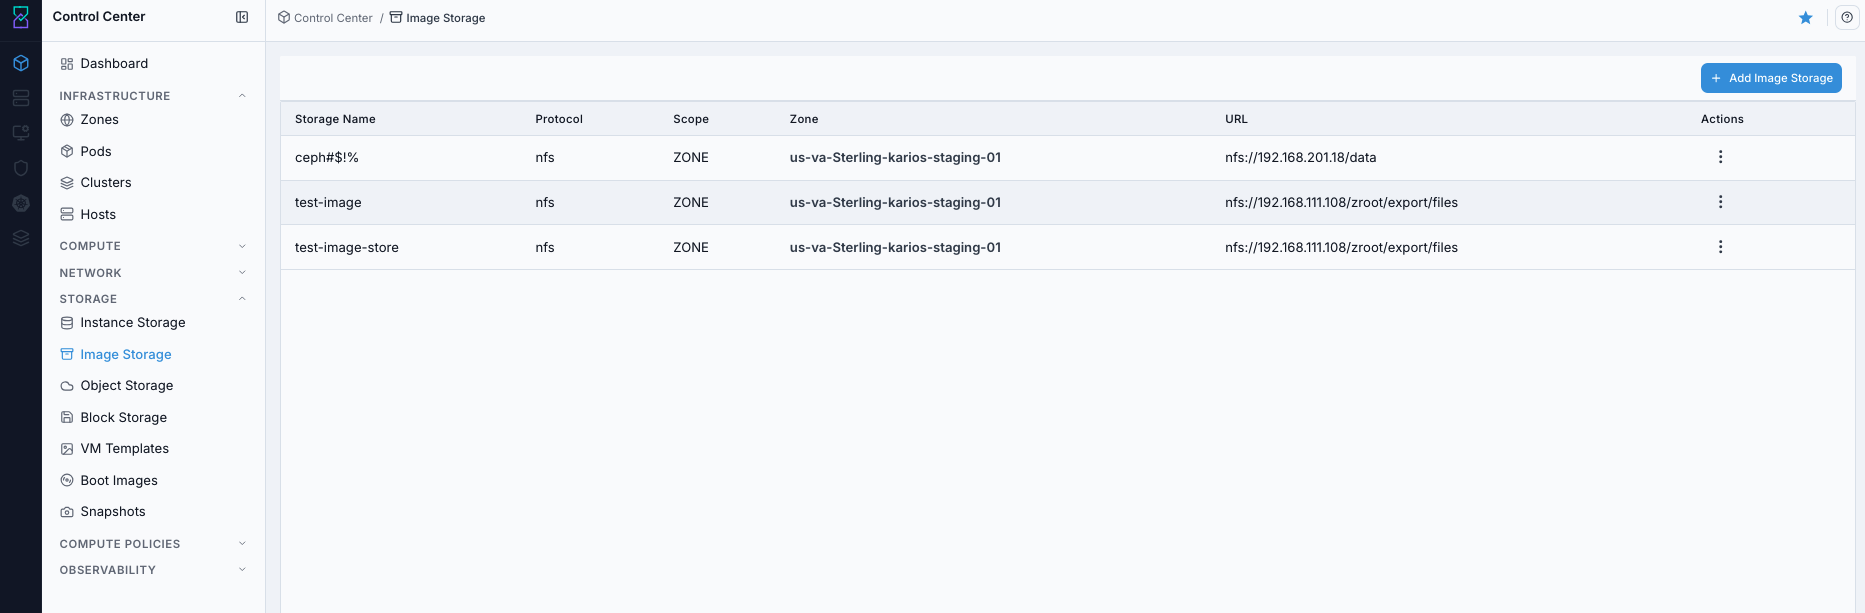
Image Storage dashboard.
Expected Outcome:
The dashboard loads with image store rows and key columns visible.
You can identify the target store before taking actions.
If this fails:
Verify backend health and available capacity for the target storage resource (pool/store/endpoint and zone scope).
Check blocking dependencies for this action (attachments, snapshots, templates, buckets, object locks, or maintenance state).
Review Observability Events/Alerts for the storage object and retry only after resolving the root cause.
Step: Open Image Storage Help Panel
When to Use: Use this after opening the dashboard when you need field definitions and page-level guidance.
Purpose: Open contextual help without mixing help flow into dashboard review.
Steps:
Open
Control Center -> Storage -> Image Storage.Click the help icon in the top-right corner.
Review definitions for dashboard fields and available controls.
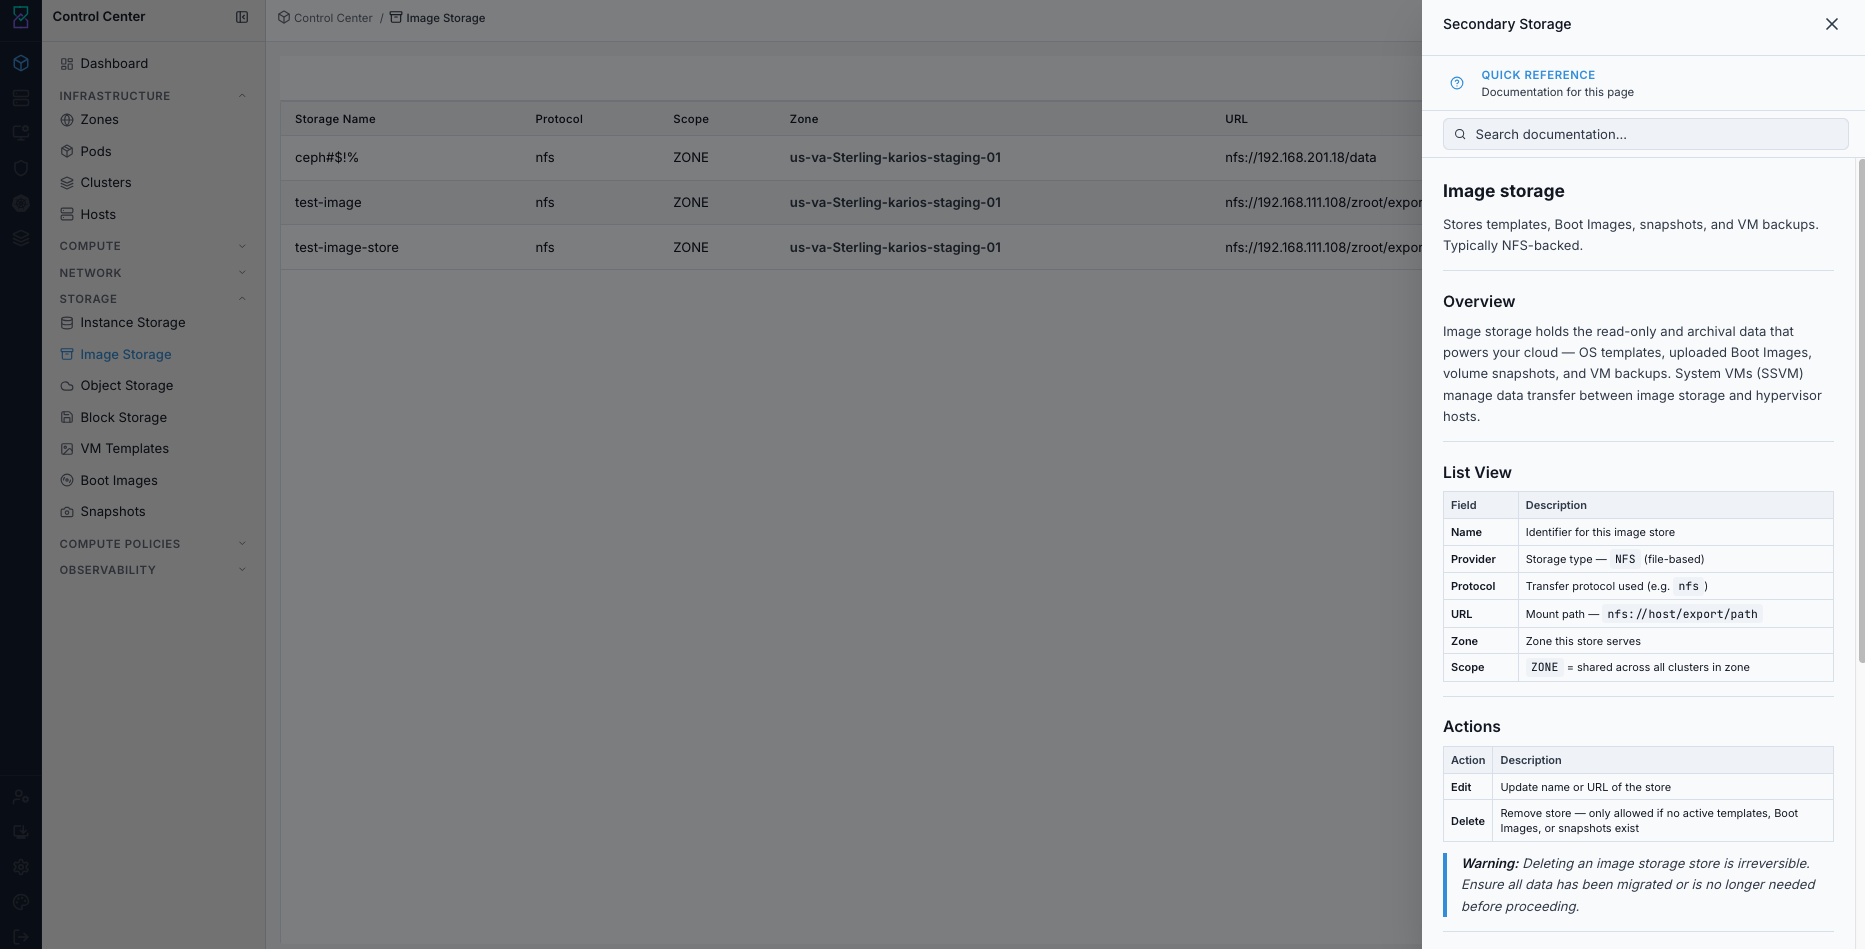
Image Storage help panel.
Expected Outcome:
The help panel opens and explains Image Storage fields and controls.
If this fails:
Verify backend health and available capacity for the target storage resource (pool/store/endpoint and zone scope).
Check blocking dependencies for this action (attachments, snapshots, templates, buckets, object locks, or maintenance state).
Review Observability Events/Alerts for the storage object and retry only after resolving the root cause.
Step: Review Image Storage Row Actions
When to Use: Use this when you need to understand or execute row-level operations from the dashboard.
Purpose: Validate available row actions and confirm what each action triggers.
Steps:
Open
Control Center -> Storage -> Image Storage.Open the row
Actionsmenu for the target store.Review available operations:
View Snapshots
View VM Templates
View Boot Images
Edit
Delete
Use only the required action for the current task.
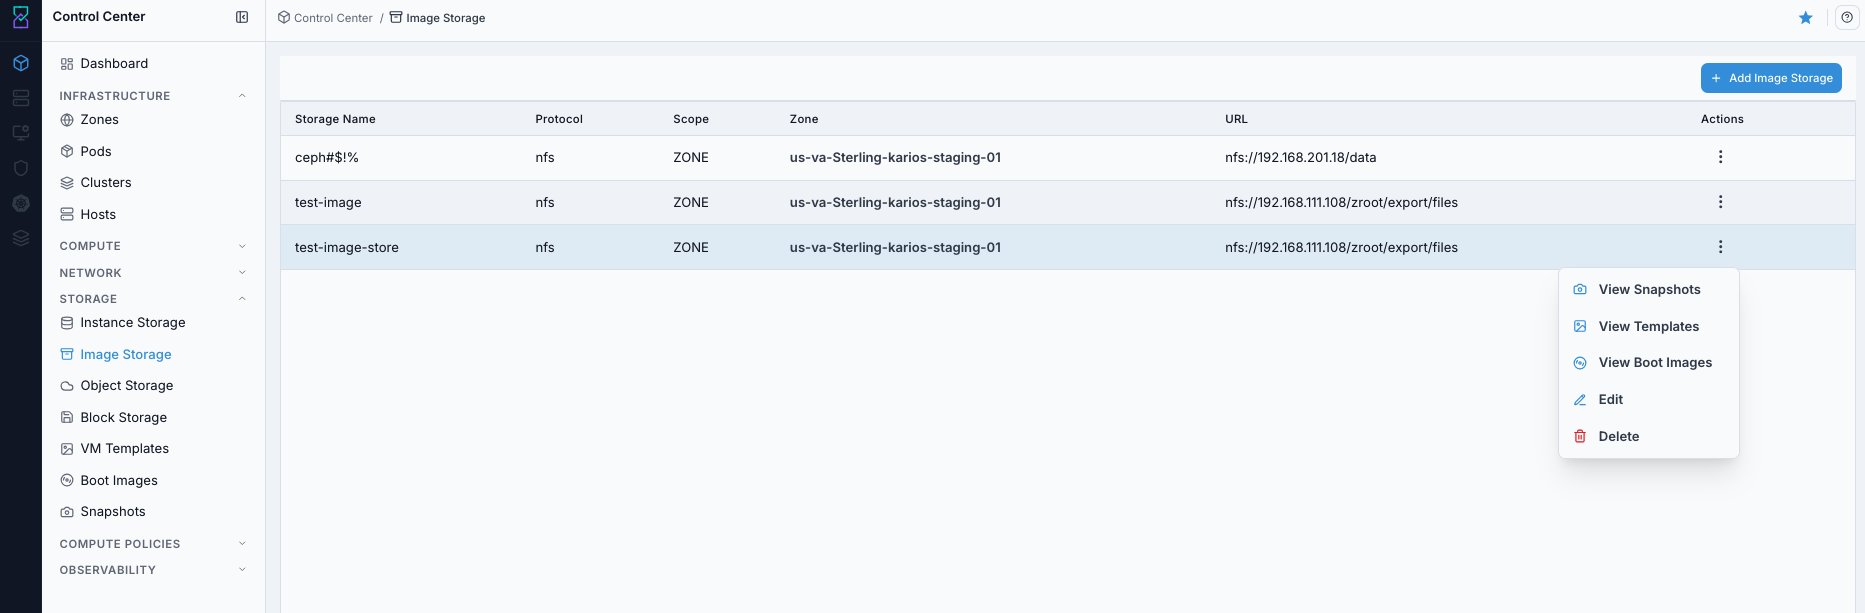
Image Storage row actions menu.
Expected Outcome:
Row actions are visible and trigger the expected navigation or lifecycle operation.
If this fails:
Verify backend health and available capacity for the target storage resource (pool/store/endpoint and zone scope).
Check blocking dependencies for this action (attachments, snapshots, templates, buckets, object locks, or maintenance state).
Review Observability Events/Alerts for the storage object and retry only after resolving the root cause.
Step: Add New Image Store
When to Use:
Use this when performing Add New Image Store in the active storage workflow.
Purpose:
Execute Add New Image Store and confirm the expected UI/state outcome for this storage resource.
Steps:
Click
+ Add Image Store.Fill required fields:
Storage Name
Provider
URL
Zone
Click
Add Image Store.Verify the new row appears on the dashboard.
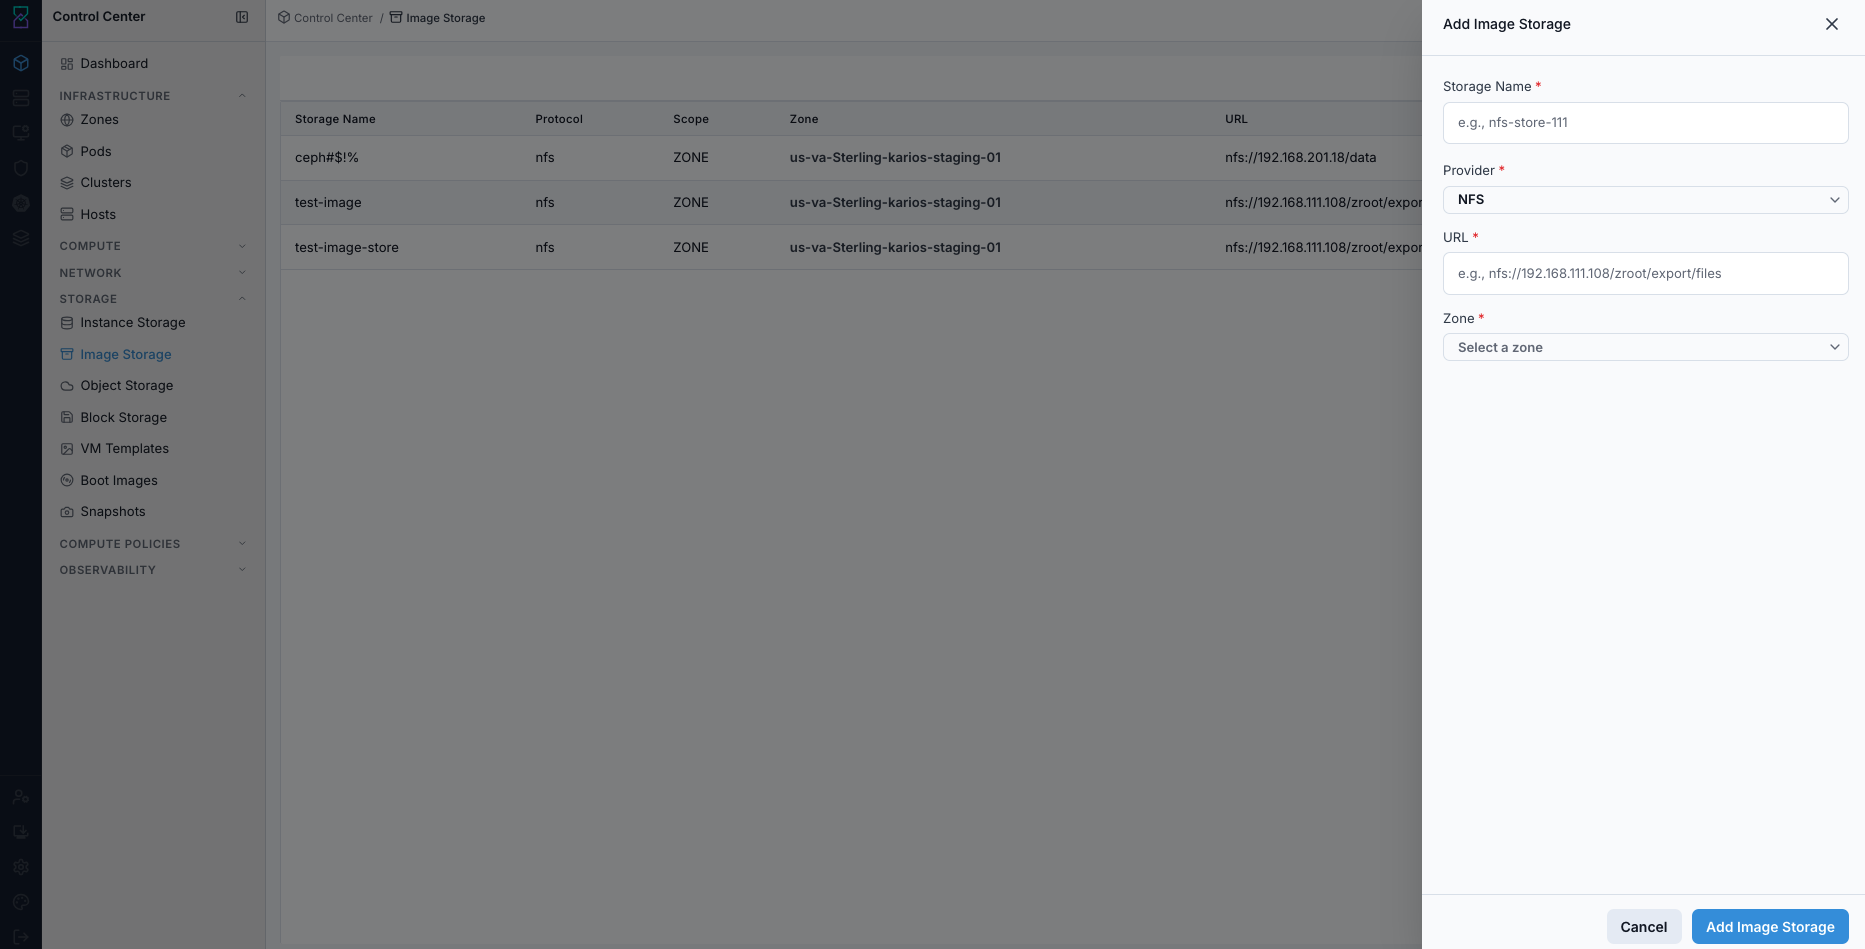
Add New Image Store form.
Expected Outcome:
A new image store row is visible with the configured URL and zone.
The store opens in details view and is available to dependent workflows.
If this fails:
Verify backend health and available capacity for the target storage resource (pool/store/endpoint and zone scope).
Check blocking dependencies for this action (attachments, snapshots, templates, buckets, object locks, or maintenance state).
Review Observability Events/Alerts for the storage object and retry only after resolving the root cause.
Step: Review Details and Header Action Icons
When to Use:
Use this when performing Review Details and Header Action Icons in the active storage workflow.
Purpose:
Execute Review Details and Header Action Icons and confirm the expected UI/state outcome for this storage resource.
Steps:
Click a storage name to open the details page.
Review capacity metrics and general configuration values.
Use top-right icons to navigate or manage the store:
View Snapshots
View VM Templates
View Boot Images
Edit
Delete

Image Storage details page with header action icons.

Image Storage details action controls.
Expected Outcome:
Task completes and the related storage view updates as expected.
If this fails:
Verify backend health and available capacity for the target storage resource (pool/store/endpoint and zone scope).
Check blocking dependencies for this action (attachments, snapshots, templates, buckets, object locks, or maintenance state).
Review Observability Events/Alerts for the storage object and retry only after resolving the root cause.
Step: Browse Files in the Image Store
When to Use:
Use this when performing Browse Files in the Image Store in the active storage workflow.
Purpose:
Execute Browse Files in the Image Store and confirm the expected UI/state outcome for this storage resource.
Steps:
Open the
Browsetab on the storage details page.Use the table to inspect files and directories.
Use action icons to download files or open directories.
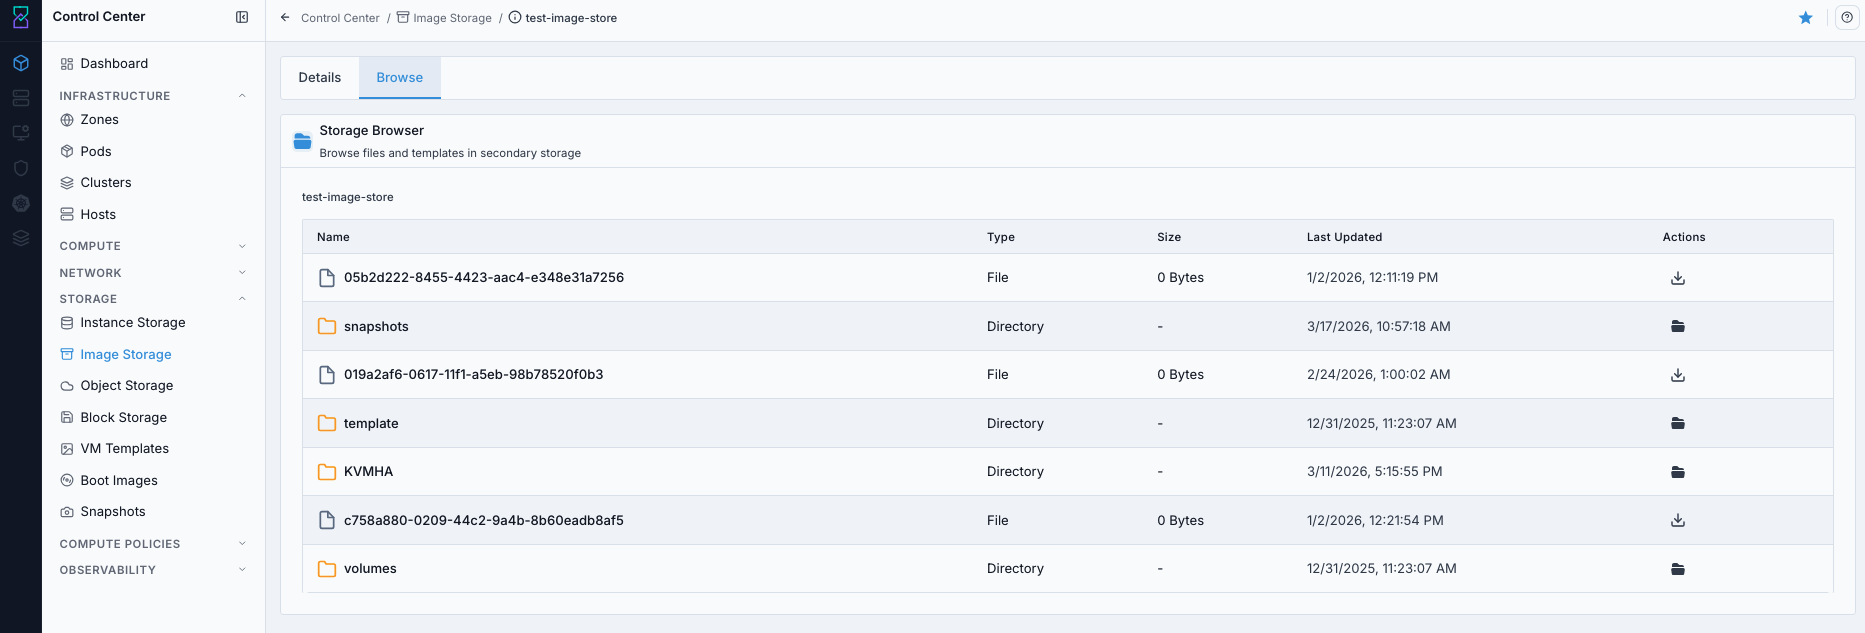
Browse view for image store contents.
Expected Outcome:
Task completes and the related storage view updates as expected.
If this fails:
Verify backend health and available capacity for the target storage resource (pool/store/endpoint and zone scope).
Check blocking dependencies for this action (attachments, snapshots, templates, buckets, object locks, or maintenance state).
Review Observability Events/Alerts for the storage object and retry only after resolving the root cause.
Step: Delete Image Store (When No Longer Needed)
When to Use:
Use this when performing Delete Image Store (When No Longer Needed) in the active storage workflow.
Purpose:
Execute Delete Image Store (When No Longer Needed) and confirm the expected UI/state outcome for this storage resource.
Steps:
Complete Pre-Delete Safety Checklist (Use Before Any Delete).
Open the image store details or dashboard row actions.
Click delete and confirm the prompt.
Verify the store row is removed and dependent workflows are not impacted.
If deleted by mistake, re-add the same store immediately using previous
Storage Name,Provider,URL, andZonevalues.
Expected Outcome:
The image store registration is removed from the current environment.
Dependent VM template/boot image/snapshot workflows are either re-pointed or intentionally retired.
If this fails:
Verify backend health and available capacity for the target storage resource (pool/store/endpoint and zone scope).
Check blocking dependencies for this action (attachments, snapshots, templates, buckets, object locks, or maintenance state).
Review Observability Events/Alerts for the storage object and retry only after resolving the root cause.
Tool Tips
Keep one known-good image store per zone before onboarding new teams.
Use
Browseafter changes to verify expected directories exist.
Warnings
Deleting an image store breaks workflows that rely on that path.
Changing URL/protocol without validation can break VM template and boot-image imports.
If this fails:
If import fails, validate URL syntax and endpoint reachability.
If
Browseshows missing folders, verify backend export-path mapping.If edit/delete actions fail, verify role permissions and dependency constraints.
Object Storage
UI path: Control Center -> Storage -> Object Storage
Purpose
S3-compatible storage for unstructured data: backups, media, logs, and application data. Backed by Ceph RGW or cloud providers.
When to Use Object Storage
Use this module when you need to:
Register an S3-compatible endpoint for bucket-based data access.
Store and retrieve unstructured data over HTTP(S) APIs.
Manage provider connection settings and bucket operations from one place.
Overview
Object storage provides an S3-compatible API for storing and retrieving unstructured data. Unlike instance and image storage, object storage is accessed through HTTP(S) endpoints and uses bucket-based organization with access control policies.
List View
Field |
Description |
|---|---|
|
Identifier for this object store. |
|
Backend type: |
|
Endpoint URL for S3-compatible API access. |
|
Total capacity allocated to this store. |
Actions
Action |
Description |
|---|---|
|
Update credentials, endpoint URL, or allocated capacity. |
|
Remove store. Allowed only when no active buckets exist. |
Warning
Deleting an object store does not delete backend data. It removes only the registration from the platform.
Supported Providers
Provider |
Protocol |
Use case |
|---|---|---|
MinIO |
S3-compatible |
On-prem, lightweight alternative. |
Ceph RGW |
S3-compatible |
On-prem, integrated with Ceph cluster (use MinIO provider). |
AWS S3 |
S3 |
Public cloud and offsite backups. |
Azure Blob |
Azure Blob API |
Public cloud, Azure-integrated workloads. |
Google Cloud Storage |
GCS / S3-compatible |
Public cloud, GCP-integrated workloads. |
Filtering & Search
Filter by
Provider.Search by
NameorURL.
Step: Understand Object Storage Controls (What Each Click Does)
When to Use:
Use this when performing Understand Object Storage Controls (What Each Click Does) in the active storage workflow.
Purpose:
Execute Understand Object Storage Controls (What Each Click Does) and confirm the expected UI/state outcome for this storage resource.
Steps:
Use this reference before editing endpoint settings or bucket policy:
Control |
What it is |
What happens when clicked |
|---|---|---|
Storage name |
Entry point for one object endpoint |
Opens details with |
Row |
Endpoint administration menu |
|
|
New bucket creation action |
Opens form to define name, quota, policy, and optional security toggles. |
|
Bucket access scope |
Applies access mode (for example private/public-read) to the new bucket. |
|
Multi-version object retention |
Stores older object versions for recovery and audit. |
|
At-rest protection setting |
Requires encryption for objects written to that bucket. |
|
Retention/immutability control |
Prevents overwrite/delete during retention period based on endpoint support. |
Warning
Object Locking can block deletes by design; enable it only when retention requirements are defined.
Expected Outcome:
Task completes and the related storage view updates as expected.
If this fails:
Verify backend health and available capacity for the target storage resource (pool/store/endpoint and zone scope).
Check blocking dependencies for this action (attachments, snapshots, templates, buckets, object locks, or maintenance state).
Review Observability Events/Alerts for the storage object and retry only after resolving the root cause.
Step: Review Object Storage Dashboard
When to Use:
Use this when performing Review Object Storage Dashboard in the active storage workflow.
Purpose:
Execute Review Object Storage Dashboard and confirm the expected UI/state outcome for this storage resource.
Steps:
Open
Control Center -> Storage -> Object Storage.Confirm endpoint rows are visible.
Verify
Provider,Allocated, andURLvalues.Confirm
Actionsis available.
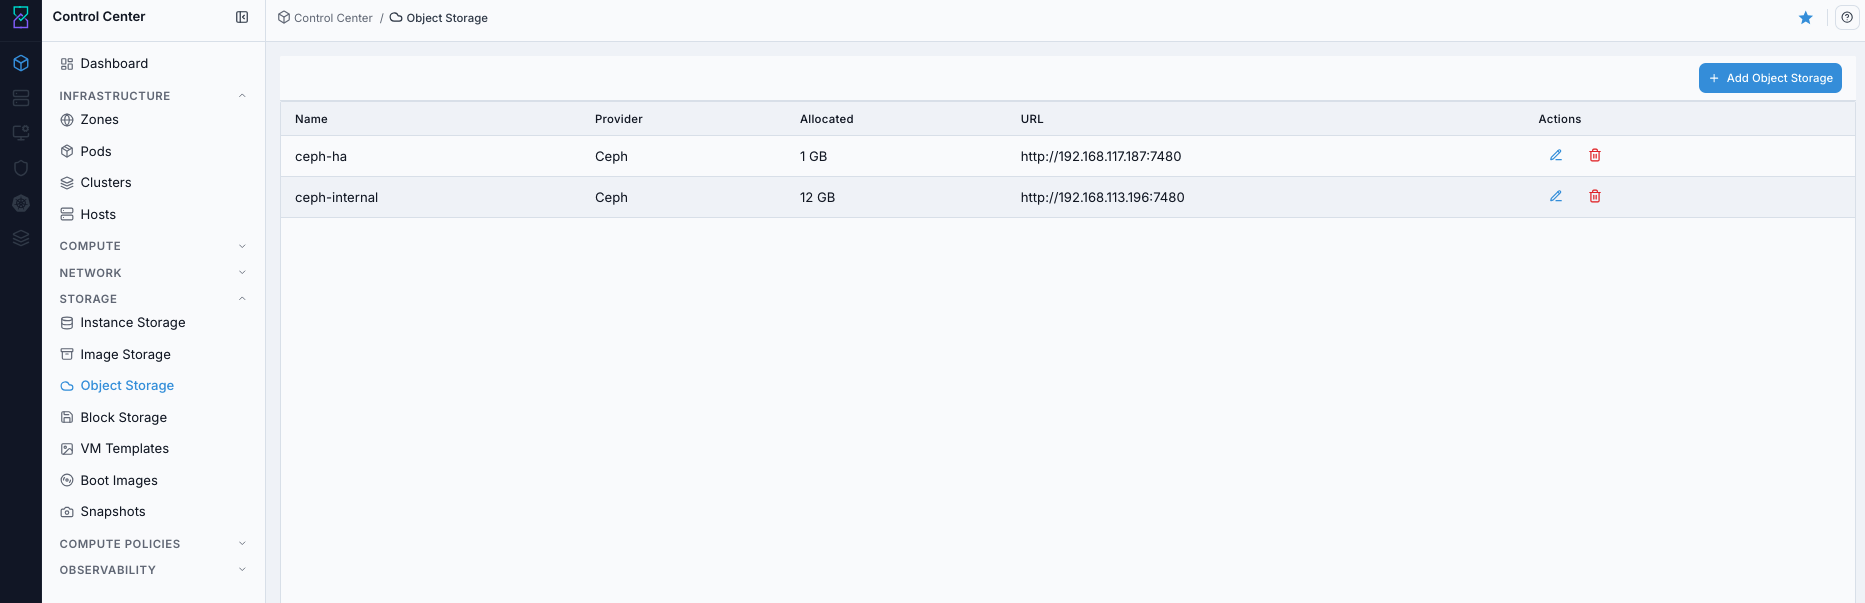
Object Storage dashboard.
Expected Outcome:
Object Storage dashboard loads with endpoint rows and actions visible.
You can identify the target endpoint for edit, details, or bucket workflows.
If this fails:
Verify backend health and available capacity for the target storage resource (pool/store/endpoint and zone scope).
Check blocking dependencies for this action (attachments, snapshots, templates, buckets, object locks, or maintenance state).
Review Observability Events/Alerts for the storage object and retry only after resolving the root cause.
Step: Open Object Storage Help Panel
When to Use: Use this after opening the dashboard when you need field definitions and guidance for Object Storage workflows.
Purpose: Open contextual help separately from dashboard review and action execution.
Steps:
Open
Control Center -> Storage -> Object Storage.Click the help icon in the top-right corner.
Review definitions for endpoint fields and available controls.
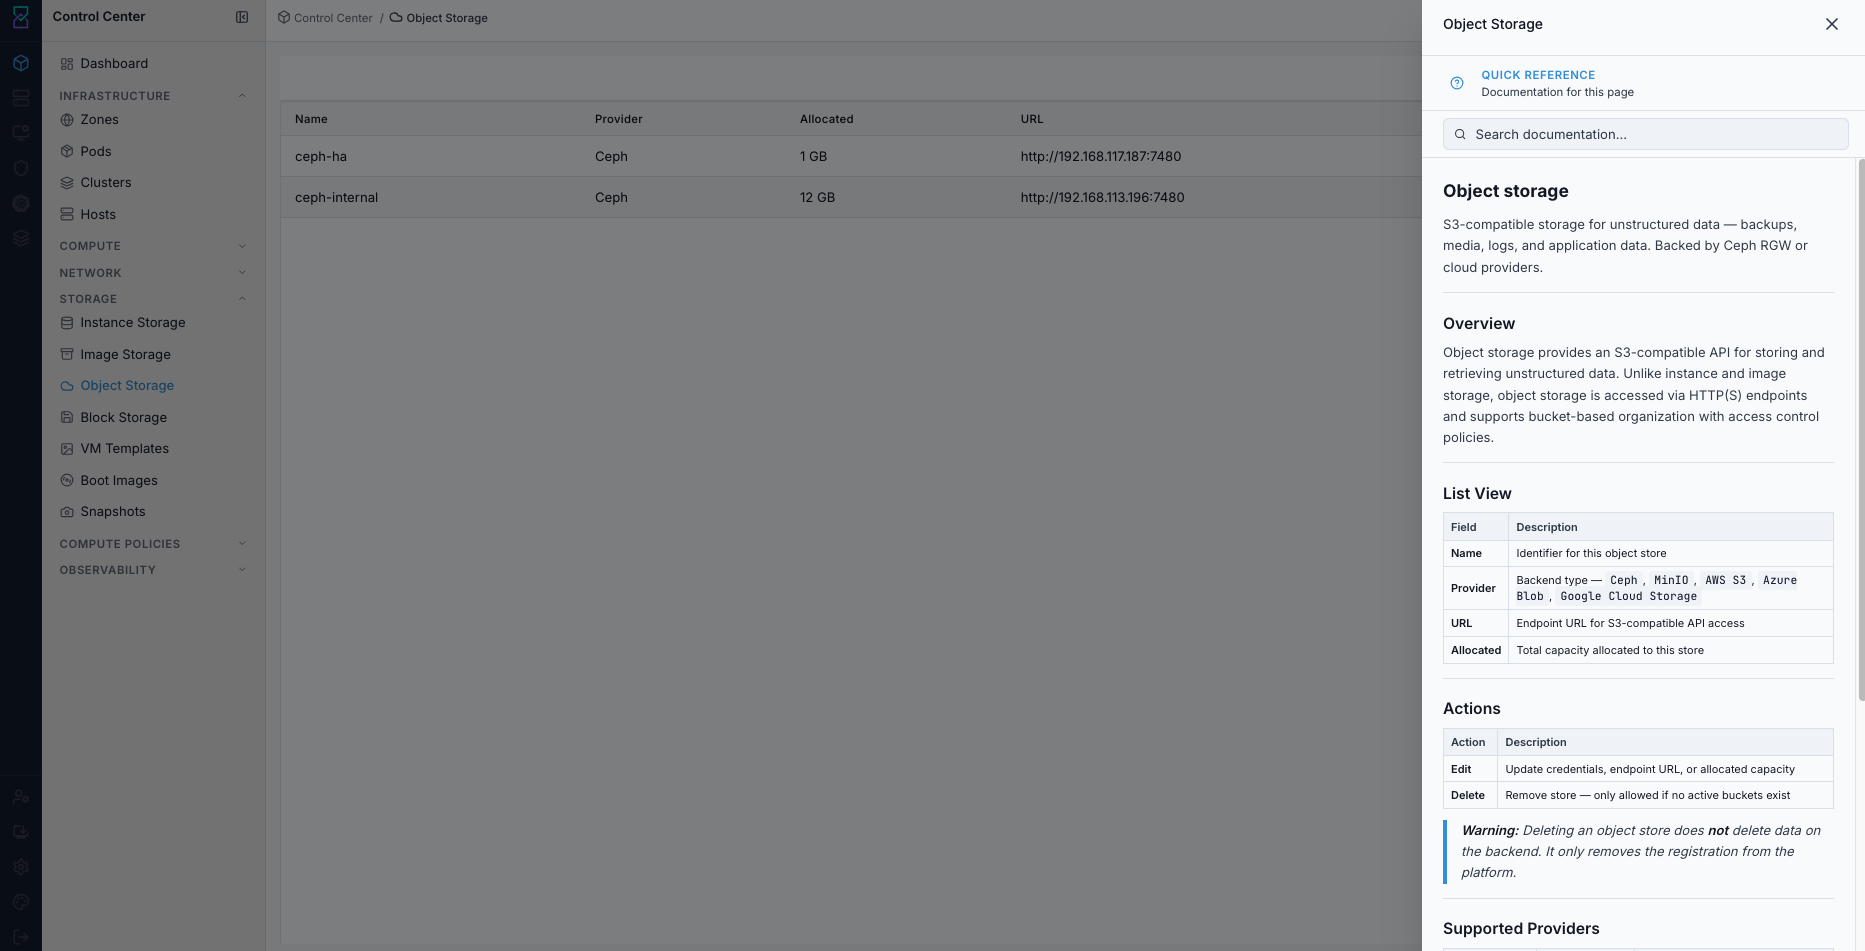
Object Storage help panel.
Expected Outcome:
The Object Storage help panel opens with page-specific guidance.
If this fails:
Verify backend health and available capacity for the target storage resource (pool/store/endpoint and zone scope).
Check blocking dependencies for this action (attachments, snapshots, templates, buckets, object locks, or maintenance state).
Review Observability Events/Alerts for the storage object and retry only after resolving the root cause.
Step: Add New Object Storage
When to Use:
Use this when performing Add New Object Storage in the active storage workflow.
Purpose:
Execute Add New Object Storage and confirm the expected UI/state outcome for this storage resource.
Steps:
Click
+ Add Object Storage.Fill required fields:
Storage Name
Provider
URL
Zone
Access Key
Secret Key
Example values:
Storage Name:ceph-internalProvider:MinIO(or your S3-compatible provider)URL:http://192.168.113.196:7480Zone:us-va-Sterling-karios-staging-01Access Key:<access-key>Secret Key:<secret-key>
Warning
Use environment-specific credentials stored and rotated per policy.
Click
Add Object Storage.Confirm the new object store appears in the dashboard.
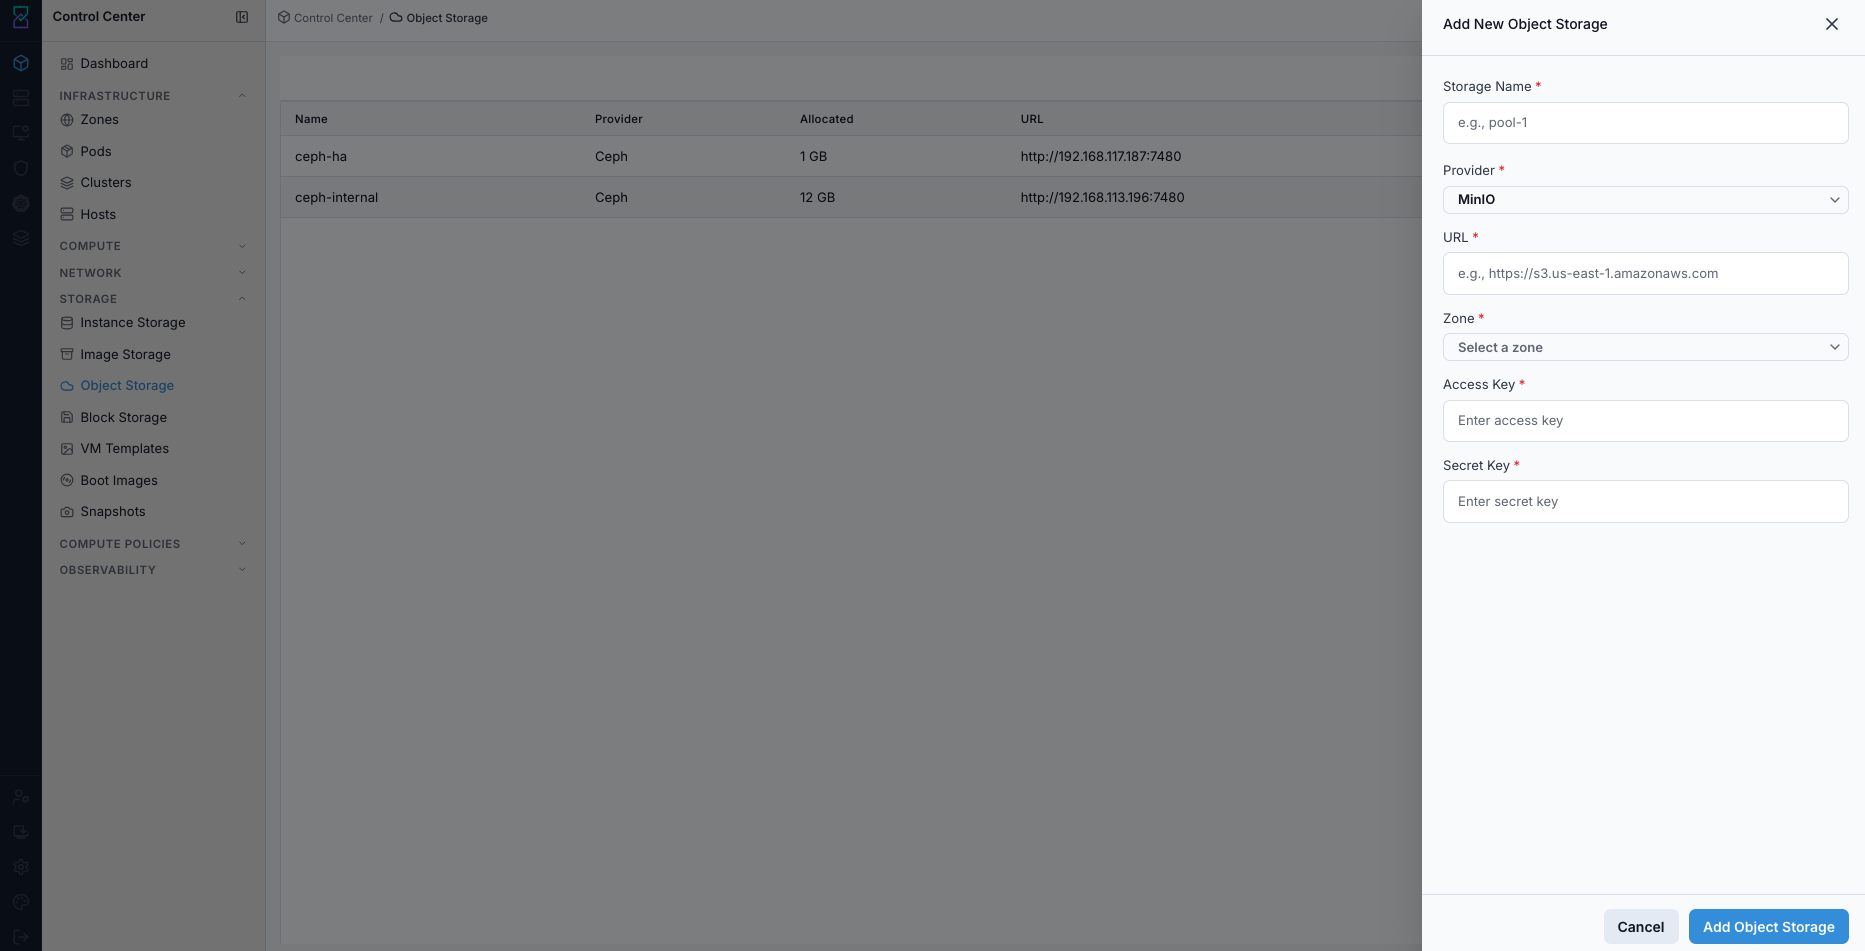
Add New Object Storage form.
Expected Outcome:
A new endpoint registration appears with provider and URL values.
The endpoint can be opened in details view for bucket management.
If this fails:
Verify backend health and available capacity for the target storage resource (pool/store/endpoint and zone scope).
Check blocking dependencies for this action (attachments, snapshots, templates, buckets, object locks, or maintenance state).
Review Observability Events/Alerts for the storage object and retry only after resolving the root cause.
Step: Edit or Delete Object Storage Registration
When to Use:
Use this when performing Edit or Delete Object Storage Registration in the active storage workflow.
Purpose:
Execute Edit or Delete Object Storage Registration and confirm the expected UI/state outcome for this storage resource.
Steps:
In a dashboard row, click the row
Actionsmenu.Choose
EditorDelete.If deleting, complete Pre-Delete Safety Checklist (Use Before Any Delete) before confirmation.
Complete and confirm the selected action.
If a wrong edit/delete was applied, restore original endpoint values (or re-register endpoint) and verify bucket access.

Edit Object Storage action (example dialog).
Expected Outcome:
Task completes and the related storage view updates as expected.
If this fails:
Verify backend health and available capacity for the target storage resource (pool/store/endpoint and zone scope).
Check blocking dependencies for this action (attachments, snapshots, templates, buckets, object locks, or maintenance state).
Review Observability Events/Alerts for the storage object and retry only after resolving the root cause.
Step: Review Object Storage Details
When to Use: Use this when you need to validate endpoint identity and configuration before bucket operations.
Purpose: Confirm you are working in the correct object-store details page.
Steps:
In Object Storage dashboard, click the target store name.
Review the
General Informationsection.Confirm key endpoint values (name, provider, URL, and zone context).
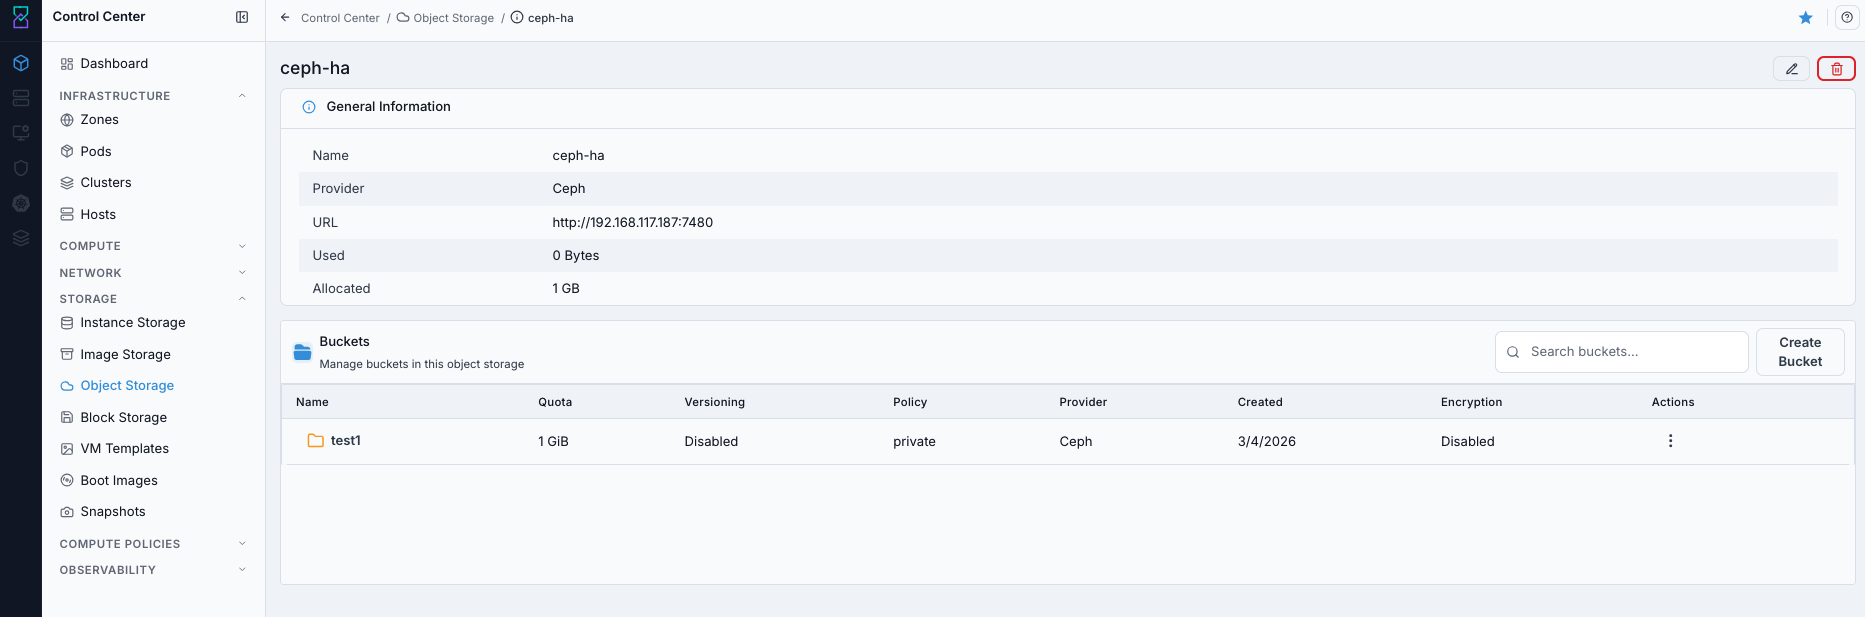
Object Storage details with bucket table.
Expected Outcome:
The details page opens for the selected object store.
Endpoint context is validated before bucket actions.
If this fails:
Verify backend health and available capacity for the target storage resource (pool/store/endpoint and zone scope).
Check blocking dependencies for this action (attachments, snapshots, templates, buckets, object locks, or maintenance state).
Review Observability Events/Alerts for the storage object and retry only after resolving the root cause.
Step: Review Bucket Actions in Details
When to Use: Use this when you need to inspect or execute row-level bucket actions from the details page.
Purpose: Validate available bucket action controls before changing bucket state.
Steps:
Open object-store details page.
In the
Bucketssection, review row action controls.Confirm the required bucket action is available for the selected row.
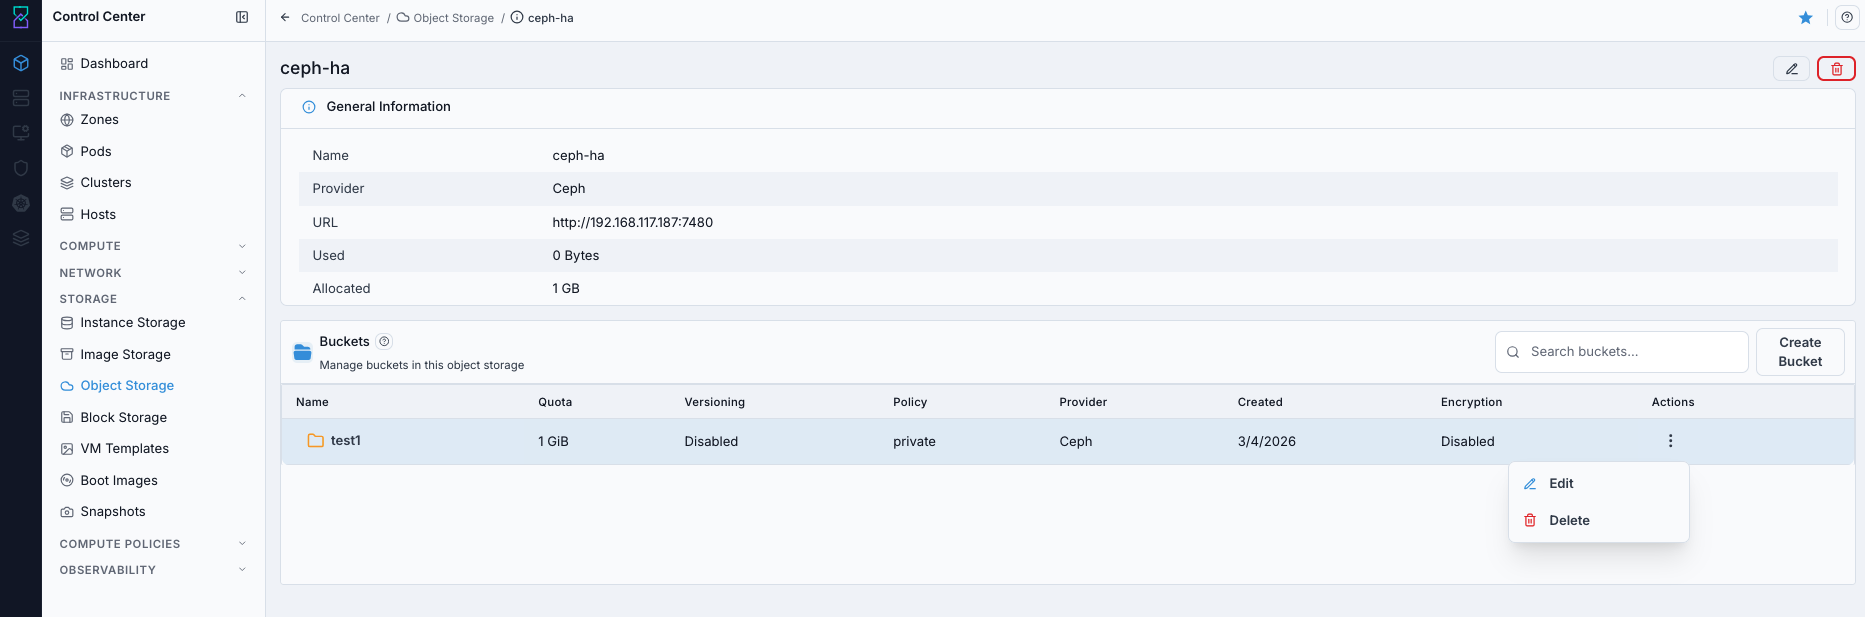
Bucket actions in Object Storage details.
Expected Outcome:
Bucket row actions are visible and ready for use.
If this fails:
Verify backend health and available capacity for the target storage resource (pool/store/endpoint and zone scope).
Check blocking dependencies for this action (attachments, snapshots, templates, buckets, object locks, or maintenance state).
Review Observability Events/Alerts for the storage object and retry only after resolving the root cause.
Step: Create Bucket from Object Store Details
When to Use: Use this when you need to create a new bucket under an existing object-store registration.
Purpose: Create a bucket with explicit quota, access policy, and optional security controls.
Steps:
In object-store details, go to
Buckets.Click
Create Bucket.Fill the form fields:
Bucket Name
Quota (GiB)
PolicyOptional toggles:
Versioning,Encryption,Object Locking
Click
Create.Verify the new bucket appears in the bucket list.
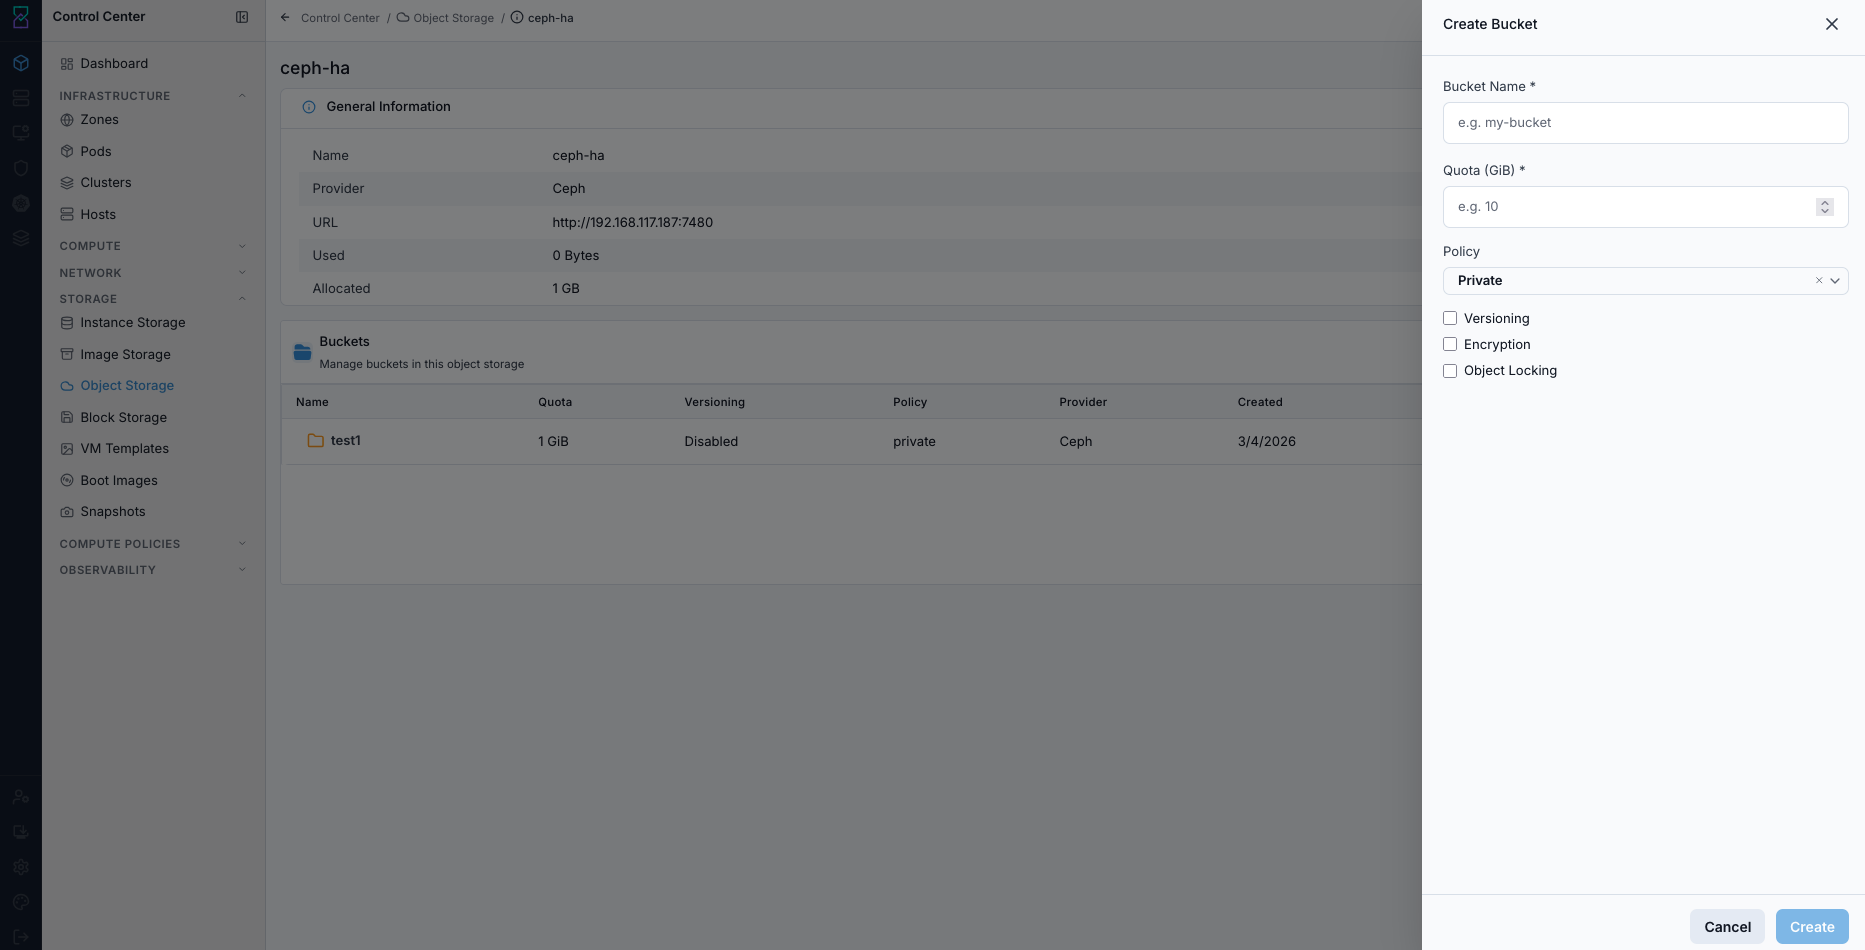
Create Bucket form.
Expected Outcome:
A new bucket row appears under the selected object store.
Quota, policy, and selected security settings are applied.
If this fails:
Verify backend health and available capacity for the target storage resource (pool/store/endpoint and zone scope).
Check blocking dependencies for this action (attachments, snapshots, templates, buckets, object locks, or maintenance state).
Review Observability Events/Alerts for the storage object and retry only after resolving the root cause.
Tool Tips
Use HTTPS endpoints and least-privilege keys for production stores.
Start with
Privatepolicy and open access only when required.
Warnings
Deleting object store registration removes platform access to that endpoint.
Exposed keys or open policies can leak sensitive data.
If this fails:
If endpoint registration fails, verify URL, DNS, and firewall path.
If authentication fails, rotate and re-enter
Access KeyandSecret Key.If bucket creation fails, check endpoint permissions, quota, and policy constraints.
Block Storage
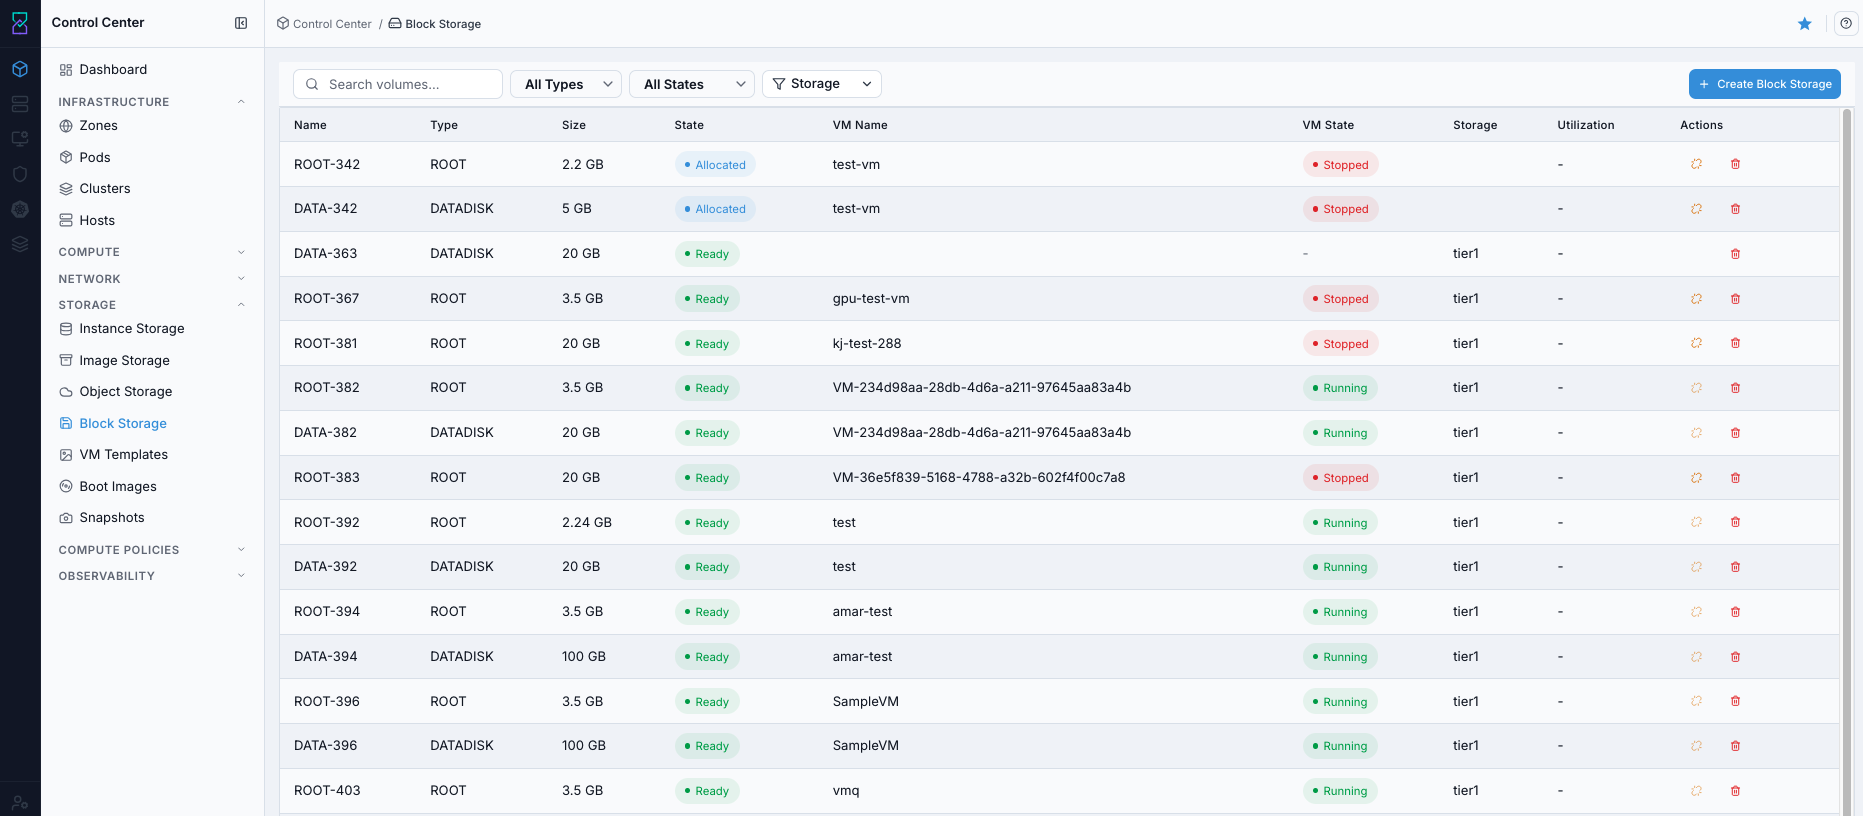
UI path: Control Center -> Storage -> Block Storage
Purpose
The Volumes Dashboard provides a centralized view of all storage volumes in Control Center. Use it to monitor status, track VM attachments, manage storage, and perform volume operations.
When to Use Block Storage
Use this module when you need to:
A VM needs additional persistent disk capacity.
You are migrating data and must detach an old disk after cutover.
You are decommissioning a workload and need safe disk cleanup.
Overview
Block Storage manages the full lifecycle of VM root and data volumes. Use it to validate state, attachment, storage location, and utilization before lifecycle actions.
Expected Outcome:
You can create, attach, detach, resize, and safely delete volumes with clear state validation.
Completion Criteria
You can create a disk and see it in the dashboard.
You can identify delete/detach actions and when to use each.
You can read utilization/state fields for risk triage.
Volumes Table
The main table displays all storage volumes with the following columns:
Column |
Description |
|---|---|
|
Unique identifier for the volume. Click to view volume details. |
|
Volume type ( |
|
Storage capacity allocated to the volume. |
|
Current state of the volume (for example |
|
Name of the VM this volume is attached to, or |
|
Current state of the attached VM (for example |
|
Storage location or pool where the volume is stored. |
|
Current usage or performance indicator, or |
|
Delete button and row |
Volume States
State badges:
State |
Meaning |
|---|---|
|
Volume is healthy and available for attachment or use. |
|
Volume has been allocated but is not yet attached to a VM. |
|
Volume is pending deletion. |
|
Volume is inaccessible or has connectivity issues. |
VM state context:
VM State |
Meaning |
|---|---|
|
Attached VM is powered on and operating normally. |
|
Attached VM is powered off or not running. |
|
Volume is not currently attached to any VM. |
Volume Types
ROOT
Root (system) volumes contain the operating system and system files.
Characteristics:
one per VM.
Contains OS installation and core system files.
Required for VM operation.
Size varies by OS and deployment profile.
Tips:
ROOT volumes cannot be detached without stopping the VM.
Monitor root volume space to avoid OS-level performance issues.
DATADISK
Data volumes store persistent application data.
Characteristics:
Multiple data disks can be attached to one VM.
Supports persistent application and service data.
Can be detached and reattached to other VMs based on policy/workflow.
Size depends on application requirements.
Tips:
Use multiple data disks where I/O separation is required.
Back up critical data disks regularly.
Quick Actions
Click the trash icon or row Actions menu (⋮) for volume operations:
Action |
Description |
|---|---|
|
Remove the volume. Detached volumes can be deleted immediately; attached volumes require detach workflow first. |
|
Open the volume details page. |
|
Attach an unattached volume to a VM (when available). |
|
Detach an attached volume from its VM (when available). |
|
Create a point-in-time snapshot (when available). |
Filtering and Search
Use browser search (
Ctrl+F/Cmd+F) to find volume names quickly.Filter by storage location or VM name when those controls are available.
Sort using column headers to organize large volume lists.
Volume Management Tips
Volumes with
VM Name=-are unattached and can be attached or deleted.If the
Storagecolumn shows a shared endpoint (for example192.168.115.16), volumes are centralized on that backend.Monitor size and utilization trends for capacity planning.
Use snapshots and backups before destructive lifecycle actions.
For high-performance workloads, validate backend availability and profile fit.
Delete unused volumes to reclaim storage capacity.
If a volume is attached to a running VM, stop or safely quiesce workload before detach/delete operations.
Use extra caution when modifying ROOT volumes to avoid boot failures.
Step: Understand Block Storage Terms and Actions
When to Use:
Use this when performing Understand Block Storage Terms and Actions in the active storage workflow.
Purpose:
Execute Understand Block Storage Terms and Actions and confirm the expected UI/state outcome for this storage resource.
Steps:
Use this map before detach or delete operations:
Control or field |
What it means |
What happens when used |
|---|---|---|
|
Disk provisioning workflow |
Opens create form; after submit, a new volume row is added. |
Link-break icon |
|
Removes VM attachment but keeps disk data and volume record. |
Trash icon |
|
Permanently removes the volume after confirmation. |
|
Volume lifecycle indicator |
Shows whether the disk is ready for attach/use or needs triage. |
|
Consumed capacity signal |
Helps identify volumes that need expansion or cleanup planning. |
Expected Outcome:
Task completes and the related storage view updates as expected.
If this fails:
Verify backend health and available capacity for the target storage resource (pool/store/endpoint and zone scope).
Check blocking dependencies for this action (attachments, snapshots, templates, buckets, object locks, or maintenance state).
Review Observability Events/Alerts for the storage object and retry only after resolving the root cause.
Step: Review Block Storage Dashboard
When to Use:
Use this when performing Review Block Storage Dashboard in the active storage workflow.
Purpose:
Execute Review Block Storage Dashboard and confirm the expected UI/state outcome for this storage resource.
Steps:
Open
Control Center -> Storage -> Block Storage.Review row values for state, VM attachment, and utilization.
Identify disks that are full, detached, or in non-ready states.
Block Storage dashboard.
Expected Outcome:
You can identify actionable volume rows by state, attachment, and storage context.
If this fails:
Verify backend health and available capacity for the target storage resource (pool/store/endpoint and zone scope).
Check blocking dependencies for this action (attachments, snapshots, templates, buckets, object locks, or maintenance state).
Review Observability Events/Alerts for the storage object and retry only after resolving the root cause.
Step: Open Block Storage Help Panel
When to Use: Use this after opening Block Storage when you need field definitions and control guidance.
Purpose: Open contextual help separately from dashboard review and filtering tasks.
Steps:
Open
Control Center -> Storage -> Block Storage.Click the help icon in the top-right corner.
Review help content for dashboard fields and volume actions.
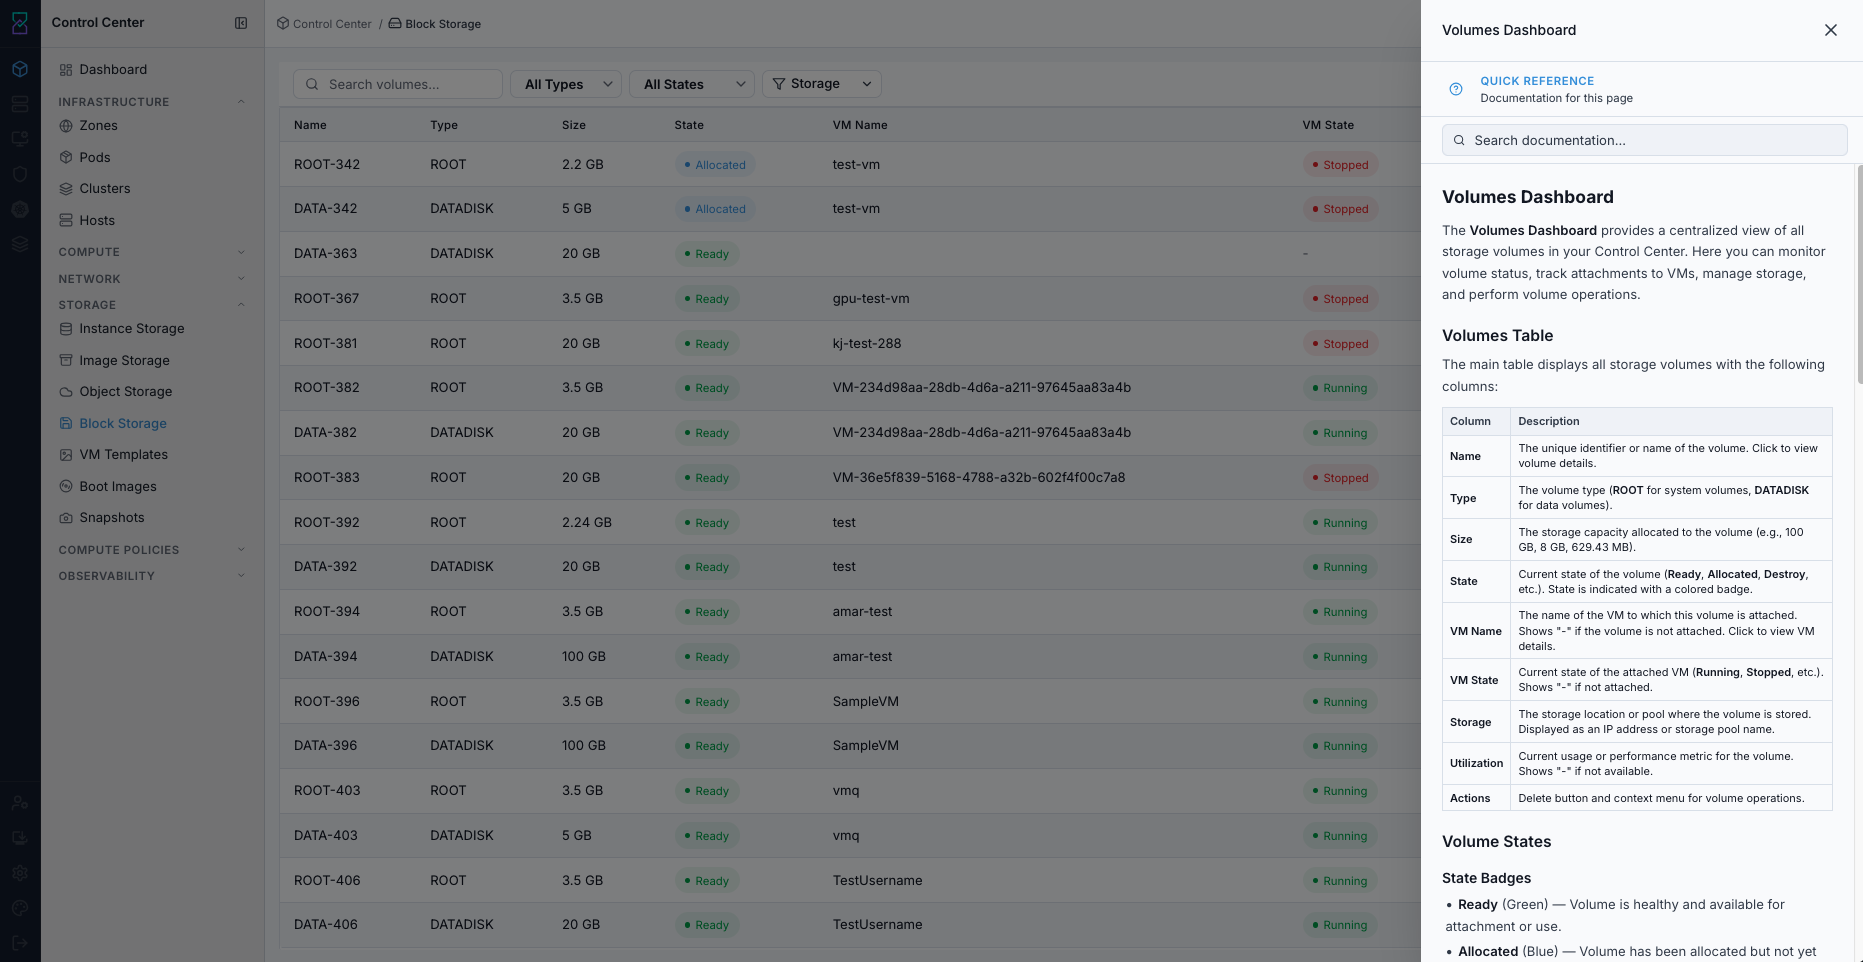
Block Storage help panel.
Expected Outcome:
The Block Storage help panel opens with page-specific guidance.
If this fails:
Verify backend health and available capacity for the target storage resource (pool/store/endpoint and zone scope).
Check blocking dependencies for this action (attachments, snapshots, templates, buckets, object locks, or maintenance state).
Review Observability Events/Alerts for the storage object and retry only after resolving the root cause.
Step: Use Block Storage Filters
When to Use: Use this when you need to narrow Block Storage results to specific disks or states.
Purpose: Reduce the working set to only relevant volume rows before taking actions.
Steps:
Open
Control Center -> Storage -> Block Storage.Use available filter controls to narrow the volume list.
Combine filters with search when needed.
Confirm only the target rows remain visible.

Block Storage dashboard filters.
Expected Outcome:
The table updates to show only rows matching filter/search criteria.
If this fails:
Verify backend health and available capacity for the target storage resource (pool/store/endpoint and zone scope).
Check blocking dependencies for this action (attachments, snapshots, templates, buckets, object locks, or maintenance state).
Review Observability Events/Alerts for the storage object and retry only after resolving the root cause.
Step: Create and Attach Disk
When to Use:
Use this when performing Create and Attach Disk in the active storage workflow.
Purpose:
Execute Create and Attach Disk and confirm the expected UI/state outcome for this storage resource.
Steps:
Click
+ Create Volume.Fill required fields:
Name
Zone
Volume Profile
Optional: select
Virtual Machineto attach during creation.Click
Create.Verify the new disk row appears.
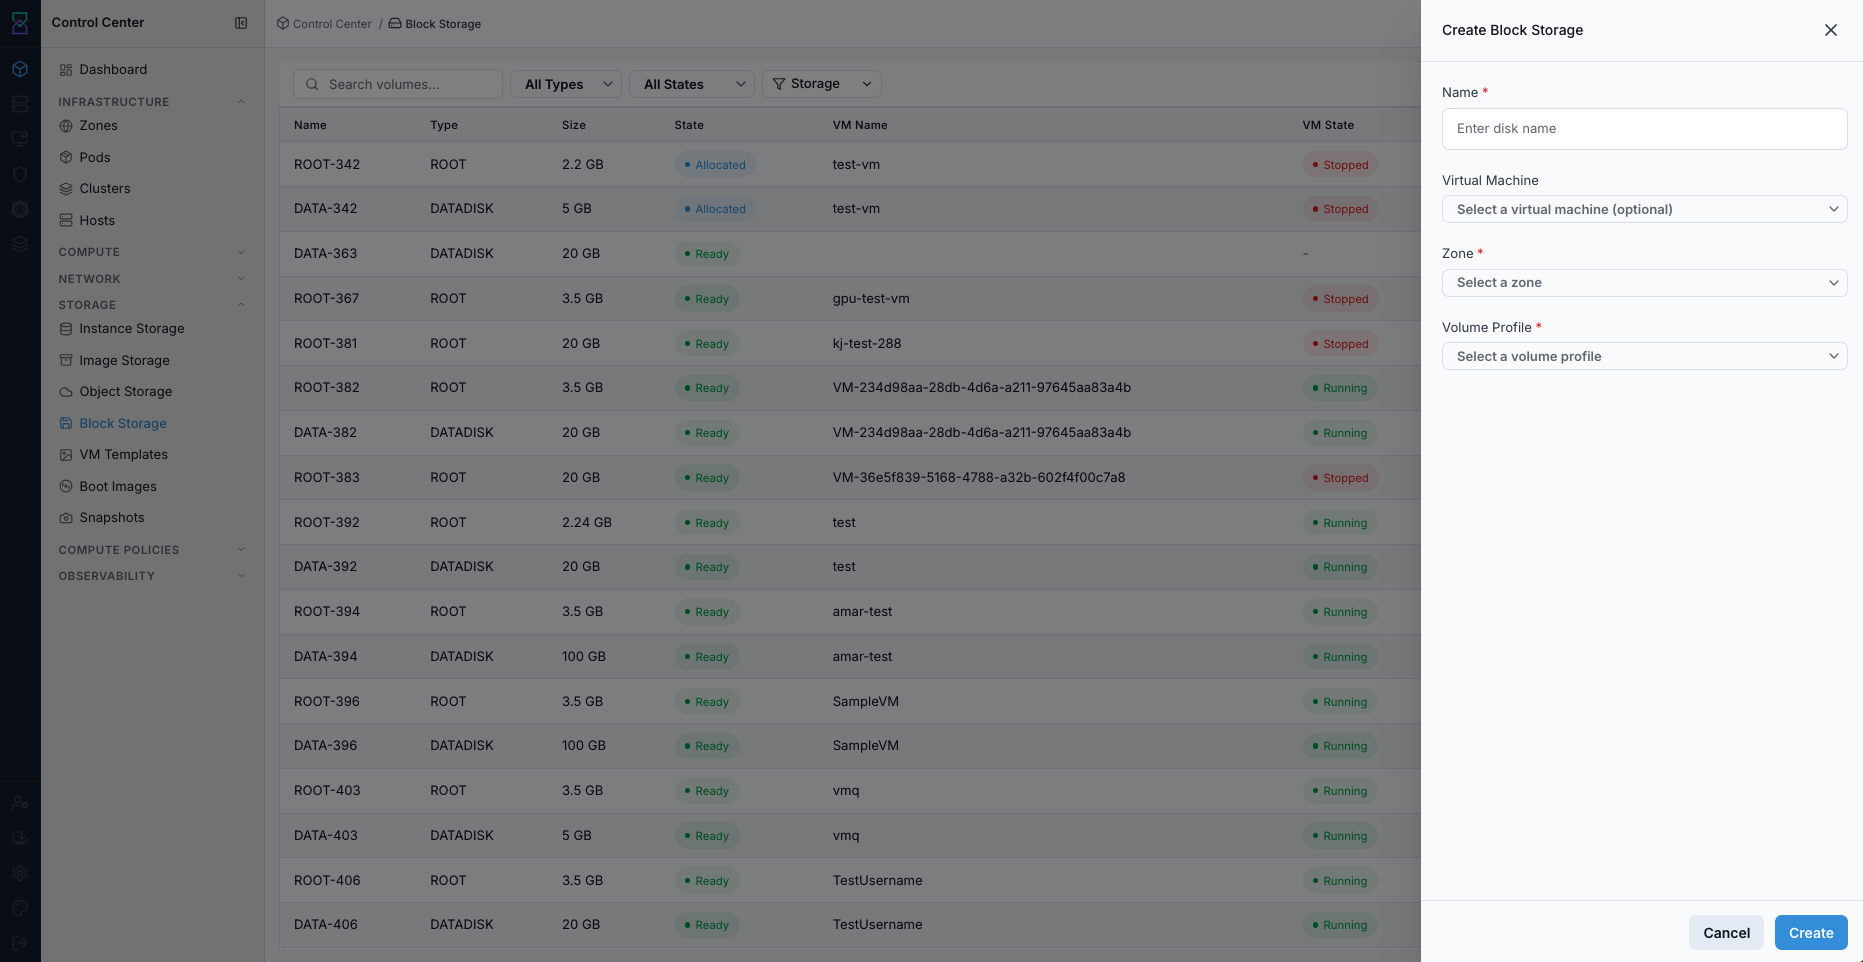
Create and Attach Disk form.
Expected Outcome:
New volume row appears with selected size/profile context.
If VM was selected, the disk is attached to that VM.
If this fails:
Verify backend health and available capacity for the target storage resource (pool/store/endpoint and zone scope).
Check blocking dependencies for this action (attachments, snapshots, templates, buckets, object locks, or maintenance state).
Review Observability Events/Alerts for the storage object and retry only after resolving the root cause.
Step: Review Block Volume Details
When to Use:
Use this when performing Review Block Volume Details in the active storage workflow.
Purpose:
Execute Review Block Volume Details and confirm the expected UI/state outcome for this storage resource.
Steps:
Click a volume name from the Block Storage dashboard.
Review
Basic InformationandAssociated Virtual Machineto confirm the disk is linked to the expected workload.Validate
Size & CapacityandInfrastructurevalues (zone, pool, hypervisor, utilization).Use this details view before deciding to detach, delete, or resize.
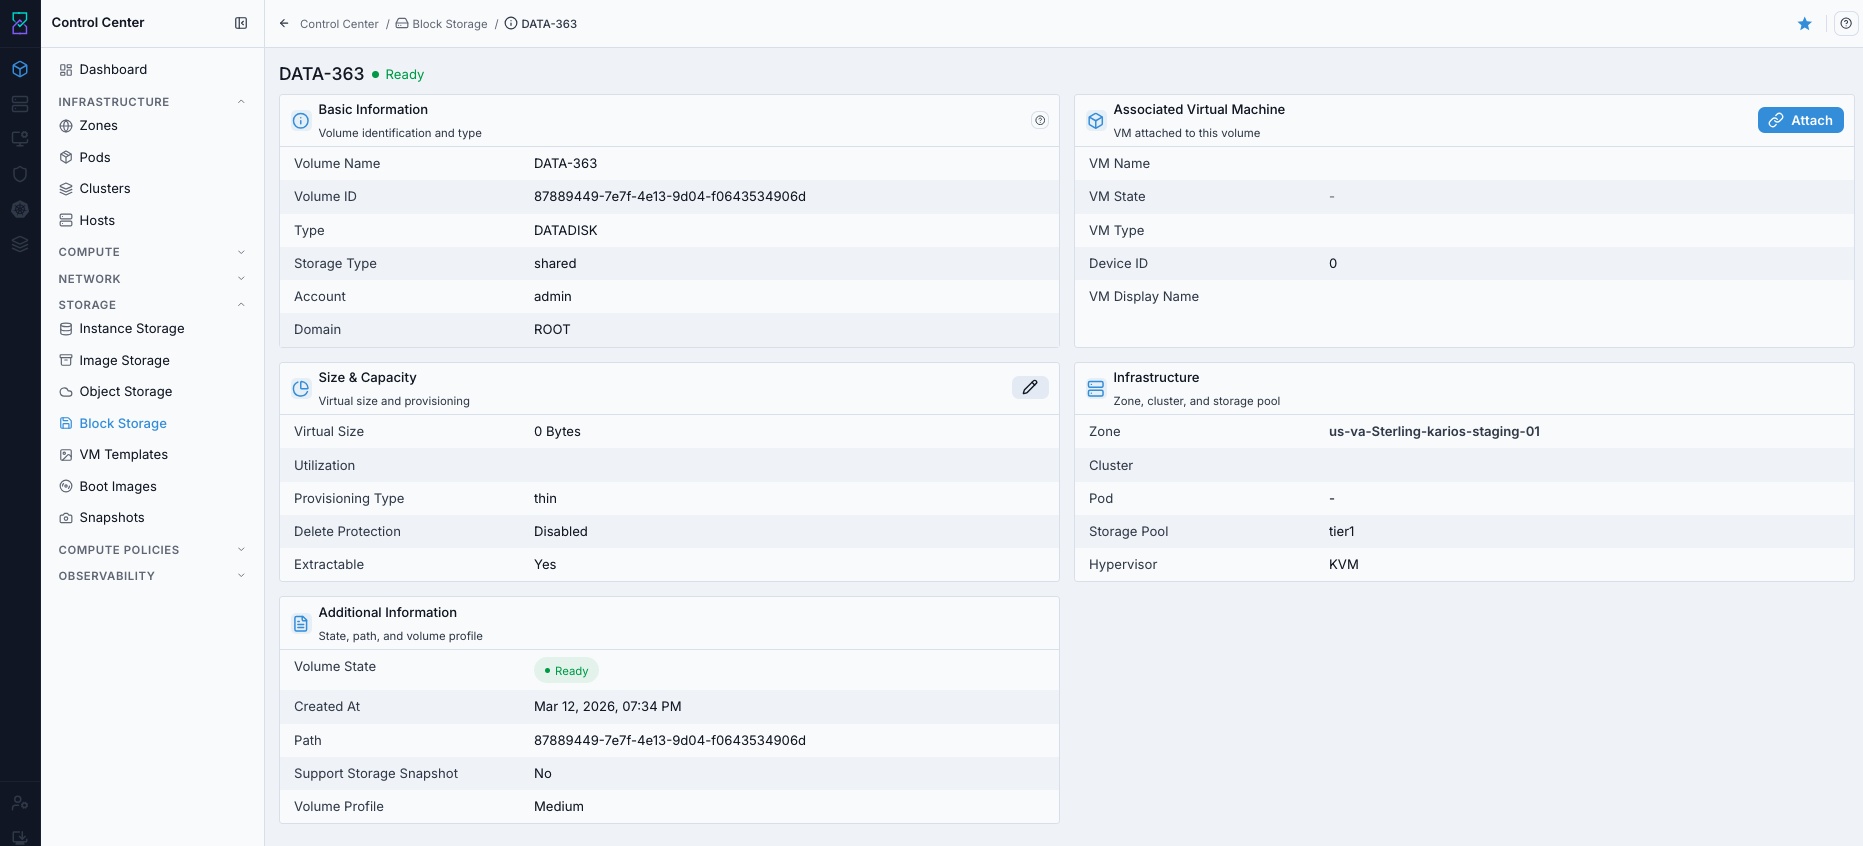
Block volume details page.
Expected Outcome:
You can confirm ownership, location, and current health of the selected volume before any lifecycle action.
If this fails:
Verify backend health and available capacity for the target storage resource (pool/store/endpoint and zone scope).
Check blocking dependencies for this action (attachments, snapshots, templates, buckets, object locks, or maintenance state).
Review Observability Events/Alerts for the storage object and retry only after resolving the root cause.
Step: Attach Existing Volume (When Available)
When to Use:
Use this when performing Attach Existing Volume (When Available) in the active storage workflow.
Purpose:
Execute Attach Existing Volume (When Available) and confirm the expected UI/state outcome for this storage resource.
Steps:
In the Block Storage dashboard, locate an unattached volume (
VM Name=-).Open row actions and select
Attach.Select target VM and confirm the attach action.
Verify
VM NameandVM Statecolumns update correctly.
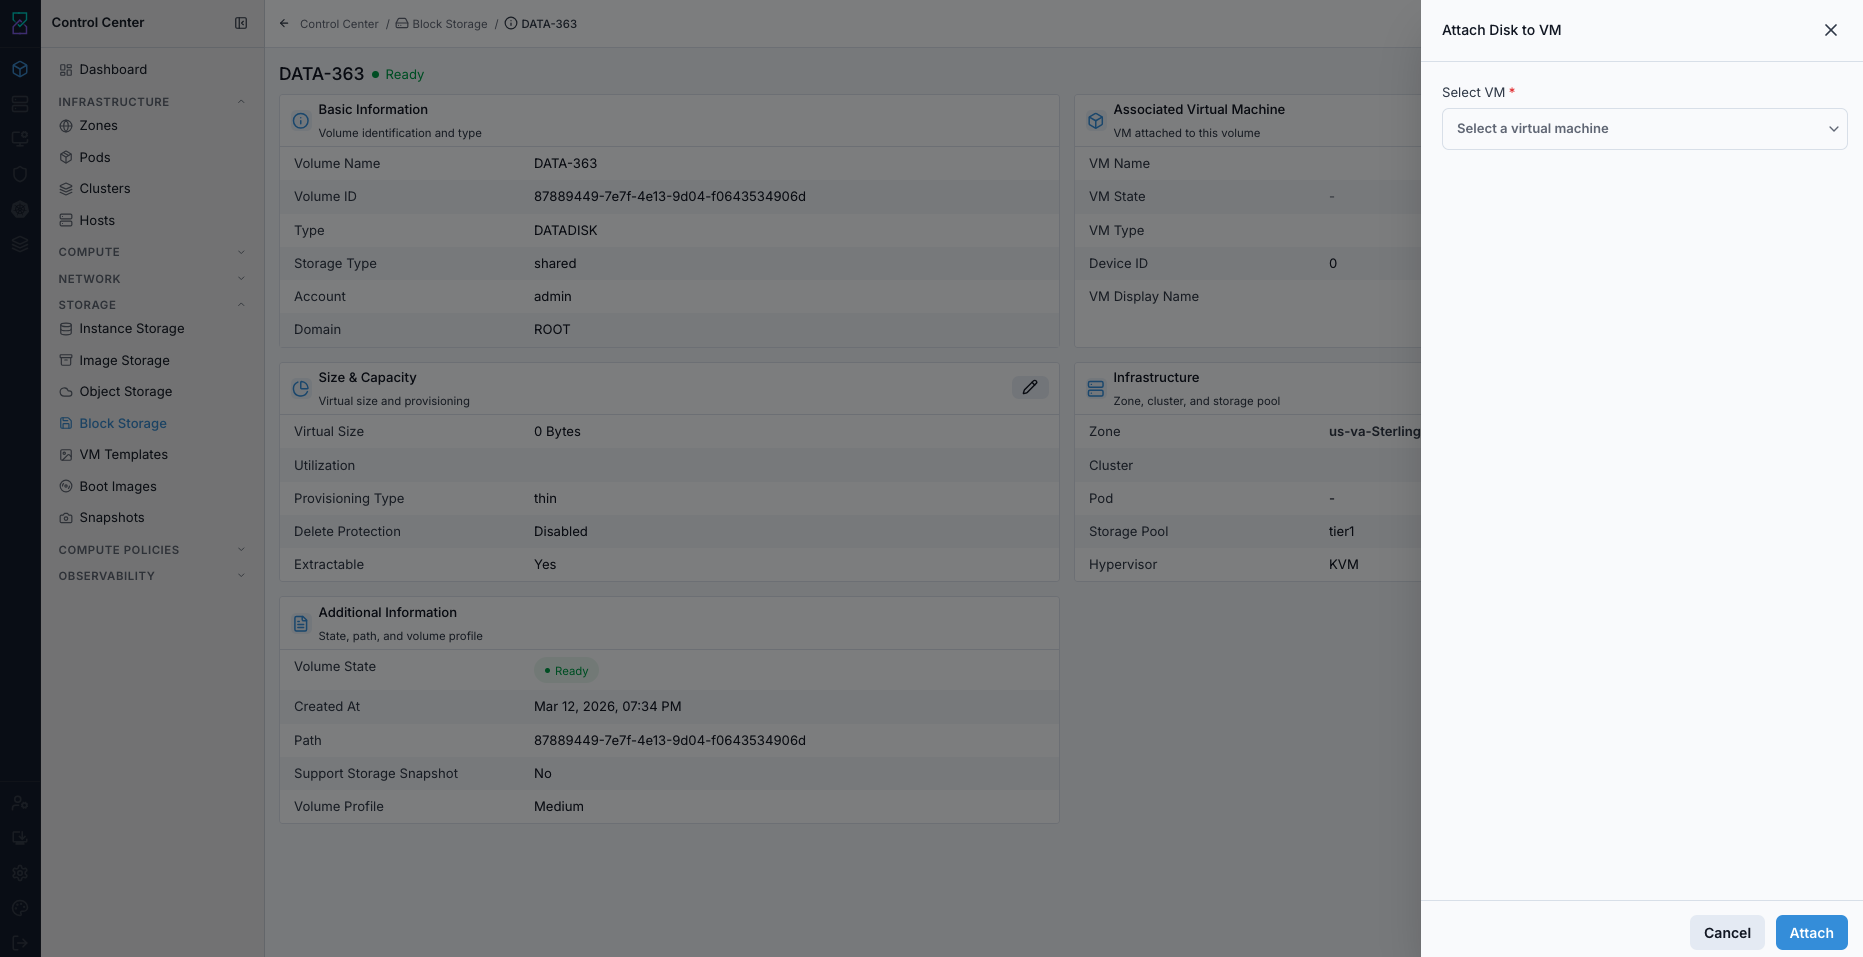
Attach disk to VM action in block storage details.
Expected Outcome:
Volume is attached to the selected VM and appears in the VM storage context.
Tip
Attach is in the same row Actions column shown in the Block Storage dashboard screenshot above.
Note
If Attach is not shown in your UI, use the VM disk management workflow instead.
If this fails:
Verify backend health and available capacity for the target storage resource (pool/store/endpoint and zone scope).
Check blocking dependencies for this action (attachments, snapshots, templates, buckets, object locks, or maintenance state).
Review Observability Events/Alerts for the storage object and retry only after resolving the root cause.
Step: Create Volume Snapshot (When Available)
When to Use:
Use this when performing Create Volume Snapshot (When Available) in the active storage workflow.
Purpose:
Execute Create Volume Snapshot (When Available) and confirm the expected UI/state outcome for this storage resource.
Steps:
Locate the target volume row in Block Storage.
Open row actions and select
Snapshot.Provide snapshot name/details if prompted and confirm.
Validate the new entry in Snapshots.
Expected Outcome:
Snapshot record is created for the selected volume and appears in snapshot inventory.
Tip
Snapshot is in the same row Actions column used for detach/delete operations.
Note
If Snapshot is not available in the row actions, use VM snapshot workflow from Virtual Machines.
If this fails:
Verify backend health and available capacity for the target storage resource (pool/store/endpoint and zone scope).
Check blocking dependencies for this action (attachments, snapshots, templates, buckets, object locks, or maintenance state).
Review Observability Events/Alerts for the storage object and retry only after resolving the root cause.
Step: Delete or Detach Disk
When to Use:
Use this when performing Delete or Detach Disk in the active storage workflow.
Purpose:
Execute Delete or Detach Disk and confirm the expected UI/state outcome for this storage resource.
Steps:
In the dashboard
Actionscolumn, locate the target disk row.Choose action by intent:
Use detach when the disk can be reused, investigated, or reattached later.
Use delete only when data is no longer required and recovery coverage is confirmed.
Use the link-break icon for detach (if shown) or trash icon for delete.
If deleting, complete Pre-Delete Safety Checklist (Use Before Any Delete) before confirmation.
Confirm the action and verify row state updates.
If the wrong action was taken, reattach the disk immediately (for detach) or start snapshot/backup restore (for delete).
Expected Outcome:
Detach preserves disk data for reuse; delete removes the disk record after confirmation.
If this fails:
Verify backend health and available capacity for the target storage resource (pool/store/endpoint and zone scope).
Check blocking dependencies for this action (attachments, snapshots, templates, buckets, object locks, or maintenance state).
Review Observability Events/Alerts for the storage object and retry only after resolving the root cause.
Step: Update Disk Size (When Available)
When to Use:
Use this when performing Update Disk Size (When Available) in the active storage workflow.
Purpose:
Execute Update Disk Size (When Available) and confirm the expected UI/state outcome for this storage resource.
Steps:
Open the target volume details.
Select disk-size update action where available.
Enter the new size and confirm.
Verify updated size in volume details/dashboard.
Update disk size action in block storage details.
Expected Outcome:
Volume size reflects the updated value after successful resize workflow.
If this fails:
Verify backend health and available capacity for the target storage resource (pool/store/endpoint and zone scope).
Check blocking dependencies for this action (attachments, snapshots, templates, buckets, object locks, or maintenance state).
Review Observability Events/Alerts for the storage object and retry only after resolving the root cause.
Tool Tips
Use naming that identifies VM or service ownership.
Filter by
Statebefore cleanup actions.
Warnings
Never delete disks attached to active workloads unless data has been migrated.
Verify backups/snapshots before destructive disk operations.
If this fails:
If volume create fails, validate zone capacity and volume profile availability.
If detach/delete is blocked, stop workload safely and retry.
If utilization is high, plan expansion and run in-guest filesystem checks.
VM Templates
UI path: Control Center -> Storage -> VM Templates
Purpose
The Templates Dashboard provides a centralized view of all VM templates available in Control Center. Use it to browse pre-configured VM images, manage template availability, and provision virtual machines faster.
When to Use VM Templates
Use this module when you need to:
Standardize VM builds using reusable template baselines.
Add or validate OS images before VM provisioning.
Review readiness, visibility, and format compatibility before production use.
Overview
Templates are pre-built VM images used for rapid and repeatable deployment. The dashboard shows metadata, readiness state, visibility scope, and image format for each template.
Templates Table
The main table displays available VM templates with the following columns:
Column |
Description |
|---|---|
|
Unique identifier or technical template name. Click to view details. |
|
User-friendly name, often including architecture or profile details. |
|
Operating system type (for example Ubuntu, Windows Server, Rocky Linux). |
|
Current template state (for example |
|
Access scope ( |
|
Whether this template is highlighted as recommended. |
|
Template image format (for example |
|
Template file size; larger images take longer to import and deploy. |
Template Status Indicators
Status Badges
Status |
Meaning |
|---|---|
|
Fully prepared and available for VM provisioning. |
|
Template is being downloaded, processed, or optimized. |
|
Preparation failed. Template cannot be used until resolved. |
|
Template has been allocated but is not yet ready. |
Visibility Badges
Visibility |
Meaning |
|---|---|
|
Accessible to all users in the Control Center based on permissions. |
|
Restricted to owner/account scope. |
Featured Badges
Featured |
Meaning |
|---|---|
|
Marked as recommended in VM provisioning workflows. |
|
Available but not marked as featured. |
Template Types and Operating Systems
Linux Templates
Pre-configured Linux images optimized for cloud deployment.
Common distributions:
Ubuntu (20.04 LTS, 22.04 LTS, 24.04 LTS)
Debian GNU/Linux 12
Rocky Linux (8, 9)
Oracle Linux (8, 9)
OpenSUSE (15.5)
Characteristics:
Lightweight and fast to deploy.
Cloud-init capable for automated customization.
patched and suitable for standard cloud workloads.
Use cases:
Development and testing environments.
Web services and application backends.
Container and microservice platforms.
Data services and processing workloads.
Windows Templates
Pre-configured Windows Server images.
Supported versions:
Windows Server 2019
Windows Server 2025
Windows-2019-Golden-Template (environment-specific optimized image)
Characteristics:
Full Windows Server feature set.
RDP and enterprise integration support.
Suitable for Microsoft stack workloads.
Use cases:
.NET and enterprise applications.
Active Directory and identity services.
SQL Server and Microsoft platform services.
Legacy Windows application hosting.
Specialized Templates
Examples include:
jammy-ubuntu-standard(Cloud-init ready baseline)sdi(specialized development image)Rocky Linux
x86_64variants
Template Formats
Format |
Description |
Best for |
|---|---|---|
|
Raw disk image (no compression) |
Performance-critical deployments. |
|
QEMU copy-on-write image |
Storage efficiency in KVM environments. |
|
Virtual hard disk format |
Hyper-V compatibility and Azure workflows. |
|
VMware disk format |
VMware interoperability and vSphere-oriented workflows. |
Quick Actions
Click the row Actions menu (⋮) or delete icon for template operations:
Delete: Remove template registration (with confirmation).View Details: Open complete template metadata and state.CopyorClone: Create a derivative template for controlled modifications.Download: Download template artifact when download is enabled.Edit: Update template metadata/settings where allowed.
Warning
Deleting a public or actively used template can impact dependent teams/workloads. Verify impact before deletion.
Creating and Registering Templates
From VM Snapshot
Prepare and configure the source VM.
Stop the VM and create a snapshot.
Convert the snapshot to a template.
Set template metadata (name, display name, visibility).
Confirm and monitor template status.
From Boot Image
Provision a VM from a Boot Image.
Complete OS installation and required customization.
Install guest tooling (Cloud-init/agents) as needed.
Stop the VM and create a template.
Set metadata and publish.
Register External Template
Prepare template artifact (
RAW,QCOW2,VMDK, and other supported formats).Upload artifact to reachable storage or provide URL.
Register the template in Control Center.
Set metadata and format values.
Monitor import until state is
Ready.
Template Preparation Tips
Include these before creating reusable templates:
Cloud-init support for automated initialization.
Guest agents/drivers required by your hypervisor.
Current security patches.
SSH and key-based access for Linux images where required.
DHCP-compatible networking configuration.
Cleanup of temporary files, logs, and transient keys.
Template Size and Deployment Profile
Use this as planning guidance. Actual behavior depends on storage and network conditions.
Size |
Deployment profile |
Recommended use |
Characteristics |
|---|---|---|---|
|
Low deployment overhead |
Minimal systems |
Minimal footprint and limited pre-installed software. |
|
Moderate deployment overhead |
Standard OS |
Basic OS with common tools. |
|
Elevated deployment overhead |
Feature-rich OS |
OS plus common development/runtime libraries. |
|
High deployment overhead |
Specialized stacks |
Pre-configured applications and service components. |
|
Very high deployment overhead |
Complex stacks |
Large multi-component environments. |
Template Management Tips
Use naming conventions with OS, version, and architecture (for example
Ubuntu-22.04-LTS-x64).Keep display names clear and user-friendly.
Version templates to track lifecycle updates.
Feature only used templates.
Use
Privatevisibility for internal or custom images.Refresh templates periodically with updates and security patches.
Validate template readiness and compatibility before broad release.
Monitor template storage usage and retire outdated images.
Keep backup copies/version history for critical templates.
Step: Review VM Templates Dashboard
When to Use:
Use this when performing Review VM Templates Dashboard in the active storage workflow.
Purpose:
Execute Review VM Templates Dashboard and confirm the expected UI/state outcome for this storage resource.
Steps:
Open
Control Center -> Storage -> VM Templates.Review table rows for name, OS type, format, visibility, and status.
Confirm template
StatusisReadywhere needed.
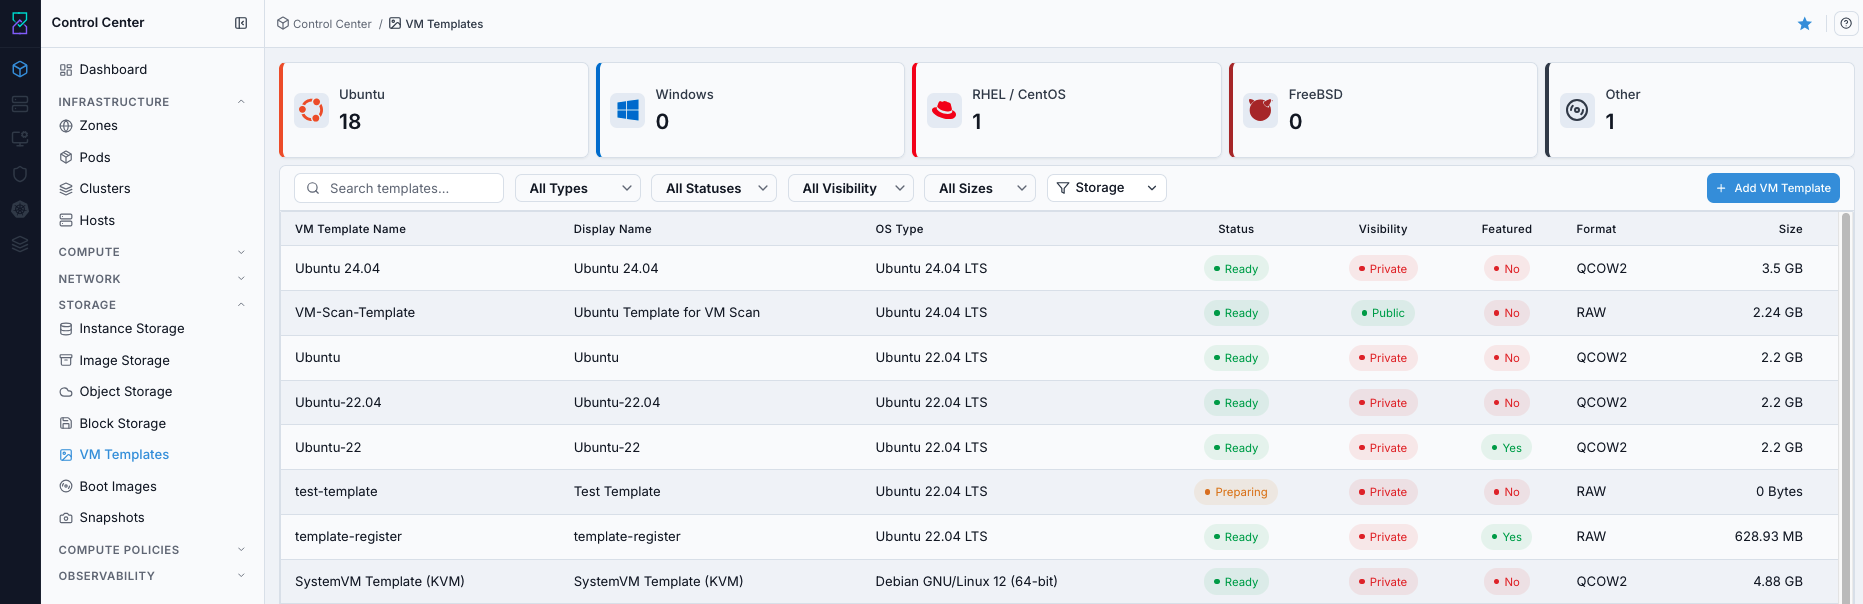
VM Templates dashboard.
Expected Outcome:
VM Templates dashboard loads with template rows and status indicators visible.
If this fails:
Verify backend health and available capacity for the target storage resource (pool/store/endpoint and zone scope).
Check blocking dependencies for this action (attachments, snapshots, templates, buckets, object locks, or maintenance state).
Review Observability Events/Alerts for the storage object and retry only after resolving the root cause.
Step: Open VM Templates Help Panel
When to Use: Use this after opening VM Templates when you need field definitions and workflow guidance.
Purpose: Open contextual help separately from dashboard and filtering actions.
Steps:
Open
Control Center -> Storage -> VM Templates.Click the help icon in the top-right corner.
Review help content for template fields and actions.
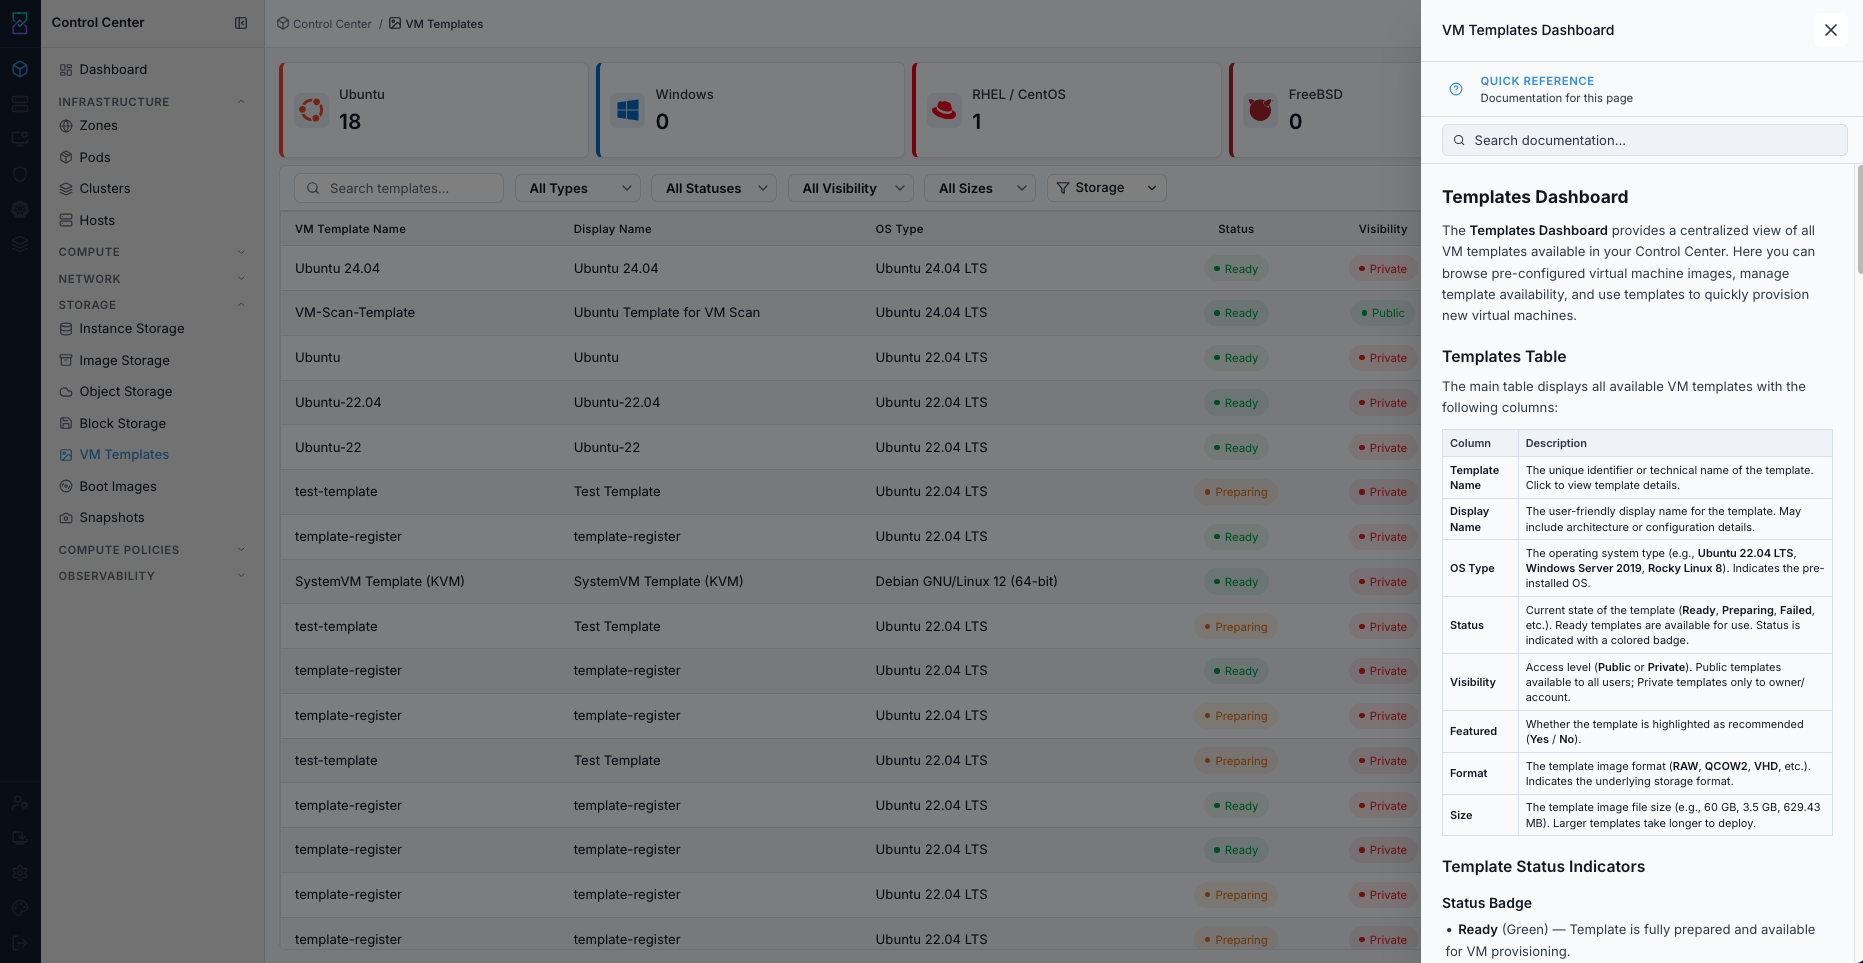
VM Templates help panel.
Expected Outcome:
The VM Templates help panel opens with page-specific guidance.
If this fails:
Verify backend health and available capacity for the target storage resource (pool/store/endpoint and zone scope).
Check blocking dependencies for this action (attachments, snapshots, templates, buckets, object locks, or maintenance state).
Review Observability Events/Alerts for the storage object and retry only after resolving the root cause.
Step: Use VM Templates Filters
When to Use: Use this when you need to narrow template rows by lifecycle or metadata attributes.
Purpose: Find target templates faster before registering, reviewing, or deleting.
Steps:
Open
Control Center -> Storage -> VM Templates.Apply filters for status, visibility, format, and size as needed.
Use search to locate a specific template name.
Confirm the filtered list contains only the intended rows.

VM Templates dashboard filters.
Expected Outcome:
The template list updates to match selected filter/search criteria.
If this fails:
Verify backend health and available capacity for the target storage resource (pool/store/endpoint and zone scope).
Check blocking dependencies for this action (attachments, snapshots, templates, buckets, object locks, or maintenance state).
Review Observability Events/Alerts for the storage object and retry only after resolving the root cause.
Step: Register Template from URL
When to Use:
Use this when performing Register Template from URL in the active storage workflow.
Purpose:
Execute Register Template from URL and confirm the expected UI/state outcome for this storage resource.
Steps:
Click
+ Add Template.In
Register Template, fill required fields:
Template Name
Display Text
URL
Hypervisor
Format
Zone
OS Type
Click
Register.
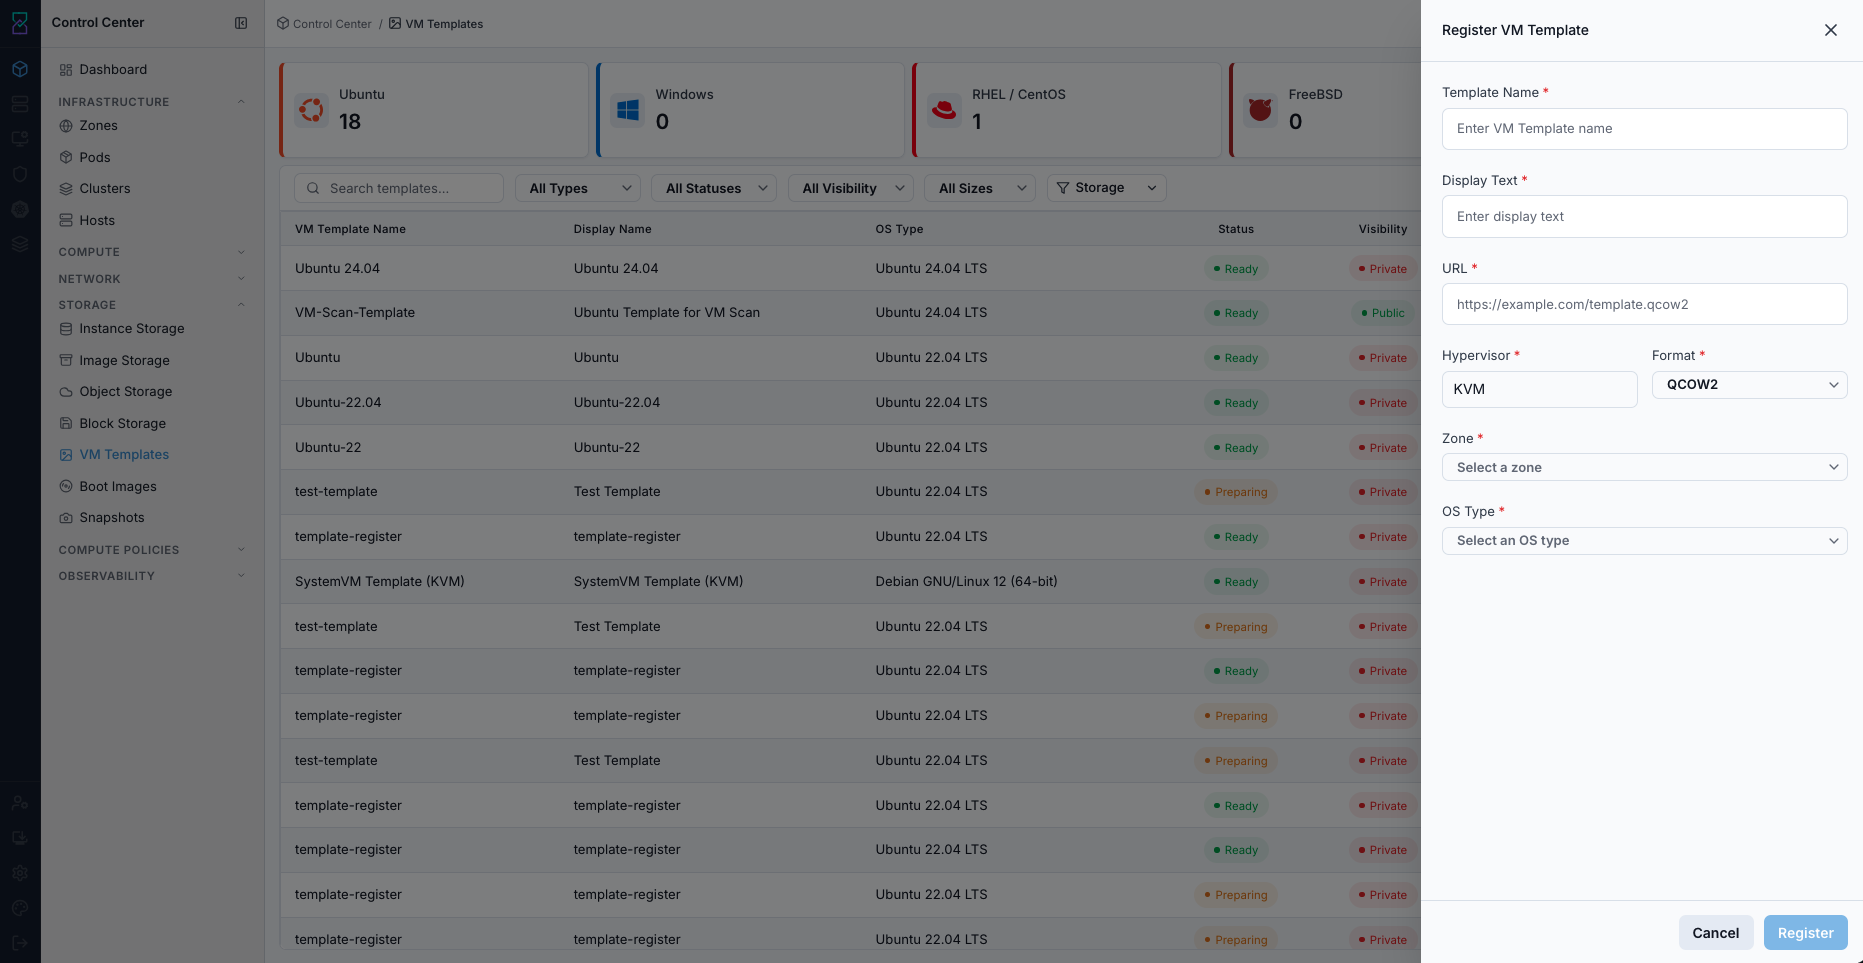
Register Template form.
Expected Outcome:
New template row is created and import processing begins.
Statuschanges toReadyafter successful preparation.
If this fails:
Verify backend health and available capacity for the target storage resource (pool/store/endpoint and zone scope).
Check blocking dependencies for this action (attachments, snapshots, templates, buckets, object locks, or maintenance state).
Review Observability Events/Alerts for the storage object and retry only after resolving the root cause.
Step: Review Template Details
When to Use: Use this when validating whether a template is safe and compatible for VM provisioning.
Purpose: Interpret the template details UI correctly before using the template in production workflows.
Steps:
Click a template name to open details.
Review the cards on the details page and confirm each value:
Basic Information:
NameandDisplay Text: human-readable template identity.
ID: unique template identifier used for support/API tracing.
Status: template lifecycle state (must beReadyfor provisioning).
AccountandDomain: ownership scope.
OS & Zone Information:
OS Type NameandOS Type ID: guest OS mapping.
ZoneandZone ID: where the template is available.
Metadata & Flags:
Visibility:PublicorPrivateaccess scope.
Featured: whether template is highlighted in selection workflows.
VM Template TypeandCross Zones: distribution/behavior flags.
Format & Hypervisor:
Format(for exampleQCOW2),Hypervisor(for exampleKVM), andArchitecture.
Bootable,Password Enabled,SSH Key Enabledcapability flags.
Size & Download:
Total SizeandPhysical Sizefor capacity planning.
Direct DownloadandExtractableflags.
Source Information:
URLandChecksumused for source integrity validation.
Download Status by Datastore:Confirms whether the template is downloaded and usable on datastore targets.
Confirm
StatusisReadyand datastore download state is healthy before provisioning.
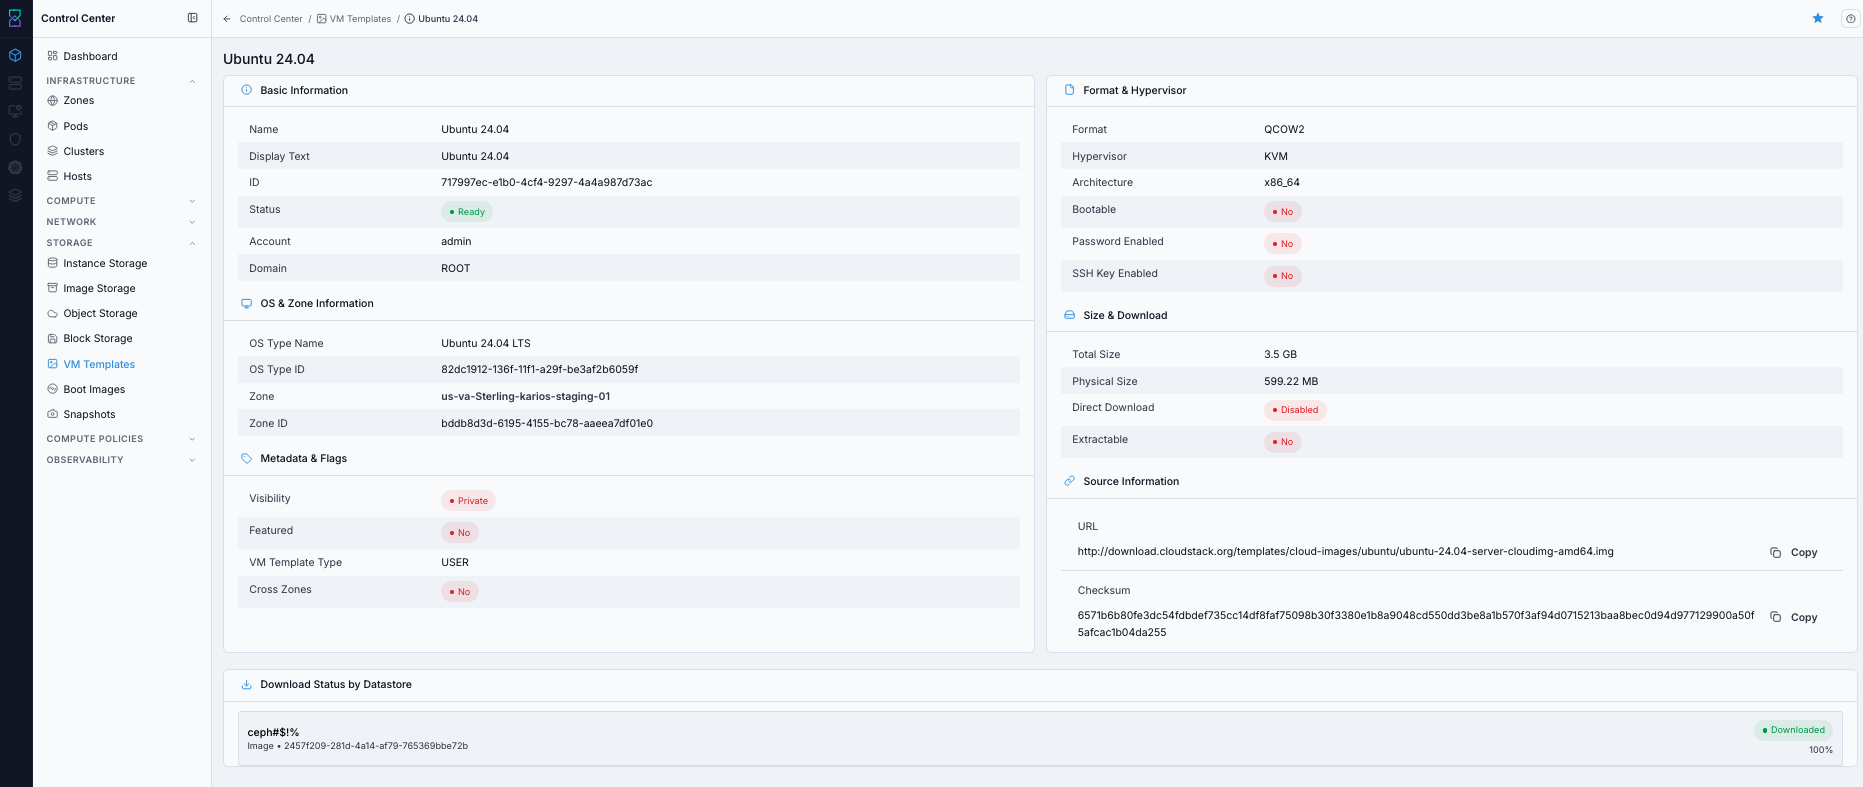
Template details page.
Expected Outcome:
You can map each details card to its operational meaning.
Template compatibility, ownership scope, source integrity, and readiness are validated before use.
If this fails:
Verify backend health and available capacity for the target storage resource (pool/store/endpoint and zone scope).
Check blocking dependencies for this action (attachments, snapshots, templates, buckets, object locks, or maintenance state).
Review Observability Events/Alerts for the storage object and retry only after resolving the root cause.
Warnings
Wrong OS type, hypervisor, or format values can block deployment from a template.
Do not provision from templates that are not in
Readystate.Confirm dependencies before deleting used templates.
If this fails:
If template registration fails, verify URL reachability, credentials, and image format compatibility.
If a template remains unusable, validate
Status,OS Type,Format, andHypervisormappings in details.If a delete action is blocked, check whether active VMs or policies depend on the template.
Review Observability for related error events when needed.
Boot Images
UI path: Control Center -> Storage -> Boot Images
Purpose
The Boot Images Dashboard provides a centralized view of all Boot Images available in Control Center. Use it to browse bootable installation media, manage Boot Image availability, and provision new virtual machines.
When to Use Boot Images
Use this module when you need to:
Publish or validate OS installation media.
Confirm architecture and zone compatibility before VM provisioning.
Manage visibility and bootable flags for shared media catalogs.
Overview
Boot Images are installation or utility media used during VM bootstrap and recovery workflows. The dashboard tracks readiness, visibility, architecture compatibility, and zone availability.
Boot Images Table
Column |
Description |
|---|---|
|
Unique identifier or name of the Boot Image. Click to view details. |
|
Processor architecture (for example |
|
Operating system type associated with the Boot Image. |
|
Current state (for example |
|
Access level ( |
|
Whether the Boot Image can boot/install an OS ( |
|
Boot Image file size. |
|
Zone where the Boot Image is available. Can show |
|
Delete action for removing Boot Images. |
Boot Image Status Indicators
Status Badges
Status |
Meaning |
|---|---|
|
Fully downloaded and available for use. |
|
Boot Image is currently being downloaded from source. |
|
Download or preparation failed; image cannot be used. |
|
Boot Image has been allocated but is not yet ready. |
Visibility Badges
Visibility |
Meaning |
|---|---|
|
Accessible to all users in Control Center. |
|
Restricted to owner/account scope. |
Bootable Badges
Bootable |
Meaning |
|---|---|
|
Bootable media for OS install/boot workflows. |
|
Not intended for VM boot; used for data/tools payloads. |
Boot Image Types
Operating System Boot Images
Pre-built bootable images for OS installation:
Windows Server installation media.
Linux distribution installation media.
Virtio/tools media for guest integration and driver support.
Use cases:
Install Windows Server variants on new VMs.
Bootstrap Linux VMs with selected distribution media.
Install guest integration tools for better VM performance and management.
Tool and Utility Boot Images
Specialized utility images for operations and platform tooling:
vmware-tools.isoxs-tools.isoKubernetes/CaaS utility images
Use cases:
Install guest tools and utilities.
Distribute system diagnostics/support media.
Support platform Bootstrap workflows.
Quick Actions
Use the trash icon in Actions to delete a Boot Image.
Warning
Deleting a Public Boot Image can impact all users that depend on it. Verify dependencies before confirming deletion.
Creating and Uploading Boot Images
Use + Add Boot Image (top-right) to publish new Boot Images.
Typical fields include:
Boot Image name
File selection (upload)
OS type
Architecture
Visibility
Zone
Bootable flag
Size and Performance Considerations
Size range |
Typical use |
Transfer profile |
Characteristics |
|---|---|---|---|
|
Minimal/live images |
Quick |
Minimal OS footprint and limited functionality. |
|
Standard OS images |
Moderate |
Full OS with common tools. |
|
Feature-rich OS images |
Slow |
OS with broader package/tool coverage. |
|
Specialized images |
Very slow |
Complex stacks and large preloaded payloads. |
Boot Image Management Tips
Ensure Boot Images exist in the zone where VMs will be provisioned.
Use descriptive naming with OS, version, and architecture.
Keep sensitive/internal media
Private; publish only approved standard media.Set
Bootable = Yesonly for valid boot/install media.Remove unused large Boot Images to reclaim storage.
Track versioned media explicitly in naming for clarity.
Check visibility settings regularly to maintain access control alignment.
Step: Review Boot Images Dashboard
When to Use:
Use this when performing Review Boot Images Dashboard in the active storage workflow.
Purpose:
Execute Review Boot Images Dashboard and confirm the expected UI/state outcome for this storage resource.
Steps:
Open
Control Center -> Storage -> Boot Images.Use search and filters for status/visibility/storage.
Review table rows and verify
StatusandBootablevalues.
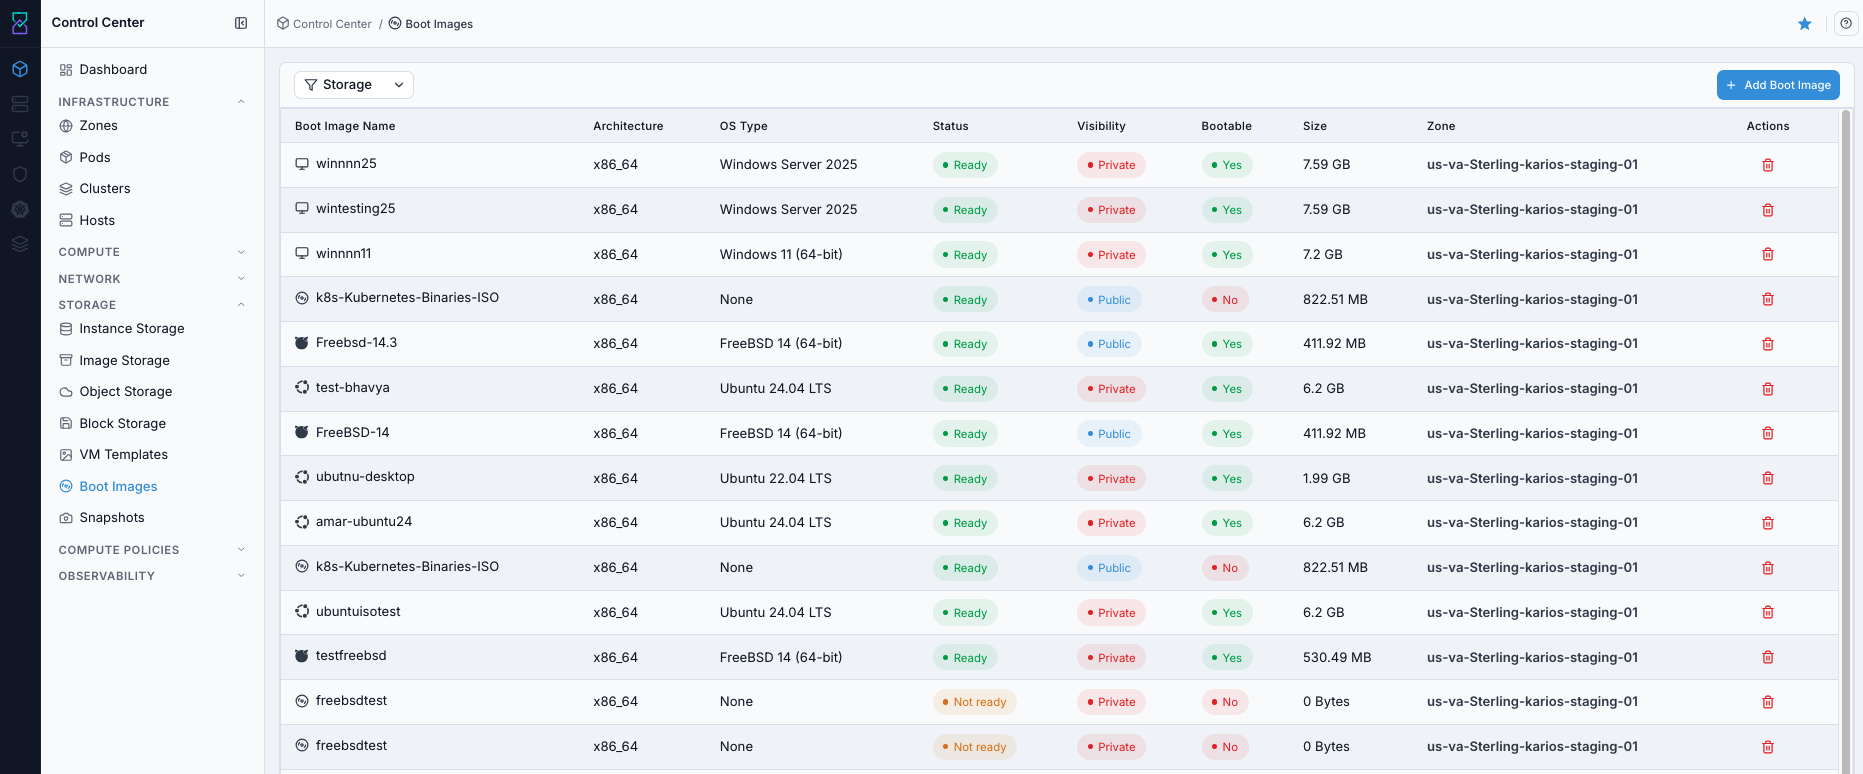
Boot Images dashboard.
Expected Outcome:
Boot Images dashboard loads with rows, status, and bootable metadata visible.
If this fails:
Verify backend health and available capacity for the target storage resource (pool/store/endpoint and zone scope).
Check blocking dependencies for this action (attachments, snapshots, templates, buckets, object locks, or maintenance state).
Review Observability Events/Alerts for the storage object and retry only after resolving the root cause.
Step: Open Boot Images Help Panel
When to Use: Use this after opening Boot Images when you need definitions for page fields and actions.
Purpose: Open contextual help separately from dashboard review and media operations.
Steps:
Open
Control Center -> Storage -> Boot Images.Click the help icon in the top-right corner.
Review help guidance for Boot Images fields and controls.
Boot Images help panel.
Expected Outcome:
The Boot Images help panel opens with page-specific guidance.
If this fails:
Verify backend health and available capacity for the target storage resource (pool/store/endpoint and zone scope).
Check blocking dependencies for this action (attachments, snapshots, templates, buckets, object locks, or maintenance state).
Review Observability Events/Alerts for the storage object and retry only after resolving the root cause.
Step: Register Boot Image from URL
When to Use:
Use this when performing Register Boot Image from URL in the active storage workflow.
Purpose:
Execute Register Boot Image from URL and confirm the expected UI/state outcome for this storage resource.
Steps:
Click
+ Add Boot Image.In
Register Boot Imagetab, fill required fields:
Name
URL
Zone
OS Type
Configure toggles as needed:
Bootable
Public
Featured
Direct Download
Click
Register.

Register Boot Image form.
Expected Outcome:
Boot-image row is created with selected zone/OS metadata.
Boot image transitions to a usable state after fetch/import processing.
If this fails:
Verify backend health and available capacity for the target storage resource (pool/store/endpoint and zone scope).
Check blocking dependencies for this action (attachments, snapshots, templates, buckets, object locks, or maintenance state).
Review Observability Events/Alerts for the storage object and retry only after resolving the root cause.
Step: Upload Boot Image File
When to Use:
Use this when performing Upload Boot Image File in the active storage workflow.
Purpose:
Execute Upload Boot Image File and confirm the expected UI/state outcome for this storage resource.
Steps:
In the same panel, switch to
Upload Boot Imagetab.Select the boot-image file.
Fill required fields:
Name
Architecture
Zone
OS Type
Confirm
Formatmatches your artifact type.Optional: set
Bootabletoggle.Click
Upload.
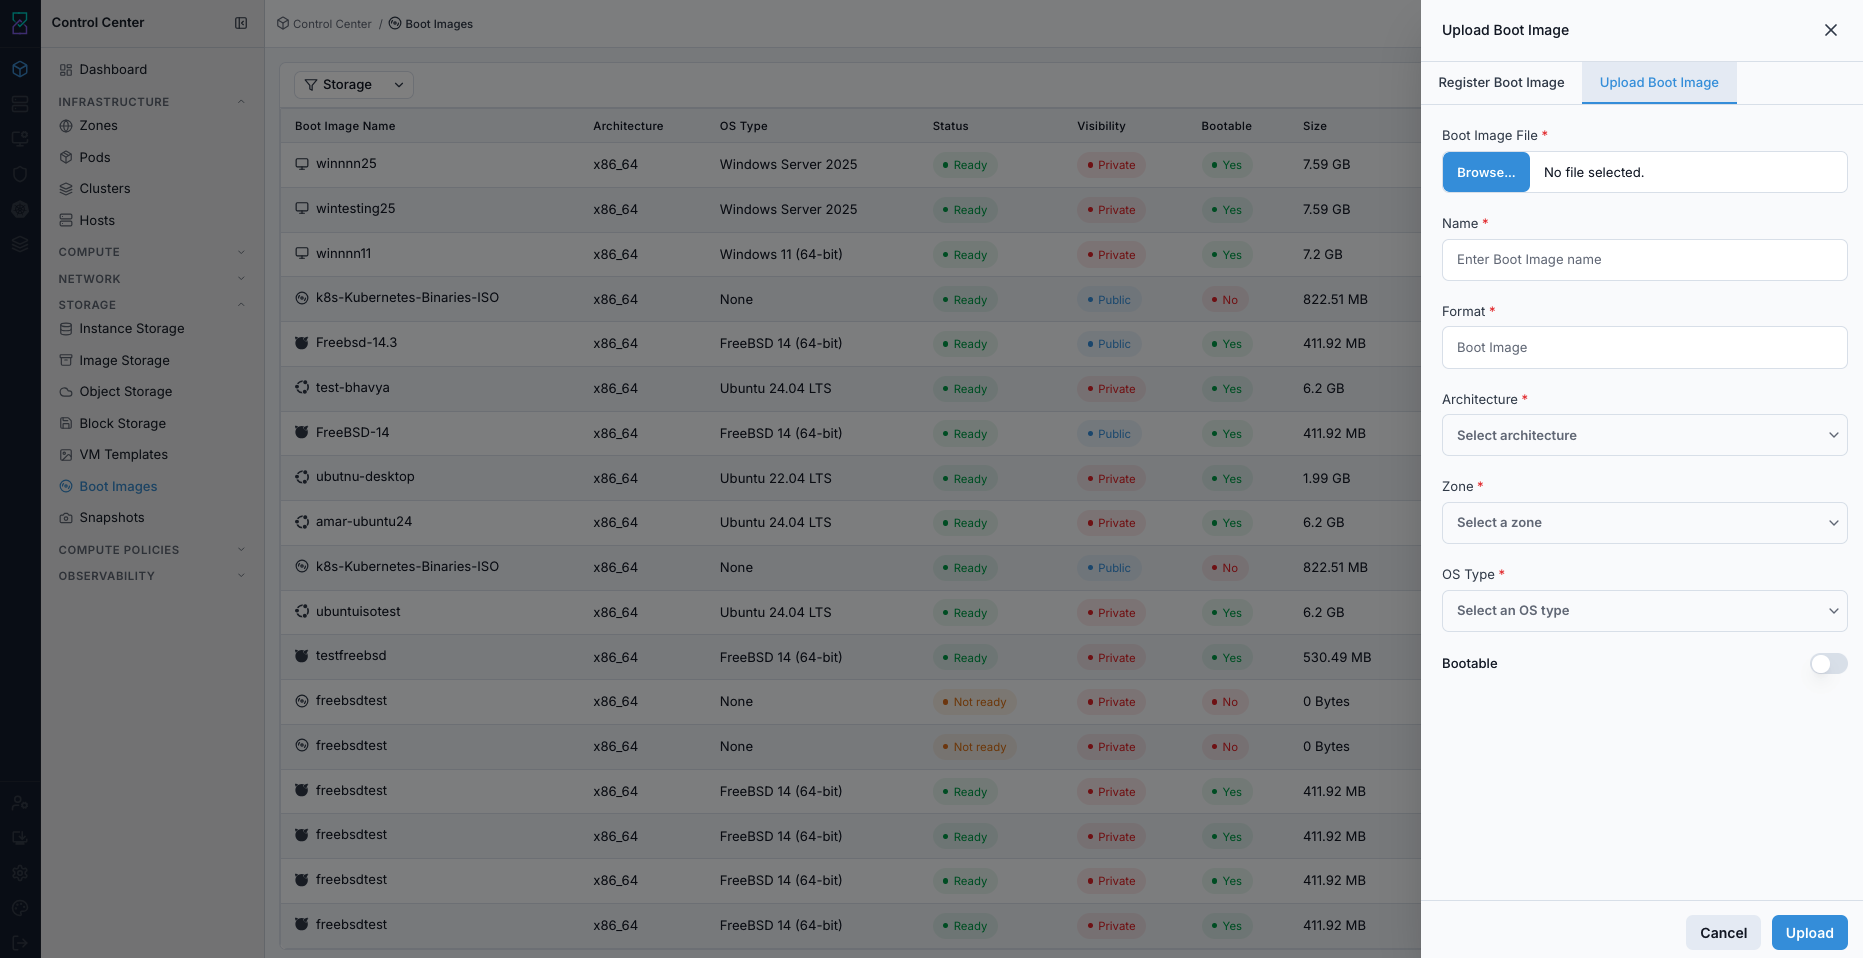
Upload Boot Image form.
Expected Outcome:
Uploaded boot image is cataloged in the list with provided metadata.
Boot image becomes usable when status indicates readiness.
If this fails:
Verify backend health and available capacity for the target storage resource (pool/store/endpoint and zone scope).
Check blocking dependencies for this action (attachments, snapshots, templates, buckets, object locks, or maintenance state).
Review Observability Events/Alerts for the storage object and retry only after resolving the root cause.
Step: Delete Boot Image
When to Use:
Use this when performing Delete Boot Image in the active storage workflow.
Purpose:
Execute Delete Boot Image and confirm the expected UI/state outcome for this storage resource.
Steps:
In the Boot Images dashboard, locate the target row.
Complete Pre-Delete Safety Checklist (Use Before Any Delete).
Click the trash icon in
Actions.Confirm deletion and verify row removal.
If deleted by mistake, re-register/upload the same boot image and wait for
Ready.
Expected Outcome:
Task completes and the related storage view updates as expected.
If this fails:
Verify backend health and available capacity for the target storage resource (pool/store/endpoint and zone scope).
Check blocking dependencies for this action (attachments, snapshots, templates, buckets, object locks, or maintenance state).
Review Observability Events/Alerts for the storage object and retry only after resolving the root cause.
Tool Tips
Keep boot images private unless broad access is explicitly required.
Use consistent naming (OS, version, architecture).
Warnings
Deleting a boot image in active use is blocked until workloads use a different boot source.
Deleting a
PublicBoot Image can impact all users; coordinate before removal.Deleting a
PrivateBoot Image removes it from owner/account scope.Deleted Boot Images are not recoverable from Control Center; confirm before deletion.
Publicvisibility should be used only with approved media.
If this fails:
If a boot image remains
Not Ready, validate storage path and upload/URL source.If register action fails, verify source URL and zone mapping.
If upload action fails, re-check file integrity and selected architecture.
Snapshots
UI path: Control Center -> Storage -> Snapshots
Purpose
The Snapshots Dashboard provides a centralized view of all volume snapshots in Control Center. Snapshots are point-in-time copies of volume data used for backup, recovery, and cloning workflows.
When to Use Snapshots
Use this module when you need to:
Confirm backup coverage before risky changes.
Validate restore points after incidents or data corruption events.
Find snapshots that can be used for cloning new volumes or templates.
Overview
The dashboard helps you track snapshot health, freshness, and scope across zones. Use state and filter controls to quickly identify healthy or failed protection records.
Snapshots Table
The main table displays all snapshots with the following columns:
Column |
Description |
|---|---|
|
Snapshot name. |
|
Source volume from which the snapshot was taken. |
|
Current snapshot state (for example |
|
Snapshot creation method (manual or recurring). |
|
Physical storage consumed by the snapshot. |
|
Date and time when the snapshot was taken. |
|
Availability zone where the snapshot resides. |
Snapshot States
State |
Meaning |
|---|---|
|
Snapshot is complete and stored successfully. |
|
Snapshot operation is in progress. |
|
Snapshot failed or entered an error state. |
Filtering & Search
Search: Filter by snapshot name, volume name, volume ID, or zone.Storagefilter: Narrow results by Image Storage location.
Tips
Recovery: Use snapshots to restore volumes to previous known-good states.
Cloning: Use snapshots as source points for new volumes or template workflows.
Storage usage: Delete snapshots no longer required to reclaim capacity.
Scheduling: Configure recurring snapshot policies for regular protection.
Expected Outcome:
Snapshot rows can be triaged quickly by state, volume, zone, and storage location.
Step: Review Snapshots Dashboard
When to Use:
Use this when performing Review Snapshots Dashboard in the active storage workflow.
Purpose:
Execute Review Snapshots Dashboard and confirm the expected UI/state outcome for this storage resource.
Steps:
Open
Control Center -> Storage -> Snapshots.Review rows for snapshot name, source volume, state, size, and creation time.
Use search and
Storagefilter to narrow results.
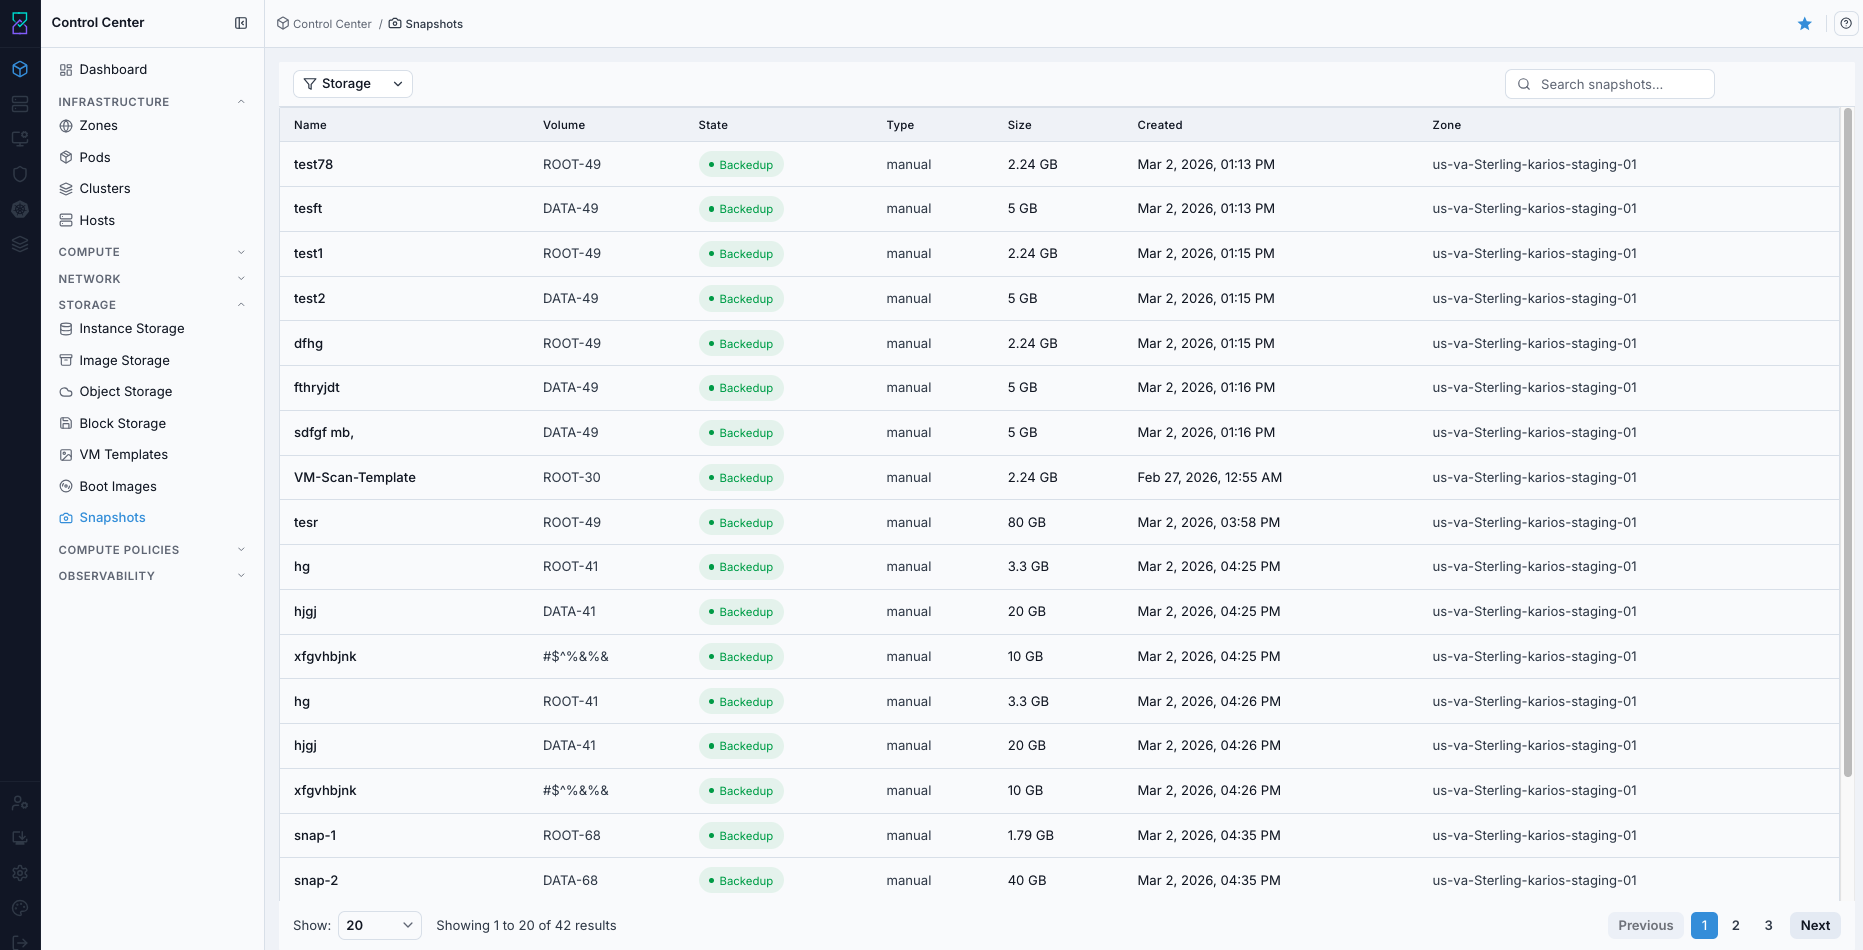
Snapshots dashboard.
Expected Outcome:
Snapshot rows are visible and can be filtered by name, volume, zone, and storage location.
If this fails:
Verify backend health and available capacity for the target storage resource (pool/store/endpoint and zone scope).
Check blocking dependencies for this action (attachments, snapshots, templates, buckets, object locks, or maintenance state).
Review Observability Events/Alerts for the storage object and retry only after resolving the root cause.
Step: Open Snapshots Help Panel
When to Use: Use this after opening the Snapshots dashboard when you need field definitions and workflow guidance.
Purpose: Open contextual help separately from snapshot triage and filtering tasks.
Steps:
Open
Control Center -> Storage -> Snapshots.Click the help icon in the top-right corner.
Review help guidance for snapshot columns and controls.
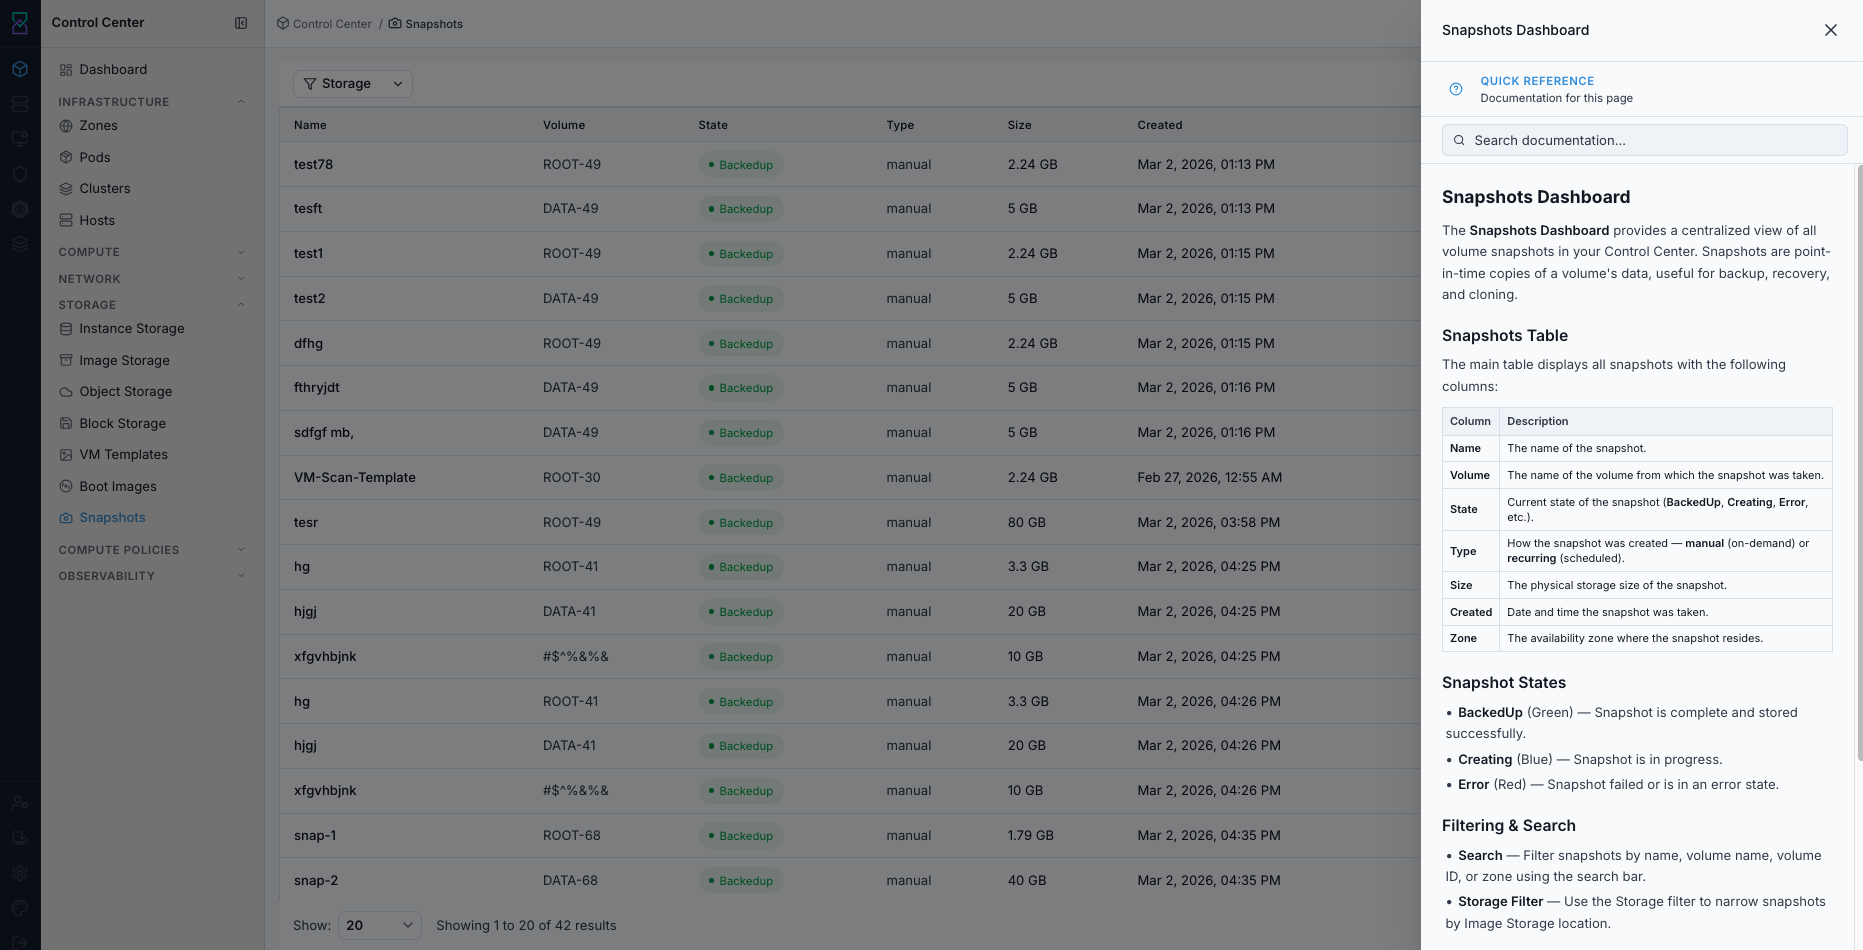
Snapshots help panel.
Expected Outcome:
The Snapshots help panel opens with page-specific guidance.
If this fails:
Verify backend health and available capacity for the target storage resource (pool/store/endpoint and zone scope).
Check blocking dependencies for this action (attachments, snapshots, templates, buckets, object locks, or maintenance state).
Review Observability Events/Alerts for the storage object and retry only after resolving the root cause.
Step: Identify and Triage Failed Snapshots
When to Use:
Use this when performing Identify and Triage Failed Snapshots in the active storage workflow.
Purpose:
Execute Identify and Triage Failed Snapshots and confirm the expected UI/state outcome for this storage resource.
Steps:
Filter/search to find rows where
StateisError.Compare with healthy rows in
BackedUpstate.Note affected volume name and timestamp for follow-up.
Expected Outcome:
Failed snapshots are identified with impacted volumes and timestamps for escalation.
If this fails:
Verify backend health and available capacity for the target storage resource (pool/store/endpoint and zone scope).
Check blocking dependencies for this action (attachments, snapshots, templates, buckets, object locks, or maintenance state).
Review Observability Events/Alerts for the storage object and retry only after resolving the root cause.
Tool Tips
Review snapshots by zone during incident checks.
Use pagination controls to review all results, not just the first page.
Warnings
Error-state snapshots indicate incomplete protection for associated volumes.
Do not perform risky disk operations until snapshot health is understood.
If this fails:
If snapshot errors increase, verify image/object storage path health first.
If recent snapshots are missing, review scheduler/job execution in platform operations.
If errors repeat on the same volume, inspect volume state and backend capacity.
Storage Quick Reference
Navigation:
Control Center -> Storage -> [Instance Storage | Image Storage | Object Storage | Block Storage | VM Templates | Boot Images | Snapshots]
Execution order is defined in Initial Validation Sequence at the top of this guide.