Migration
        flowchart LR
    vC[VMware vCenter] --> Mig[Karios<br/>Migration module]
    Esx[Standalone ESXi] --> Mig
    Hv[Microsoft Hyper-V] --> Mig
    Mig --> Run[VM running on KVM<br/>in Karios]
1 |
9 |
||
2 |
10 |
||
3 |
11 |
||
4 |
12 |
||
5 |
13 |
||
6 |
14 |
||
7 |
|||
8 |
Overview
The Migration module moves virtual machines from a source environment (VMware vCenter, standalone ESXi, or Microsoft Hyper-V) into Karios as new running VMs - without installing anything on the source VM. The Karios server connects to the hypervisor, copies the VM’s disks over the network, prepares them for KVM, and boots the VM in Karios. You then verify it works and optionally shut down the original.
Supported source platforms:
VMware vCenter - managed multi-host environments via vCenter
VMware ESXi - standalone ESXi hosts (no vCenter required)
Microsoft Hyper-V - Windows Server clusters or standalone Hyper-V hosts
How to Open the Migration Module
Step 1 - Click Migrations in the Sidebar
In the left sidebar of the Karios web console, click Migrations.
Note
Migrations appears below Karios DFS in the sidebar. Scroll down if you do not see it immediately.
What you see: The Migration module opens and you land on the Dashboard page. The Dashboard is mostly empty on your first visit - this is normal.
Step 2 - Confirm the Navigation Panel is Visible
The left navigation panel shows all Migration pages: Dashboard, Sources, Migrations, Plans, and Network Maps.
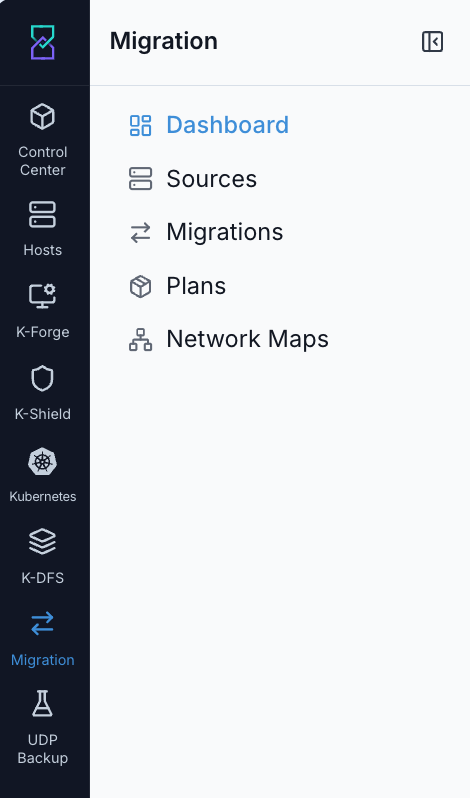
What this shows: The Migration left-hand navigation panel. Use it to move between every Migration page in this guide.
Important
First time here? You land on the Dashboard but do not start there. Click Sources in the left panel - that is step 1 of the setup. The Dashboard and Migrations tabs are only useful after at least one source is connected and one migration has run.
If the Migrations entry is missing from the sidebar entirely, contact your Karios administrator - your user role may not have access to the Migration module.
First-time setup - follow this order:
Step |
Page |
What you do |
|---|---|---|
1 |
Add your source hypervisor connection (vCenter / ESXi / Hyper-V). One-time per environment |
|
2 |
Map source networks to Karios networks. Do this before running any migrations in a multi-network environment |
|
3 |
Map source datastores to Karios storage pools. Do this if you have more than one storage pool |
|
4 |
Pick VMs to migrate - use a Plan for scheduled or repeatable runs; use the Source detail page for immediate one-off migrations |
|
5 |
Migrations → Active |
Watch per-VM progress in real time |
6 |
Control Center → Virtual Machines |
Verify the migrated VM is running and reachable before powering off the source |
All pages at a glance:
Page |
Purpose |
|---|---|
Sources |
Connections to VMware vCenter / ESXi / Hyper-V - start here |
Network Maps |
Source network → Karios network translation rules |
Storage Maps |
Source datastore → Karios storage pool translation rules |
Plans |
Reusable migration configurations you can validate, schedule, and run repeatedly |
Dashboard |
Live health summary: how many migrations are running, how many failed recently |
Migrations |
Three sub-tabs: Active (in-flight) · Batches (group jobs) · History (completed) |
Backup |
Backup-related migrations |
Sources
When to Use
Go to Sources when:
You are setting up Migration for the first time - this is step 1
You want to add a new VMware or Hyper-V environment to migrate from
You want to browse which VMs are available on a connected source hypervisor
You want to start an immediate one-off migration for a single VM without creating a Plan
Purpose
A source is a saved connection to a VMware vCenter, standalone ESXi host, or Microsoft Hyper-V manager. Karios uses the connection to discover VMs, probe reachability every 60 seconds, and copy disks during migration. Add one source per environment.
What You See When You First Arrive
When you click Sources in the left panel for the first time, you land on an empty Sources list. There are no rows yet.
The only action available is + Add Source in the top-right corner. Before you can browse VMs or start a migration, you must add at least one source.
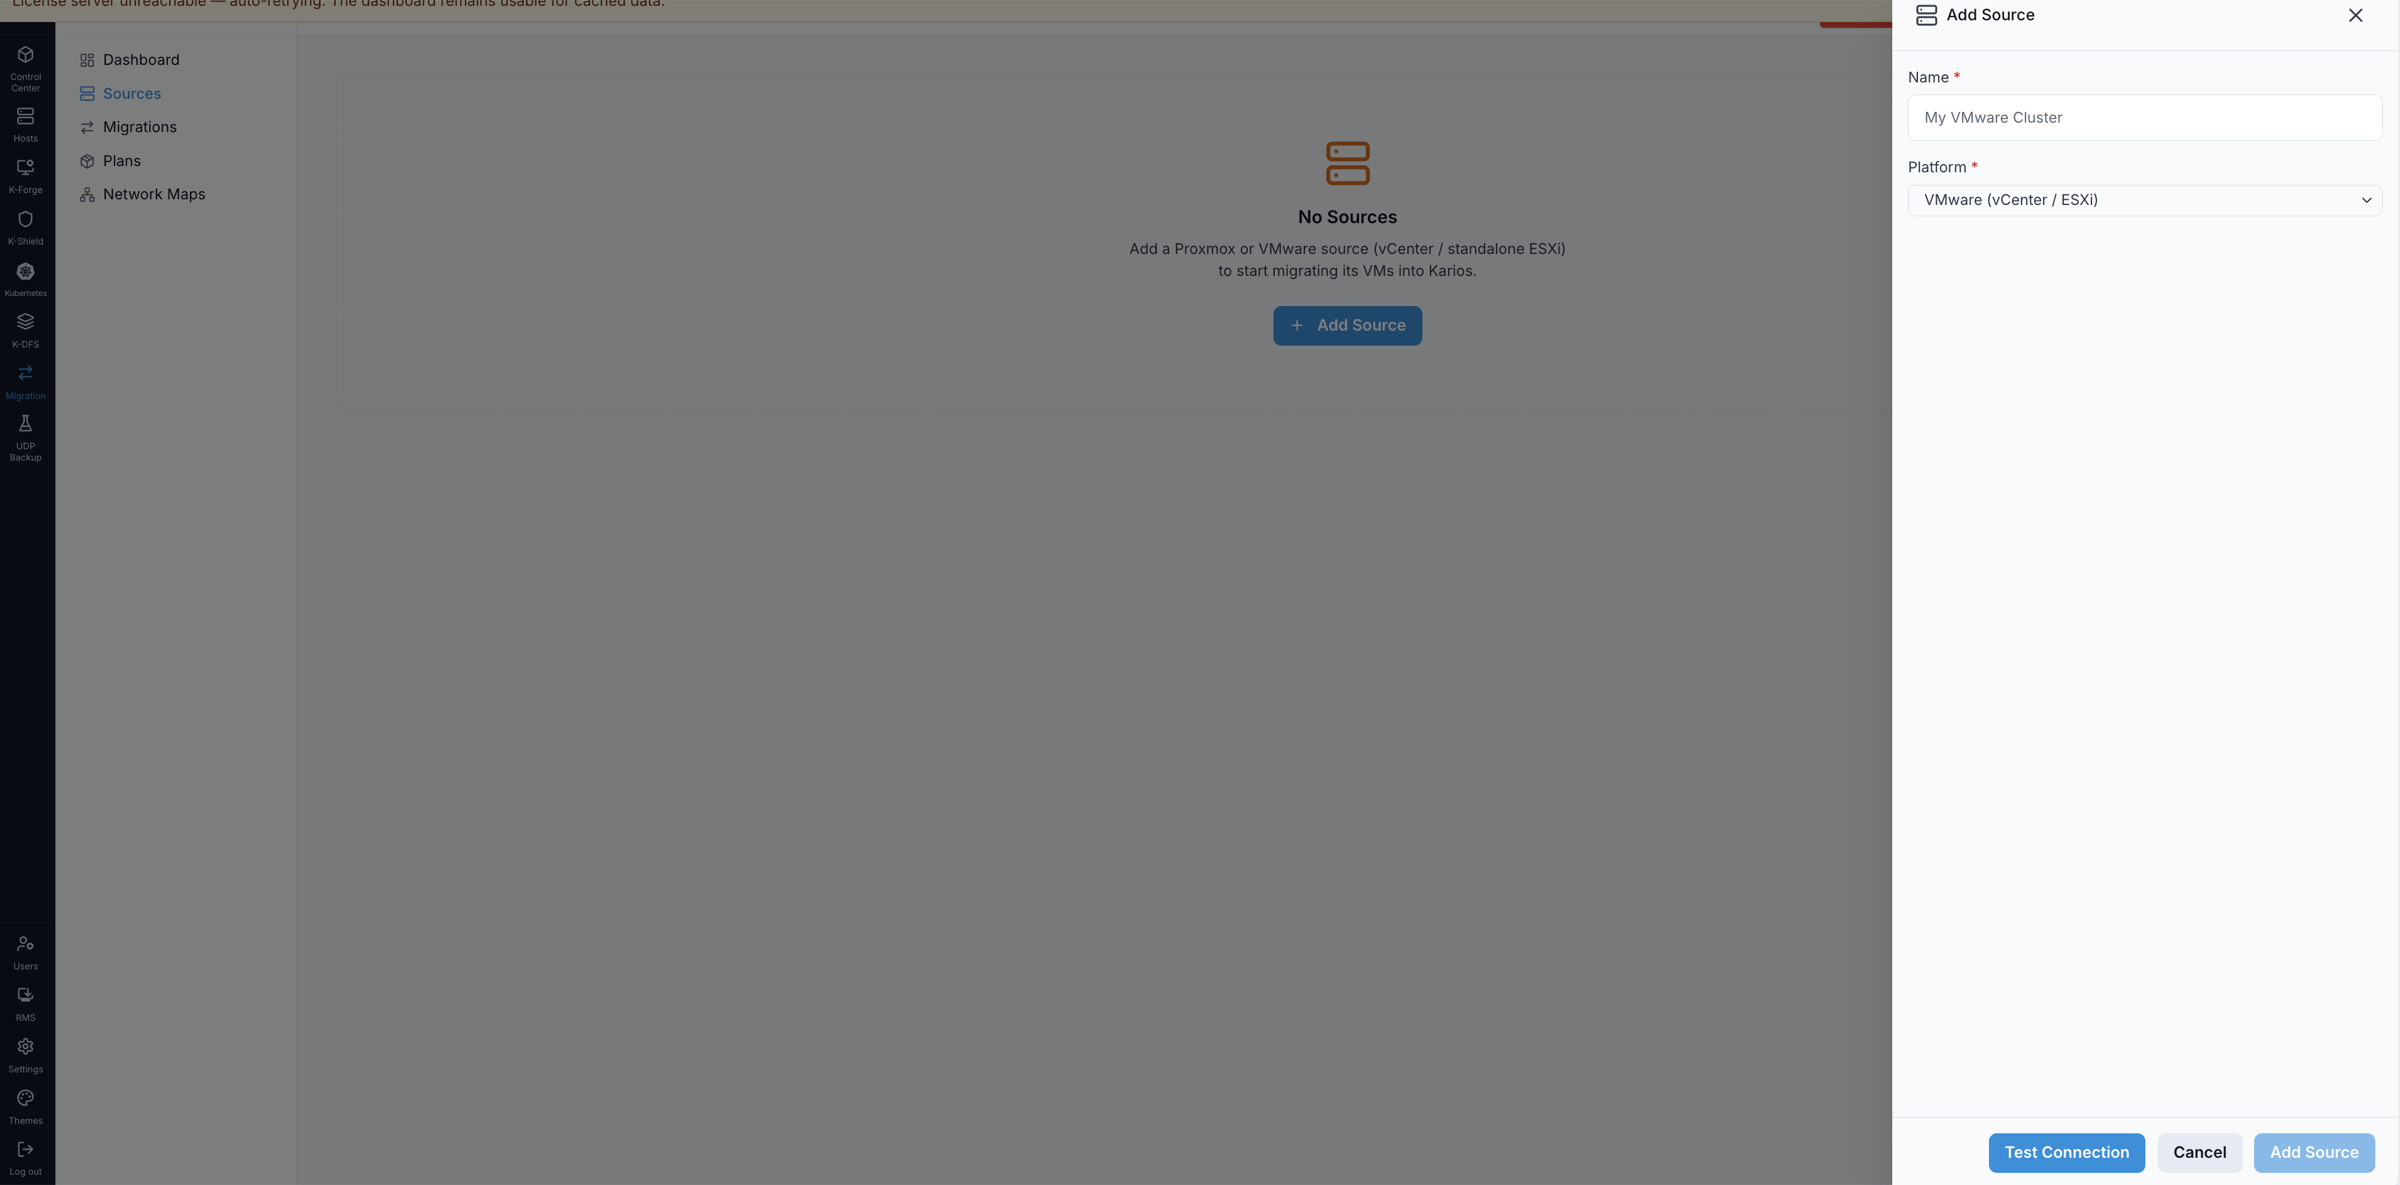
What this shows: The empty Sources list with the Add Source form open. Enter a Name for this connection, then select the Platform. Connection fields (hostname, port, credentials) appear after platform selection. Use Test Connection to verify credentials before saving, or click Add Source to save directly.
Once sources have been added, the list shows one row per source:
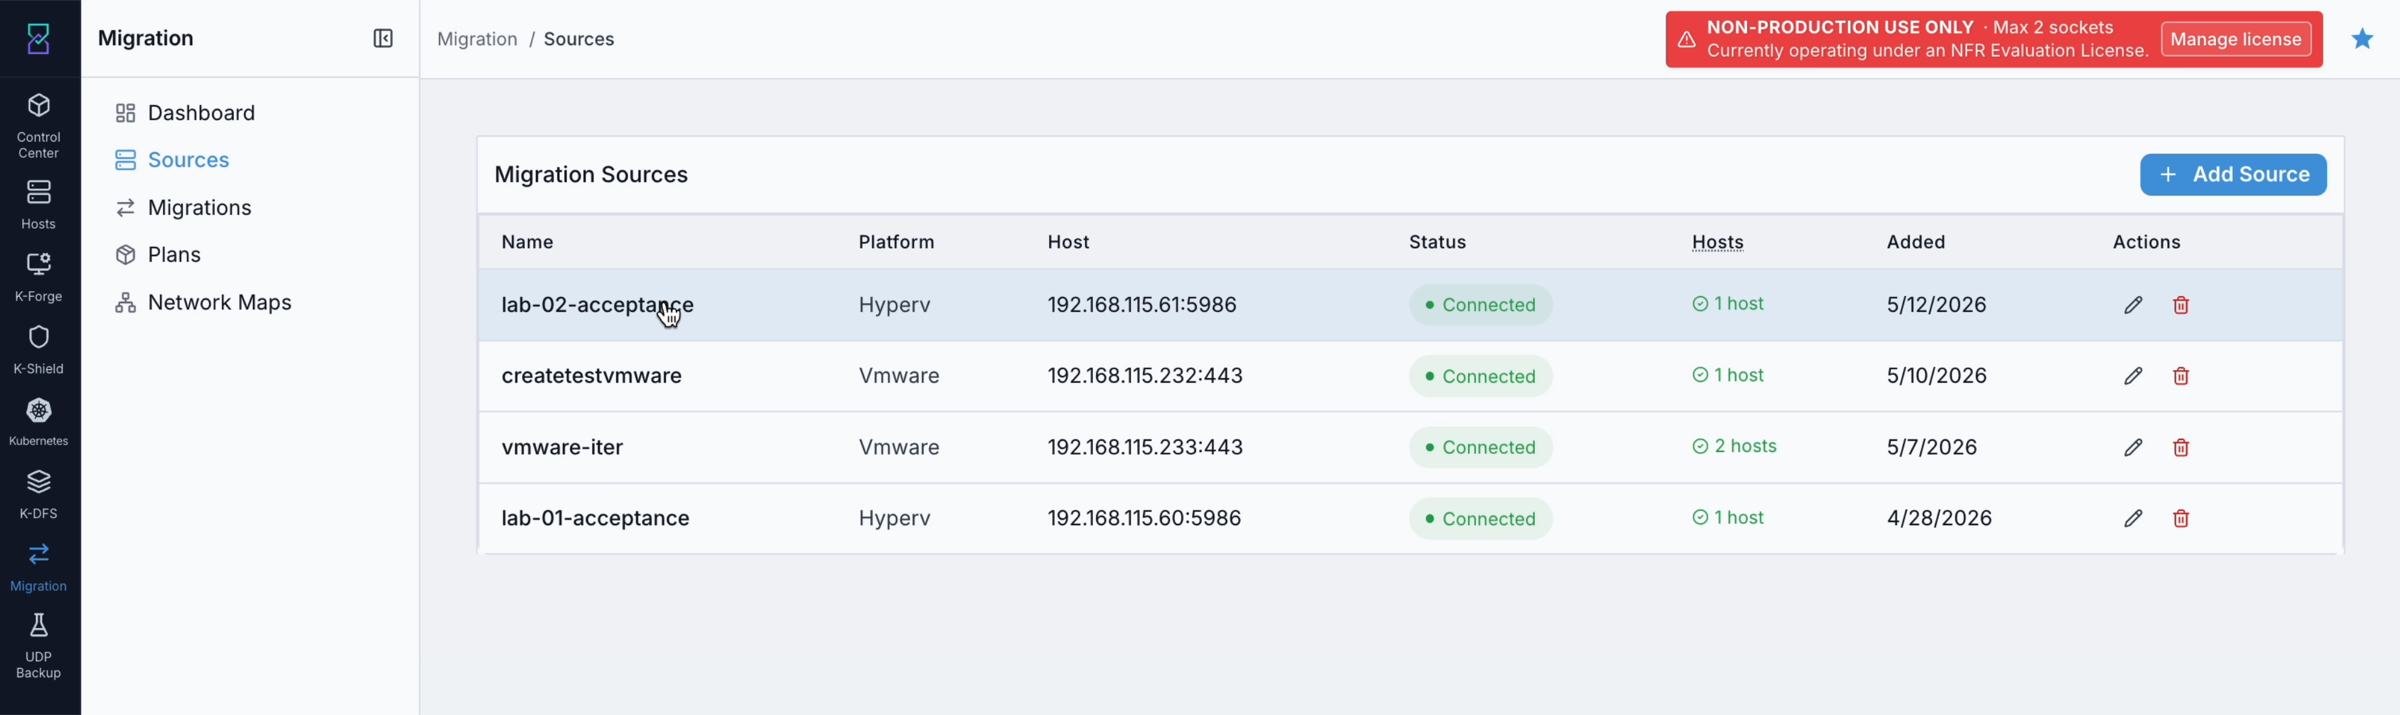
What this shows: The Sources list with registered sources. Each row shows: source name, platform type (vmware / esxi / hyper-v), hostname/IP, connection status (green = connected, amber = partial, red = disconnected), health indicator, and edit/delete action icons.
Steps - Add a Source and Start a Migration
Follow these steps in order. Steps 1–2 connect your hypervisor. Steps 3–6 select VMs and start migrating.
Step 1 - Add Your Source Hypervisor
Click + Add Source (top-right corner).
What you see: The Add Source form slides in from the right. It shows a Name field and a Platform dropdown. Additional connection fields appear below after you select a platform.
Select your platform: VMware vCenter, VMware ESXi, or Microsoft Hyper-V.
Fill in the connection fields:
vCenter or ESXi - hostname or IP address, port (default
443), username, password, optional TLS thumbprintHyper-V - hostname of any cluster node, WinRM port (default
5986), username, password
Important
Credentials are sent directly to the Karios backend’s encrypted credential store. They are never saved to the browser’s local storage.
Click Save.
What you see: The source appears in the list and Karios immediately tests the connection.
Step 2 - Verify the Connection Status
Check the Status column on the source row:
Green (Connected) - connection is working. Continue to Step 3.
Amber (Partial) - some hosts are unreachable. VMs on those hosts will fail at preflight. Click the source row to see which hosts are failing.
Red (Disconnected / Error) - connection failed. Click the edit (✏) icon, correct the hostname, port, or credentials, and save again. Repeat until the status turns green.
Warning
Do not continue to Step 3 until the status is green. All subsequent steps require a working source connection.
Step 3 - Open the Source and Browse VMs
Click the source name to open its Source Detail page.
What you see: A two-panel view. The left panel lists all nodes (ESXi hosts or Hyper-V nodes). The main table lists every VM discovered on those nodes.
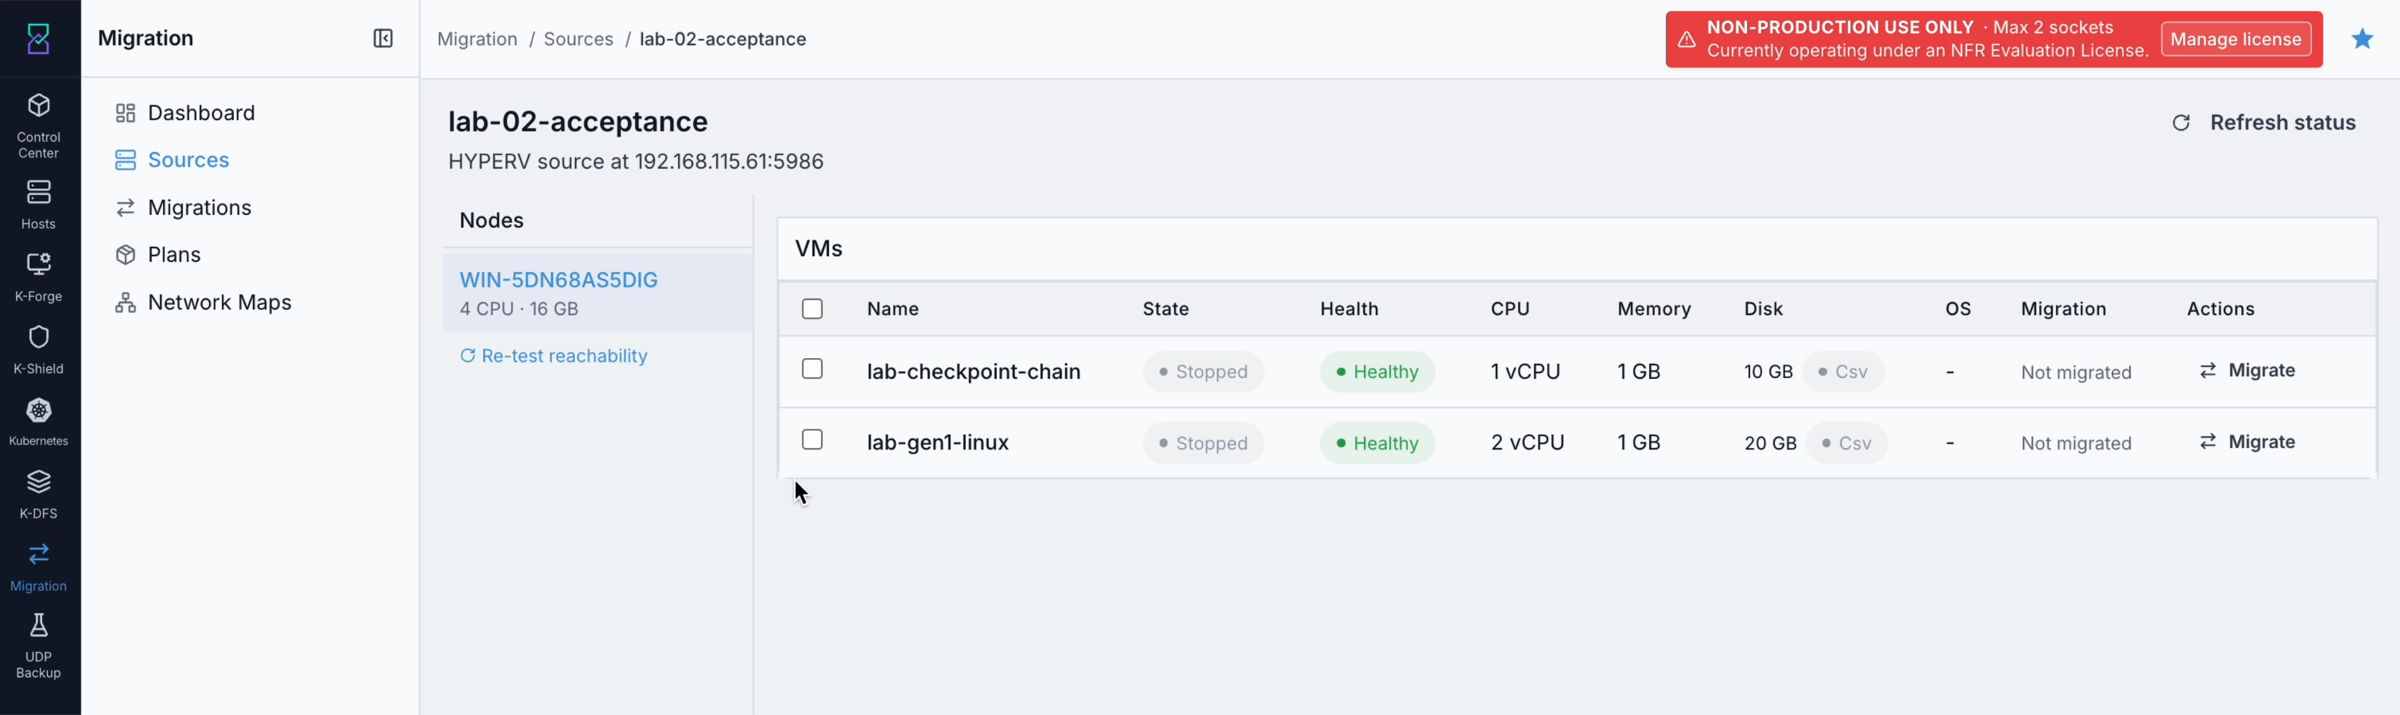
What this shows: The Source detail page. The left panel lists the hypervisor nodes. The VM table shows each VM with its CPU, memory, disk, and current migration status.
Use the grouping toggle (Node grouping / Cluster grouping) at the top of the table to organise the list if it is long.
Click 🔄 Re-test reachability to refresh which VMs are currently accessible.
Note
VMs with a warning badge (Orphan, Inaccessible, or Disk-less) cannot be migrated. See the badge reference below.
Step 4 - Select VMs to Migrate
Tick the checkbox next to each VM you want to migrate.
What you see: The ▶ Migrate button in the page header becomes active as soon as at least one VM is selected.
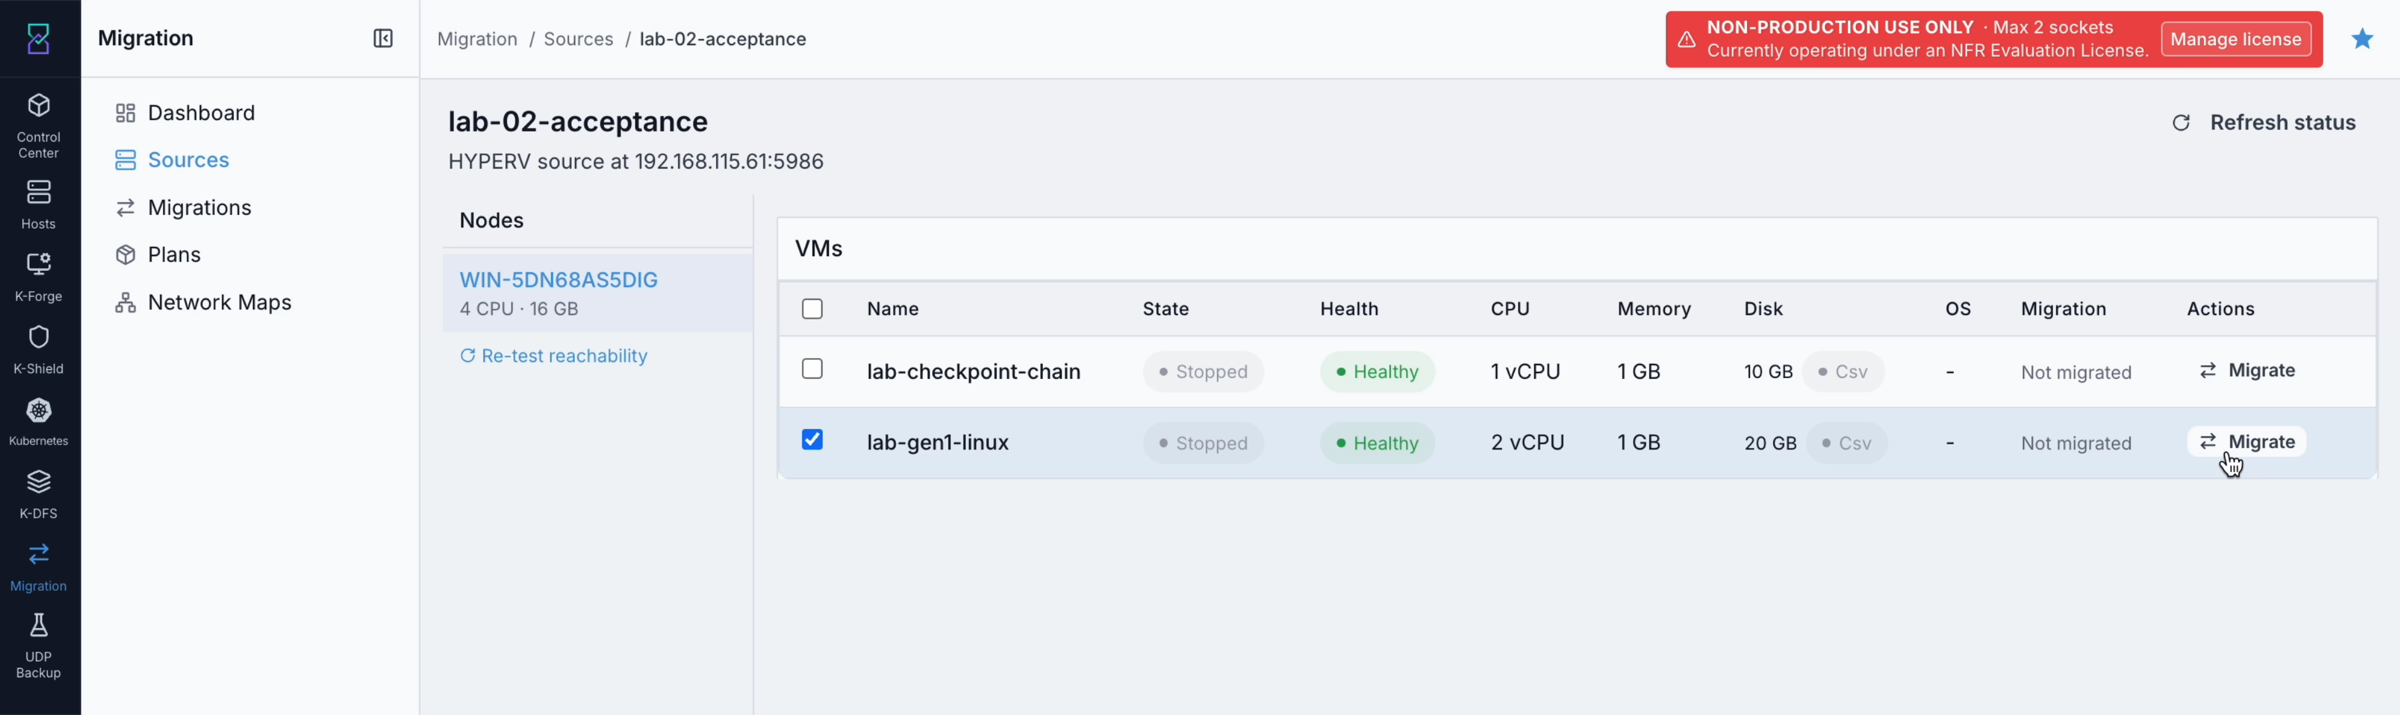
What this shows: The VM list with one VM checked. The ▶ Migrate button is now active.
Step 5 - Fill in the Migration Form
Click ▶ Migrate.
What you see: The Migrate VM form opens.
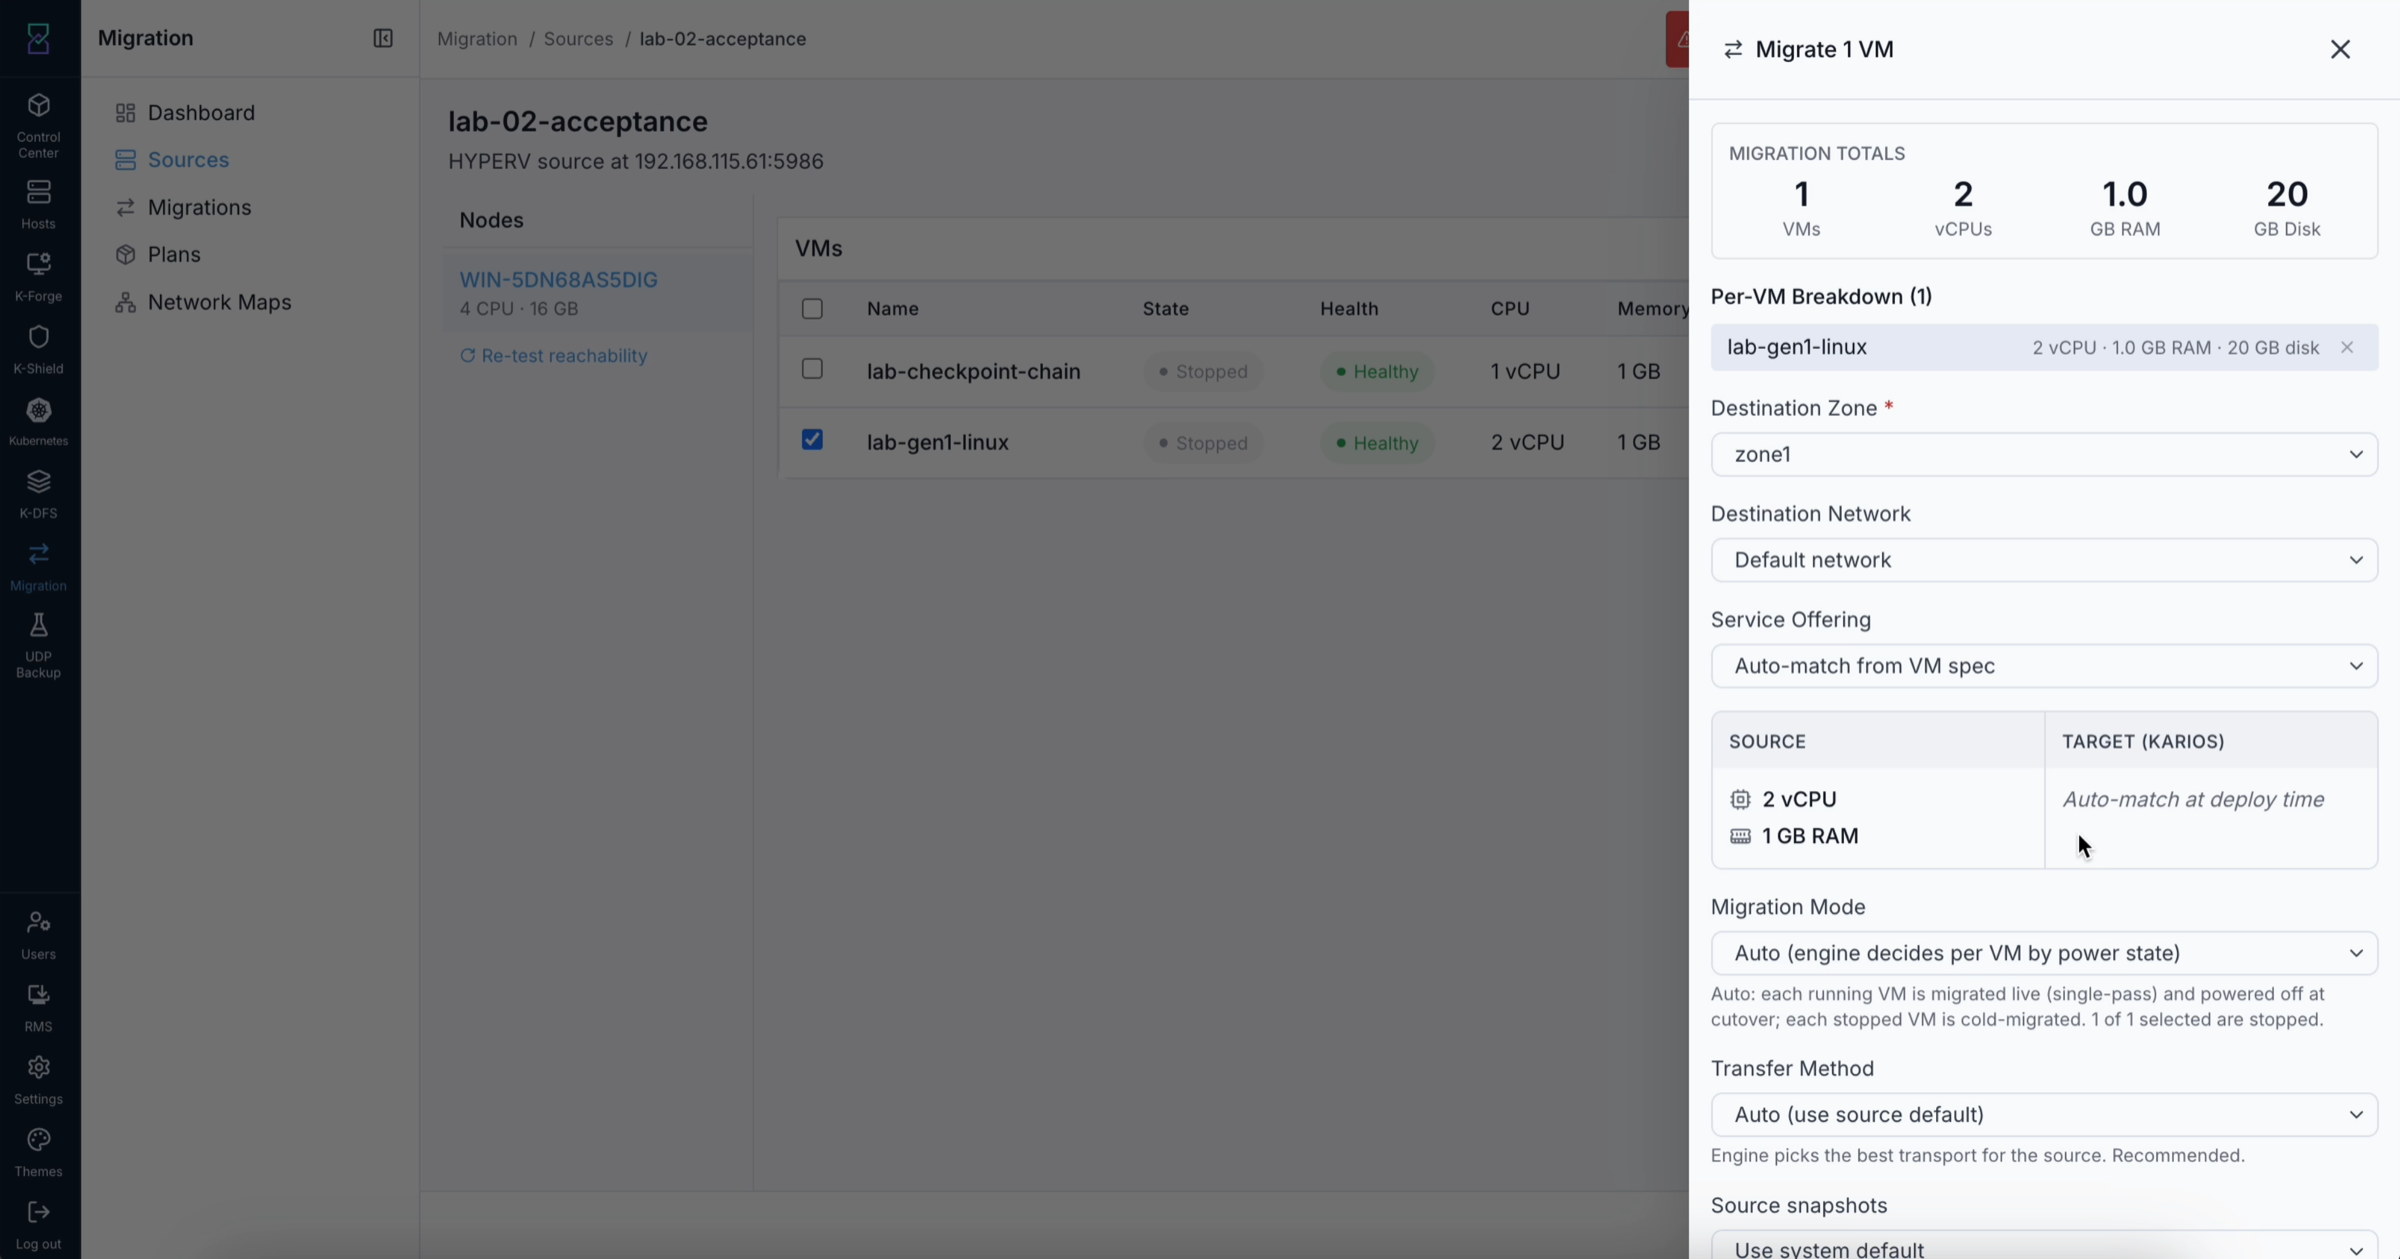
What this shows: The top half of the Migrate VM form. “Migration Totals” shows the combined resource footprint of all selected VMs. Destination Zone and Destination Network are required.
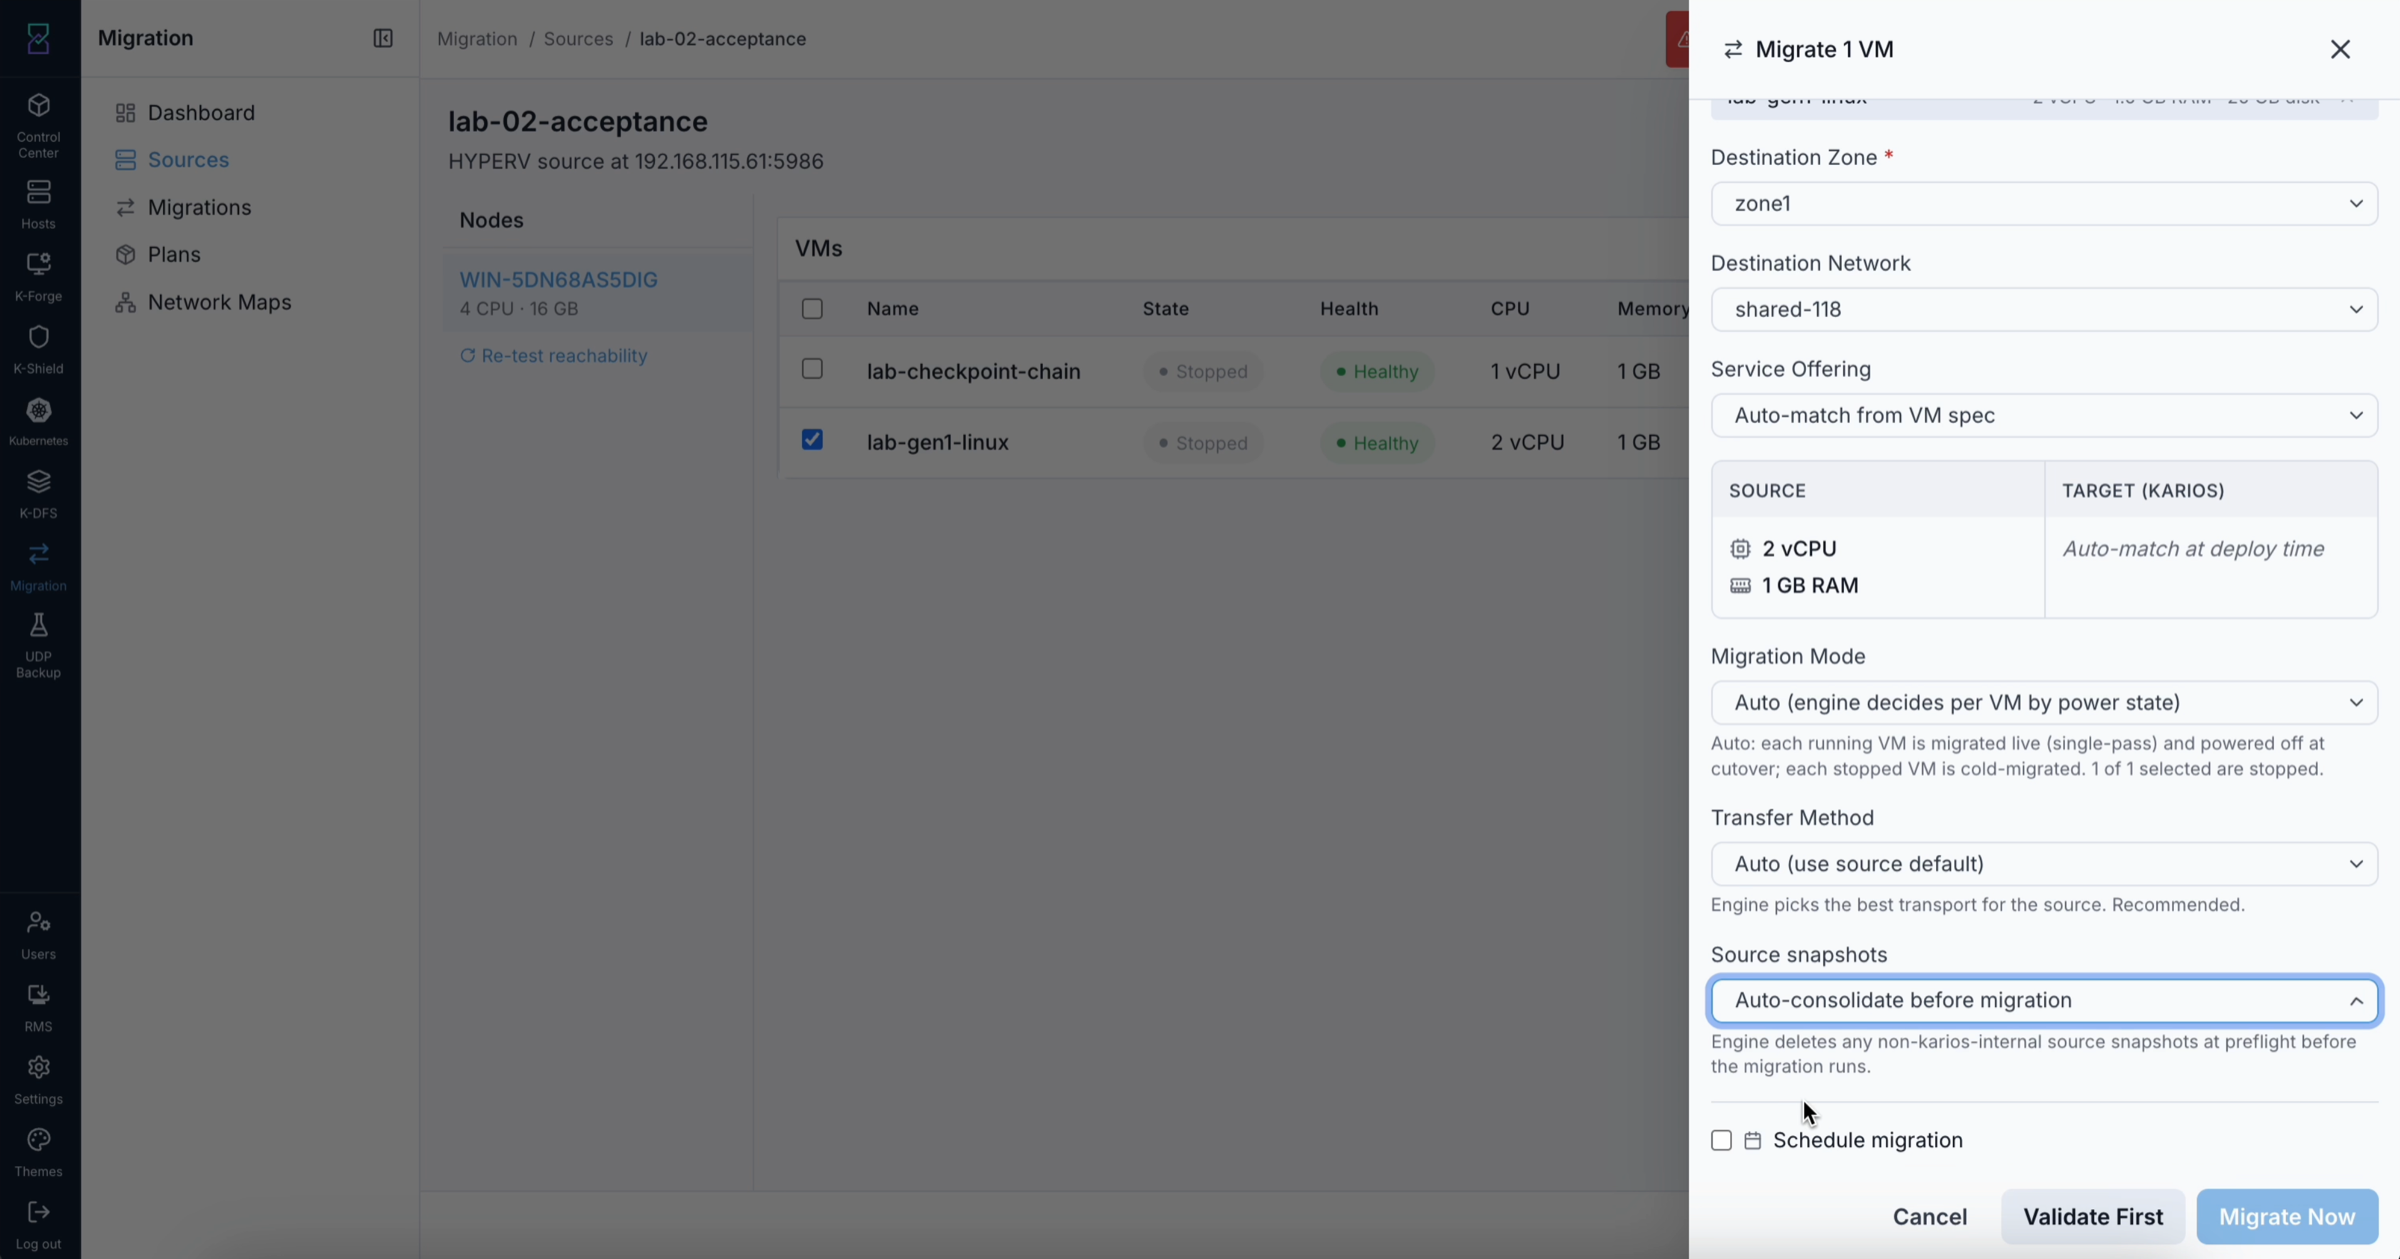
What this shows: The bottom half of the form. Source snapshot handling, schedule option, and two action buttons: Validate First and Migrate Now.
Fill in the form fields:
Destination Zone - required
Destination Network - required
Service Offering -
Auto-match from VM specis recommendedMigration Mode - leave on Auto (see Plans for full mode descriptions)
Data path - required; pick the source and destination interfaces this migration’s disk transfer uses (see Data-Path NIC Selection below)
Source snapshots - controls how existing VMware snapshots are handled before migration
Step 6 - Validate and Start the Migration
Click Validate First.
What you see: Karios runs pre-flight checks without moving any data. Any issues appear inline.
Warning
Fix every issue reported before clicking Migrate Now. Common issues: missing Network Map entry, unreachable source host, incompatible service offering.
Once validation passes, click Migrate Now.
What you see: The form closes. A Batch is created and the migration starts immediately. Go to Migrations → Active to watch progress.
Important
Step 1 complete. Your source is connected and your first migration is running. Continue to Network Maps to complete step 2 of first-time setup - or go to Migrations → Active now to watch progress.
Warning badges you may see next to a VM:
Badge |
Meaning |
|---|---|
Orphan |
VMware shows the VM as registered but its disk files cannot be found. Fix in VMware before migrating |
Inaccessible |
The underlying ESXi host is offline; Karios cannot reach the VM |
Disk-less |
The VM has no virtual disks attached |
In Plan |
The VM is already part of a saved Plan and cannot be selected independently until the Plan finishes |
Data-Path NIC Selection
A migration reads from an ESXi VMkernel adapter over VMware NFC, then writes to a destination host interface over SSH. Both hops default to the shared management link. Data path on the Migrate VM form lets you point either hop at a faster card instead, independently.
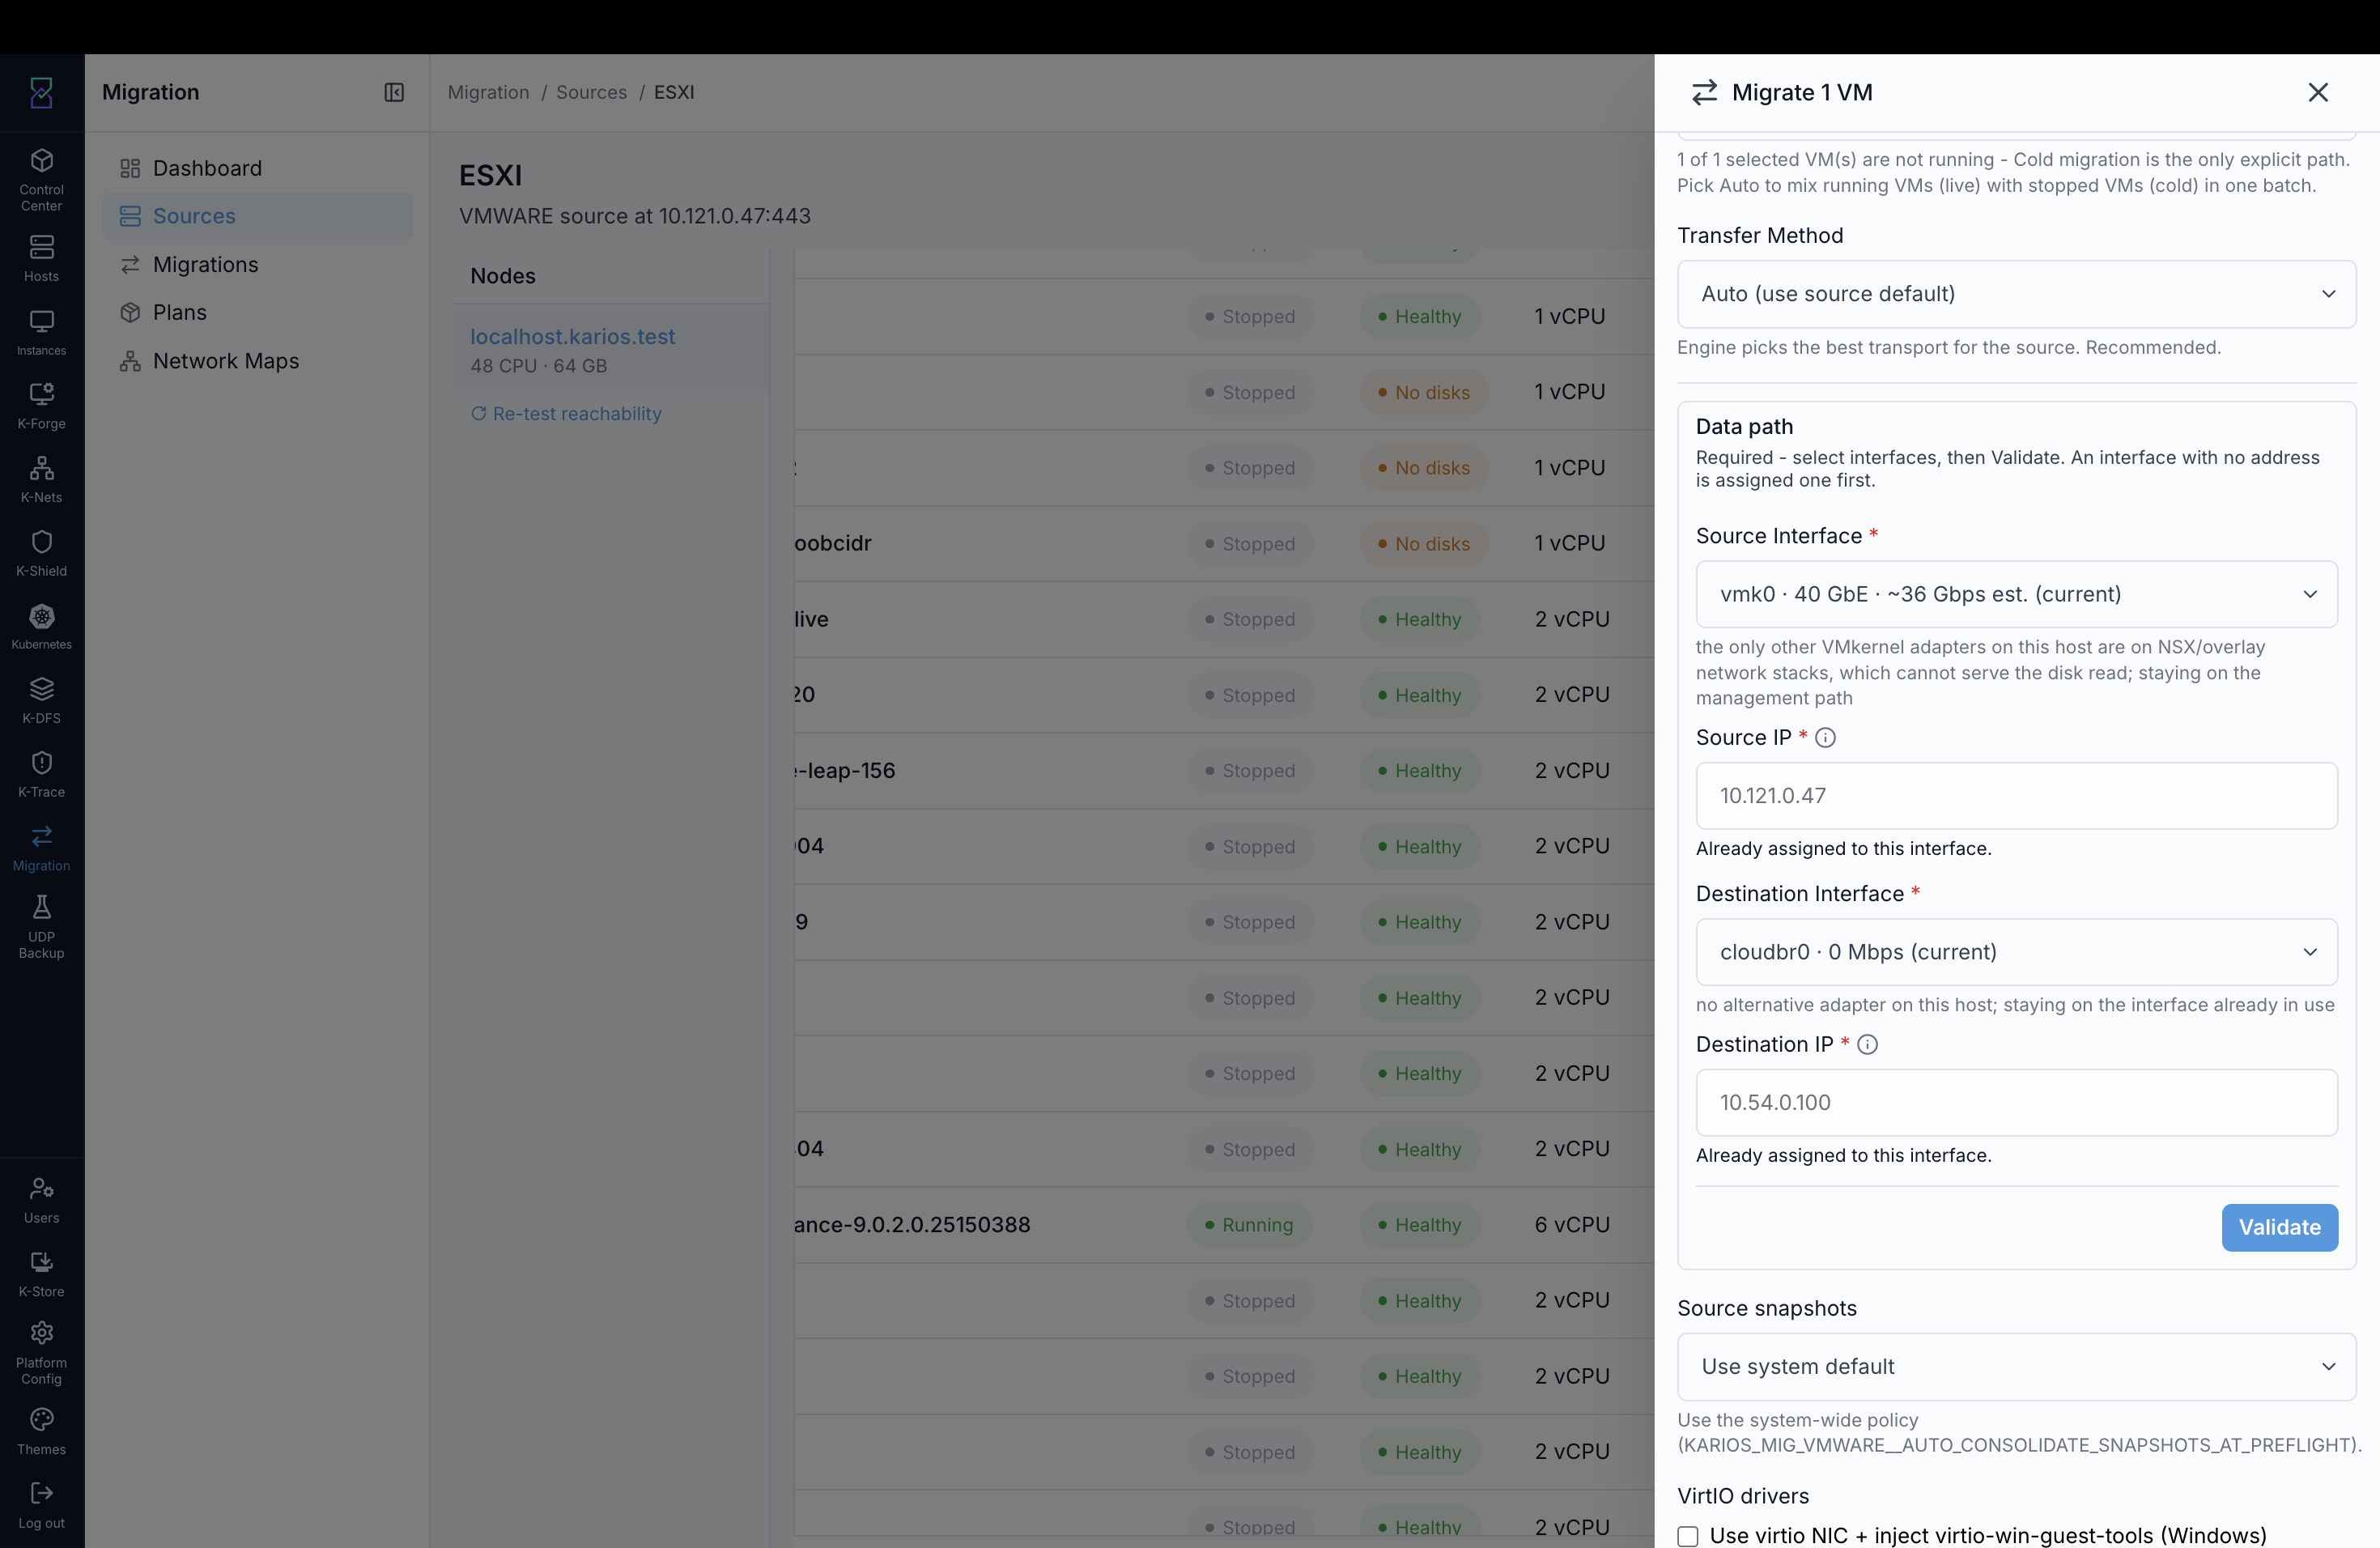
What this shows: The Data path panel. Karios preselects the fastest usable interface at each end.
Warning
A faster source card alone will not speed up the read - VMware NFC caps it at ~1 Gbps per
stream regardless of adapter. Only KARIOS_MIG_NFC_STREAMS (default 1, max 16) raises it. The
destination write has no such cap.
Steps: open the picker, resolve any flag (Needs IP allocation, Link down,
Reachable: no), assign an address if needed - existing networks suggest one from the
interface’s subnet, a direct cable proposes a /30 from 10.255.255.0/24 - then click
Validate; an unreachable interface is refused, never silently reverted to management.
Estimated throughput (card capacity, link speed minus ~10%) is not expected transfer (what NFC will actually achieve) is not live rate (what’s really moving). Raising stream count, not card speed, is what closes that gap:
Link speed |
Streams |
Card could carry |
Source expected |
Pair expected |
|---|---|---|---|---|
1G (mgmt) |
1 |
900 |
900 |
900 |
10G |
1 |
9000 |
1000 |
1000 |
10G |
4 |
9000 |
4000 |
4000 |
10G |
16 |
9000 |
9000 |
9000 |
40G |
1 |
36000 |
1000 |
1000 |
40G |
4 |
36000 |
4000 |
4000 |
Reachability is re-checked at preflight, immediately before transfer, and a failure refuses
cleanly rather than falling back to management. Afterward a verification line logs the achieved
rate against the prediction.
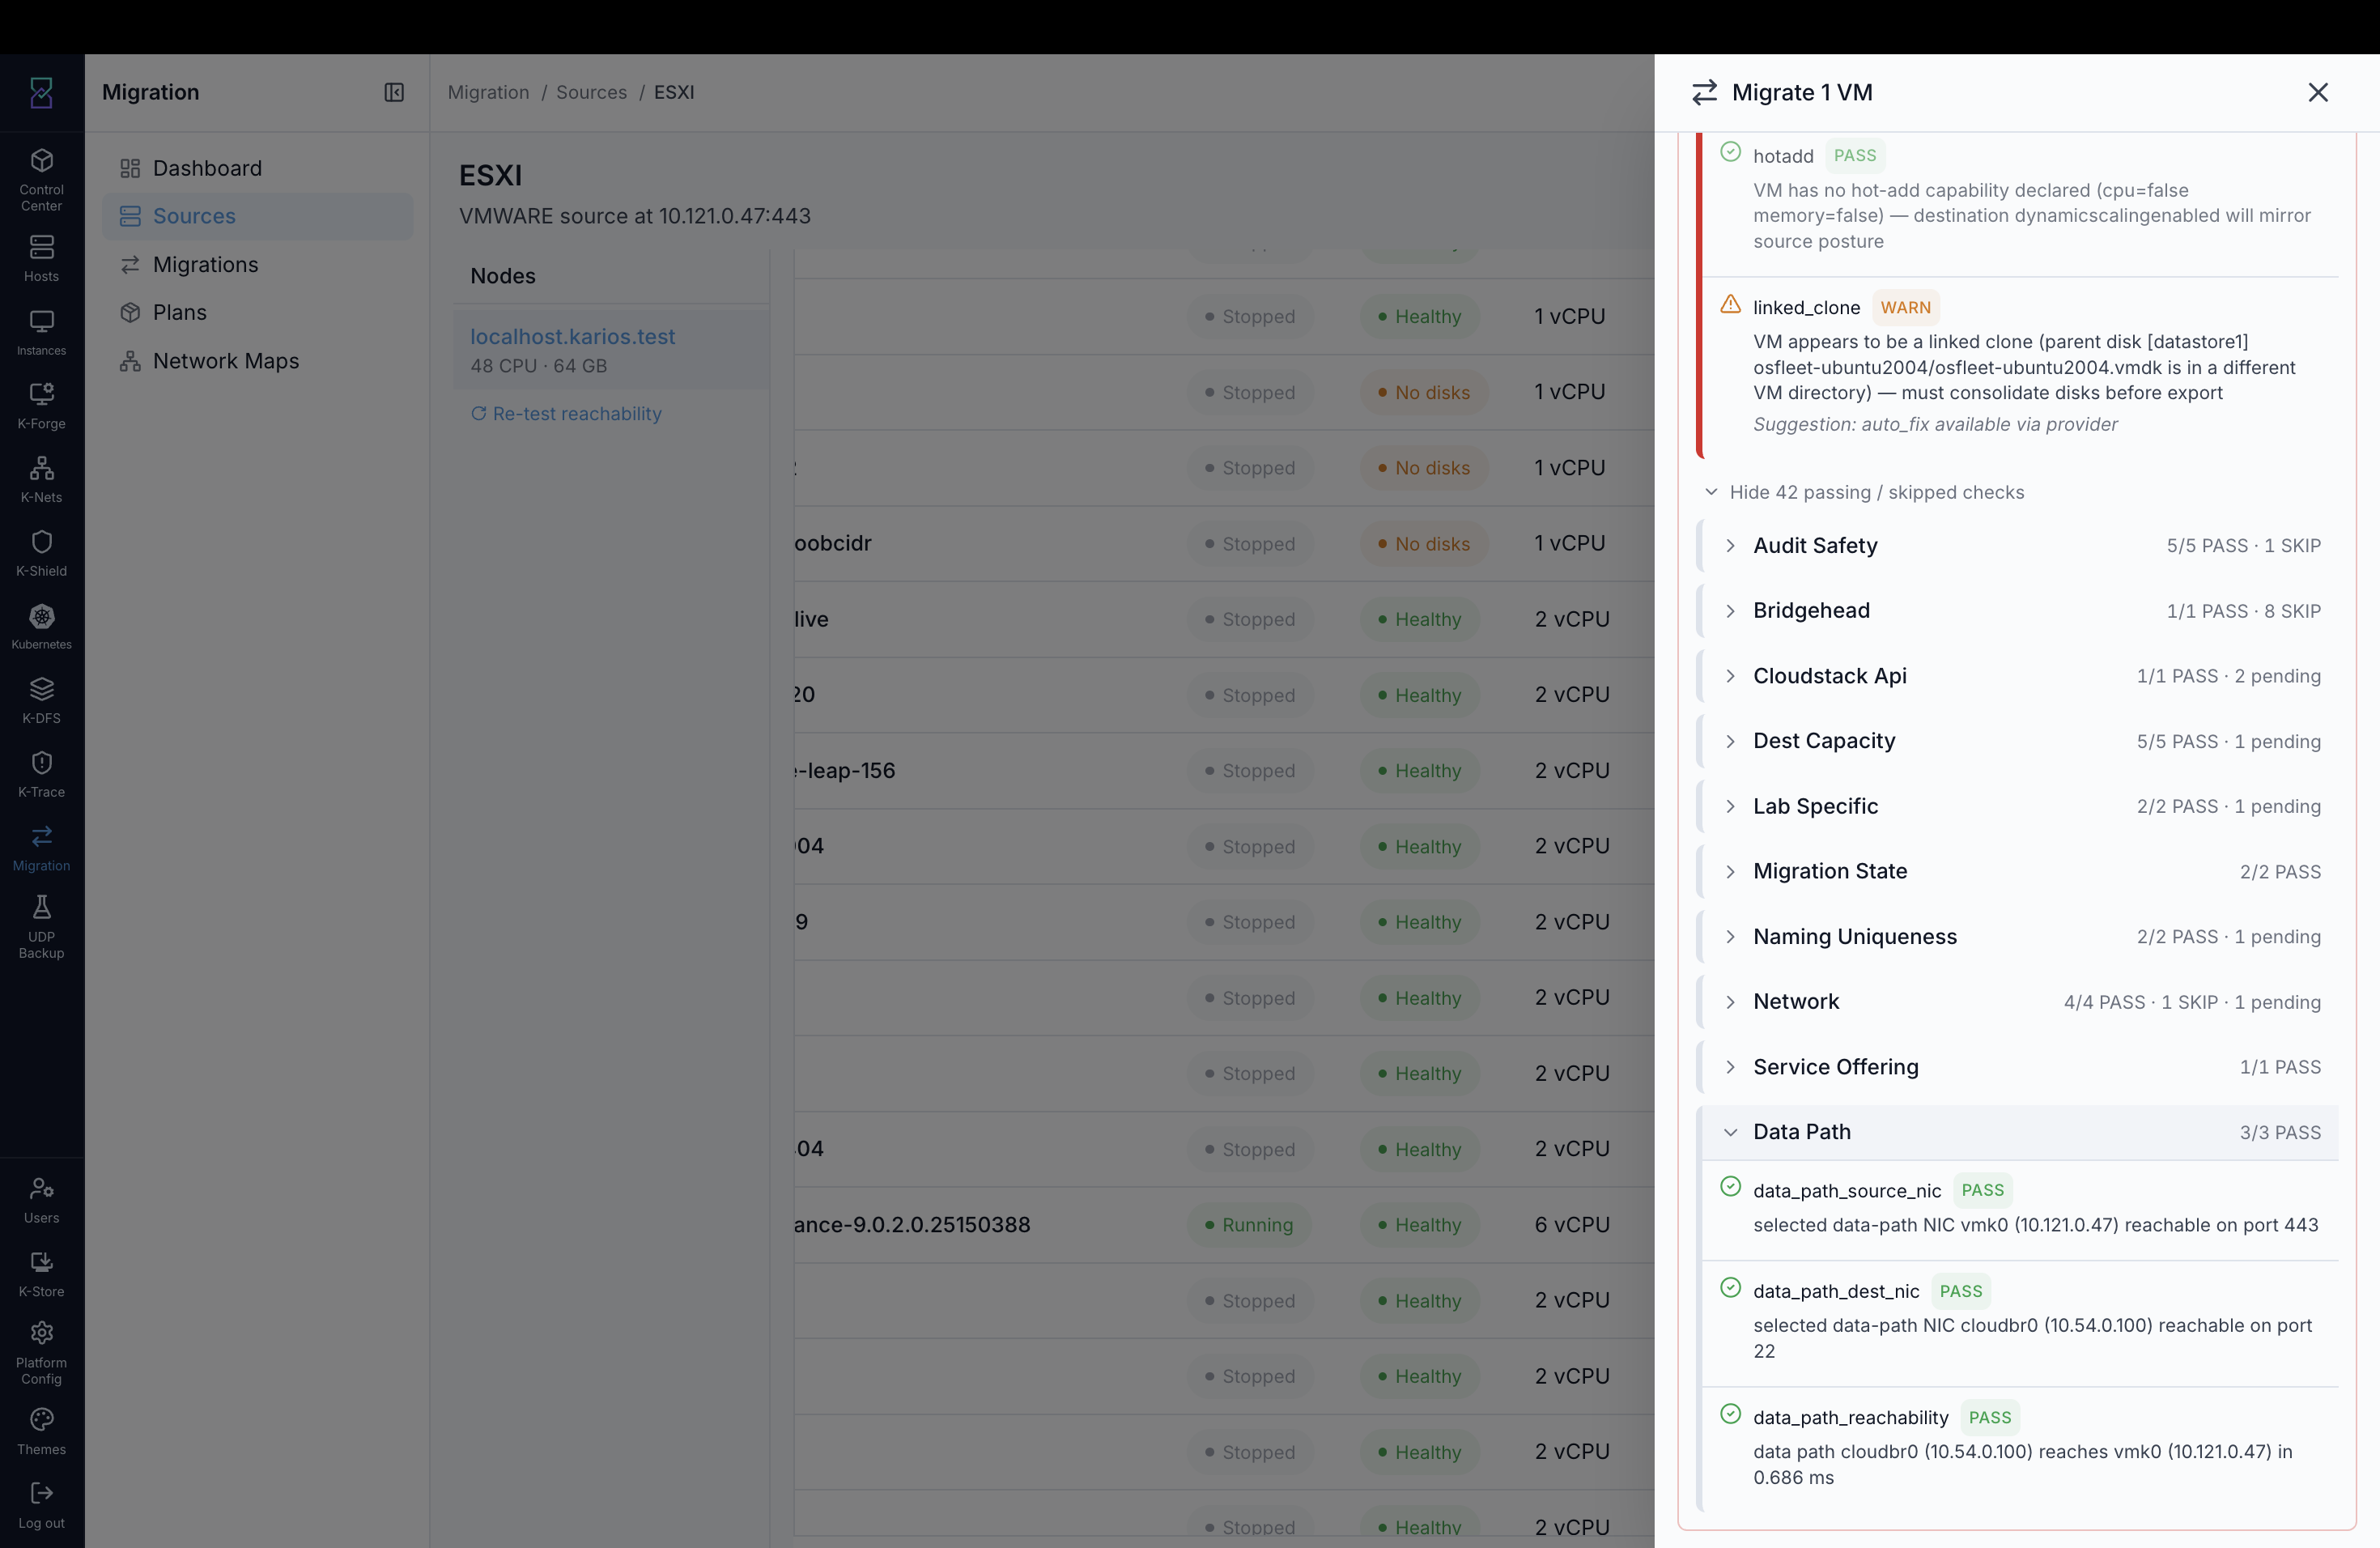
What this shows: The preflight Data Path check group confirming both NICs are reachable
before transfer starts.
Only NFC-based transfers (NFC, NFS, NFC-stream-to-RBD, VDDK-falls-back-to-NFC) honour a source interface choice; other methods use a fixed path. The destination interface is honoured for every method.
Note
IPv4 only. Source interface selection requires a VMware source.
Symptom |
Cause and fix |
|---|---|
High estimate, transfer near 1000 Mbps |
That’s card capacity, not expected transfer - raise |
Refused: no address / not reachable (443, 22) |
Assign an address, and check cabling/subnet/firewall before selecting. |
Interface enslaved to a bridge |
Select the named bridge instead - a bridge port can’t hold its own address. |
Fast card missing from the list |
It has no VMkernel adapter, or one on a non-default stack (NSX overlay, vMotion). Create a vmk on the default stack. |
Source host lost its management address |
A wide mask on a direct wire captured it - use a |
What You Can Do From This Screen
Action |
How |
|---|---|
Add a new source |
Click + Add Source on the Sources list page |
Edit an existing source’s credentials |
Click the pencil (✏) icon on the source row |
Delete a source |
Click the bin (🗑) icon - Karios refuses if active migrations are using this source |
Open the VM browser for a source |
Click the source name |
Re-test source reachability now |
Click 🔄 Re-test reachability on the Source detail page |
Migrate selected VMs immediately |
Check VM checkboxes → click ▶ Migrate → fill form → click Migrate Now |
Re-migrate a previously migrated VM |
Click ↻ Re-migrate on its row (only appears if the destination VM has been deleted) |
Expected Outcome
After adding a source: Status shows Connected (green) within 60 seconds
The Source detail page shows all VMs discovered on the source hypervisor
After clicking Migrate Now: a Batch is created and visible on Migrations → Active within a few seconds
If This Fails
Symptom |
What to do |
|---|---|
Status shows Disconnected or Error after adding the source |
Edit the source → verify hostname, port, and credentials. For ESXi/vCenter, confirm port 443 is open from the Karios host to the source. For Hyper-V, confirm WinRM port 5986 is open |
Status shows Partial (amber) |
Some ESXi hosts are unreachable. Click the source row to see which hosts are failing. VMs on those hosts will refuse at preflight; all other VMs are unaffected |
Status shows Unknown (grey) |
No probe has run yet. Wait 60 seconds for the first probe, or click Re-test reachability on the Source detail page |
No VMs appear in the Source detail page |
The connection succeeded but no VMs were discovered. Verify the credentials have read permissions in vCenter / Hyper-V. For vCenter, confirm the user has access to the datacenter and cluster |
A VM shows the Orphan badge |
VMware shows the VM as registered but its disk files cannot be found. Fix the orphan state in VMware first before attempting to migrate it |
A VM shows the Inaccessible badge |
The ESXi host it lives on is offline. Wait for the host to return, or use vCenter to move the source VM to a reachable host first |
Tip
Hyper-V sources auto-discover all cluster nodes from any single seed hostname. Add one node and Karios discovers the rest automatically.
Tip
For air-gapped sites, configure the Karios host to route to the source’s management network. Only the Karios host needs a network path to the source - not the source hypervisor itself.
Network Maps
When to Use
Configure Network Maps when:
You have completed step 1 (adding a Source) and are now doing step 2 of first-time setup
Source VMs have NICs on named port-groups or vSwitches that need to map to specific Karios networks
Migrated VMs are landing on the wrong Karios network
Purpose
When you migrate a VM, its NIC was attached to a VMware port group or Hyper-V vSwitch that does not exist by name in Karios. A network map tells Karios: “source NIC on port-group X → destination NIC on Karios network Y.”
A network map is per-source. One source can have at most one active network map. Each map can contain many entries - one entry per source-to-destination network pair.
Without a network map, migrations fall through to Karios’s default network selection. In multi-network environments, VMs can end up on the wrong network - discovered only at first guest boot.
What You See When You First Arrive
When you click Network Maps for the first time, you see an empty mappings list below the Add Mapping form. No entries exist yet.
The only action available is + Add Mapping. You must add at least one entry before any migration can use network-aware destination selection.
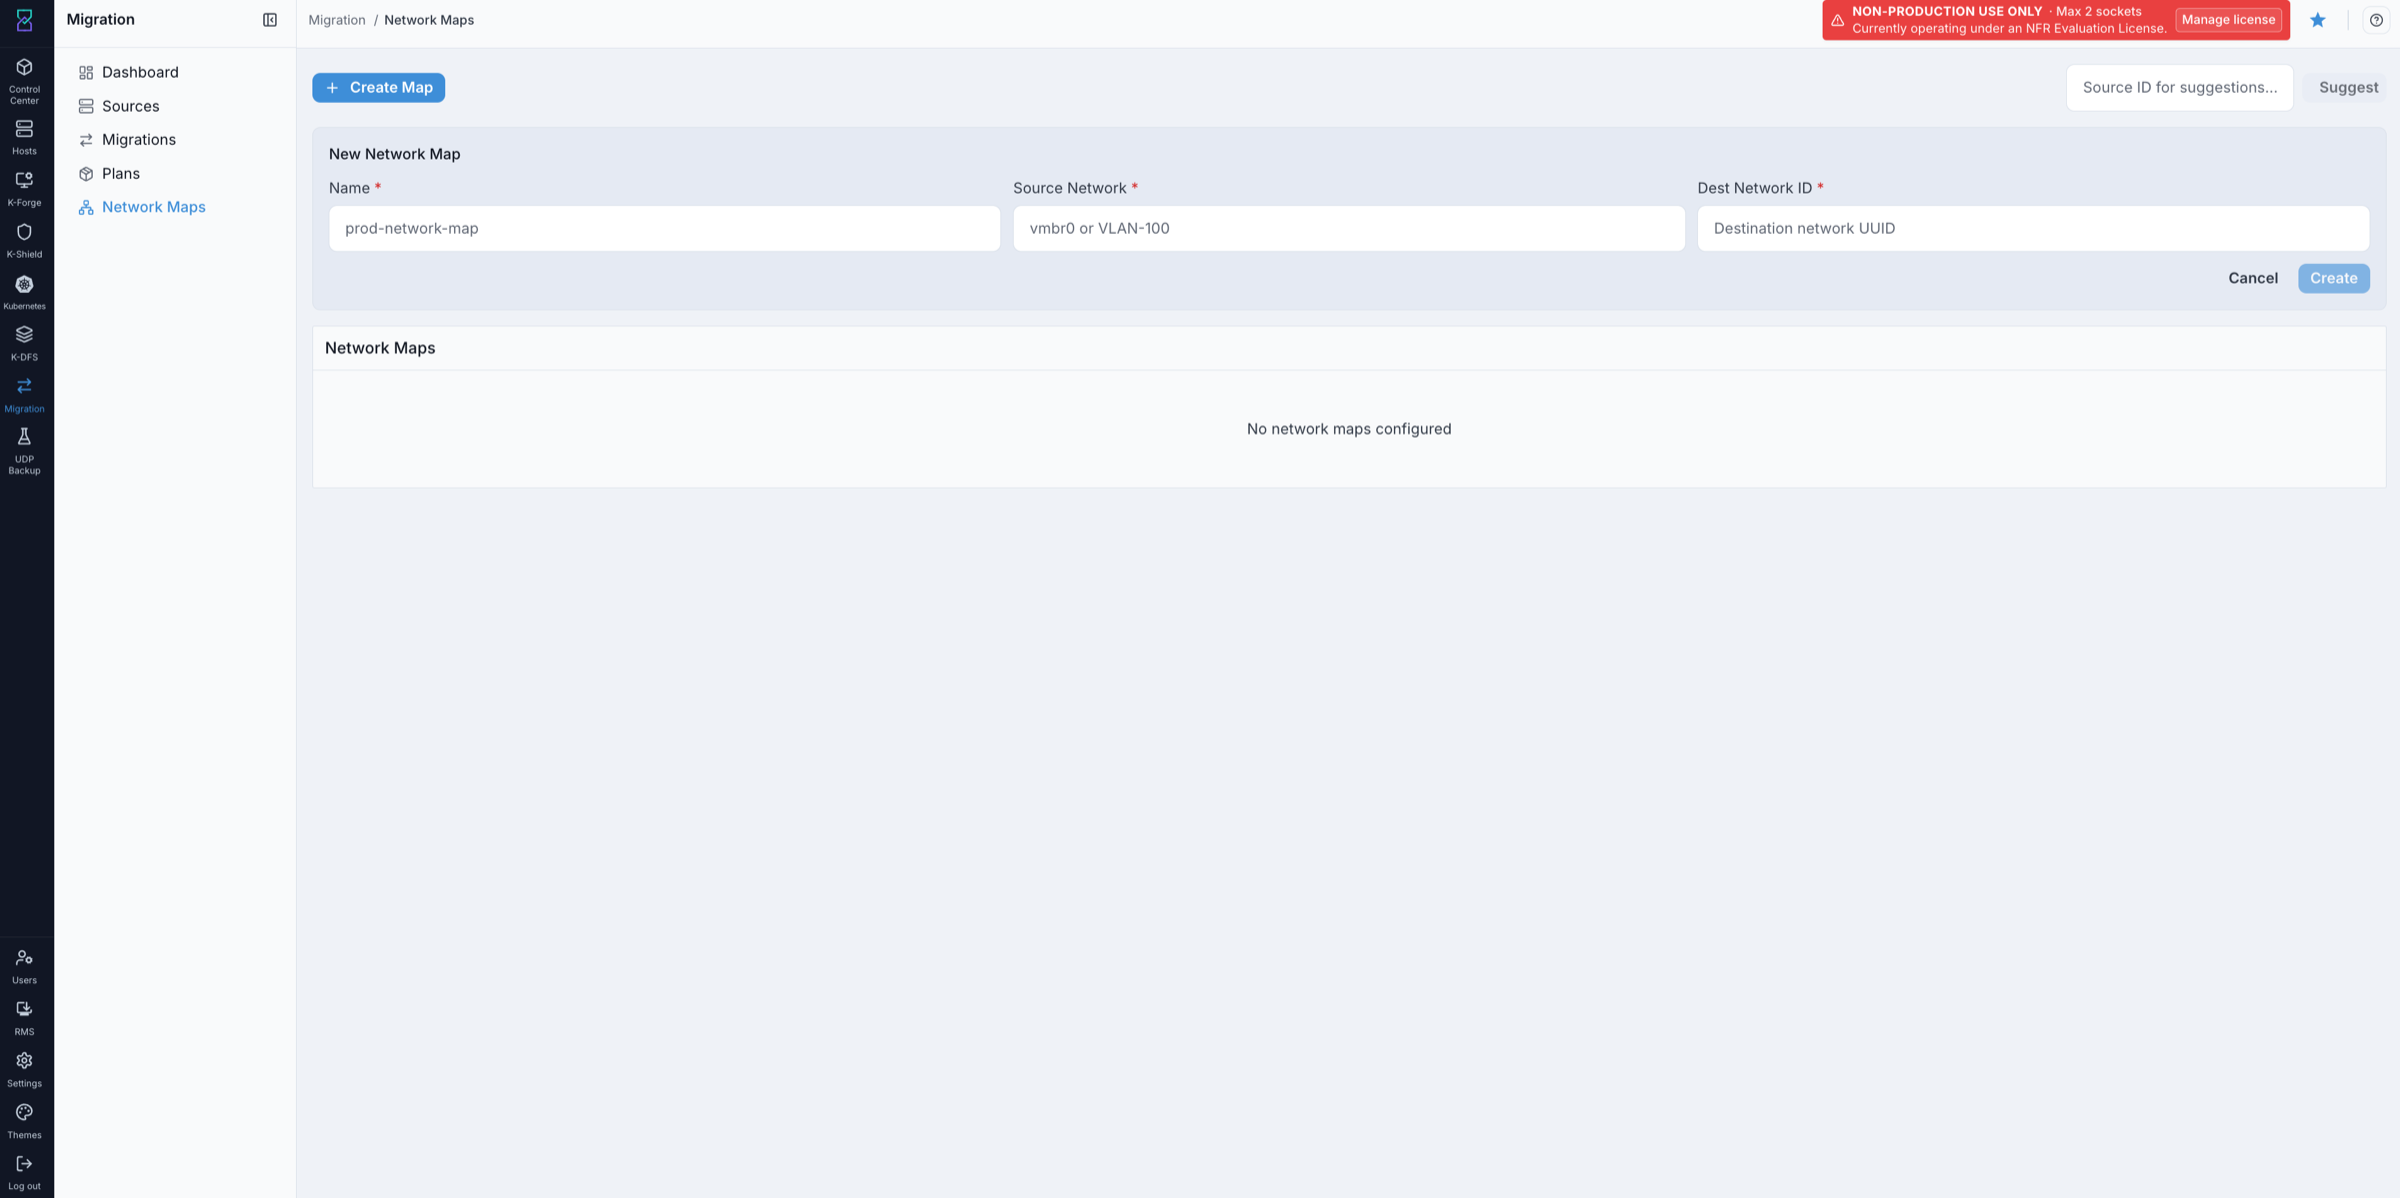
What this shows: The Network Maps page. The top form creates a new mapping entry. Below it is the existing mappings list (empty on first visit) with Validate (✓), Suggest (⚡), and Delete (🗑) action icons per row.
Steps - Add and Validate Network Mappings
Step 1 - Add a Mapping Entry
Click + Add Mapping.
What you see: The mapping form expands with three fields.
Fill in the fields:
Name - a descriptive label for this entry, e.g.
prod-network-mapSource Network - the network name exactly as it appears on the source hypervisor, e.g.
vmbr0orVLAN-100Dest Network ID - the UUID of the target Karios network
Note
To find the Dest Network ID: open Control Center → Network in another browser tab and copy the UUID from there. Do not type it manually - the UUID must match exactly.
Click Create to save the entry.
What you see: The entry appears in the mappings list below the form.
Step 2 - Validate the Entry
Click ✓ Validate on the new row.
Valid - both fields are populated and the network ID is recognised. The entry is ready to use.
INVALID - one or both fields are empty or incorrect. Edit the row, correct the values, and validate again.
Step 3 - Add More Entries (if needed)
Repeat Steps 1–2 for each additional source network that your VMs connect to. One entry per source-to-destination network pair.
Note
Optional shortcut - Suggest: Click ⚡ Suggest to have Karios auto-propose mappings by matching similar network names between source and destination. Review each proposal and keep only the ones that are correct.
Step 4 - Confirm All Entries are Valid
Review all rows in the mappings list. Every row must show Valid before you proceed to Storage Maps. A red INVALID badge on any row means that entry will not be used during migration.
Important
Step 2 complete. All network mappings are valid. Continue to Storage Maps to complete step 3 of first-time setup.
Column reference:
Column |
Description |
|---|---|
Name |
Your label for this mapping entry |
Source Network |
Network name or VLAN ID seen on the source hypervisor |
Dest Network ID |
The Karios network UUID this source network maps to |
Actions |
Validate (✓) · Suggest (⚡) · Delete (🗑) |
What You Can Do From This Screen
Action |
How |
|---|---|
Add a new mapping entry |
Click + Add Mapping → fill the form → click Create |
Validate a mapping entry |
Click ✓ Validate on the row - shows “Valid” or “INVALID - empty field” |
Auto-populate mappings from source topology |
Click ⚡ Suggest - review proposals before keeping them |
Delete a mapping entry |
Click 🗑 Delete on the row |
Find a destination network UUID |
Open Control Center → Network in another tab and copy the UUID from there |
Expected Outcome
Each mapping row shows “Valid” after clicking Validate
Plans and migrations that reference this source now use network-aware destination selection - VMs land on the correct Karios network automatically
If This Fails
Symptom |
What to do |
|---|---|
Validate shows INVALID |
One or both required fields are empty. Fill in Source Network and Dest Network ID, then re-validate |
Suggest button does not propose any mappings |
Karios could not find similar names between source and destination. Add entries manually |
VMs are still landing on the wrong network after setting up a map |
Verify the Plan’s Network mapping field points to this map. If the Plan uses an explicit network selection instead of Auto-pick, the map is bypassed - switch it to Auto-pick |
The Dest Network ID field shows an error |
The UUID must exactly match a Karios network. Copy it from Control Center → Network rather than typing it manually |
Important
Configure Network Maps before creating Plans or running migrations in multi-network environments. Without a map, Karios cannot guarantee VMs land on the correct network.
Tip
The Plan-level network field “Auto-pick” resolves via the network map. An explicit network selection in a Plan bypasses the map entirely - use explicit selections only when you need to override the map for a specific run.
Storage Maps
When to Use
Configure Storage Maps when:
You have completed step 2 (Network Maps) and are now doing step 3 of first-time setup
Source VMs have disks on named datastores that must land on specific Karios storage pools
You have multiple storage tiers in Karios (NVMe, SSD, spinning disk) and want VMs placed on the correct tier automatically
Purpose
A storage map works exactly like a network map, but for storage. A VM’s disks live on a VMware datastore (e.g. vsan-datastore-1). In Karios, those disks will live on a primary storage pool (e.g. pool-nvme-01). The storage map provides the translation table so Karios places each disk on the correct pool.
What You See When You First Arrive
When you click Storage Maps for the first time, you see an empty list. No storage maps exist yet.
The only action available is + Add Mapping. If your Karios environment has only one storage pool, you can skip this section - Karios uses that pool by default. If you have more than one pool, add a storage map now before creating Plans.
Steps - Add a Storage Map
Step 1 - Create a New Storage Map
Click + Add Mapping.
What you see: The storage map form opens.
Fill in the form fields:
Name - a label for this map, e.g.
prod-storage-mapSource ID - select the source environment this map applies to (the source you added in step 1)
Entries - one row per source datastore → destination pool mapping:
Click + Add Entry to add a row
For each row: select the source datastore and the matching Karios storage pool
Click ✕ next to a row to remove it
One map can contain many entries - for example, 3 source datastores mapping to 2 destination pools
Step 2 - Save the Map
Click Save.
What you see: The map appears in the list with the entry count shown. The map is now available to assign to Plans.
Step 3 - Assign the Map to a Plan
When creating or editing a Plan, select this storage map in the Storage mapping field. Without this assignment, the Plan will not use the map - Karios will fall back to its default pool for all disks.
Important
Step 3 complete. Storage map saved and assigned. Continue to Plans to create your migration plan, or return to Sources to start an immediate one-off migration now.
Column reference:
Column |
Description |
|---|---|
Name |
Your label for this map |
Source ID |
Which source environment this map applies to |
Mappings |
Inline list of source datastore → destination pool entries |
Actions |
Delete |
What You Can Do From This Screen
Action |
How |
|---|---|
Create a new storage map |
Click + Add Mapping → fill the form → click Save |
Add more datastore-to-pool entries |
Click + Add Entry inside the form |
Remove an entry from a map |
Click ✕ next to the entry row |
Delete a storage map |
Click Delete on the map row |
Expected Outcome
Storage map appears in the list after saving
Plans that reference the map automatically place VM disks on the correct storage pool during execution
If you have only one storage pool, a storage map is not required - Karios uses its default pool
If This Fails
Symptom |
What to do |
|---|---|
Disks land on the wrong pool after migration |
Verify the Plan’s Storage mapping field points to this map. If blank, the map is not being used - edit the plan and assign it |
A source datastore entry does not match |
The name must exactly match what Karios discovered. Open the Source detail page, check a VM’s disk storage label, and copy the exact datastore name from there |
Plans
When to Use
Use Plans when:
You want to migrate the same set of VMs repeatedly with the same settings (e.g. test → staging → production)
You want to schedule a migration for a specific date and time (e.g. 2 AM Sunday maintenance window)
You want to validate all settings are correct before the migration starts - not mid-transfer
You are migrating many VMs and want them grouped logically as a named job
If you want to migrate one VM right now without saving a configuration, go to Sources and use the Migrate button directly.
Purpose
A plan is a saved configuration that says “migrate these VMs to this destination, using these settings.” Author it once, validate it, and execute it immediately or on a schedule. When a plan executes, it creates a Batch - one migration per VM in the plan.
What You See When You First Arrive
When you click Plans in the left panel for the first time, you land on an empty Plans list. There are no rows in the table yet.
The only action available is + Create Plan in the top-right corner of the page.
Important
Before creating a plan, confirm you have completed:
Sources - at least one source hypervisor connected (green status)
Network Maps - source networks mapped to Karios networks
Storage Maps - source datastores mapped to Karios storage pools (if you have more than one pool)
Without these, plan validation will fail.
Once you have created at least one plan, the list shows one row per plan with these columns:
Column |
What it shows |
|---|---|
Plan name |
The label you gave the plan when you created it |
Status |
Current state: Draft · Scheduled · Running · Paused · Complete · Failed · Cancelled |
VM count |
How many VMs the plan covers |
Scheduled at |
The date and time the plan will auto-fire (blank if Schedule is off) |
Actions |
Validate (✓) · Execute (▶) · Delete (🗑) |
Plans List
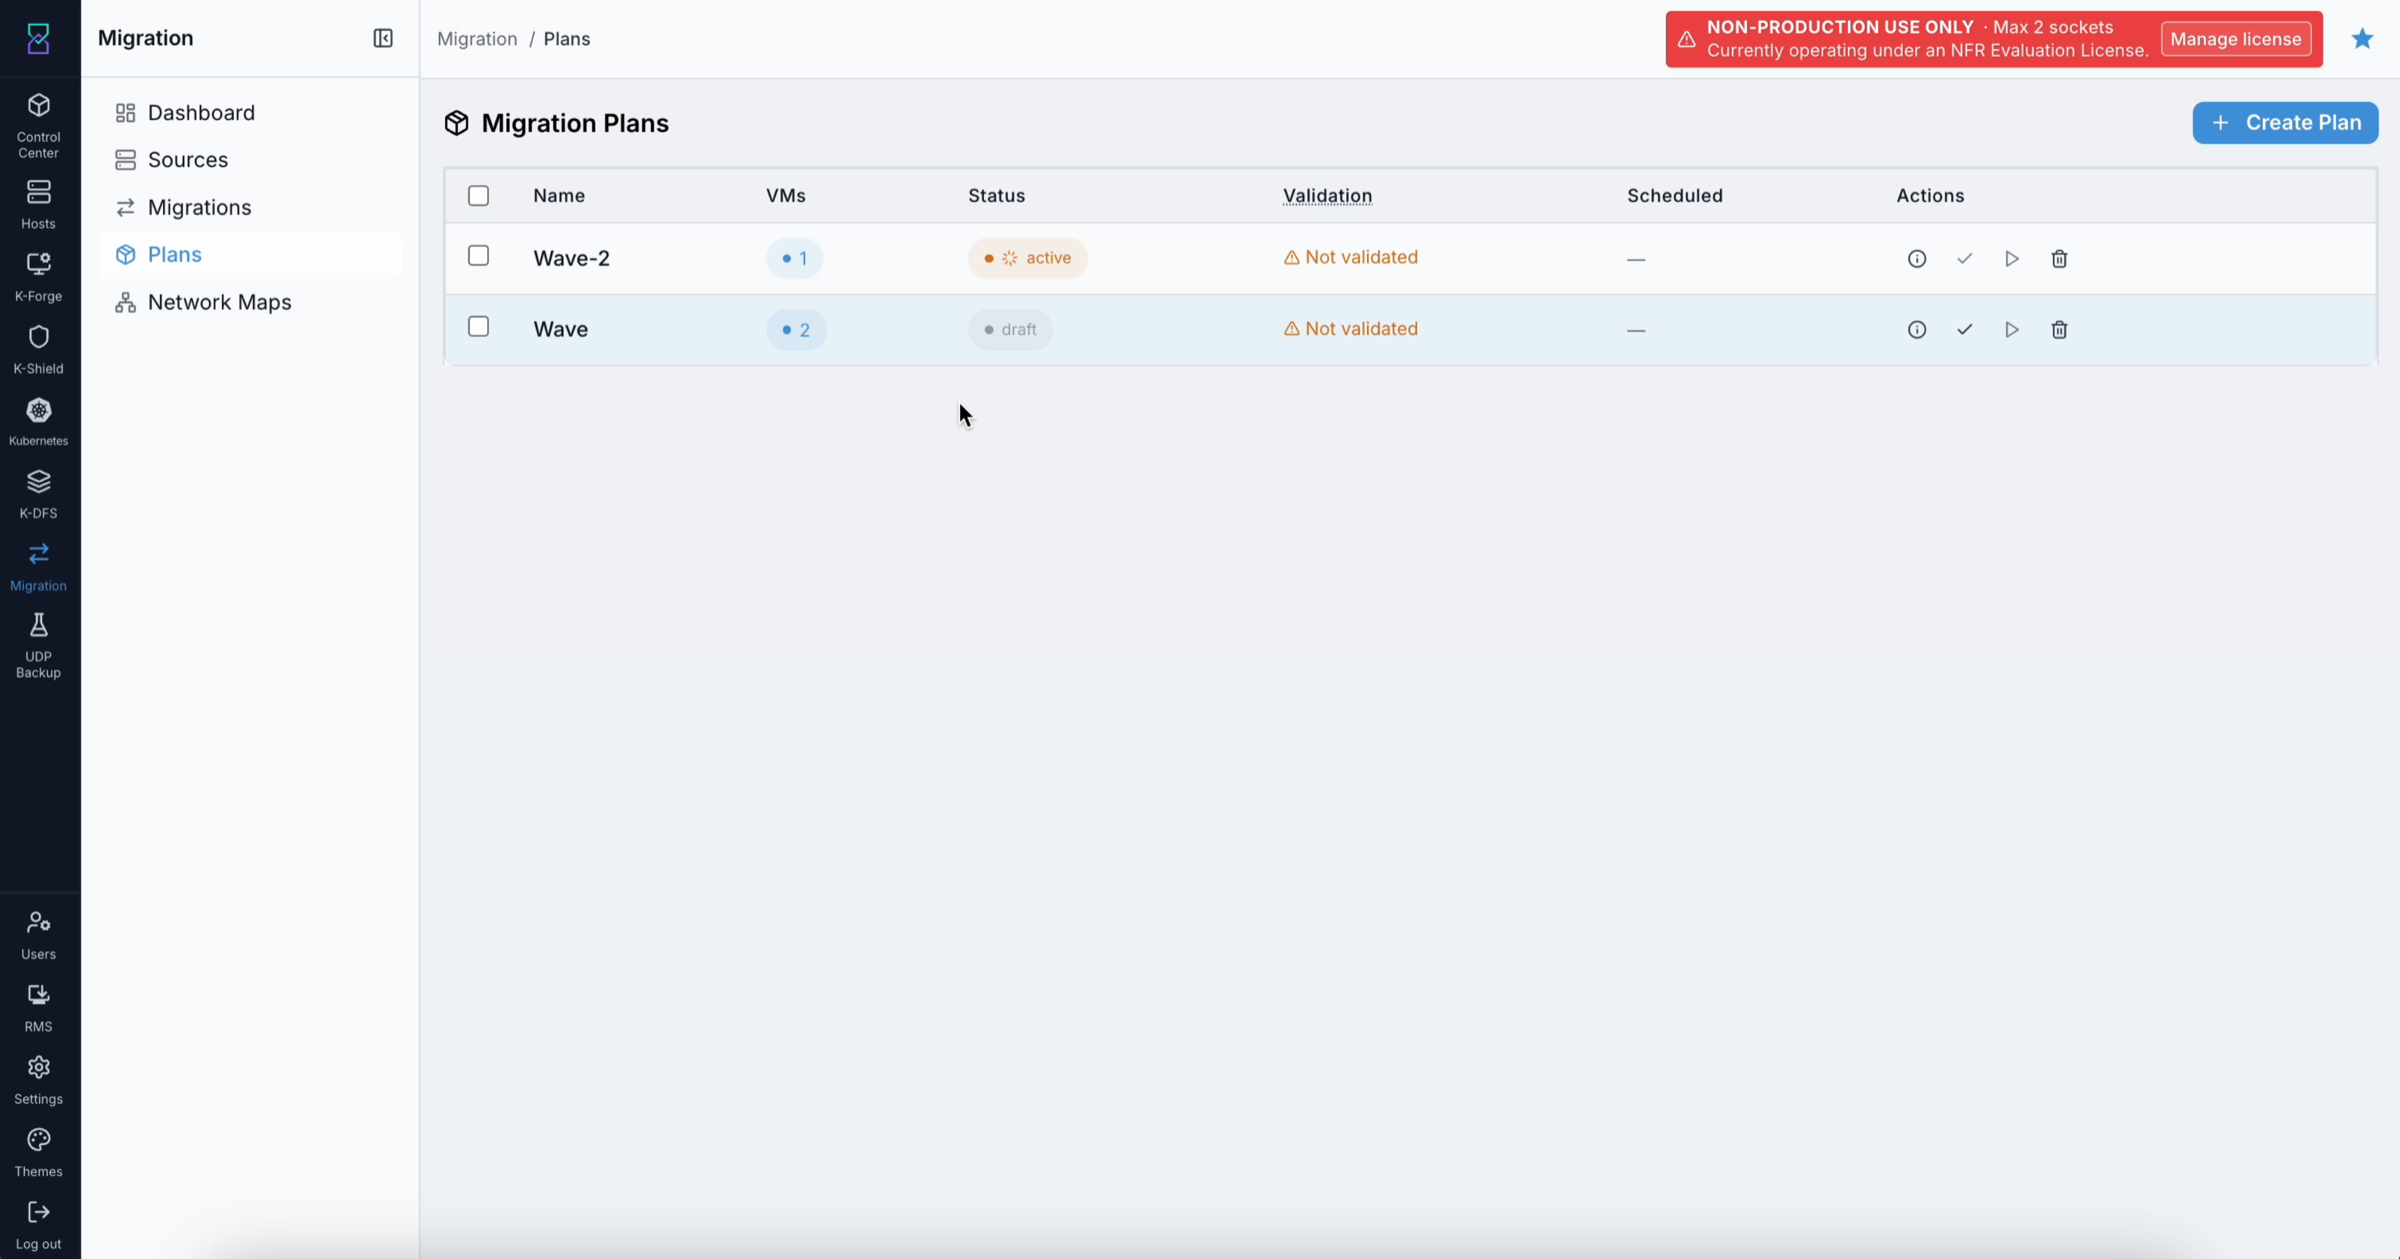
What this shows: The Plans list page after plans have been created. Each row is one saved plan with its status, VM count, scheduled date, and action buttons. On first visit this table is empty - click + Create Plan to add your first plan.
Steps - Create, Validate, and Execute a Plan
Follow these steps in order. Steps 1–7 create the plan. Steps 8–9 validate and run it.
Step 1 - Open Plans
Click Plans in the Migration left panel.
What you see: The Plans list. If this is your first visit, the table is empty. The only available action is + Create Plan in the top-right corner.
Step 2 - Open the Create Plan Form
Click + Create Plan.
What you see: The Create Migration Plan form opens as a panel. It has two scrollable sections - fill them top to bottom.
Step 3 - Name the Plan and Choose a Source
Plan name - enter a descriptive label, for example
Finance VMs - phase 1. This name appears in the Plans list and in batch records.Source - select the source hypervisor connection (vCenter / ESXi / Hyper-V) you registered in Sources.
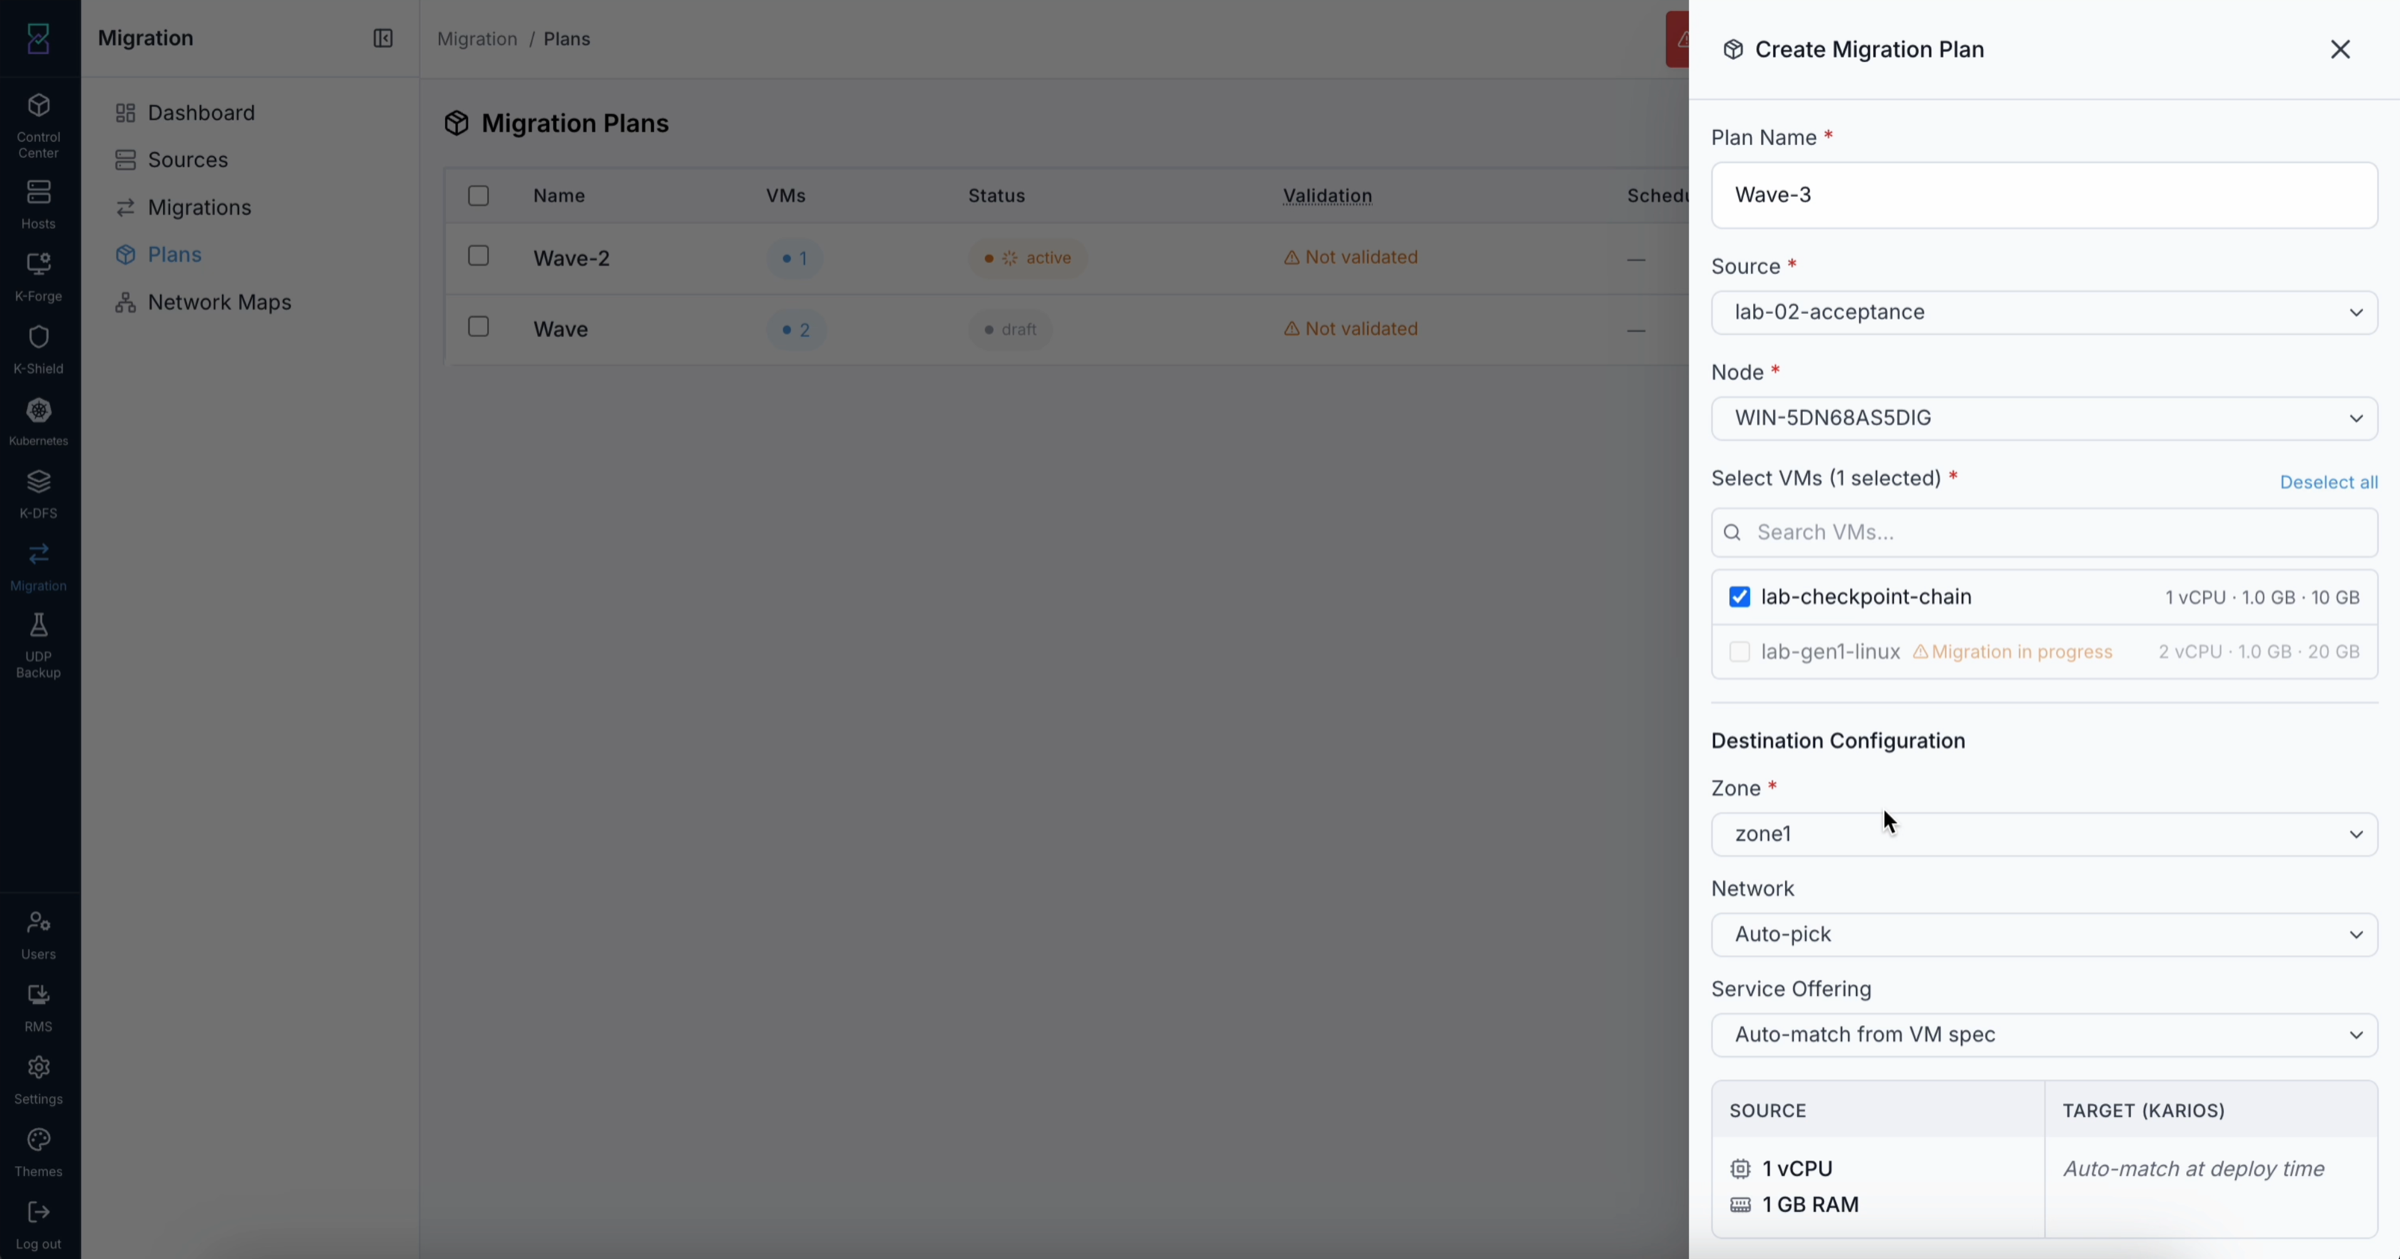
What this shows: The top half of the Create Migration Plan form. Plan name and Source are the first two fields. The VM selector below them lists every VM Karios can see on the chosen source.
Step 4 - Select the VMs to Migrate
In the VM selector, tick the checkbox next to every VM you want this plan to include.
Each VM row shows its vCPU count, RAM, and total disk size so you can confirm you are selecting the right machine.
You can use the search box above the list to filter by VM name.
Note
VMs with a warning badge (Orphan, Inaccessible, or Disk-less) cannot be migrated. Do not include them in the plan.
Step 5 - Set the Destination
Destination zone - select the Karios zone where the migrated VMs will run.
Destination network - select the Karios network the migrated VMs’ NICs will attach to.
Service offering - select the CPU and RAM profile for the destination VMs. Choose
Auto-match from VM specto mirror the source VM’s resources, or pick a specific profile.Network mapping - (optional) select a pre-defined Network Map if you configured one. Recommended for multi-network environments.
Storage mapping - (optional) select a pre-defined Storage Map if you configured one. Recommended if you have more than one storage pool.
Step 6 - Set Migration Mode and Schedule
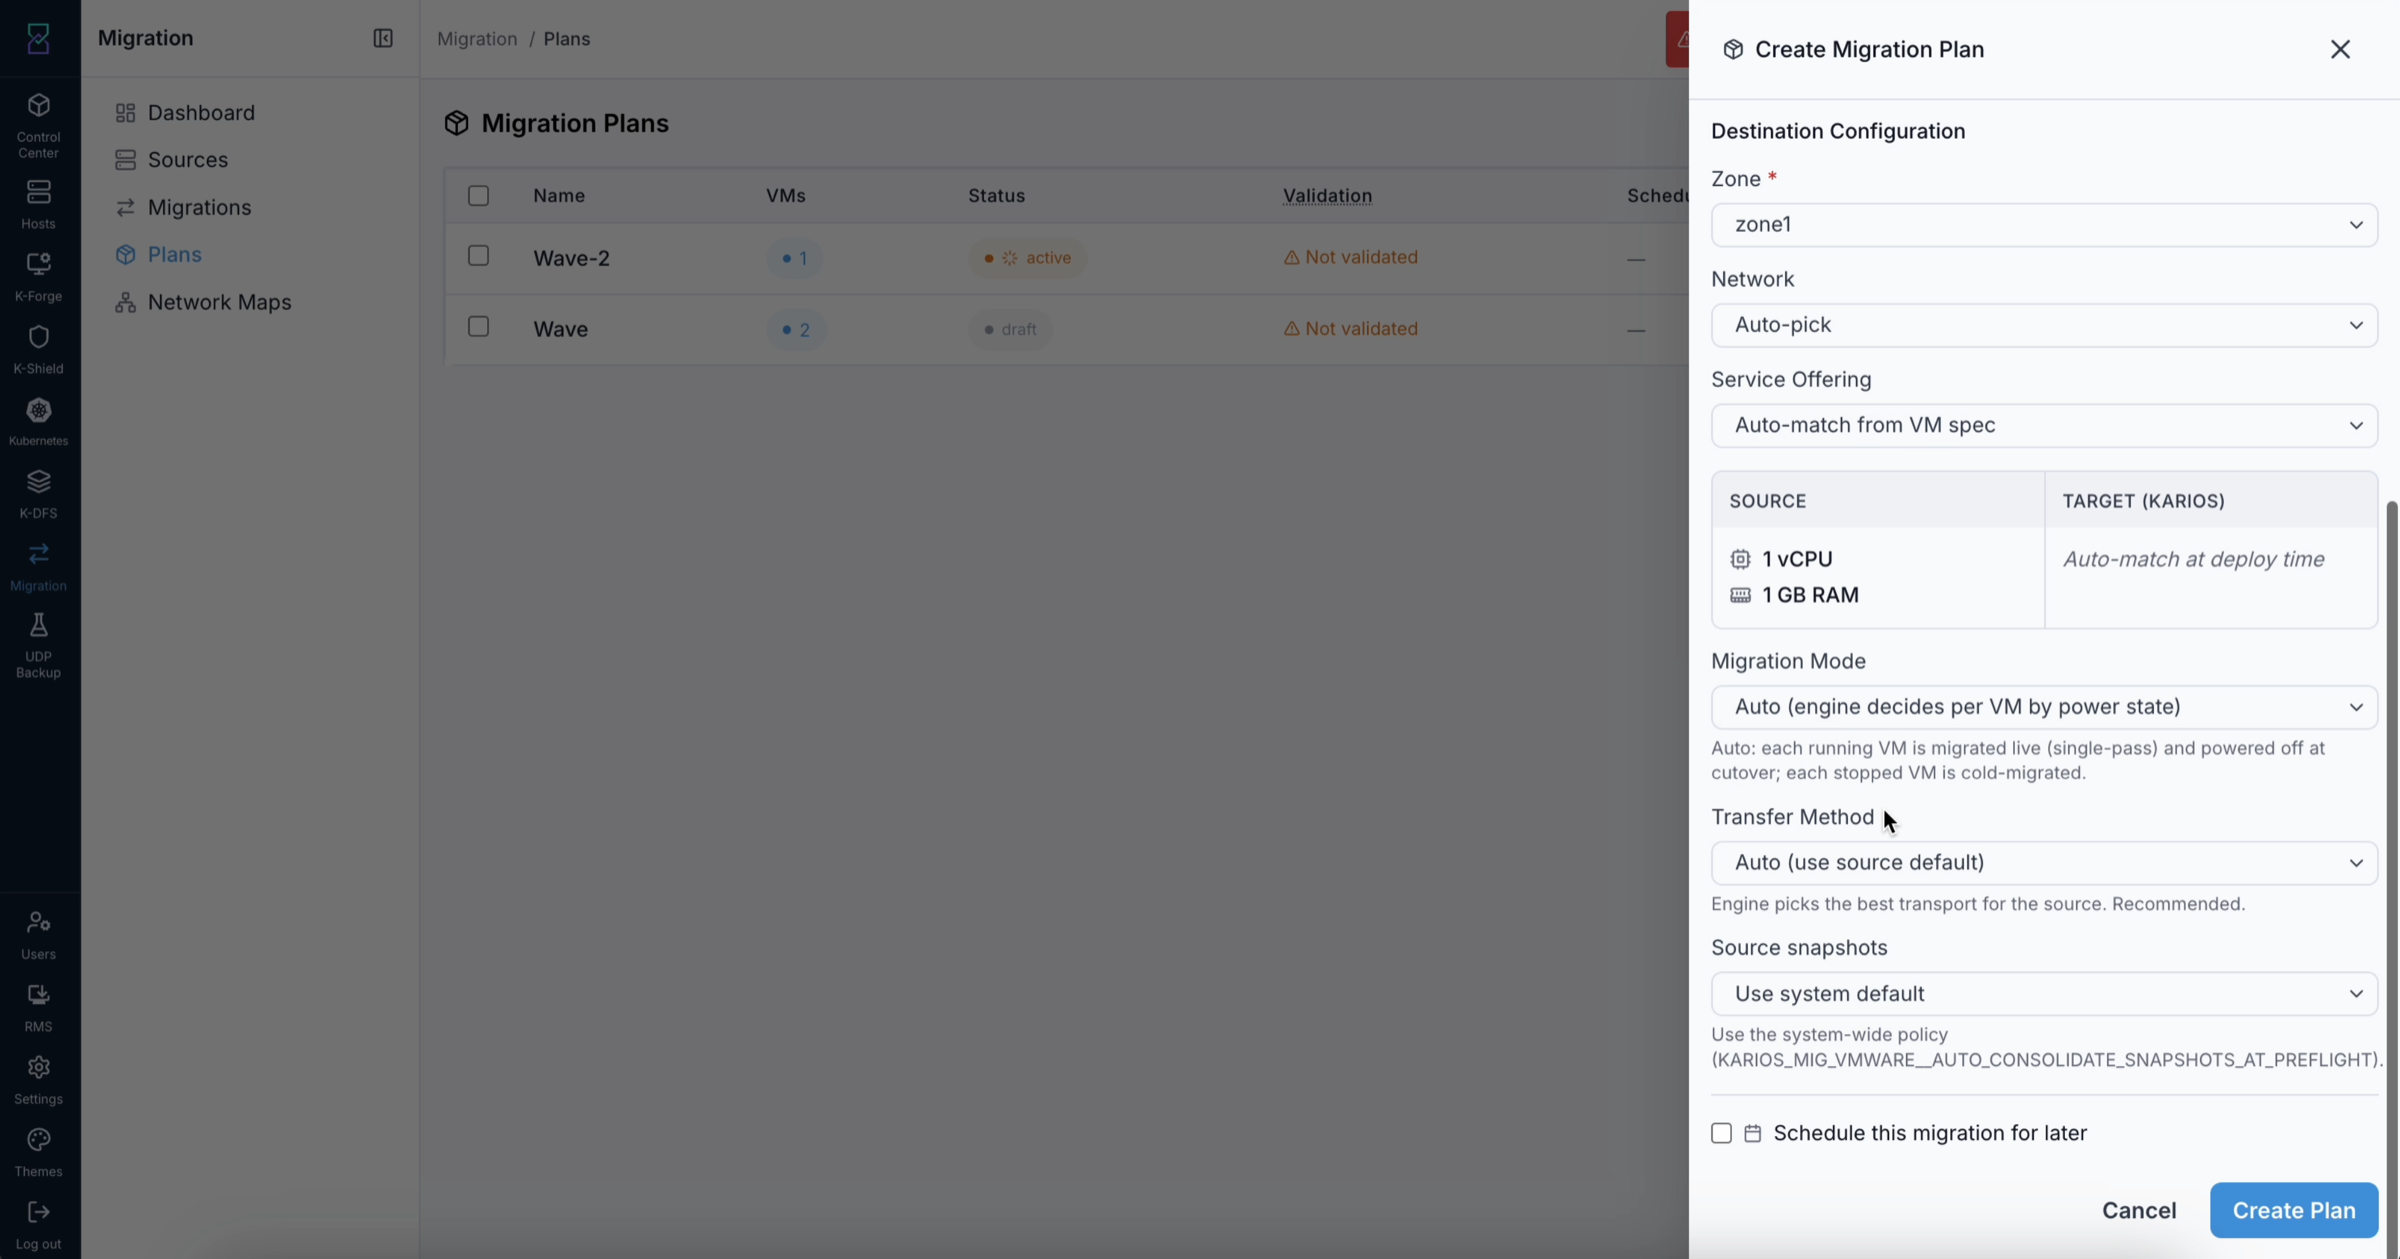
What this shows: The bottom half of the Create Plan form. Transfer Method (leave on Auto to let Karios pick the best transport) and Data path - the same source/destination NIC picker covered in Data-Path NIC Selection - come first, followed by live migration mode, Auto-consolidate, and the Schedule toggle.
Live migration mode - choose how Karios copies the source disks:
Mode
What it does
Auto (recommended)
Karios picks the safest method based on the VM’s current state (running or powered off)
Live (Warm)
Copies disks while the VM keeps running using VMware Changed Block Tracking (CBT), then a short final cutover. Best when you cannot afford downtime
Cold
Powers off the VM first, then copies disks fully. VM is offline for the entire transfer. Simpler but causes downtime
Auto-consolidate - leave on Default. Setting this to Yes tells Karios to merge VMware snapshot chains before copying, which reduces transfer time and avoids snapshot-related errors.
Schedule - choose when to run the plan:
OFF - run it manually whenever you click Execute.
ON - pick a date and time. Karios will auto-fire the plan at that exact time and create a Batch automatically.
Step 7 - Save the Plan
Click Save.
What you see: The form closes. The plan appears in the Plans list with a Draft status badge - it is saved but not yet validated or executed.
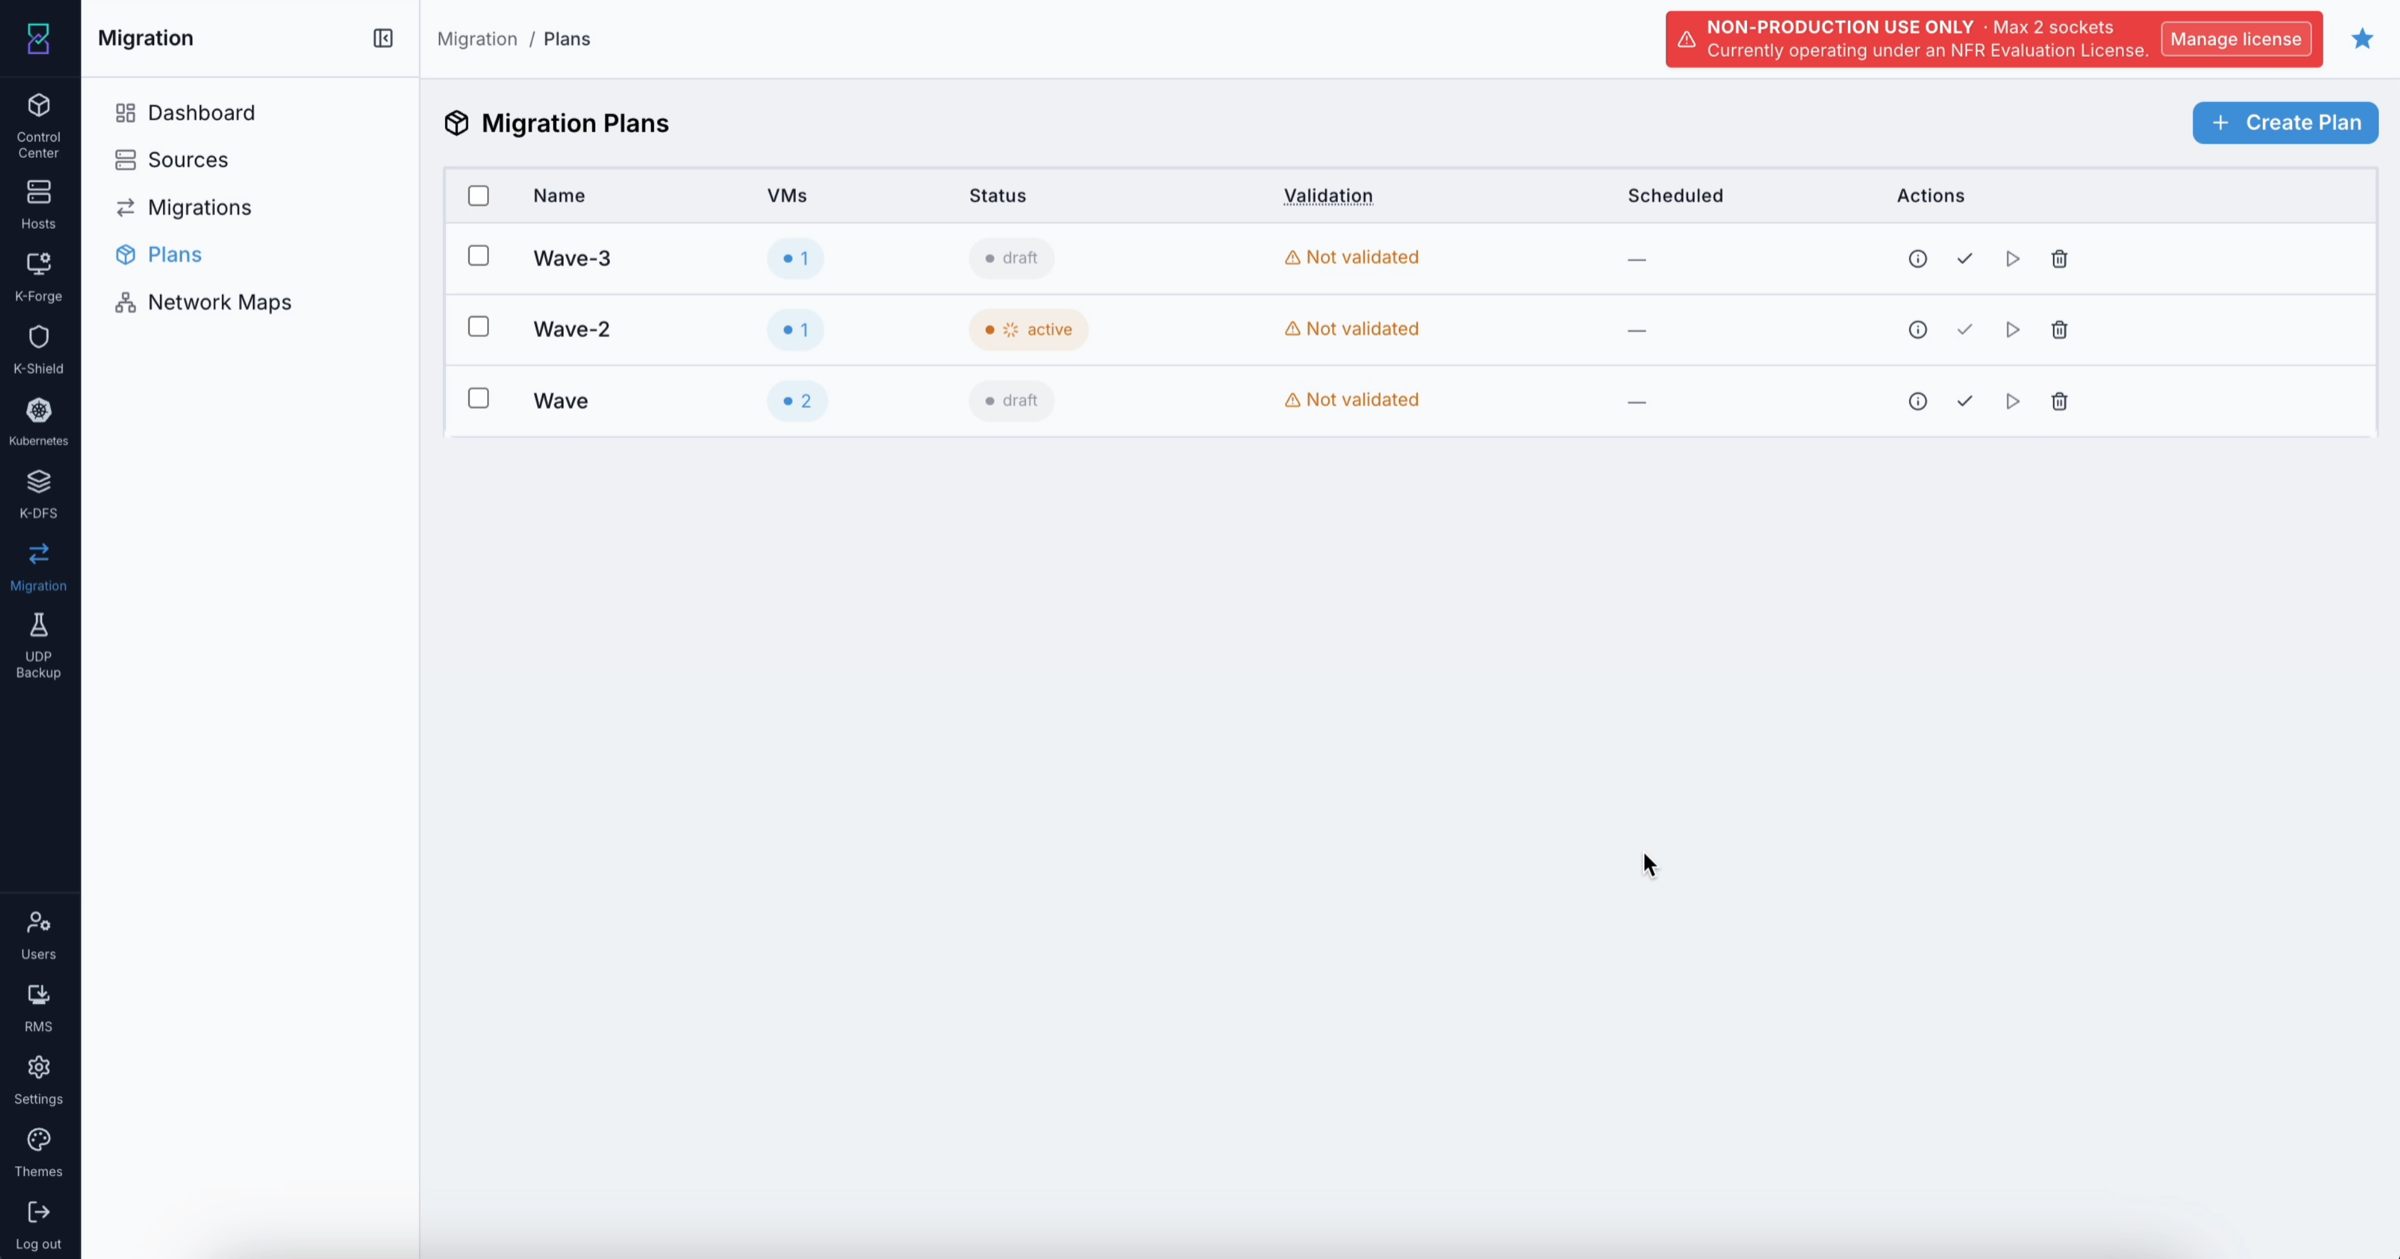
What this shows: The Plans list after saving. The new plan (shown as “Wave-3”) has a Draft badge - confirming it is saved and ready to validate.
Step 8 - Validate the Plan
Warning
Always validate before executing. Validation catches configuration problems without moving any data. Fixing issues after a batch has started is much harder.
In the Plans list, find your plan and click ✓ Validate in the Actions column.
What you see: Karios runs every pre-flight check - source connectivity, destination capacity, snapshot state, network and storage map completeness.
Review the validation results:
All checks pass - the plan row updates to show a green Validated state. Go to Step 9.
One or more FAIL items - each failed check is listed with a description. Fix each issue:
Missing network mapping → go to Network Maps, add the entry, return here and re-validate.
Unreachable source host → go to Sources → click 🔄 Re-test reachability → confirm the host is green, then re-validate.
Incompatible service offering → edit the plan and choose a service offering with more CPU or RAM.
Re-validate after each fix until all checks pass.
Step 9 - Execute the Plan
Click ▶ Execute on the plan row.
What you see: A confirmation dialog opens. Every field from the plan is pre-filled. You can override zone, network, or service offering for this run only without changing the saved plan.
Review the pre-filled values and adjust if needed.
Click Confirm.
What you see: The dialog closes. Karios creates a Batch - one migration job per VM in the plan - and queues them all.
Click Migrations → Active in the left panel to watch each VM’s progress in real time. Or click Migrations → Batches to see the overall batch progress as a group.
What You Can Do From This Screen
Action |
How |
|---|---|
Create a new plan |
Click + Create Plan in the page header |
Validate a plan before executing |
Click ✓ Validate on the plan row - fix any FAIL items before executing |
Execute a plan |
Click ▶ Execute - a confirmation dialog opens before anything starts |
Delete a plan |
Click 🗑 Delete - Karios refuses if any of the plan’s migrations are still running and shows which ones are blocking |
Track execution progress |
Go to Migrations → Batches after executing |
Expected Outcome
After saving: the plan appears in the list with Draft status
After validating: all items show a green check; the plan is ready to execute
After executing: a Batch is created and appears in Migrations → Batches
If scheduled: the plan fires automatically at the set time with no further action required
If This Fails
Symptom |
What to do |
|---|---|
Validation shows FAIL for a VM |
Read the error description next to the FAIL label. Common causes: VM is already in an active migration, source host is unreachable, or capacity is insufficient at the destination |
Execute button is greyed out |
Validate the plan first. Execute requires at least one clean validation pass |
Plan fails to delete |
The pop-up shows which migrations are blocking. Click “View in Active” to cancel them, then retry the delete |
Scheduled plan did not fire at the expected time |
Check the plan’s scheduled date/time - it may be set to a past date. Edit the plan, update the schedule, and save again |
VMs land on the wrong network after execution |
Edit the Network Map for the plan’s source (or create one if missing). Re-validate the plan before re-executing |
Important
Always validate a plan before executing in production. Validation catches capacity, connectivity, snapshot, and mapping issues before they cause a mid-transfer failure.
Tip
Validation freshness older than 24 hours is informational, not a hard gate - but re-validate before any large execute to ensure the cluster state has not shifted.
Dashboard
When to Use
Open the Dashboard when:
You want to know whether anything is broken right now without clicking into individual migrations
Migrations ran overnight and you want a quick summary before investigating details
You received a failed-migration alert and want a high-level count before diving in
Purpose
The Dashboard is a live health summary of your entire migration environment. It shows KPI counts, the migrations running at this moment, and pass-vs-fail trends over time. It does not let you take action - it tells you where to go next.
The page subscribes to Server-Sent Events so data refreshes automatically. You do not need to refresh the browser.
What You See When You First Arrive
When you click Migrations in the left sidebar, you land here automatically - the Dashboard is the default landing page. On a fresh environment with no migrations run yet:
All three KPI cards show 0 or -
The Currently Running list is empty
The Activity Over Time chart shows no bars
This is normal. The Dashboard is read-only - you cannot start migrations from here. Once you connect a source and run your first migration, data begins populating automatically.
Important
If you are setting up Migration for the first time, click Sources in the left panel now - do not stay on the Dashboard. The Dashboard only becomes useful after at least one migration has run.
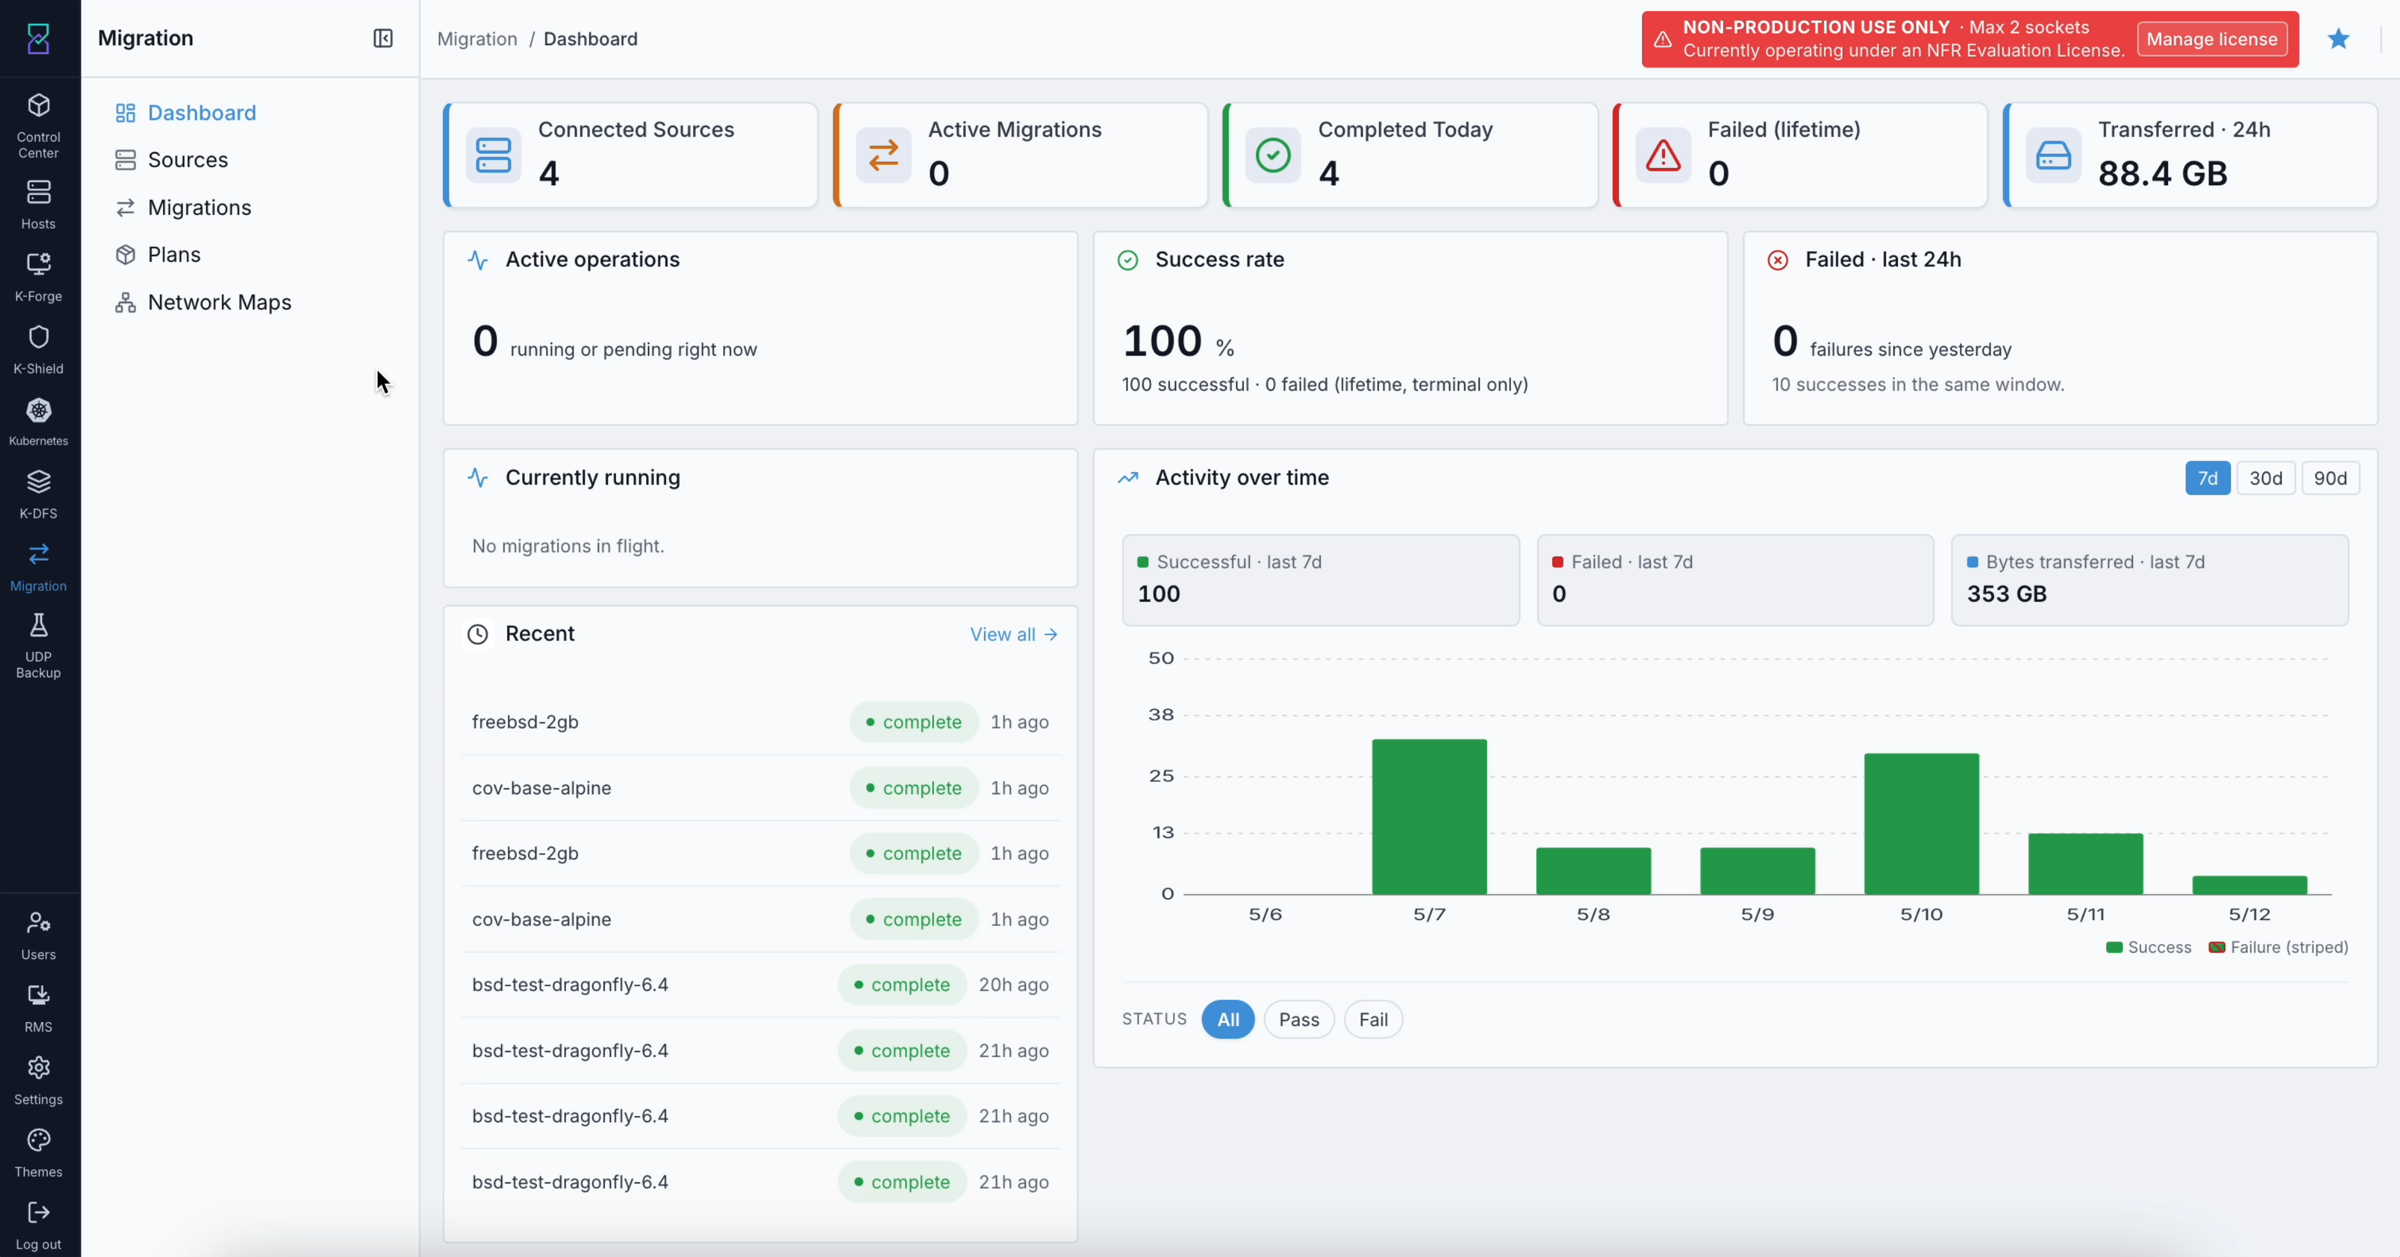
What this shows: The full Migration Dashboard. Top row: three KPI cards (active operations, success rate, failures in last 24 h). Middle rows: the “Currently Running” live list and “Recent Activity” section. Bottom: the “Activity Over Time” bar chart with window and status toggles.
Steps
Confirm you are on the Dashboard - it is the default view when you click Migrations in the sidebar. If you navigated away, click Dashboard in the Migration left panel.
Check the three KPI cards at the top:
Active operations - any non-zero count means migrations are running now
Success rate - a lifetime percentage; below 90% suggests a systemic issue worth investigating
Failed (last 24h) - if non-zero, click the card to go directly to History filtered for today’s failures
Scroll to Currently Running - each row shows the VM name, a live progress bar, and elapsed time. Click any row to open the Migration Detail Drawer for per-disk status and logs.
Scroll to Recent Activity - the five most recently finished migrations. Click View all to go to the full History page.
Scroll to Activity Over Time - use the window selector (7 / 30 / 90 days) and status toggle (All / Pass / Fail) to identify trends.
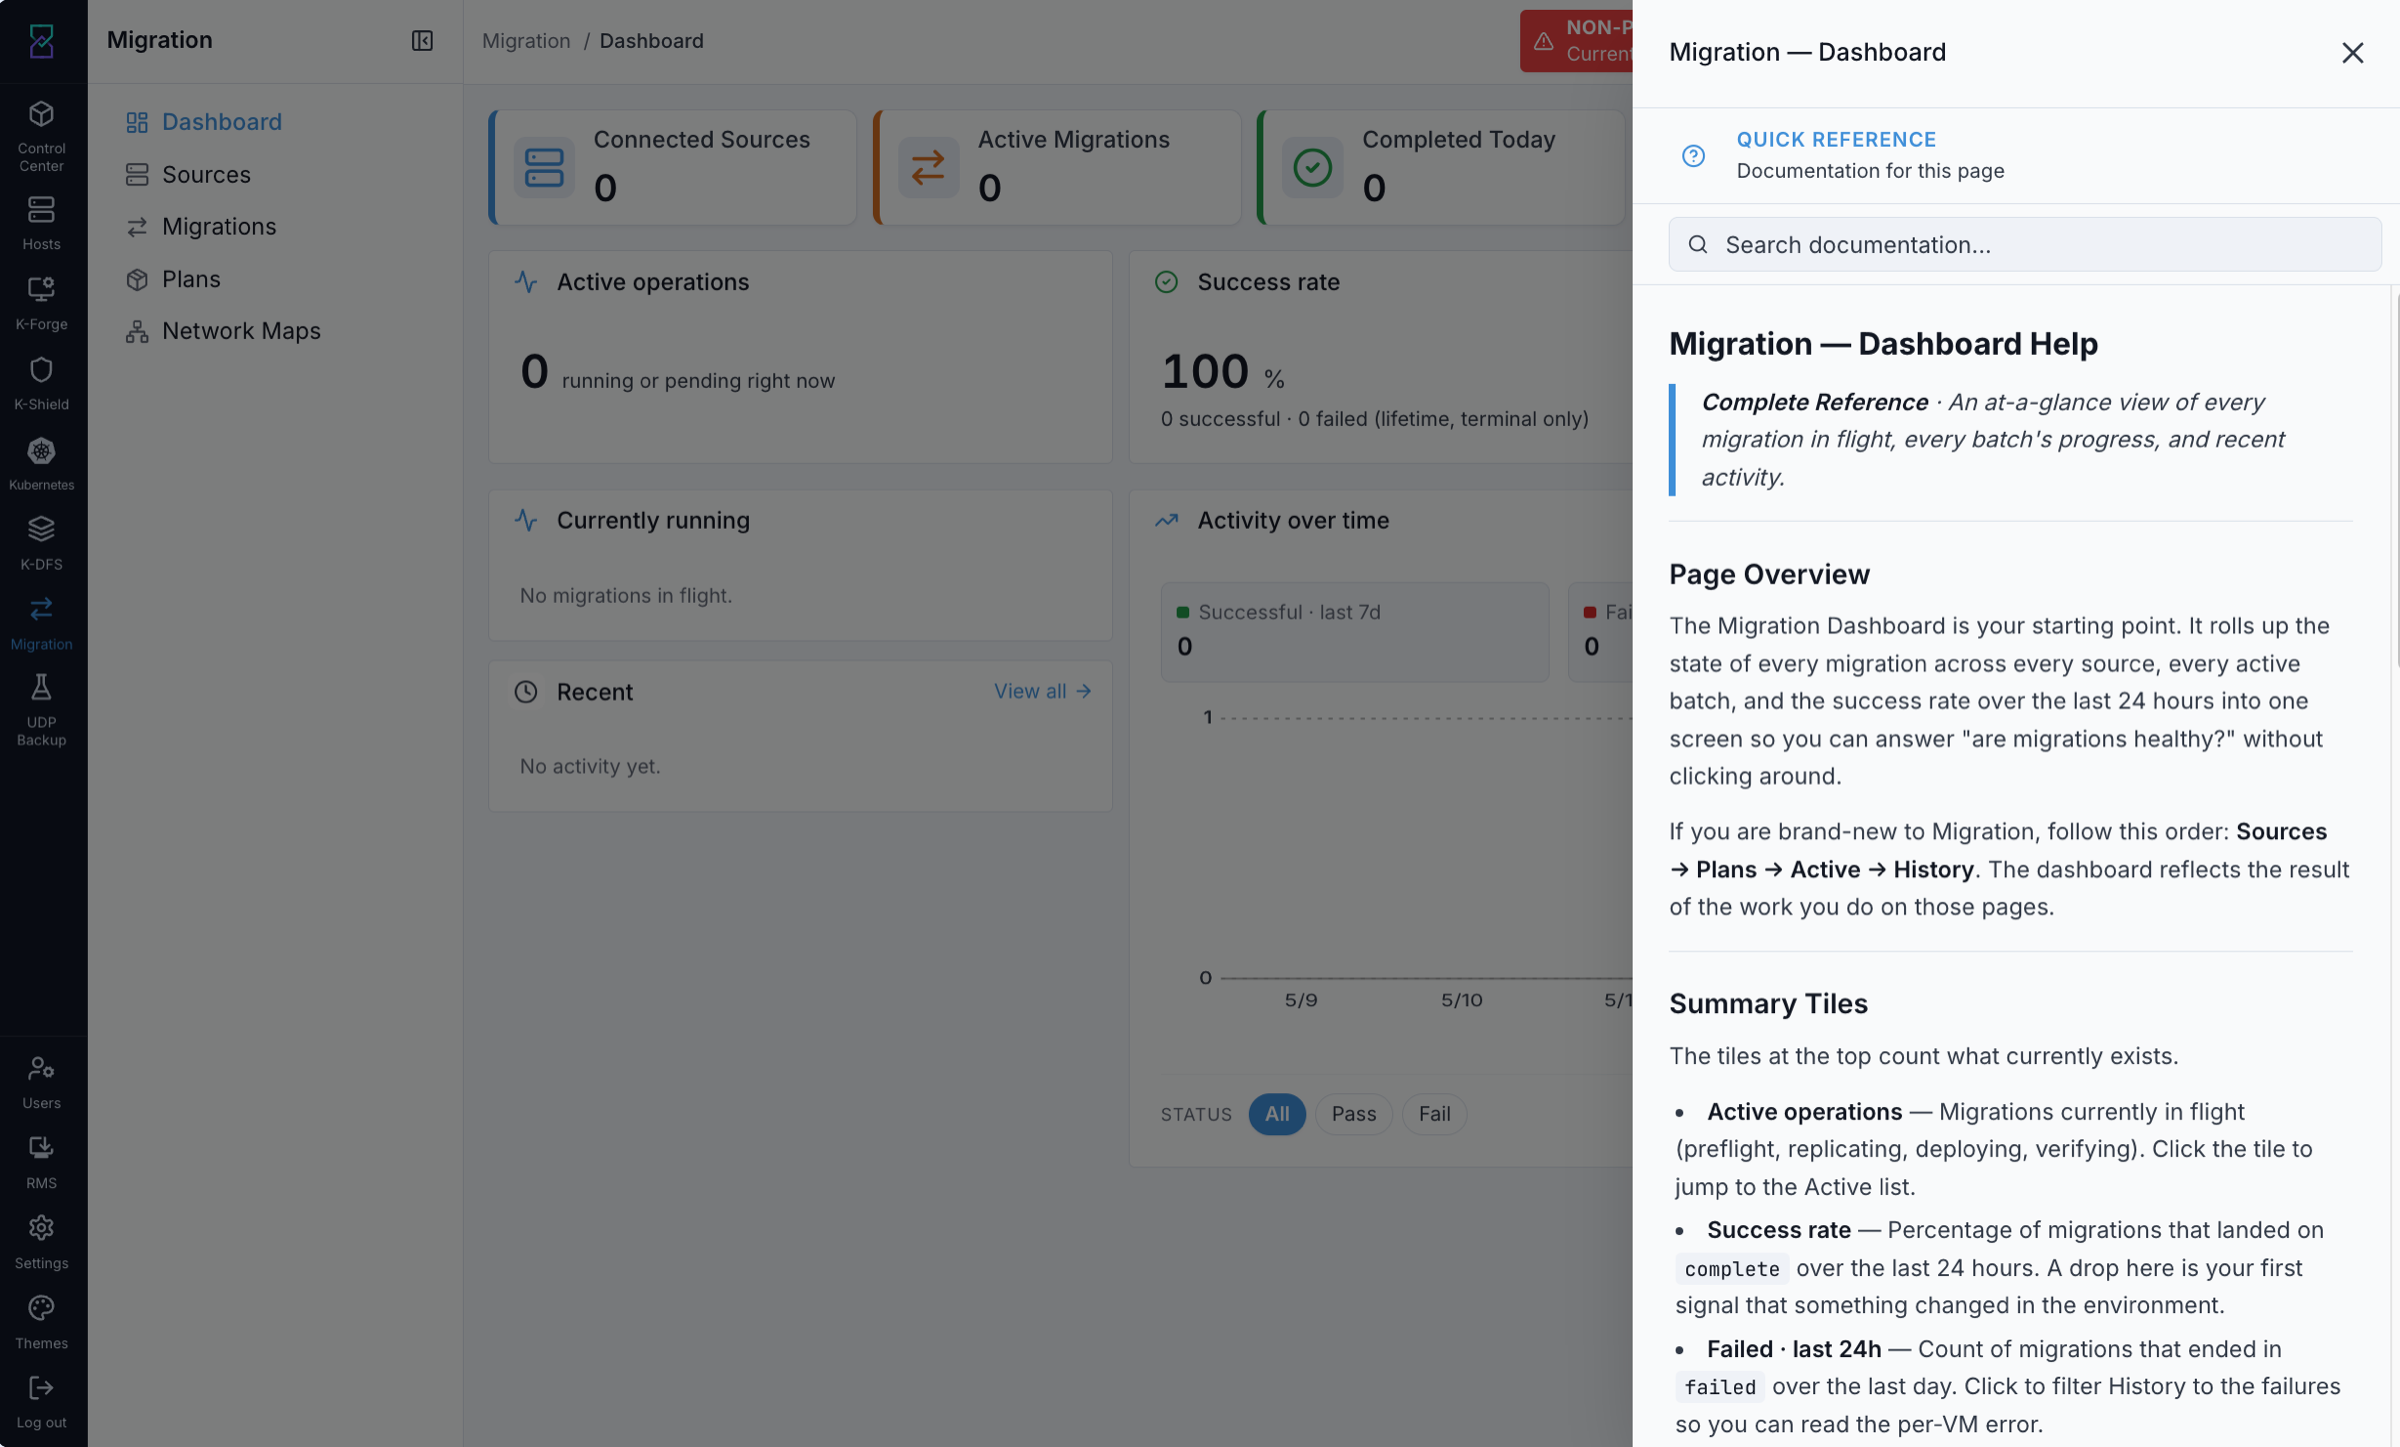
What this shows: The Dashboard with the Quick Reference help panel open. Click the [K] icon in the top-right of any Migration page to open this panel without leaving your current view.
What You Can Do From This Screen
Action |
How |
|---|---|
Jump to today’s failures |
Click the Failed (last 24h) KPI card |
View a running migration’s details |
Click any row in the “Currently Running” list |
Go to the full migration history |
Click View all in the Recent Activity section |
Change the chart time window |
Use the Window selector (7 / 30 / 90 days) on the bar chart |
Filter the chart to pass or fail only |
Use the Status toggle on the bar chart |
Open the Quick Reference help panel |
Click the [K] icon in the top-right corner of any Migration page |
Expected Outcome
KPI cards reflect current state within seconds of page load - no manual refresh required
The “Currently Running” list updates live as VMs progress through stages
A healthy environment shows: Failed (last 24h) = 0, success rate above 90%, and no rows in “Currently Running” that have been stuck for more than 30 minutes
If This Fails
Symptom |
What to do |
|---|---|
KPI cards show “-” instead of numbers |
The statistics service may still be loading. Wait 10 seconds and refresh. If it persists, check Karios system health in Control Center |
“Currently Running” does not update automatically |
The Server-Sent Events connection may have dropped. Refresh the page to re-establish it |
“Failed (last 24h)” card shows a non-zero count |
Click the card → History → read logs for each failed migration → Retry or Rollback as appropriate |
A spike of failures appears at the same time each night |
Check your source hypervisor’s backup window schedule - a backup process may be locking disks during the migration window. Adjust the plan schedule to avoid overlap |
Migrations
The Migrations page bundles three views into one tabbed interface. The URL keeps your tab choice - refreshing or bookmarking returns you to the same view.
What You See When You First Arrive
When you click Migrations in the Migration left panel, you land on the Active tab by default. You will see three tabs at the top of the page: Active, Batches, and History.
On a fresh environment with no migrations run yet, the Active tab is empty - no rows appear. This is normal. Rows appear here as soon as a migration is started from Sources or a Plan is executed.
Active Tab
When to Use
Go to the Active tab when:
You want to watch in-flight migrations progressing in real time
You suspect a migration has stalled and need to check its current state
You want to cancel a migration that is not progressing
Purpose
The Active tab shows every migration currently in a non-terminal state - all VMs that are queued, pre-flighting, transferring, deploying, or verifying. Rows update live without a page refresh.
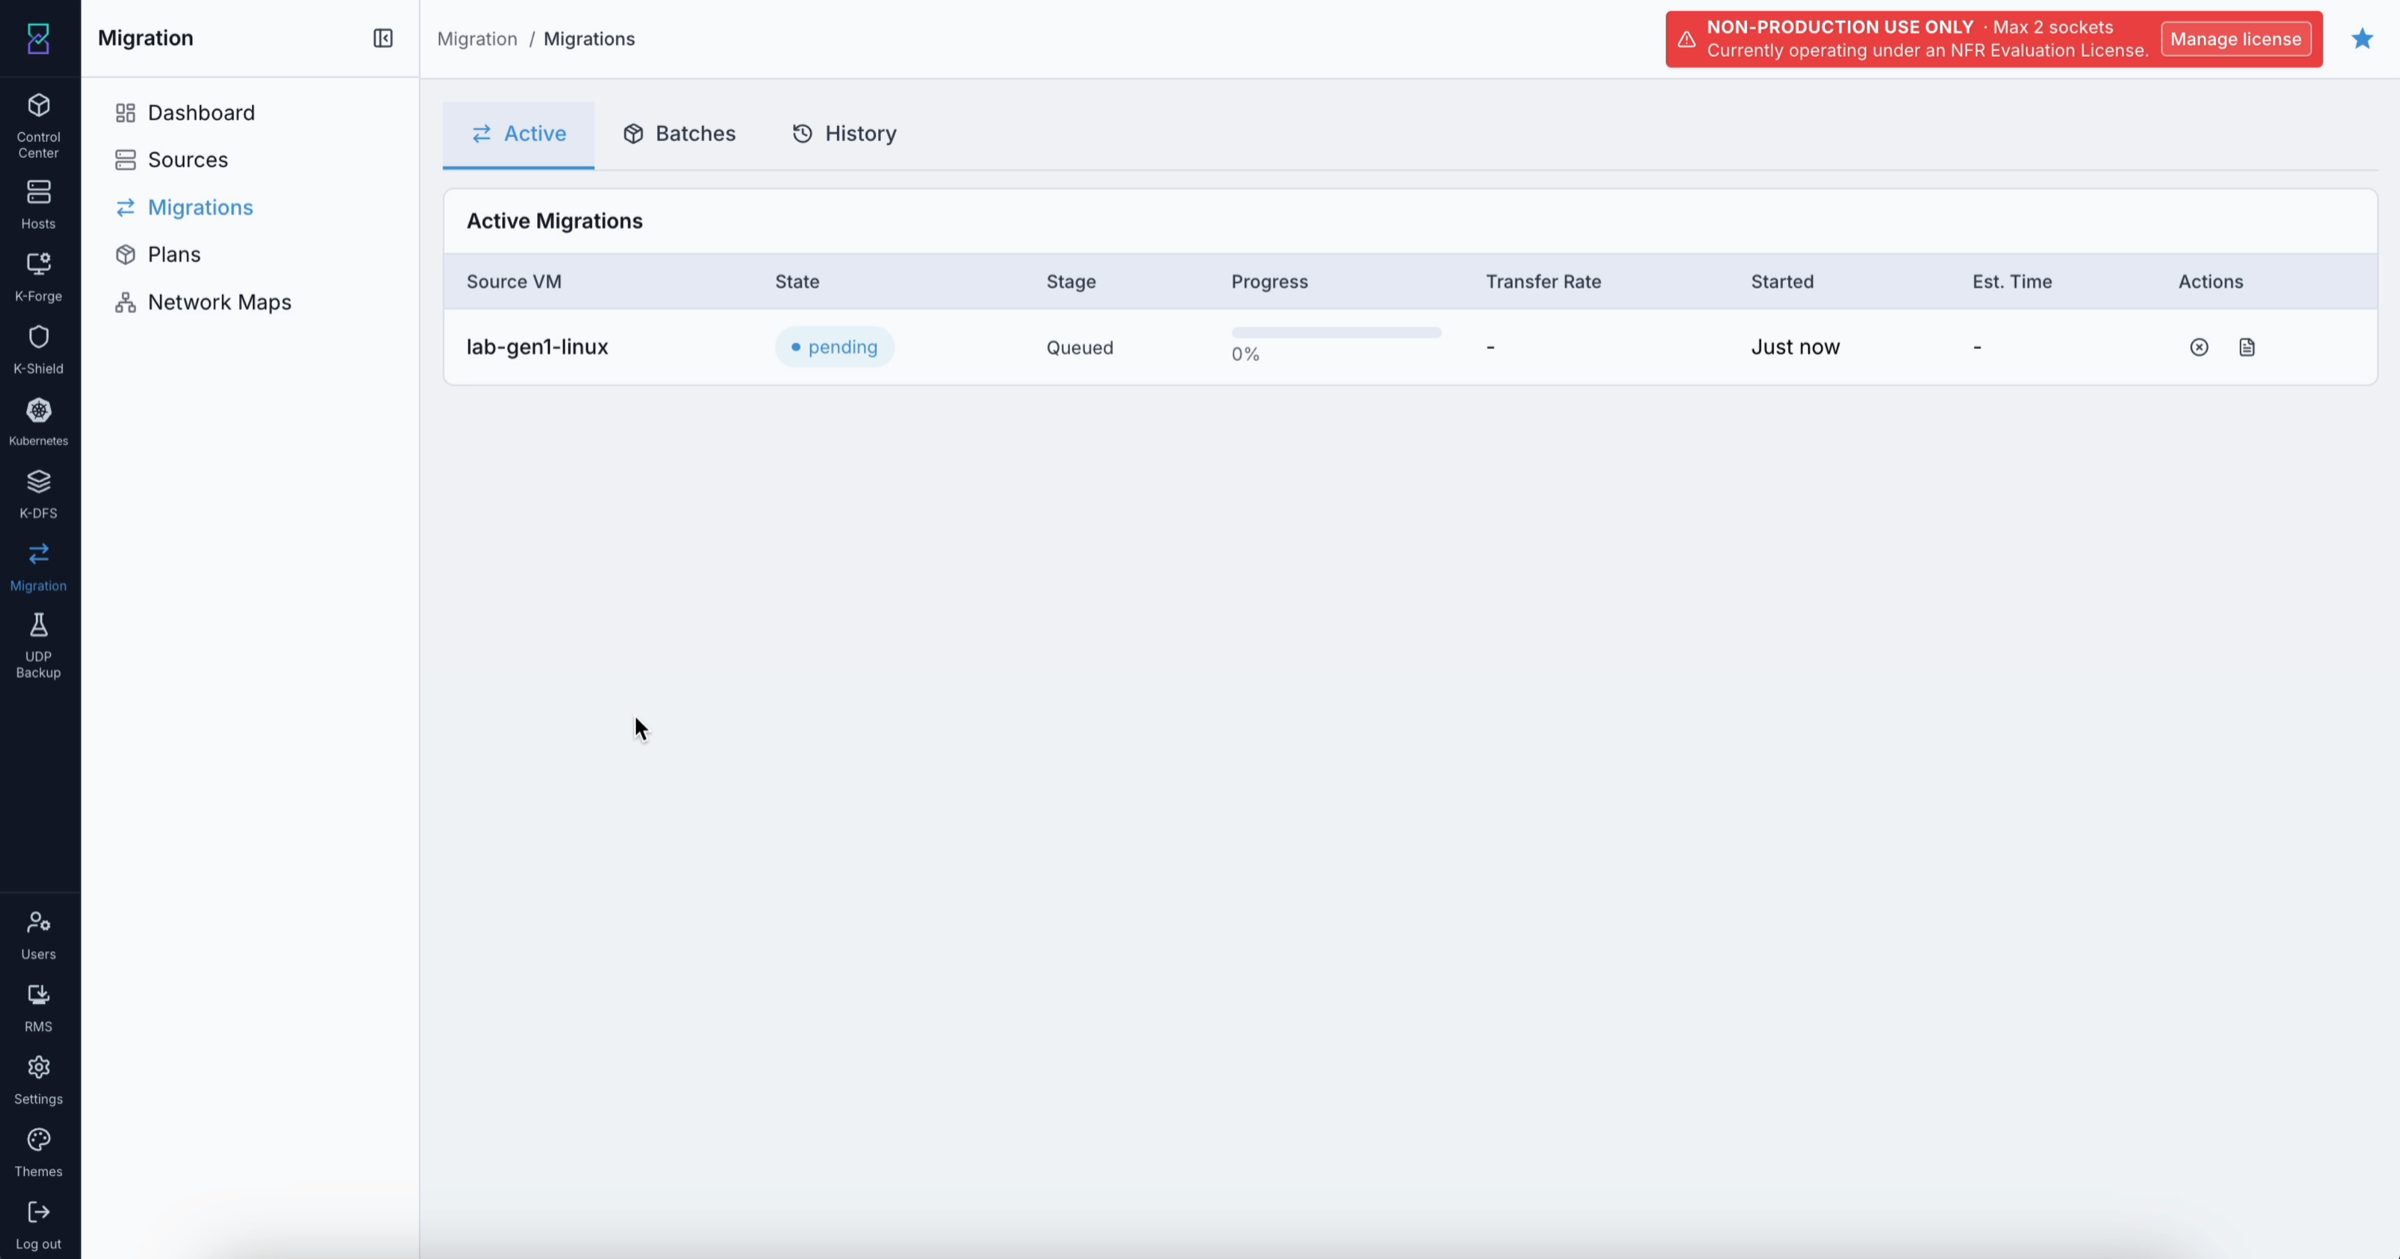
What this shows: The Active Migrations tab with a VM in the pending (queued) state. The State pill is blue, indicating the migration is waiting to start. No transfer rate or ETA is shown yet because the VM has not reached the Transferring stage.
Steps
In the Migration left panel, click Migrations - the page opens with three tabs. The Active tab is selected by default.
Scan the State column for any red pills (failed) or orange pills that have not advanced in more than 30 minutes.
Click any row to open the Migration Detail Drawer - the drawer shows per-disk progress and the full log stream.
To cancel a migration: click the ✕ icon on the row. The icon is greyed out if the migration cannot be cancelled at its current stage.
To retry a failed migration: click the ↻ icon on a row in
failedstate.To open just the log stream: click the 👁 (eye) icon on the row.
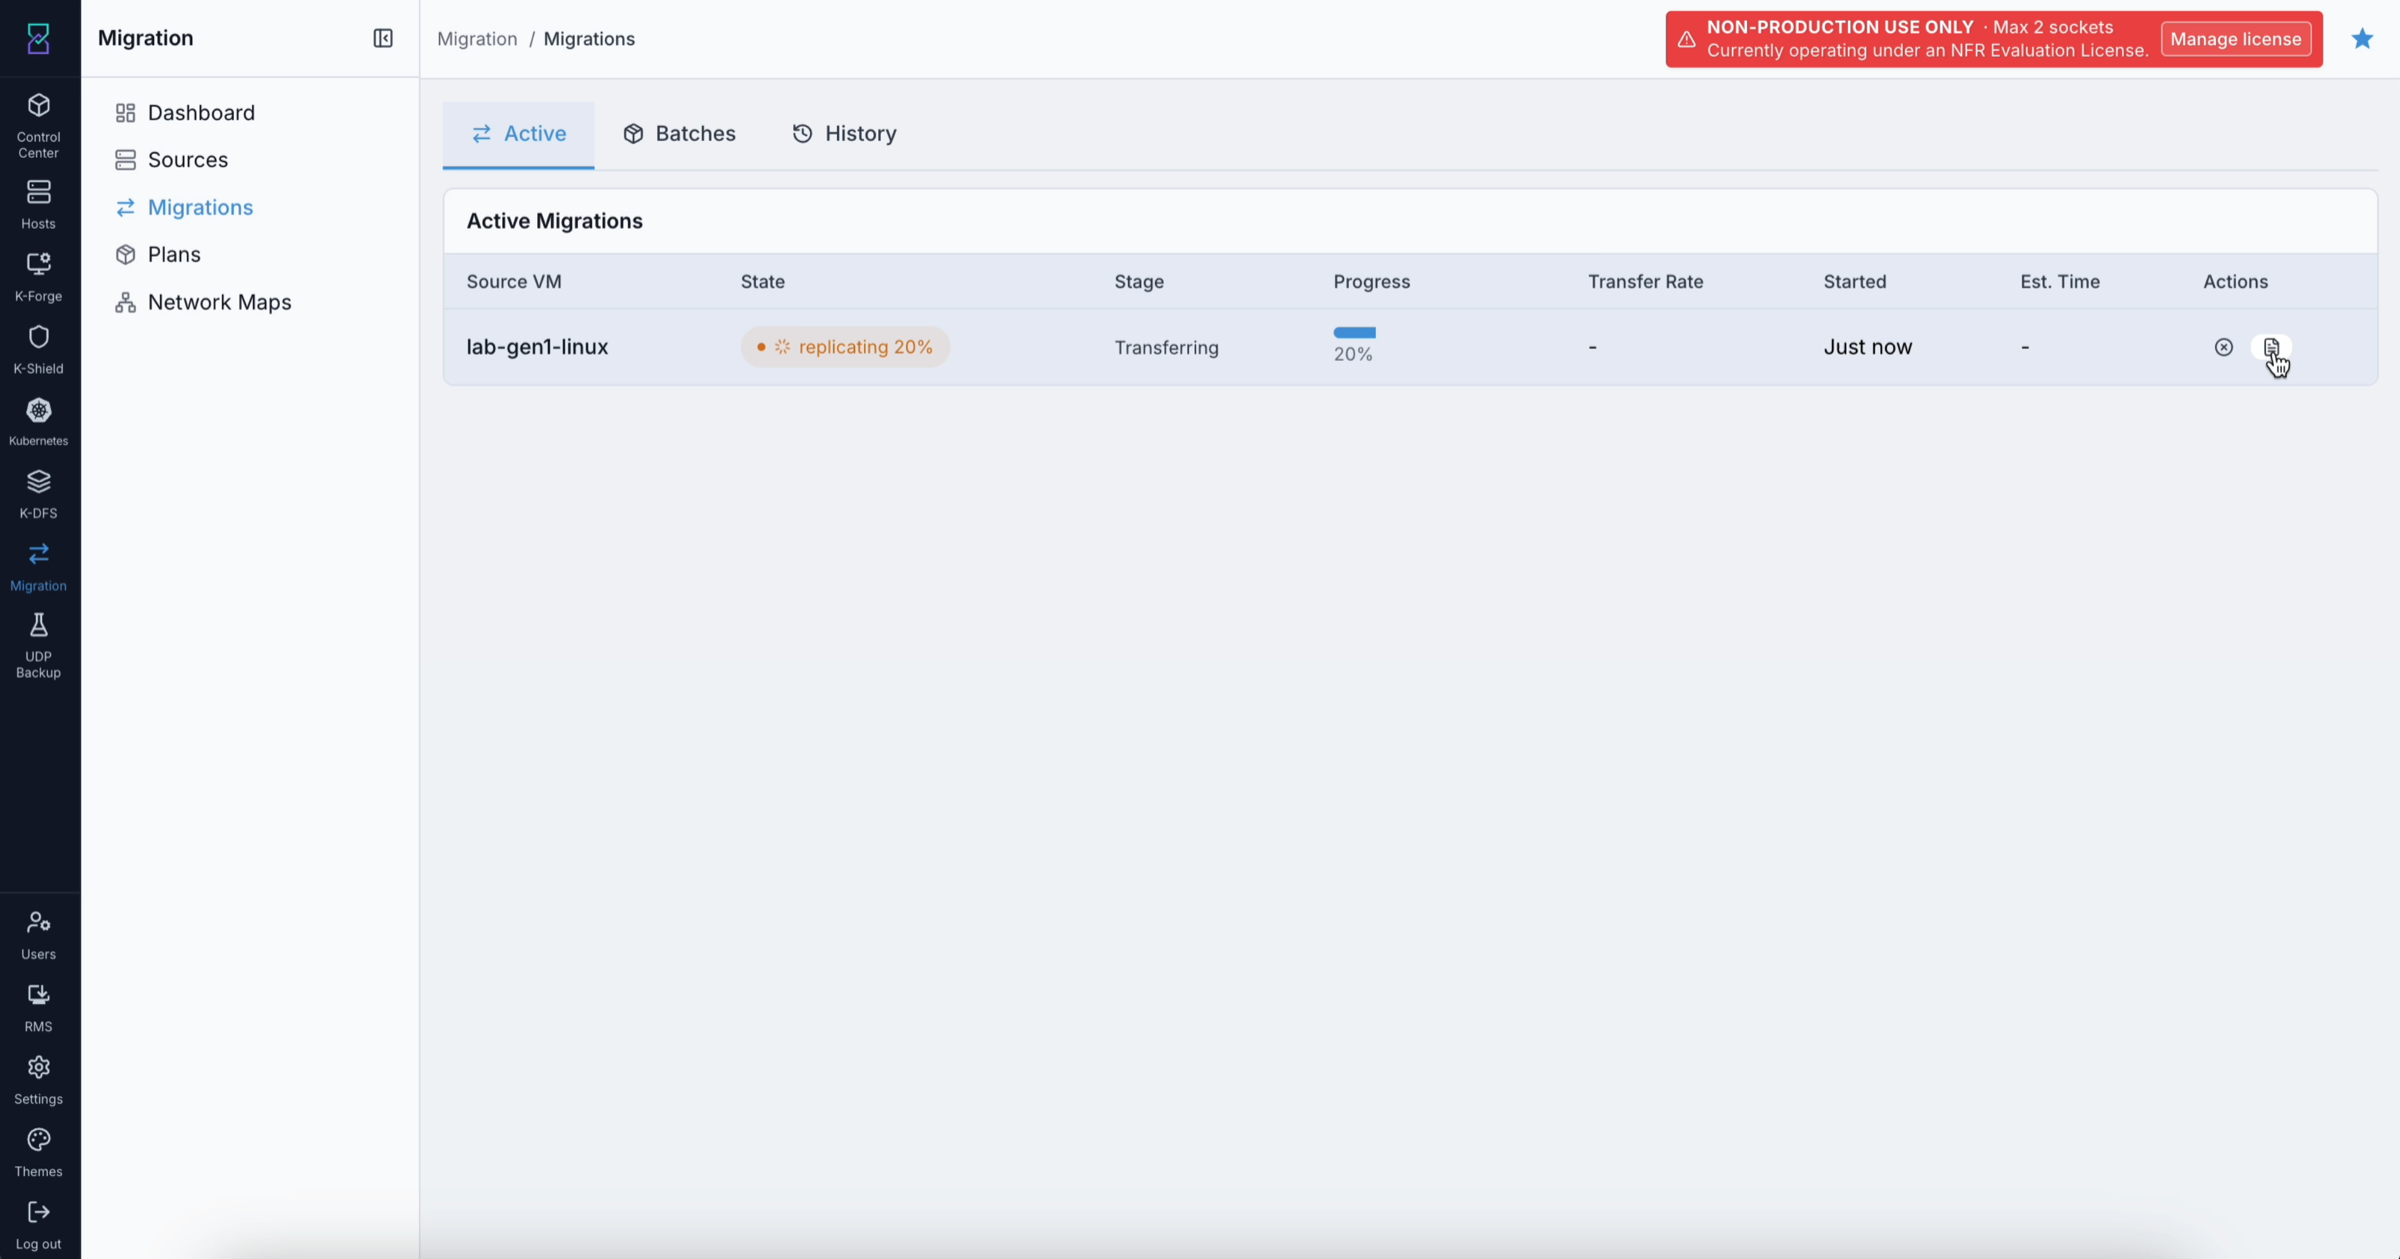
What this shows: The Active tab with a VM at 20% through the Transferring stage. The State pill is orange with a spinner. The progress bar and transfer rate are visible. The Est. Time column shows the engine’s remaining time estimate.
Column reference:
Column |
Description |
|---|---|
Source VM |
Name of the VM being migrated (from the source side) |
State |
Coloured pill (e.g. “Replicating”, “Verifying”) with a spinner for active states |
Stage |
Plain-English label of the current phase: Queued · Pre-flight · Transferring · Deploying VM · Verifying |
Progress |
Horizontal bar 0–100% with the percentage underneath |
Transfer Rate |
Live disk copy speed in MB/s |
Started |
Relative time, e.g. “3m ago” |
Est. Time |
Karios’s estimate of remaining time (shown once transfer has begun) |
Actions |
Cancel (✕) · Retry (↻, only for failed state) · View Logs (👁) |
What You Can Do From This Screen
Action |
How |
|---|---|
Watch real-time progress |
The table updates live - leave the page open and progress bars advance automatically |
Open per-disk and log detail |
Click anywhere on a row to open the Migration Detail Drawer |
Cancel a running migration |
Click the ✕ icon on the row (greyed out if not cancellable at this stage) |
Retry a failed migration |
Click ↻ on a row in |
Open just the log stream |
Click the 👁 icon on the row |
Expected Outcome
Migrations move through stages in order: Queued → Pre-flight → Transferring → Deploying VM → Verifying
Transfer rate is non-zero once the Transferring stage begins
The row disappears from the Active tab when it reaches a terminal state (complete, failed, cancelled) and moves to the History tab
If This Fails
Symptom |
What to do |
|---|---|
A migration has been at 0% for over 10 minutes |
Click the row → Logs → filter Stage = |
Transfer rate shows 0 MB/s despite “Transferring” state |
The connection to the source may have dropped. Check the source’s Status in the Sources page. If disconnected, fix the connection and retry the migration |
The ✕ Cancel button is greyed out |
The migration is at a stage where cancelling is not safe (e.g. the final deploy step). Wait for it to reach a terminal state |
Warning
A migration idle for more than 30 minutes is considered stuck. Open the detail drawer → Logs → look for the last log entry. Cancel and retry if the saga has stalled. Karios automatically excludes stuck migrations from capacity reservations - they do not block new submissions.
Batches Tab
When to Use
Go to the Batches tab when:
You just executed a Plan or selected many VMs for bulk migration and want to track the group as a whole
You want to pause an in-progress batch to reduce load on the source
You want to retry only the VMs that failed in a batch, without re-running the ones that already completed
Purpose
A batch is a set of VMs migrated together - created when you click “Migrate” on the Sources page or “Execute” on a Plan. The Batches tab shows every batch as a collapsible card with aggregate progress and per-VM detail inside.
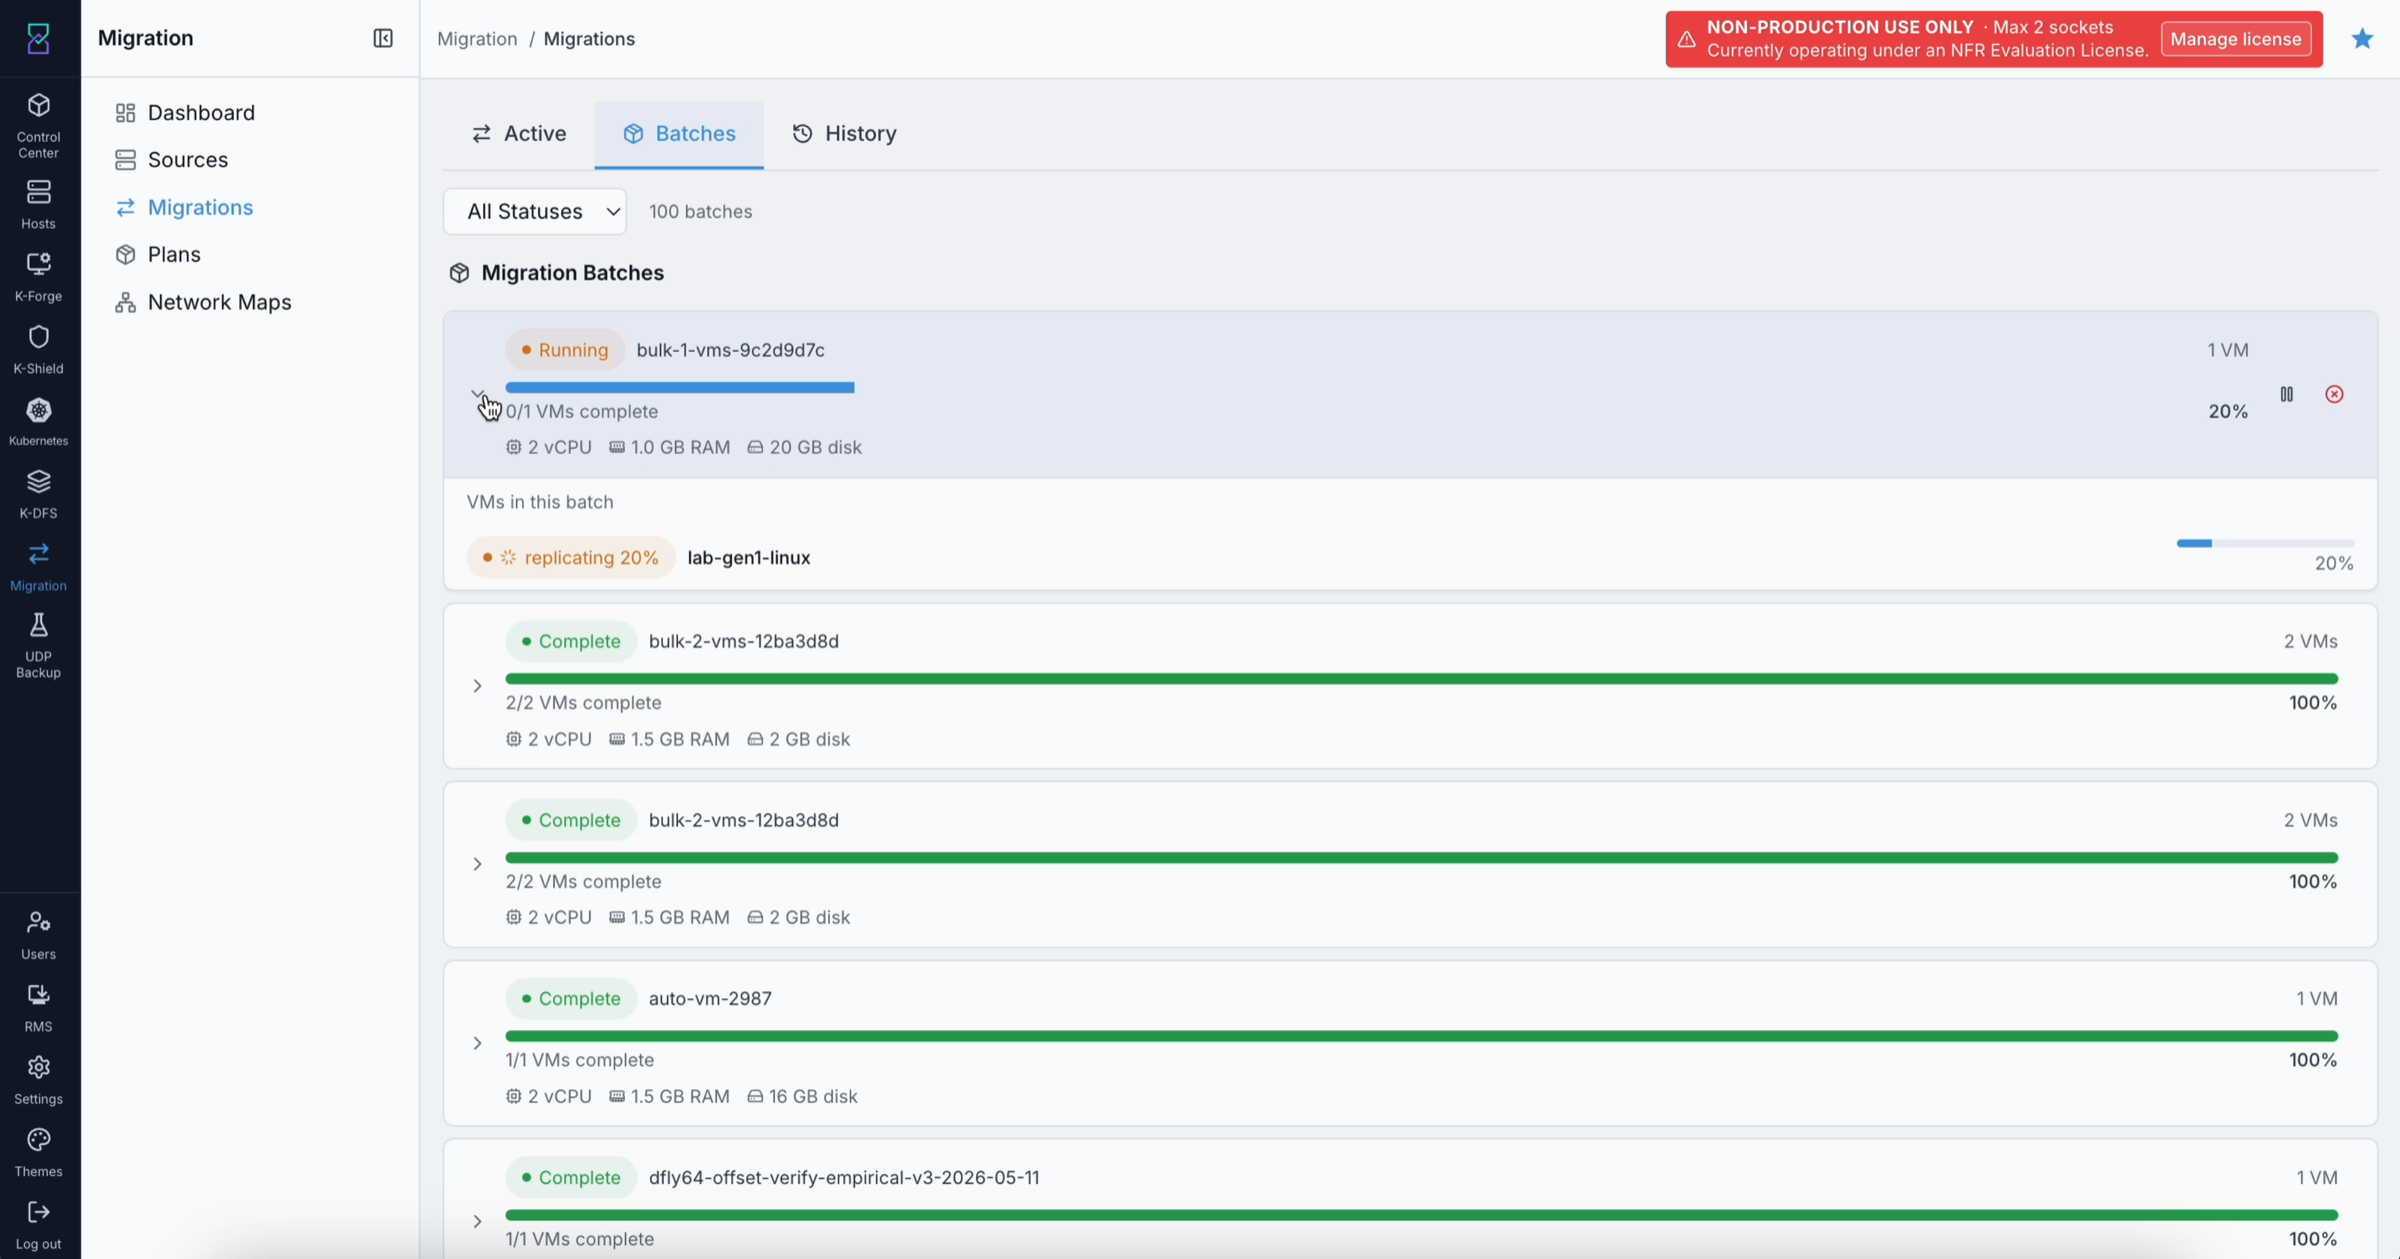
What this shows: The Batches tab with a running batch (orange pill, progress bar advancing) and several completed batches (green pill). Each card header shows the batch name, state, a weighted progress bar across all VMs, and counts such as “3/10 complete, 1 failed”. Clicking the card expands it to show individual VM rows.
Steps
Click Migrations → Batches tab.
Find your batch by name. The card header shows the overall state and completion counts.
Click the card header to expand it - one row per VM appears, each with its own state pill and a View Logs icon.
To act on the whole batch, use the controls in the top-right of the card:
▶ Play - start a paused or pending batch
⏸ Pause - hold the batch; VMs already in flight finish, new ones do not dequeue
✕ Cancel - stop everything still queued; VMs already
completeare left intact↻ Retry Failed - re-run only the VMs that failed; already-complete VMs are not touched
To inspect a specific VM within the batch, click its row to open the Migration Detail Drawer.
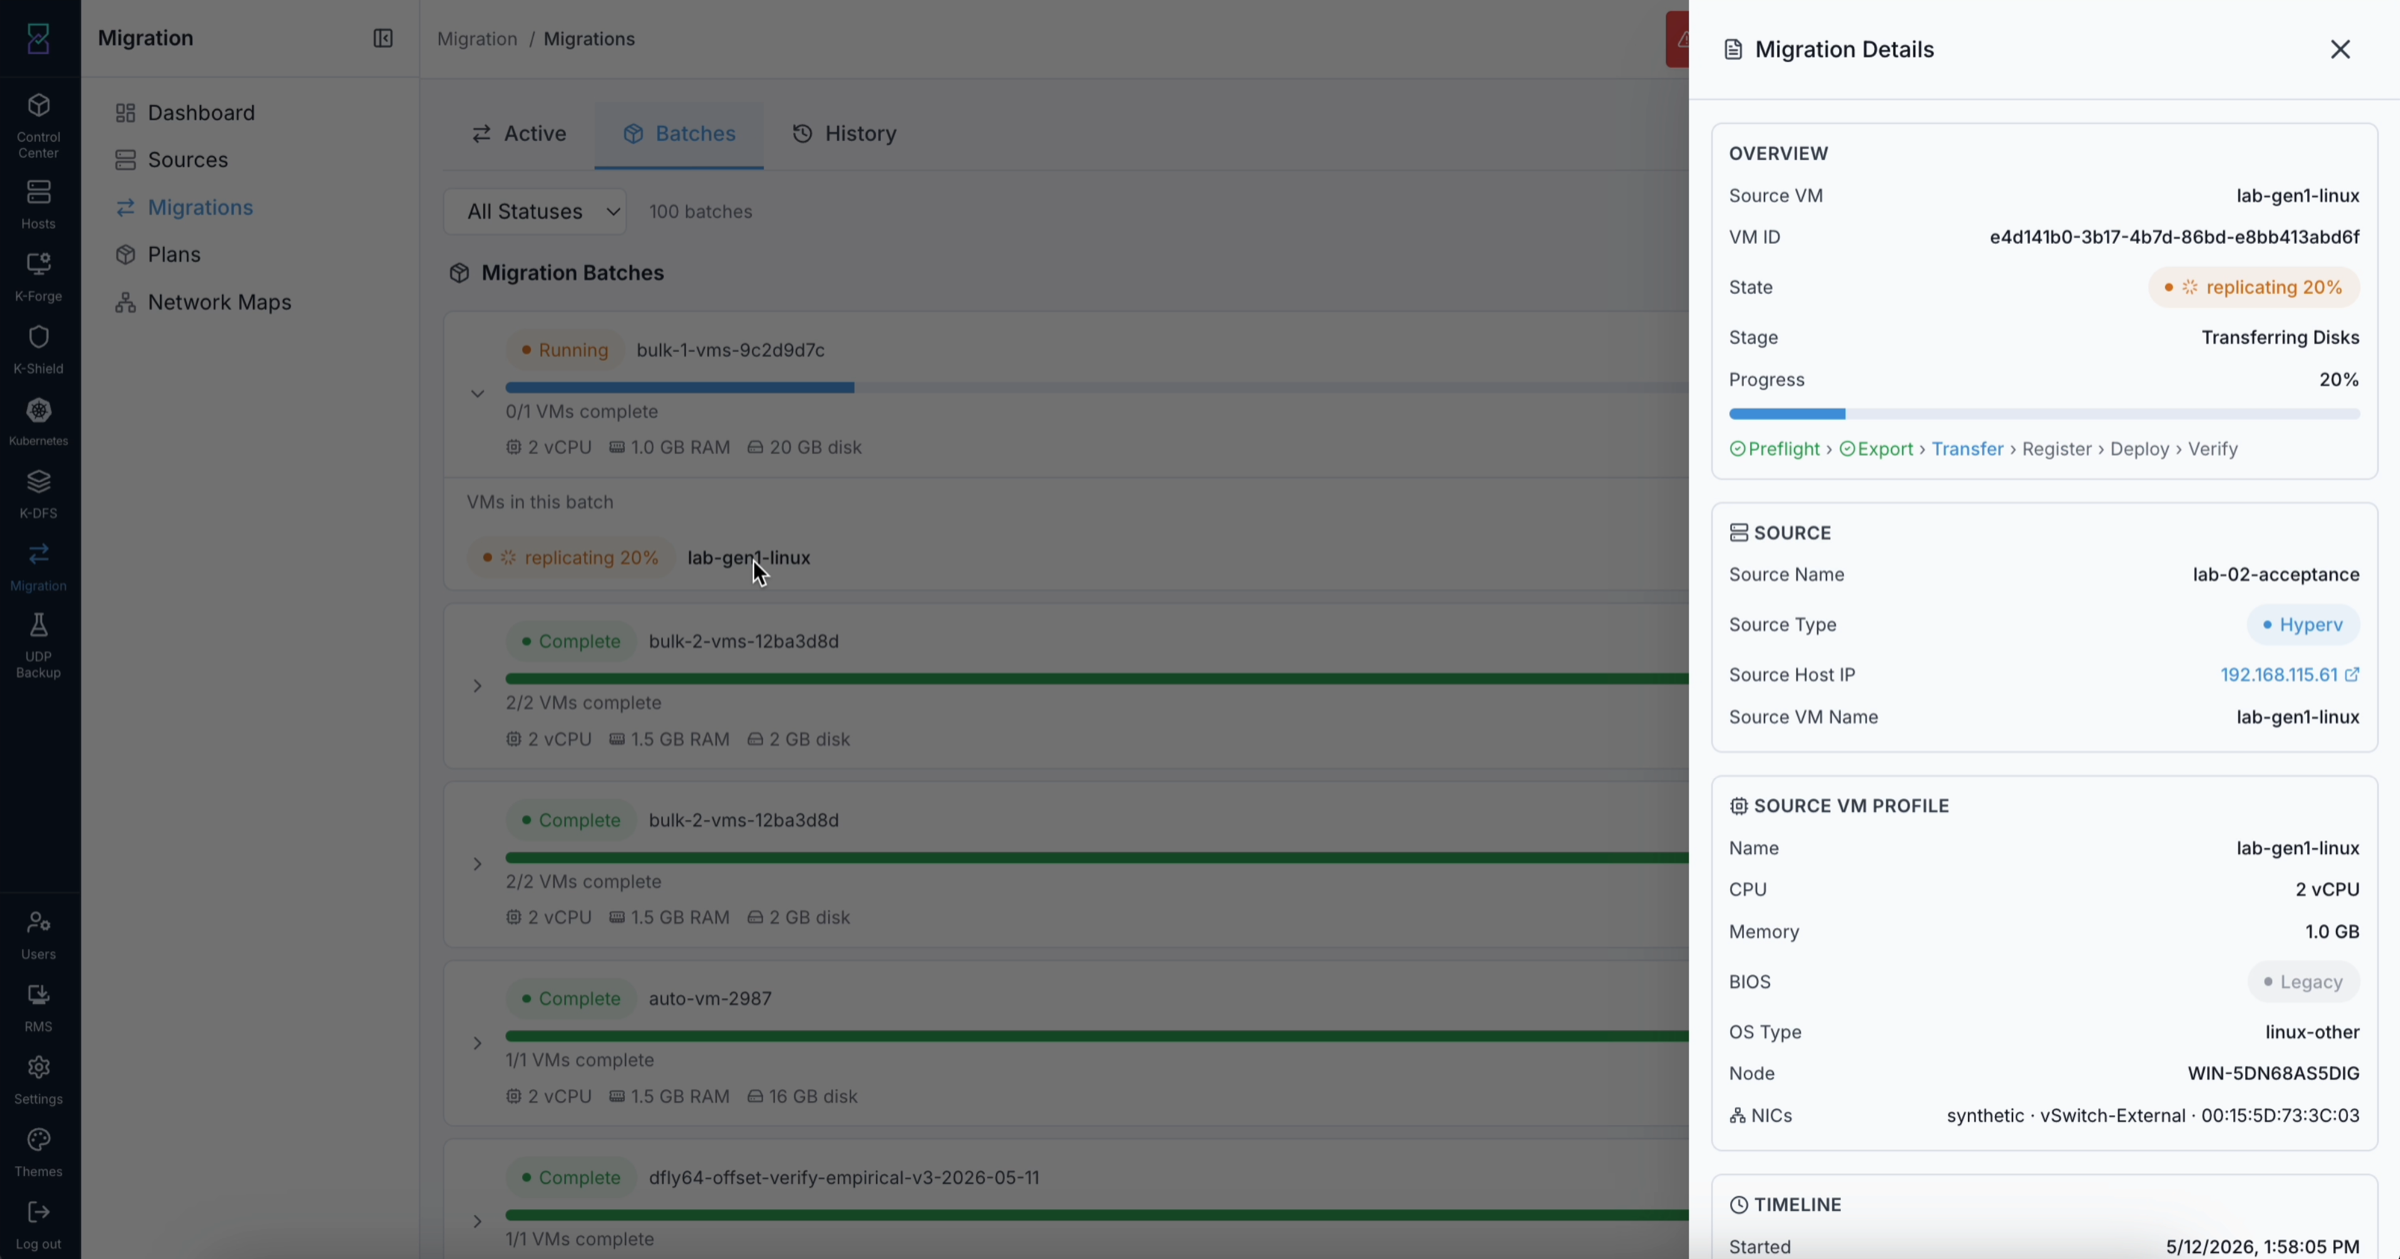
What this shows: The Batches tab with a specific VM’s Migration Detail Drawer open on the right. The drawer shows the VM’s saga pipeline (Preflight → Export → Transfer → Register → Deploy → Verify), the current active stage, and the log stream for that VM.
Batch states:
State |
Meaning |
|---|---|
Pending |
No child migrations have started yet |
Running |
At least one child is in a non-terminal state |
Paused |
Batch was paused; queued VMs are held, in-flight VMs finish on their own |
Completed |
All children reached |
Failed |
At least one child is in |
Cancelled |
The batch was cancelled; all non-terminal children were stopped |
What You Can Do From This Screen
Action |
How |
|---|---|
See aggregate batch progress |
Read the progress bar and counts in the card header |
See per-VM state inside a batch |
Expand the card by clicking its header |
Pause a running batch |
Click ⏸ Pause in the top-right of the card |
Resume a paused batch |
Click ▶ Play |
Cancel a whole batch |
Click ✕ Cancel - already-complete VMs are not touched |
Retry only failed VMs in a batch |
Click ↻ Retry Failed |
View a specific VM’s detail and logs |
Click the VM’s row within the expanded card |
Expected Outcome
A batch starts in Pending and progresses to Running once any child VM begins processing
Completed means all child VMs reached
completeFailed means at least one child is
failedand no children are still running - use ↻ Retry FailedPausing does not interrupt a VM already in the Transferring stage - it only prevents new VMs from dequeuing
If This Fails
Symptom |
What to do |
|---|---|
Batch shows “Running” but no VMs appear to be progressing |
Expand the card → click the stalled VM row → Logs → look for a preflight or connectivity error |
“Retry Failed” button does not appear |
The batch must be in a terminal state (not Running or Paused). Wait for in-flight VMs to finish first |
Batch will not cancel |
VMs in late-stage deploy cannot be cancelled mid-flight. Cancel stops queued VMs; in-flight VMs finish before the batch moves to Cancelled |
History Tab
When to Use
Go to the History tab when:
A migration has finished and you want to verify its outcome
You need to find a specific VM’s previous migration results
You want to export a CSV report of migration outcomes for a date range
You want to roll back a failed migration that left a half-built destination VM
Purpose
The History tab is the permanent record of every migration that has reached a terminal state: complete, complete_degraded, failed, cancelled, or rolled_back. Filters and sort choices are preserved in the URL - back and forward buttons restore your exact view.
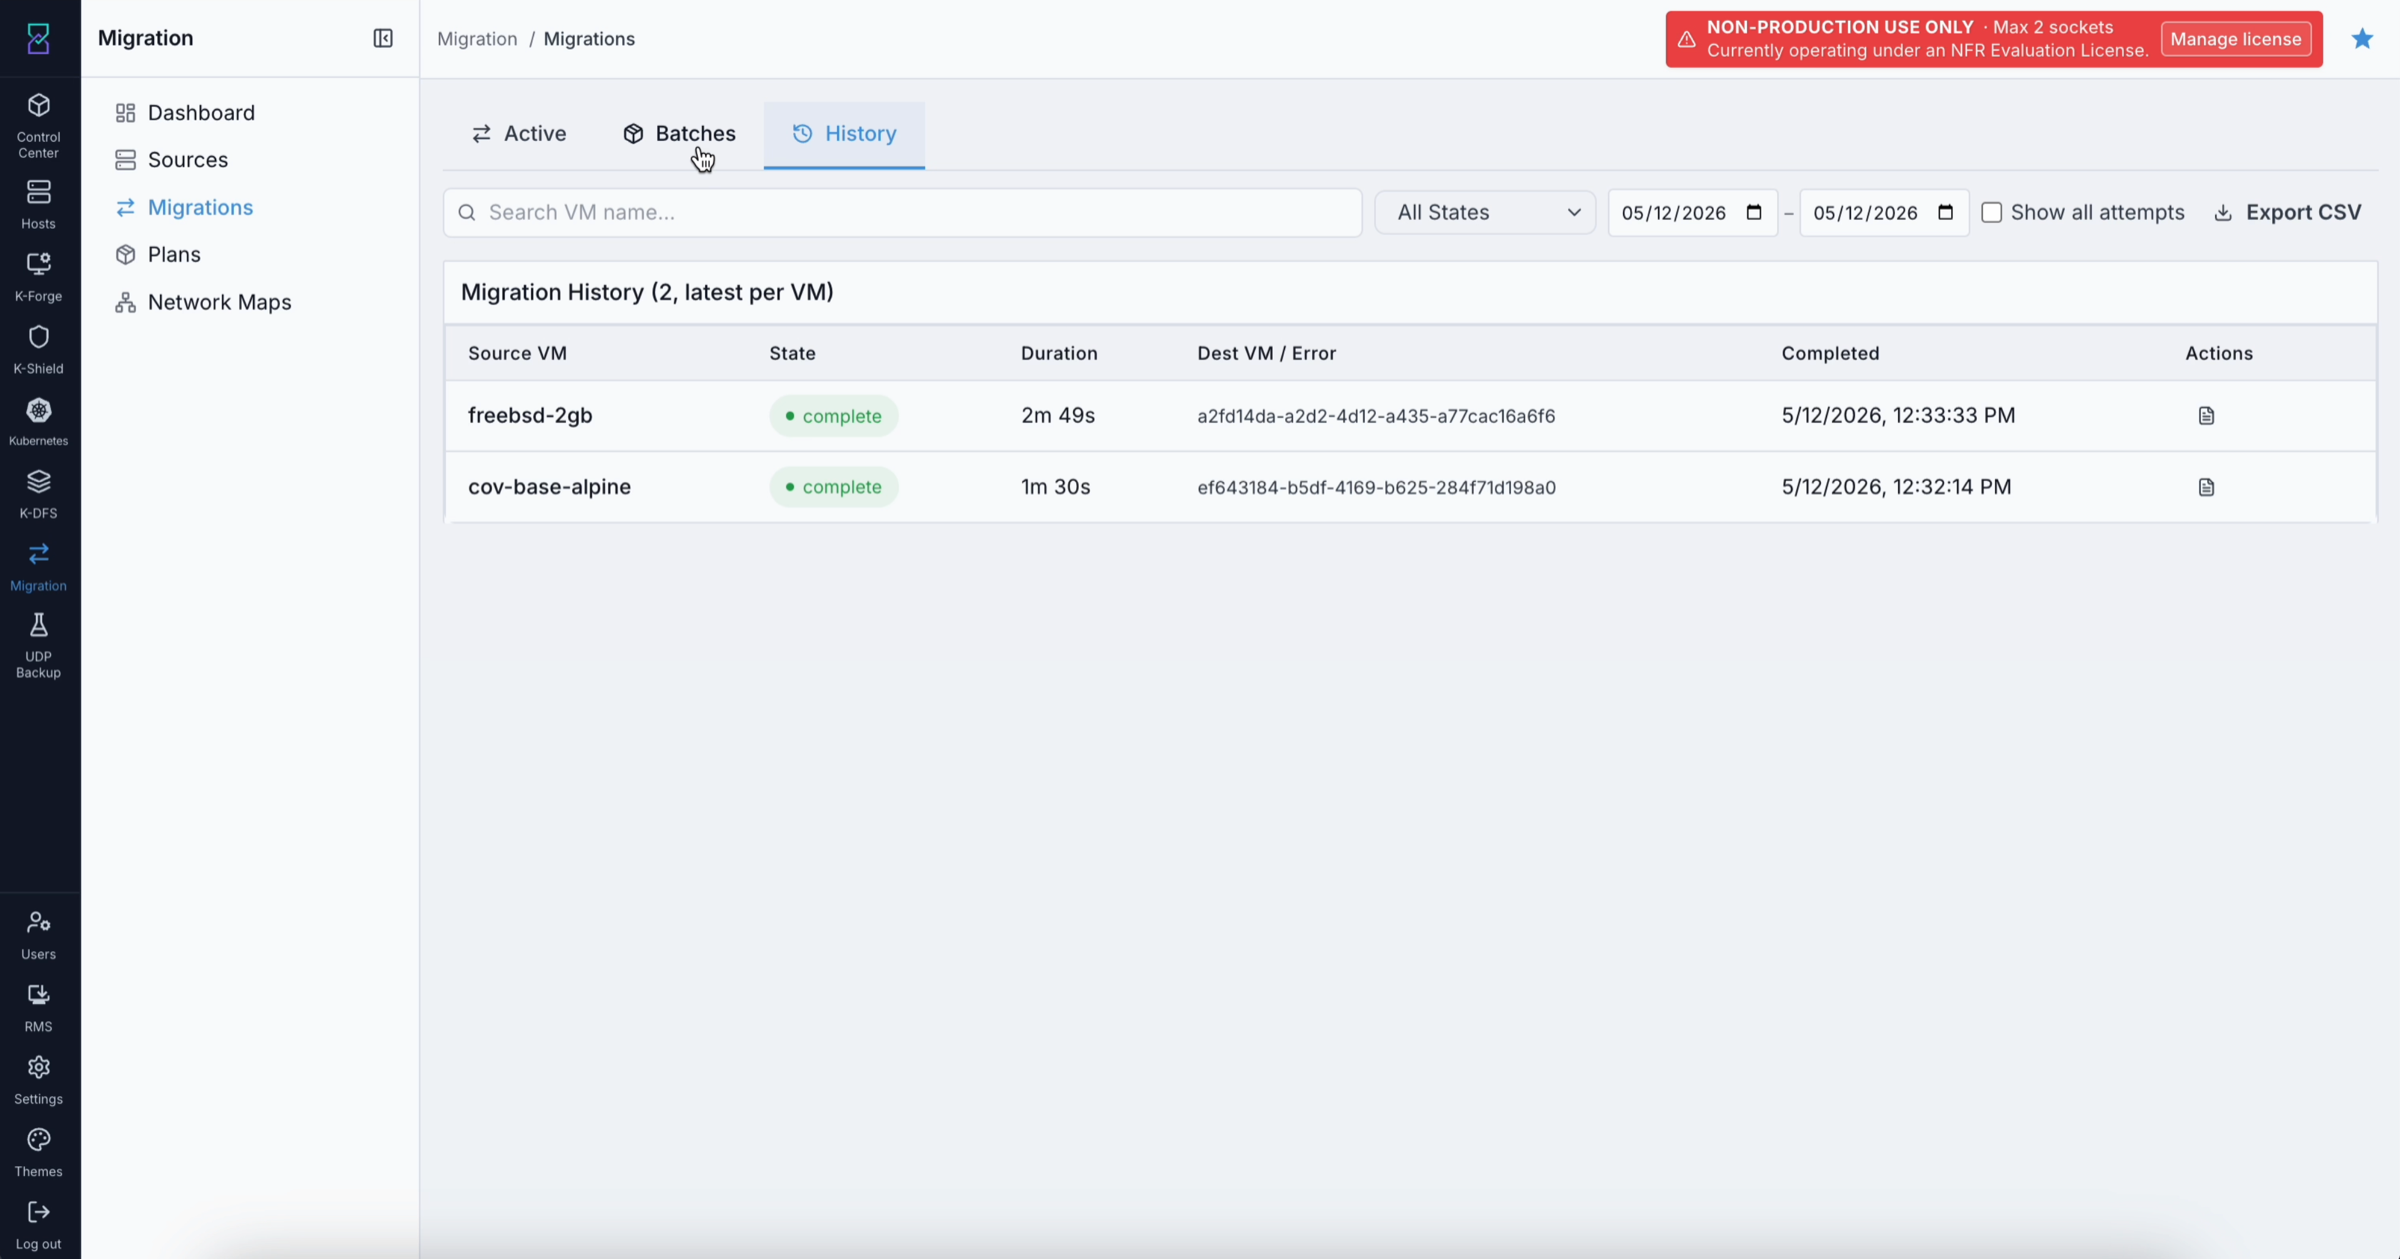
What this shows: The History tab with two completed migrations. Each row shows: Source VM name (clickable to open the drawer), state pill (green = complete), total duration, the destination VM ID in Karios, and the completion timestamp. The Actions column provides View Logs, Retry, and Rollback icons.
Steps
Click Migrations → History tab.
Use the filters above the table to narrow results:
VM name search - type any part of the VM name (case-insensitive)
State dropdown - All / Complete / Failed / Cancelled / Rolled Back
Date range - default is today; expand the range for older migrations
Show all attempts - OFF shows only the latest attempt per VM; ON shows every retry attempt
Locate the VM you want. Check the State pill colour - green (complete), amber (complete_degraded), red (failed), grey (cancelled / rolled_back).
Click the VM name or the 👁 View Logs icon to open the Migration Detail Drawer.
For failed VMs:
Click ↻ Retry to restart from scratch
Click ▶ Rollback to destroy the half-built destination VM before retrying - a confirmation dialog appears before anything is deleted
To export results: click Export CSV - the download reflects your current filter settings.
State pill colours:
State |
Colour |
|---|---|
|
Green |
|
Amber |
|
Red |
|
Grey |
|
Grey |
What You Can Do From This Screen
Action |
How |
|---|---|
Search for a specific VM |
Type in the VM name search box |
Filter by outcome |
Use the State dropdown |
View all retry attempts for a VM |
Toggle Show all attempts to ON |
Open logs for a migration |
Click the VM name or the 👁 icon |
Retry a failed migration |
Click ↻ on a failed row |
Roll back and clean up a failed migration |
Click ▶ Rollback on a failed row → confirm destruction of the destination VM |
Export results to CSV |
Click Export CSV (your current filters apply to the download) |
Expected Outcome
Every migration that reaches a terminal state appears here within seconds
A green
completepill with a Dest VM ID means the VM is running in Karios - go verify it in Control CenterRollback destroys the destination VM and moves the migration to
rolled_back- it is then safe to retry
If This Fails
Symptom |
What to do |
|---|---|
A VM does not appear in History after its migration finished |
Wait 30 seconds and refresh. If it still does not appear, contact Karios support with the migration ID |
Rollback button is greyed out |
Rollback is only available when the migration created destination resources. If it failed at preflight (before creating anything), click Retry directly |
Export CSV produces an empty file |
Your filters may be excluding all records. Reset to All / All dates and try again |
Migration shows |
The VM migrated but with a warning (e.g. a non-essential disk was skipped). Open the detail drawer → Logs to see what was degraded before verifying the VM in Control Center |
Tip
If a VM shows multiple history entries, enable Show all attempts to compare error messages between retries - this reveals whether a failure is consistent or intermittent.
Verifying a Migrated VM
When to Use
Verify the migrated VM in Control Center after a migration reaches complete or complete_degraded in History - and before you decommission or power off the source VM. This is step 6 of the first-time setup order.
Purpose
A complete state in Migration History means Karios’s internal verification stage passed. However, you must confirm the VM is genuinely running and reachable in your environment before treating the source as disposable.
Steps
Note the Dest VM UUID shown in the History row (or in the Migration Detail Drawer).
Open Control Center → Virtual Machines.
Search for the destination VM. Migrated VMs appear with a
mig-prefix followed by the source hypervisor shortcode and the original VM name (e.g.mig-hyv-lab-gen1-linux).Confirm the VM shows Running, has an assigned IP, and is in the correct zone and host.
Click the VM name → Details tab - verify the hardware profile, OS type, network interfaces, and IP configuration match your expectations.
Click the Volumes tab - every disk must show state
Readyon the Karios backend (e.g.cephrbd). A disk showingPendingmeans the transfer is not fully committed.Connect to the VM (SSH or RDP) from your workstation or monitoring system.
Once satisfied: power off and archive the source VM.
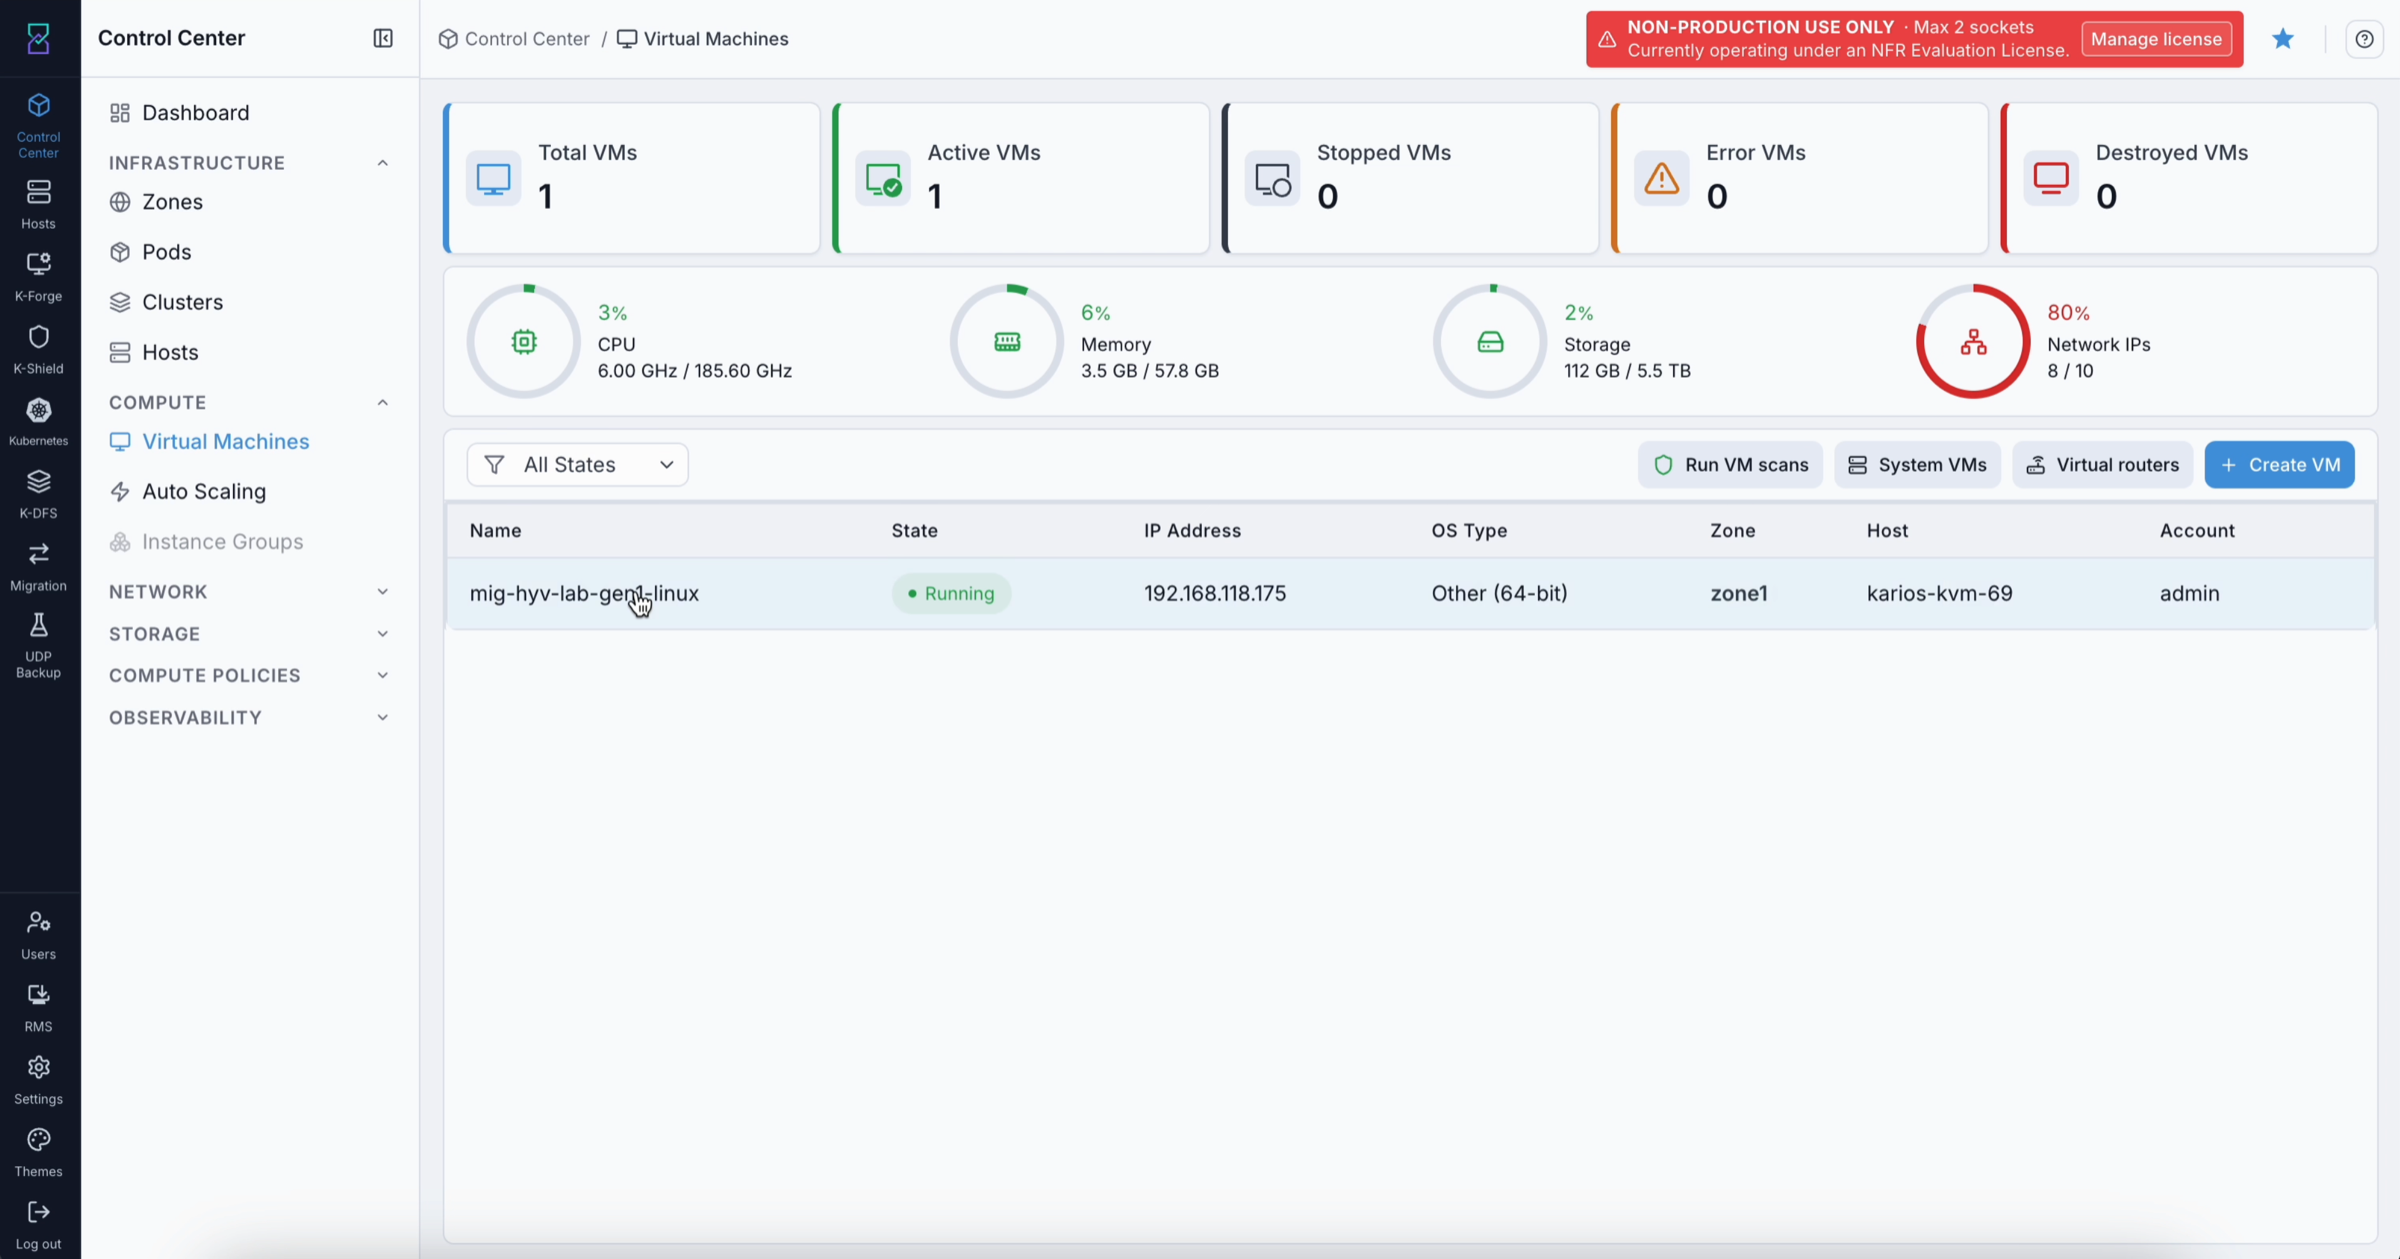
What this shows: The Control Center Virtual Machines list with the migrated VM (mig-hyv-lab-gen1-linux) showing Running state and an assigned IP address. This confirms the VM was created successfully in Karios.
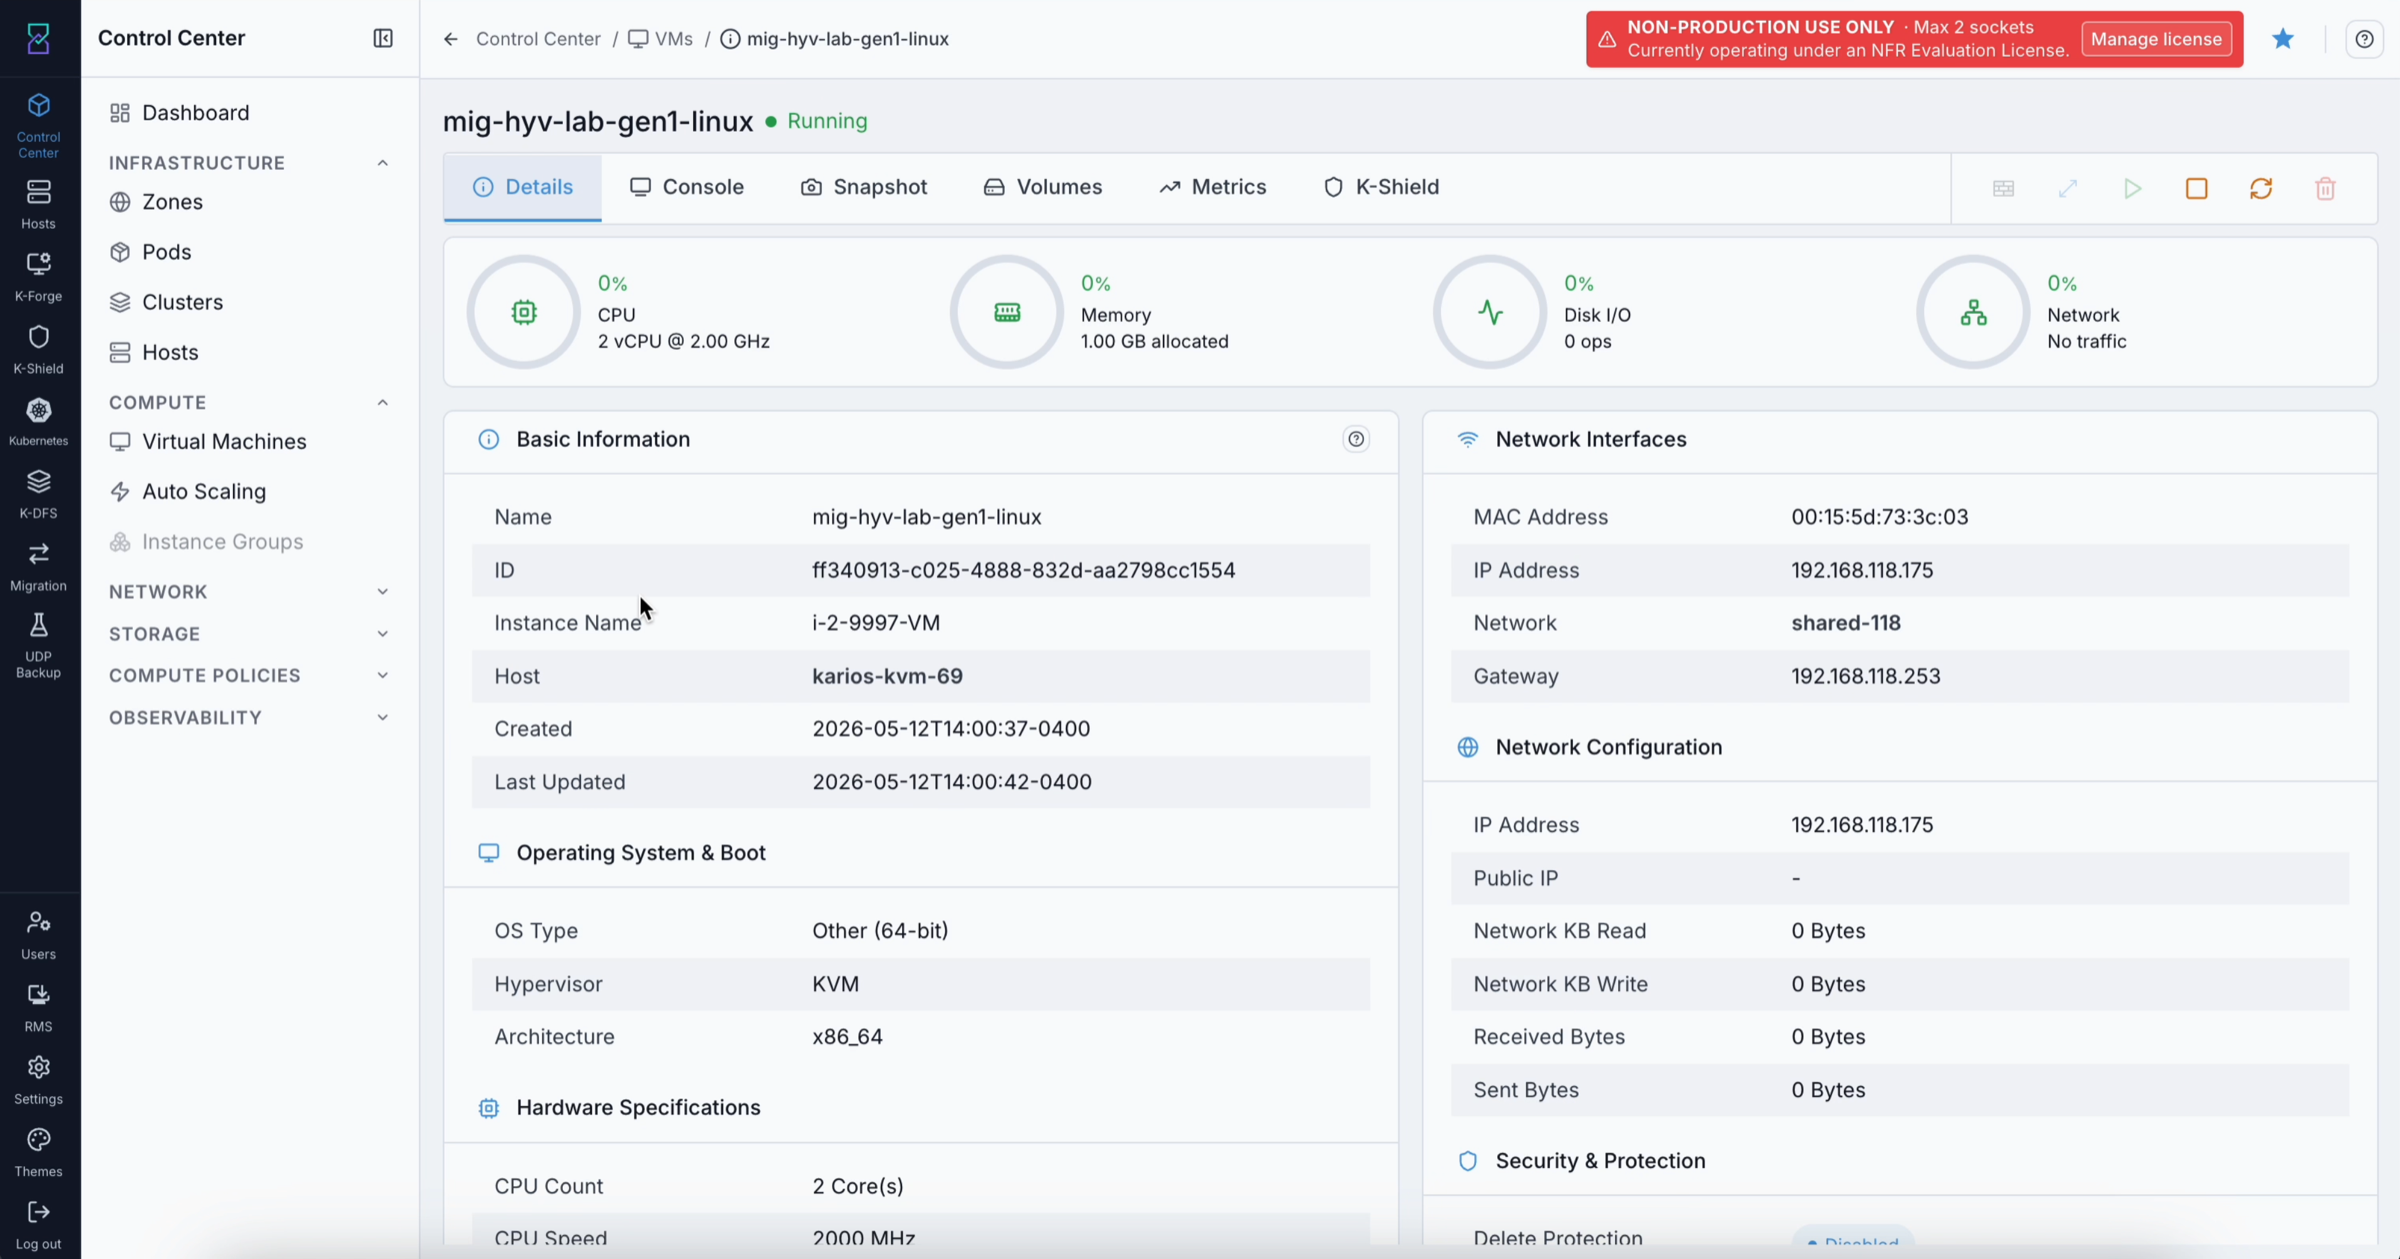
What this shows: The Details tab of a migrated VM. Verify hardware profile (CPU, RAM), OS type, host placement, and network interface configuration all match what you expect from the source VM.
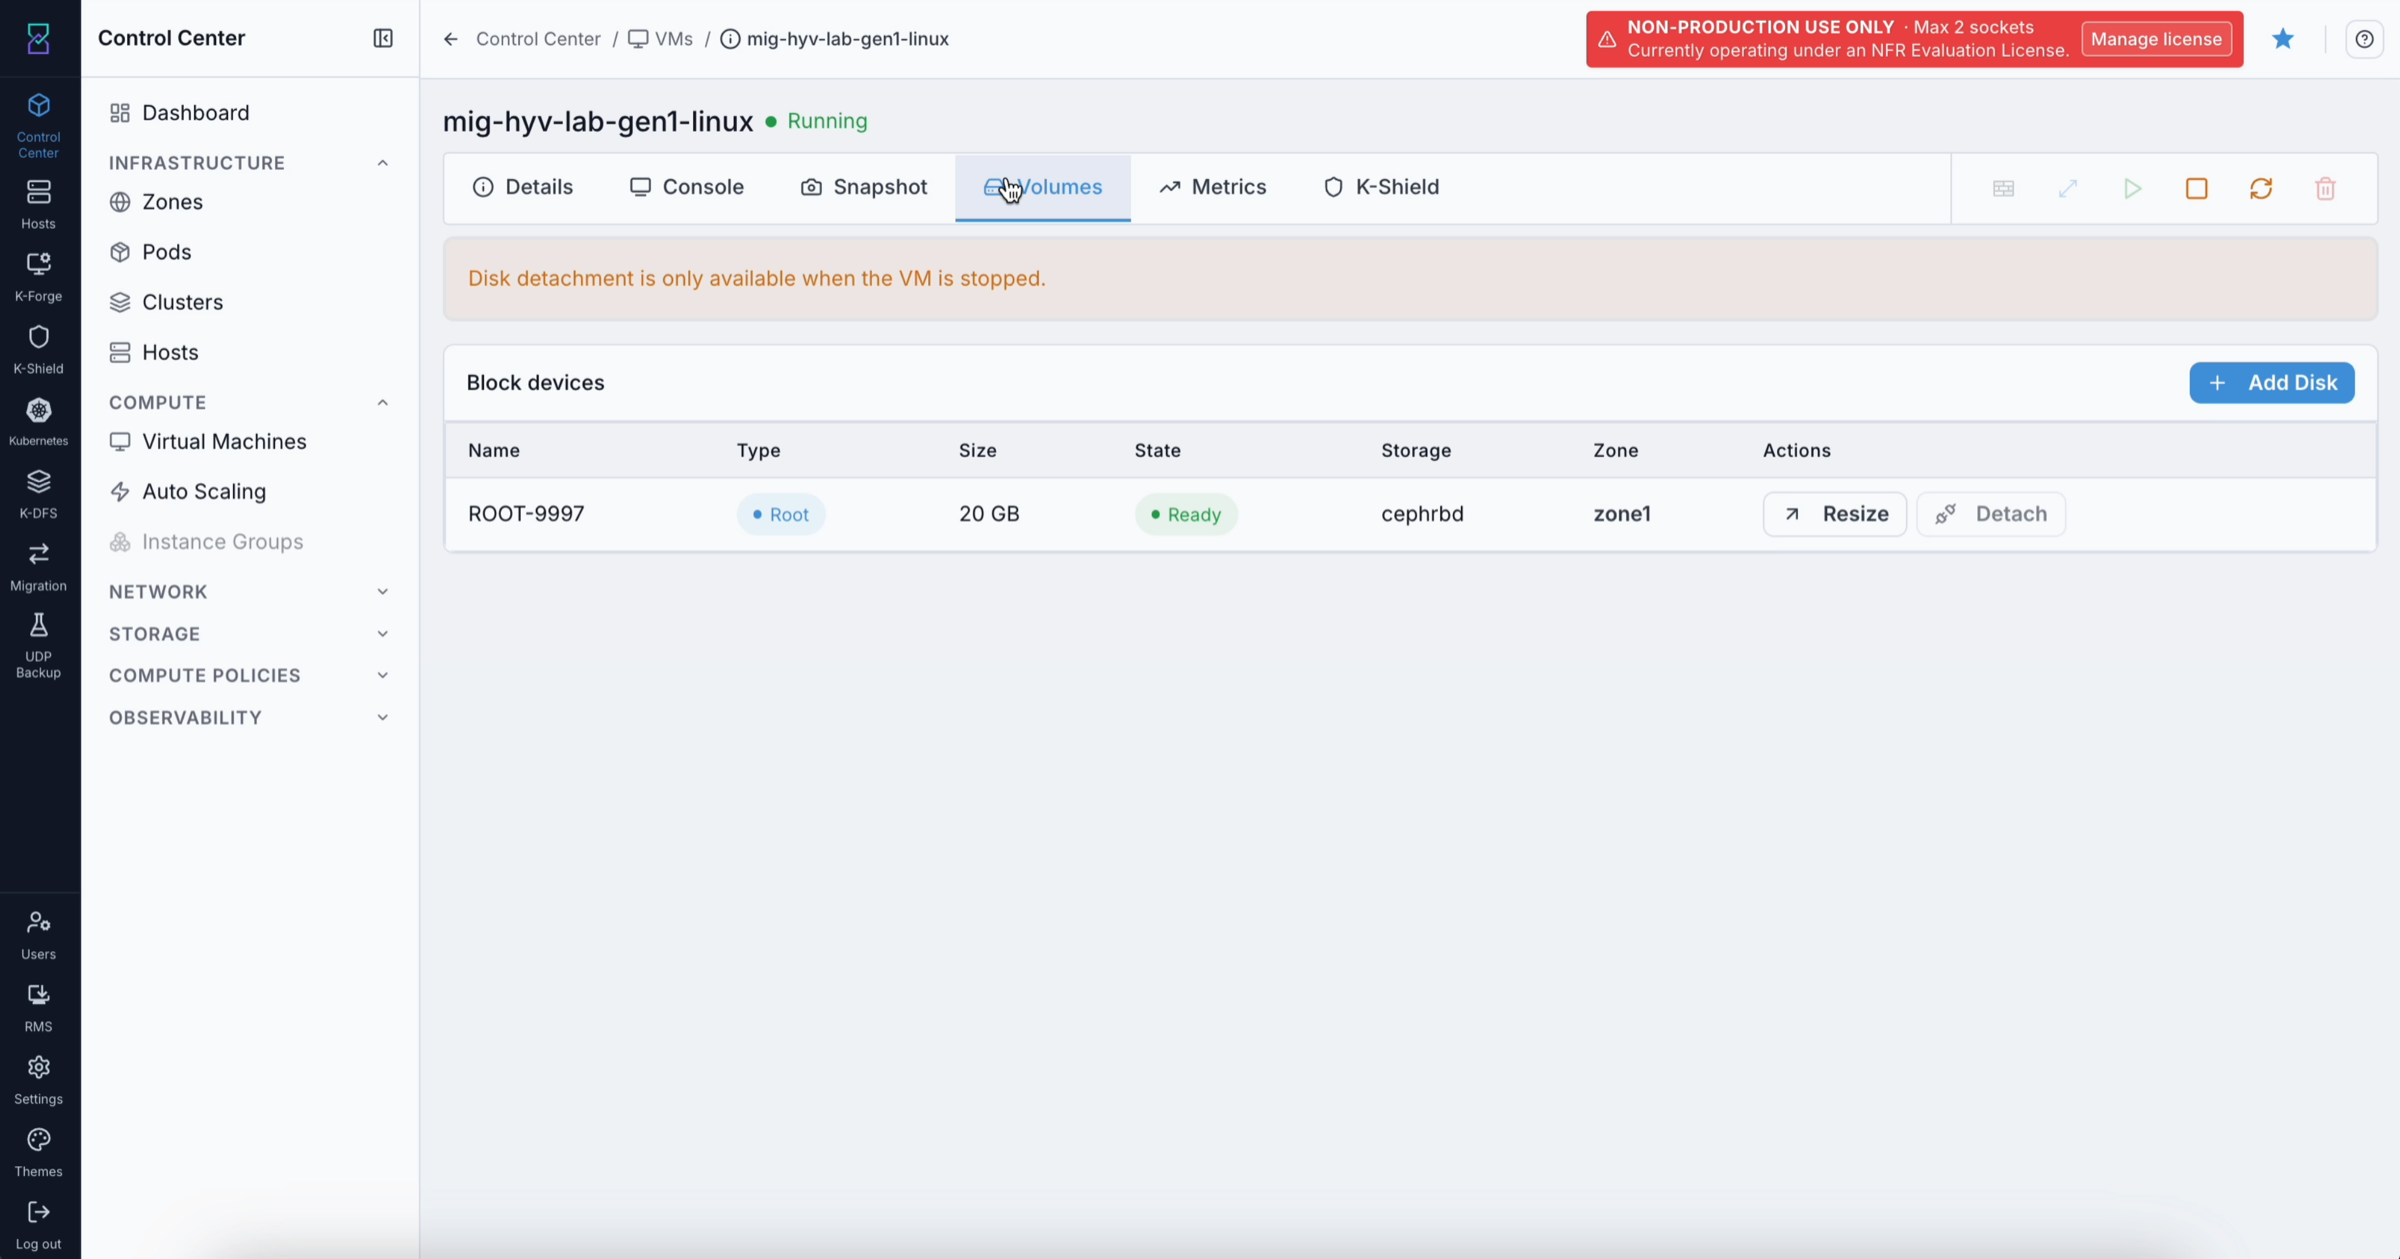
What this shows: The Volumes tab of a migrated VM. Every disk must show Ready state on the Karios backend. A Pending disk means the transfer is not fully committed - do not power off the source until all disks are Ready.
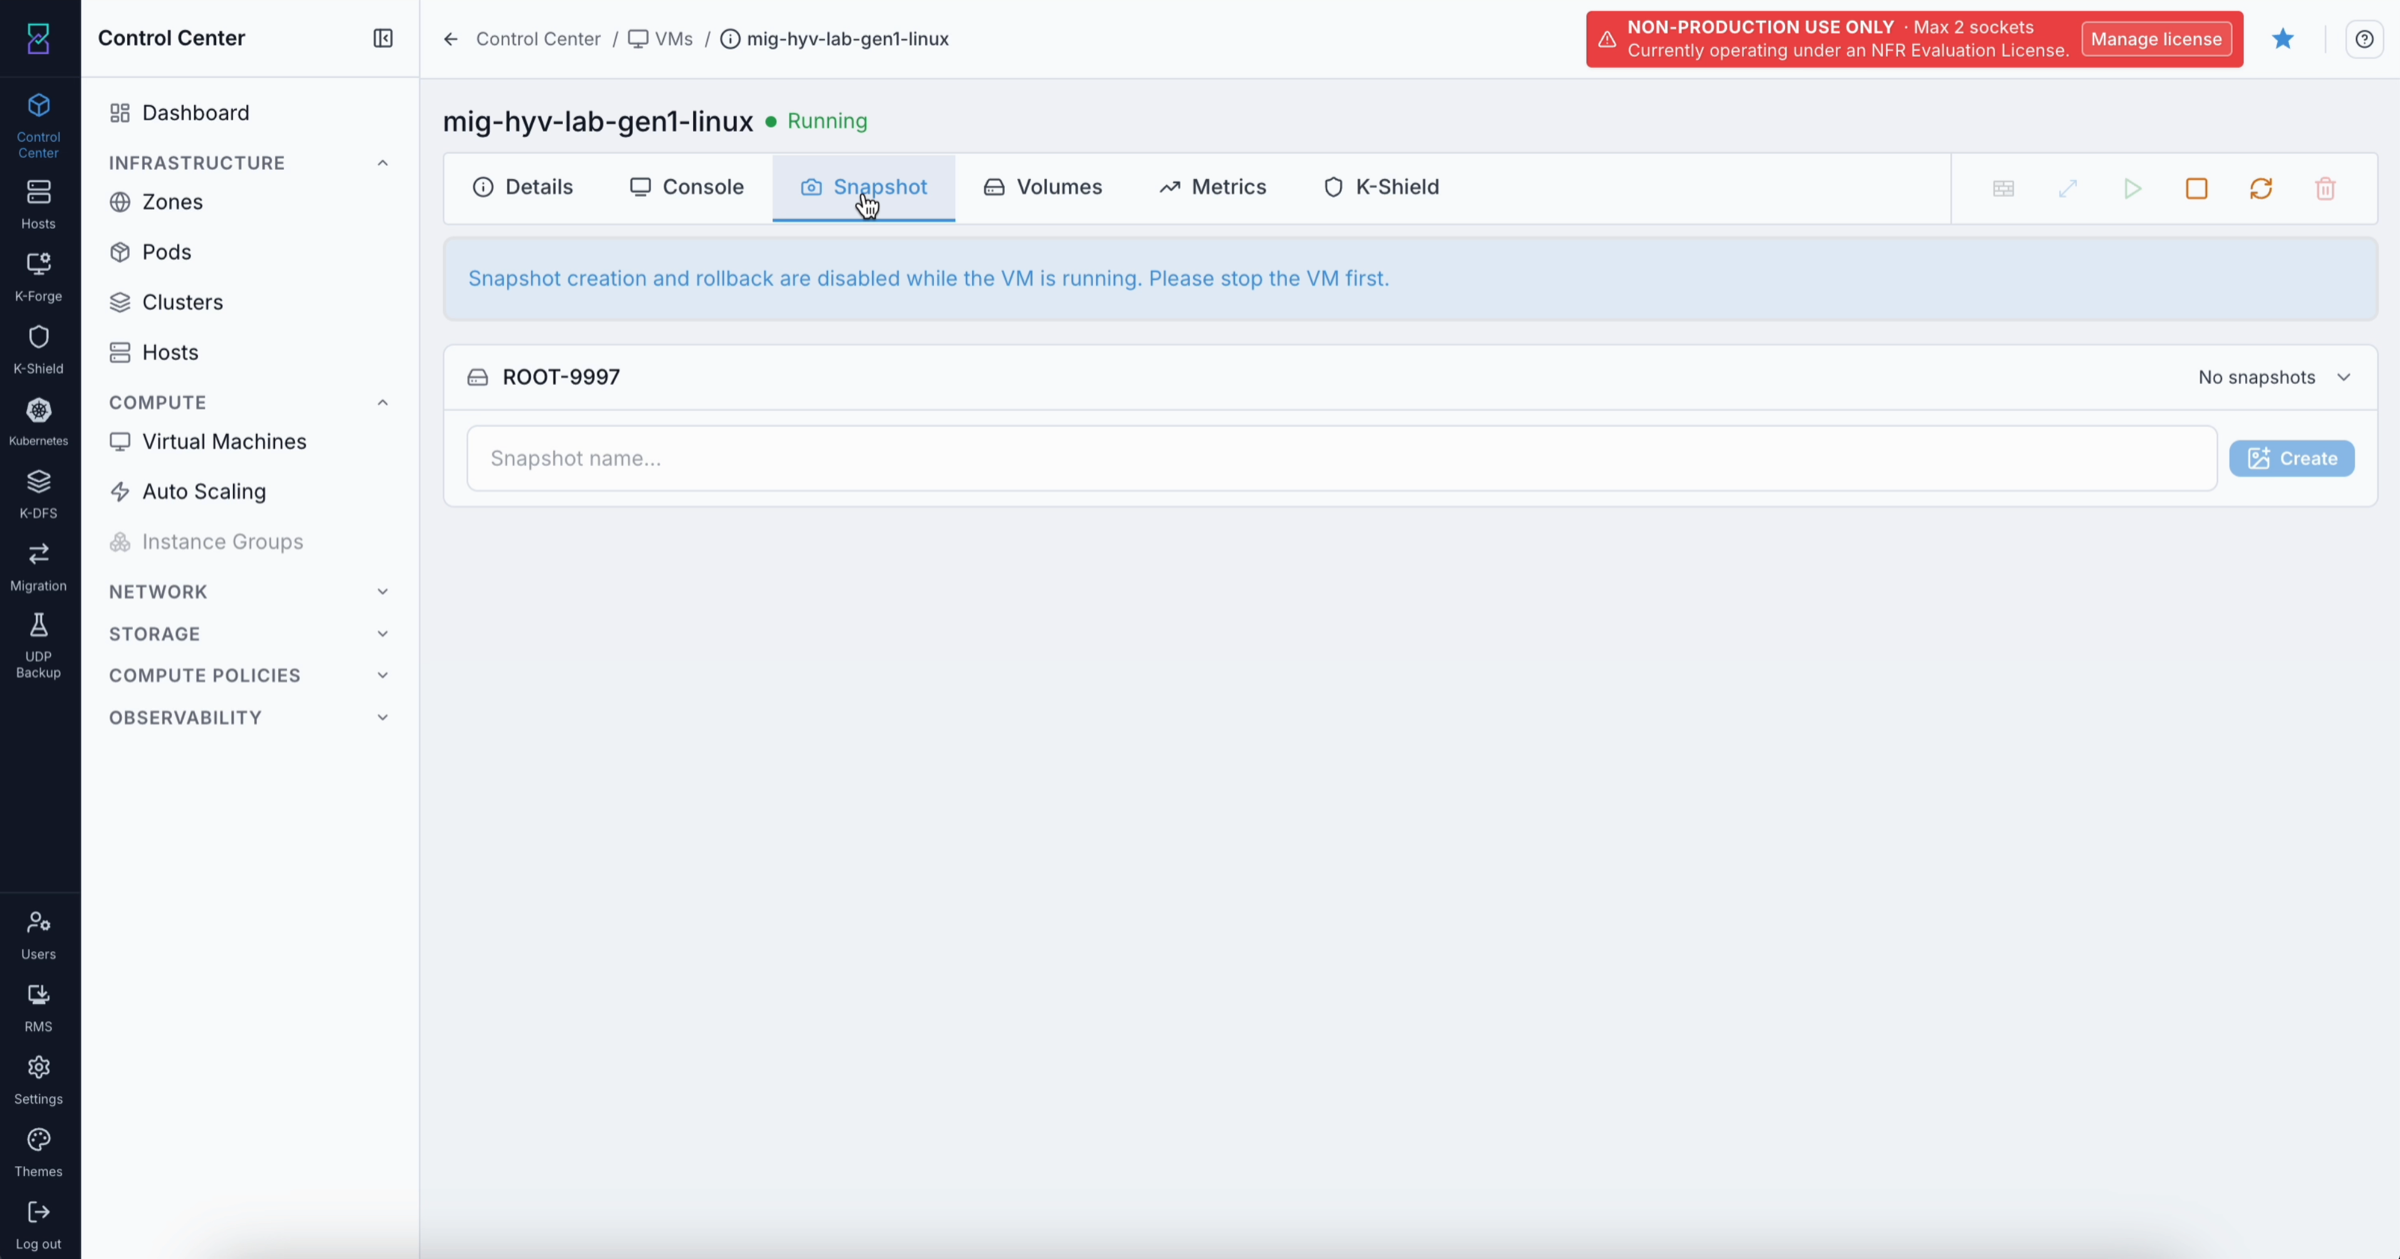
What this shows: The Snapshot tab of a migrated VM. Snapshot creation and rollback are disabled while the VM is running. Stop the VM first if you need to take a post-migration snapshot.
What You Can Do From This Screen
Action |
How |
|---|---|
Confirm the VM is running |
Check the State column in the VM list for Running |
Verify hardware and network config |
Click the VM name → Details tab |
Confirm all disks transferred successfully |
Click the VM name → Volumes tab - all disks must show |
Take a post-migration snapshot |
Stop the VM first, then go to the Snapshot tab |
Expected Outcome
VM shows Running with an assigned IP in Control Center
All disks in the Volumes tab show
Readystate on the Karios backendVM is reachable via SSH or RDP from your workstation
After confirming the above: power off the source VM and update your inventory
If This Fails
Symptom |
What to do |
|---|---|
Migrated VM does not appear in Control Center |
Go back to History → click the migration row → check the Dest VM UUID in the drawer. Search for that UUID directly in Control Center |
VM shows Running but no IP is assigned |
The guest networking configuration (e.g. DHCP lease) may be tied to the source VLAN. Confirm the Network Map placed the VM on the correct network |
A disk is still showing |
Do not power off the source VM. Return to Migration History → open the migration drawer → Logs → look for disk transfer errors. Retry the migration if needed |
VM will not boot (console shows kernel panic or boot loop) |
Go to History → Rollback the migration → investigate the logs. Common cause: NIC driver or storage controller incompatibility during the KVM conversion step |
Warning
Do not decommission or power off the source VM until you have confirmed: (1) the migrated VM is Running in Control Center, (2) all volumes are in Ready state, and (3) network connectivity has been verified from your workstation or monitoring system.
Backup
When to Use
Go to the Backup tab when you are managing migration of backup-related VM images rather than standard production VM migrations.
Purpose
The Backup tab is scoped to backup data sets. It presents the same interface as the History tab - state pills, filters, View Logs, Retry, and Rollback actions - but the list is filtered to backup-class migration jobs.
What You Can Do From This Screen
Action |
How |
|---|---|
View backup migration results |
The table lists all backup-class migrations with state pills and outcomes |
Open logs for a backup migration |
Click the 👁 icon on the row |
Retry a failed backup migration |
Click ↻ on a failed row |
Roll back a failed backup migration |
Click ▶ Rollback on a failed row |
Migration Detail Drawer
When to Use
Open the Migration Detail Drawer when you want to inspect one migration in depth - to read logs, check per-disk progress, understand why a migration failed, or find the destination VM ID.
Purpose
The drawer slides in from the right and shows everything Karios knows about one migration: its current stage, the saga pipeline, source VM profile, per-disk transfer status, warm migration status (if applicable), and the full live log stream.
How to open: Click any migration row on the Active tab, Batches tab, History tab, or the Dashboard “Currently Running” list.
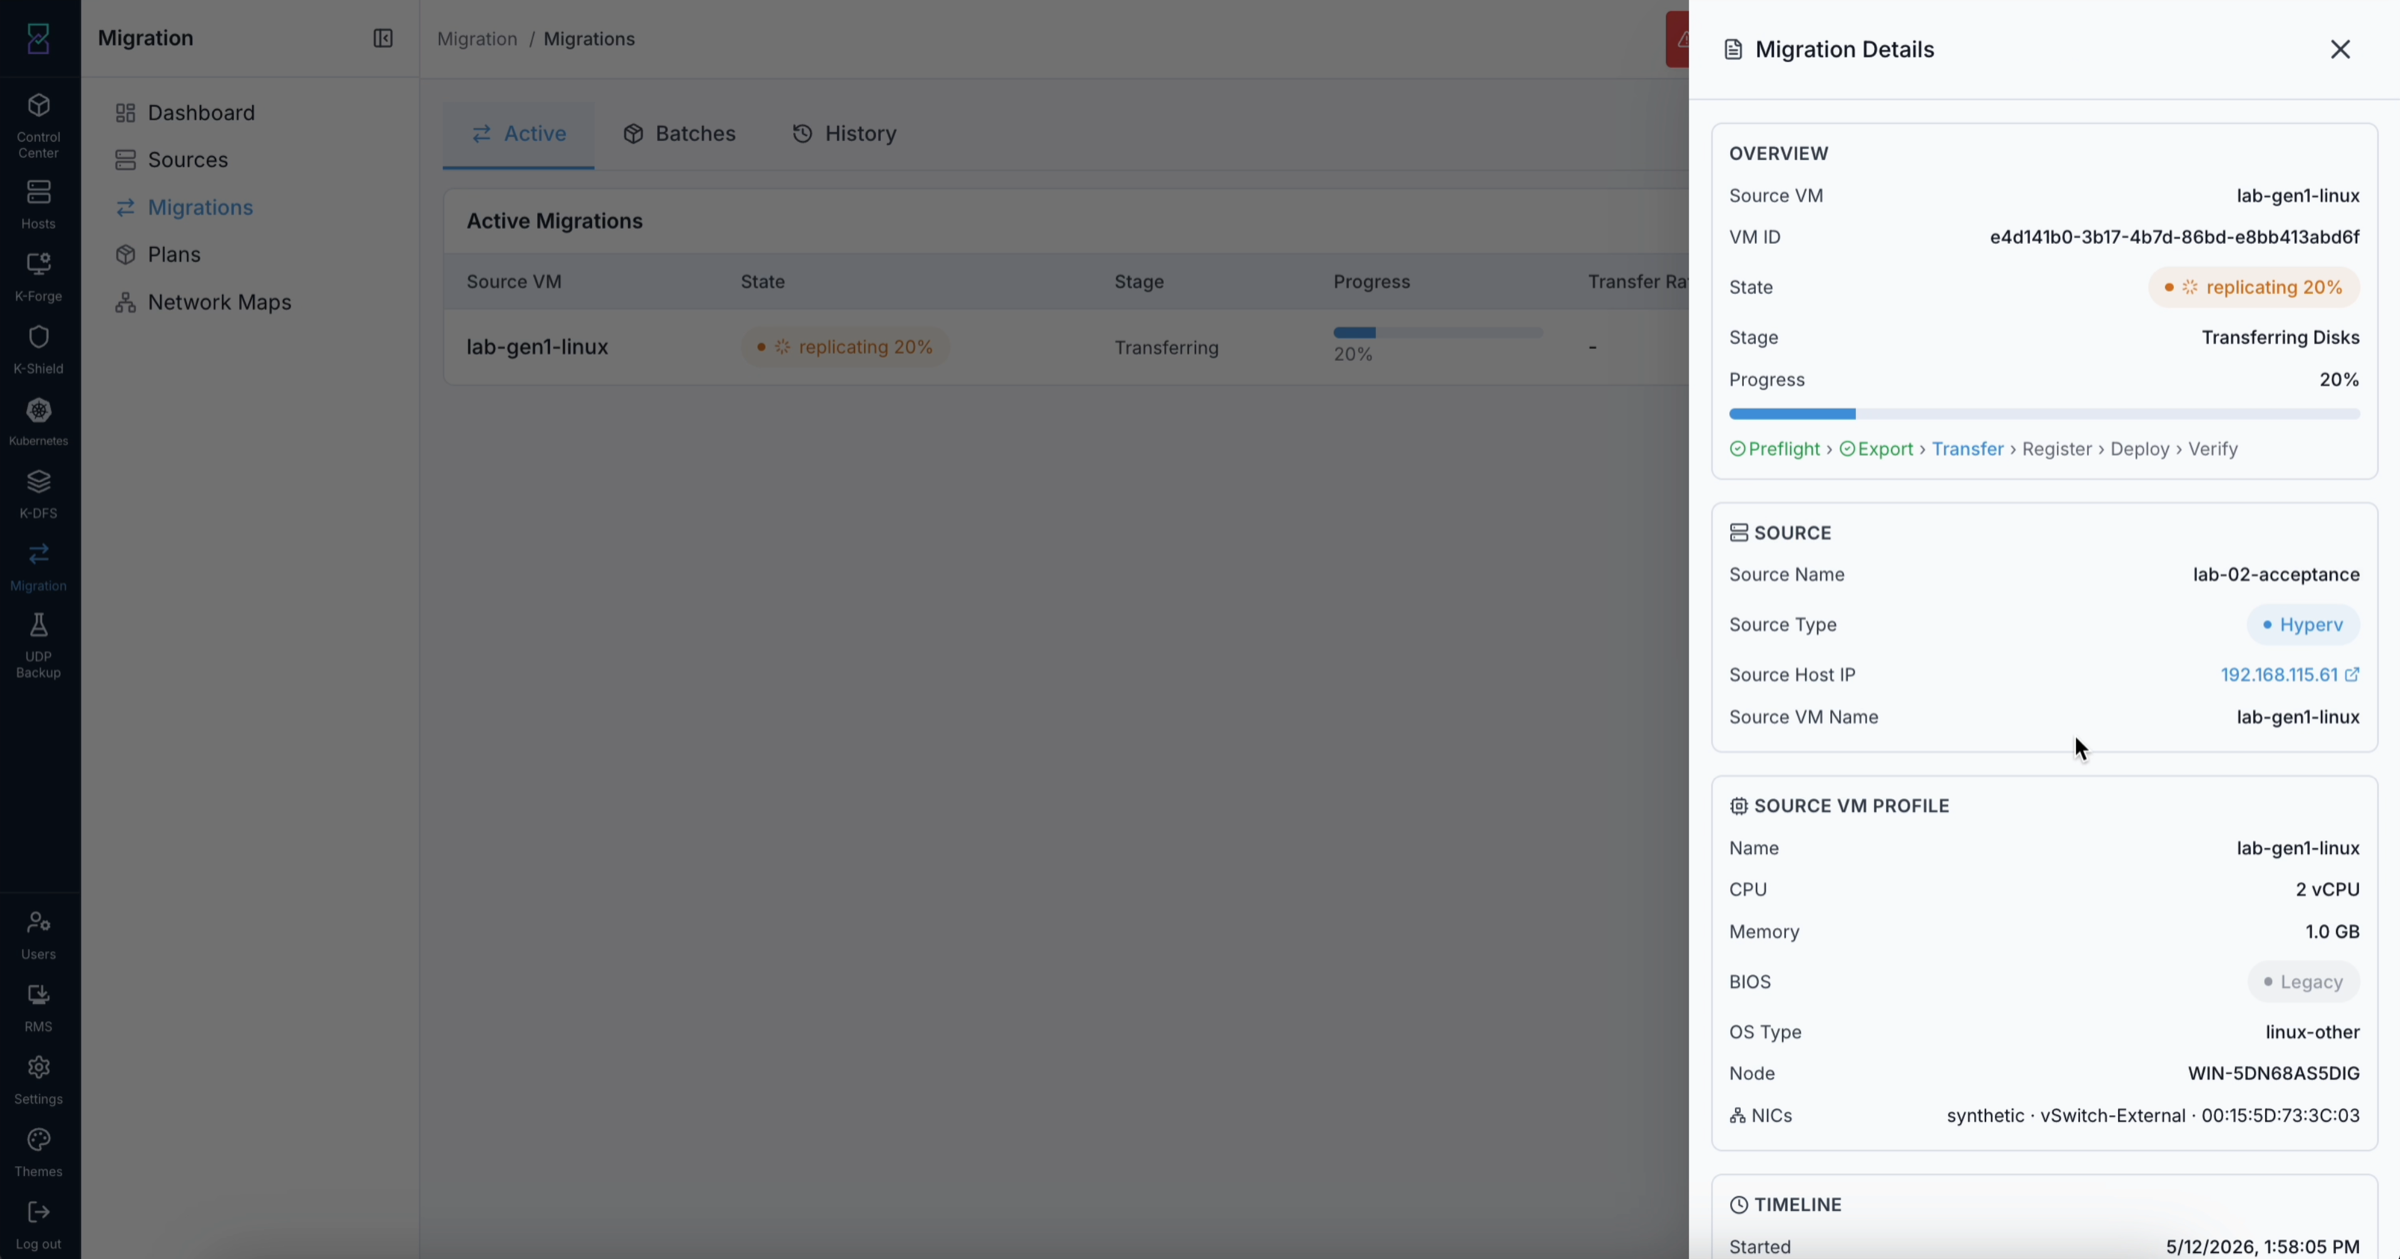
What this shows: The Migration Detail Drawer in its default state. At the top: the saga pipeline bar showing all stages (Preflight → Export → Transfer → Register → Deploy → Verify) with the active stage highlighted. Below: the Overview section (VM name, state pill, stage, elapsed time, destination VM ID) and the Source section (platform, host IP, original VM name on the source).
Steps
Click any migration row anywhere in the Migration module - Active, Batches, History, or Dashboard Currently Running.
The drawer slides in from the right. Read the saga pipeline bar at the top - it shows all stages in sequence. The active stage is highlighted; completed stages have a tick.
Check the Overview section for: current state pill, stage name, elapsed time, and destination VM ID.
Read the VM Profile section - CPU cores, memory, BIOS type, OS type, NIC MAC addresses, and source connection details.
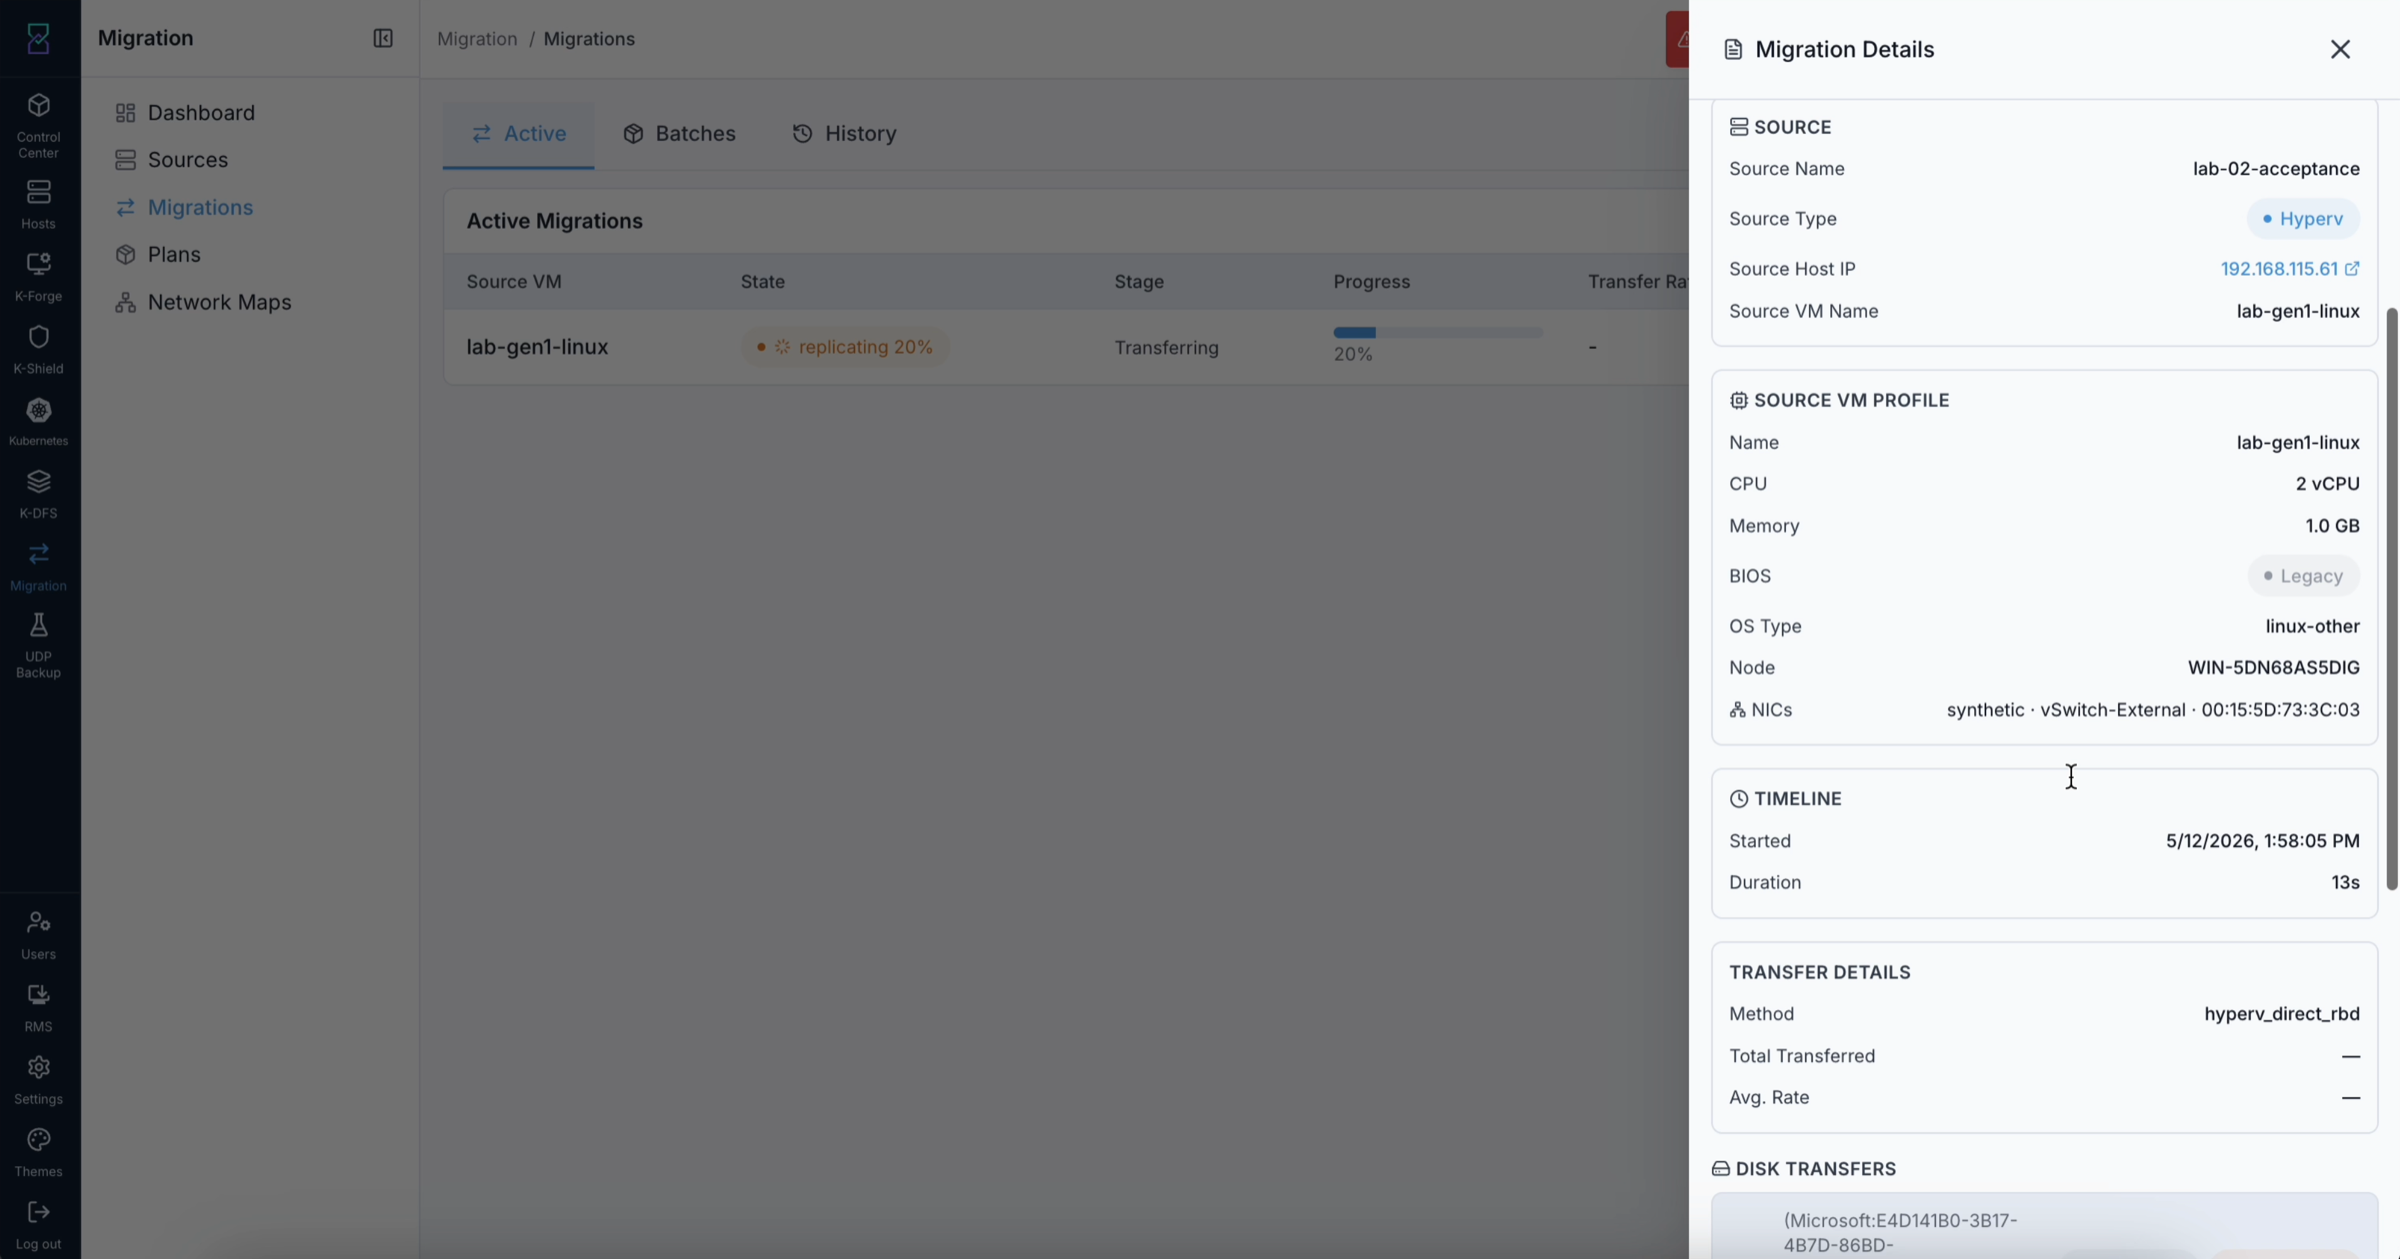
What this shows: The middle section of the Migration Detail Drawer. The Transfer Status section shows per-disk progress bars, transfer rates in MB/s, and per-disk ETAs. Each disk row has an individual ↻ Retry Disk and → Skip Disk button.
Scroll to Transfer Status (per-disk) - one row per virtual disk being copied:
Check each disk’s progress bar and transfer rate
Click ↻ Retry Disk to restart just this disk if it failed, without restarting the whole migration
Click → Skip Disk to mark this disk as skipped and continue - use with caution, as the destination VM may not boot if a required disk is skipped
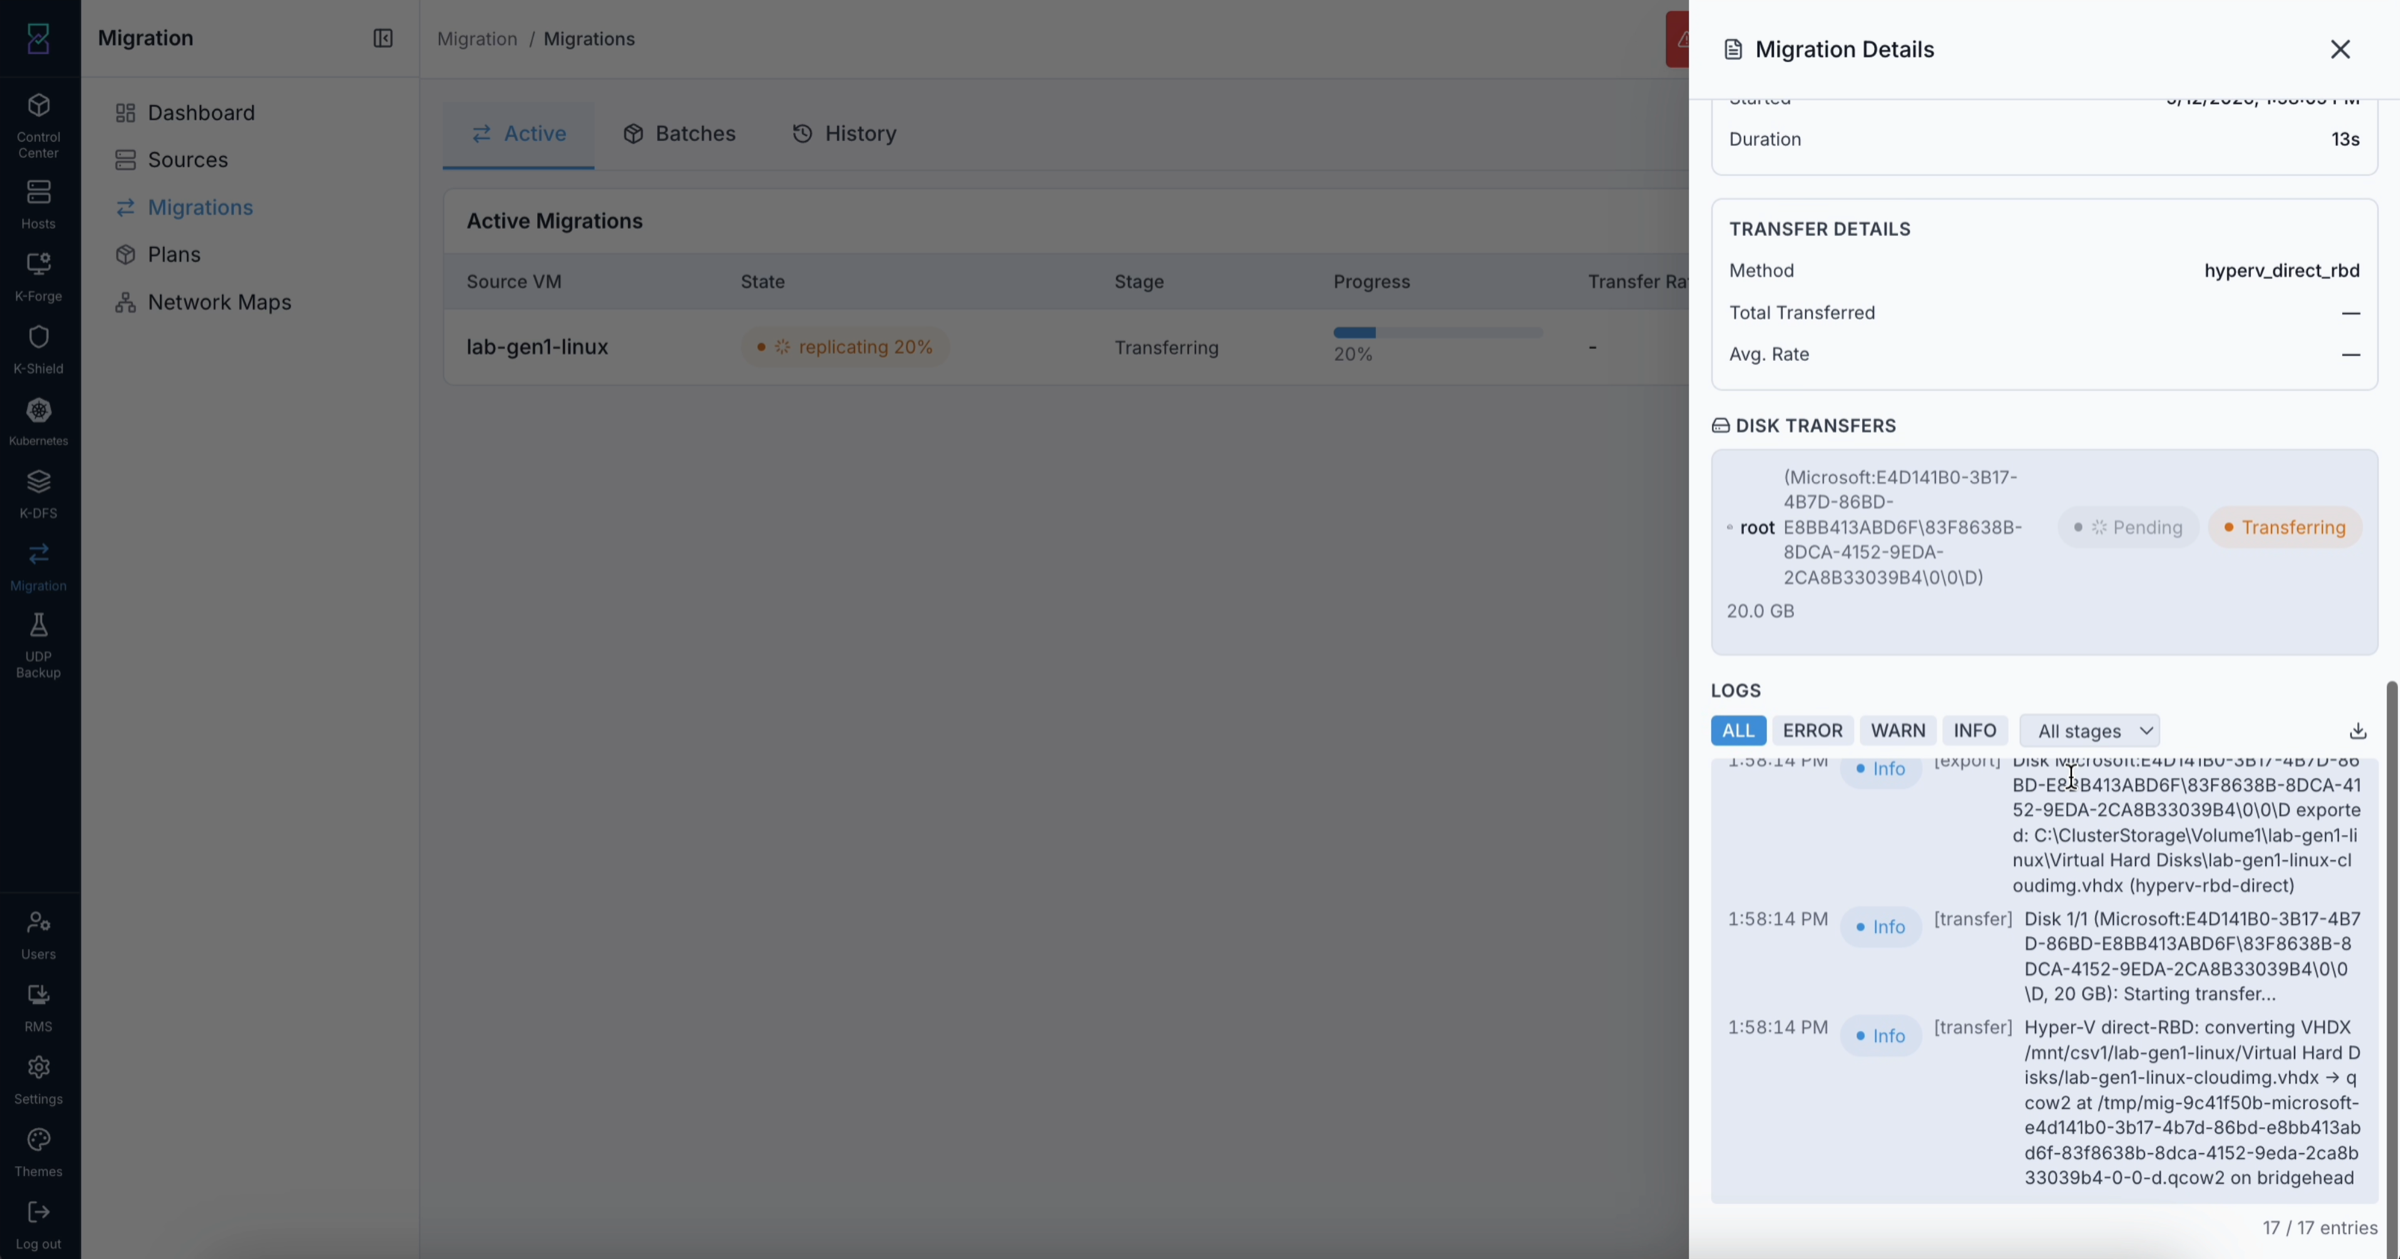
What this shows: The bottom section of the Migration Detail Drawer showing the live log stream. Filter buttons (ALL / ERROR / WARN / INFO) appear above the log list. The Stage dropdown narrows the view to one saga phase. The ⬇ Download logs button saves the full log to a .txt file.
Scroll to the Logs section - see Log Panel for full controls.
To roll back a failed migration: click ▶ Rollback at the bottom of the drawer. This is only enabled for failed migrations that already created destination resources.
Per-disk fields:
Field |
Description |
|---|---|
Disk name and size |
Disk identifier and total size on the source |
Per-disk progress bar |
0–100% for this individual disk |
Transfer rate |
Live copy speed in MB/s |
Per-disk ETA |
Engine estimate of remaining time for this disk |
↻ Retry Disk |
Restart just this disk if it failed |
→ Skip Disk |
Mark this disk as skipped and continue; destination VM may not boot if a required disk is skipped |
What You Can Do From This Screen
Action |
How |
|---|---|
Read the current saga stage |
Check the pipeline bar at the top of the drawer |
Find the destination VM ID |
Read the Overview section - use this ID to find the VM in Control Center |
Check per-disk progress and rate |
Scroll to the Transfer Status section |
Retry a failed individual disk |
Click ↻ Retry Disk on the disk row |
Skip a disk (advanced - use with caution) |
Click → Skip Disk on the disk row |
Read the full log stream |
Scroll to the Logs section - see Log Panel for controls |
Roll back a failed migration |
Click ▶ Rollback at the bottom (only available when destination resources were created) |
Close the drawer |
Click ✕ in the top-right corner |
Expected Outcome
The drawer shows real-time updates - the saga pipeline bar advances as stages complete, and log entries arrive live
Per-disk progress bars update alongside the Active tab progress bar
After clicking Rollback: the migration moves to
rolled_backstate in History and is safe to retry
If This Fails
Symptom |
What to do |
|---|---|
Drawer does not open when clicking a row |
Try clicking on a different part of the row (not on an action icon). If still not opening, refresh the page |
Rollback button is greyed out |
Rollback is only available when the migration created destination resources. If it failed at preflight (before creating anything), click Retry directly |
Logs section is empty for an active migration |
The Server-Sent Events connection may have dropped. Close and re-open the drawer to re-establish it |
Logs section is empty for a completed migration |
Logs for old completed migrations may have been purged from the database. Contact Karios support with the migration ID |
Log Panel
When to Use
Use the Log Panel when:
A migration failed and you need to find the root cause before retrying
A migration is slow and you want to see what the engine is doing step by step
You want to share a log file with Karios support
Purpose
The Log Panel lives inside the Migration Detail Drawer in the Logs section. It is the full event stream for one migration - every message the engine produced, from preflight through to the final state transition. Past logs from the database and live logs from the server are merged and deduplicated, so you always see a complete timeline.
Logs auto-scroll as new entries arrive. If you scroll up to review earlier entries, auto-scroll pauses - a “Resume scroll” button appears to jump back to the bottom.
Steps
Open the Migration Detail Drawer (click any migration row).
Scroll to the Logs section at the bottom of the drawer.
Use the Level filter buttons to narrow the view:
ALL - every log entry
ERROR - only errors (best starting point when diagnosing a failure)
WARN - warnings only
INFO - informational events only
Use the Stage dropdown to narrow to one saga phase (e.g. show only
preflightmessages).Read the log entries - each entry shows: timestamp, level pill, disk ID (if relevant), stage label, and message text.
If you identify the root cause: close the drawer, fix the underlying issue, and retry the migration.
If you cannot diagnose the issue: click ⬇ Download logs to save the full log stream to a
.txtfile named after the migration ID. Share this file with Karios support.
Log entry fields:
Field |
Description |
|---|---|
Timestamp |
Local time, e.g. “14:35:22” |
Level pill |
ERROR (red) · WARN (yellow) · INFO (grey) · DEBUG (darker grey) |
Disk ID |
If relevant to a specific disk, e.g. “disk-0” |
Stage |
Which saga phase this message came from, e.g. |
Message |
The actual log text |
What You Can Do From This Screen
Action |
How |
|---|---|
Filter to only errors |
Click the ERROR level button |
Filter to one saga phase |
Use the Stage dropdown |
Jump back to live auto-scroll |
Click ↑ Resume scroll (appears if you scrolled up) |
Download the full log stream |
Click ⬇ Download logs |
Expected Outcome
Switching to ERROR filter cuts through noise and shows only the messages that indicate what went wrong
The stage label on each log entry tells you exactly which phase of the saga produced the message
Downloading the log produces a
.txtfile containing the complete log stream - safe to share with support
If This Fails
Symptom |
What to do |
|---|---|
No log entries appear even though the migration ran |
Logs for completed migrations are stored in the database. If empty for a finished migration, the logs may have been purged. Contact support with the migration ID |
Logs stop updating for a live migration |
The Server-Sent Events connection may have dropped. Close and re-open the Migration Detail Drawer to re-establish it |
Download logs produces a very small or empty file |
The level filter applies before download. Switch to ALL before downloading to get the full stream |
Status Badge Reference
Status pills appear on every tab. Here is the full meaning of each colour:
Colour |
States |
What it means to you |
|---|---|---|
Blue |
|
Not started yet, or in a setup phase |
Orange |
|
In progress - the spinner is animated for these states |
Green |
|
Finished successfully |
Red |
|
Something went wrong. Click the row to open the detail drawer and read the logs |
Grey |
|
Terminal but not a success |
Note
A spinner animation appears only for: replicating, deploying, verifying, rolling_back, running, active. Progress percentage appears on the pill only for active states between 0–99%. Terminal states never show a percentage.
Common Workflows
Important
New to Karios Migration? Follow Guide 1 below from Step 1 through Step 9 in order. Do not skip any step - each one sets up what the next step needs.
Guide 1 - Run Your First Migration (Complete Walkthrough)
When to Use
Use this guide the first time you migrate any VM into Karios. It covers the full journey - from opening the module to confirming the destination VM is running.
Purpose
Walk through every required setup step in order and migrate one VM into Karios without missing any configuration.
Note
This guide takes approximately 10–20 minutes for a single VM. Have the following ready before you start:
Hostname or IP address of your source hypervisor (vCenter / ESXi / Hyper-V)
Username and password for that hypervisor
The name of the Karios network you want the migrated VM to connect to
The name of the Karios storage pool you want to use
Step 1 - Open the Migration Module
In the left sidebar of the Karios web console, click Migrations.
What you see: The Migration module opens and you land on the Dashboard page. The Dashboard shows migration statistics and recent activity. It will be mostly empty on your first visit - this is normal.
Look at the left navigation panel. You should see:
Dashboard,Sources,Migrations,Plans,Network Maps.Note
If you do not see the left navigation panel or the Migrations entry is missing from the main sidebar, contact your Karios administrator - your user role may not have access to the Migration module.
Next: Go to Step 2 to add your source hypervisor.
Step 2 - Add Your Source Hypervisor
Your source hypervisor is the VMware or Hyper-V system the VMs are currently running on. You register it once and reuse it for every migration from that environment.
In the Migration left panel, click Sources.
What you see: The Sources list. It is empty on your first visit.
Click + Add Source (top-right of the page).
What you see: A form with platform and connection fields.
Select your platform:
VMware vCenter - for managed multi-host VMware environments
VMware ESXi - for a standalone ESXi host with no vCenter
Microsoft Hyper-V - for Windows Server Hyper-V (cluster or standalone)
Fill in the connection fields:
vCenter or ESXi: hostname or IP address, port (default
443), username, password, and optional TLS thumbprintHyper-V: hostname of any cluster node (Karios auto-discovers the rest), WinRM port (default
5986), username, password
Click Save.
What you see: The source appears in the list. Karios immediately tests the connection and updates the Status column.
Check the Status column:
Green (Connected) - connection is working. Go to Step 3.
Amber or Red - connection failed. Click the edit (pencil) icon on the row, correct the hostname, port, or credentials, and save again. Repeat until the status turns green.
Warning
Do not continue to Step 3 until the source status is green. All subsequent steps depend on a working source connection.
Next: Go to Step 3 to map your networks.
Step 3 - Map Your Networks
A Network Map tells Karios: “when the migrated VM was on source network X, attach it to Karios network Y.” Without this, migrated VMs may connect to the wrong network or fail pre-flight validation.
In the Migration left panel, click Network Maps.
What you see: The Network Maps list. It is empty on your first visit.
Click + Add Mapping.
What you see: A small form with three fields.
Fill in the fields:
Name - a label for this mapping (example:
prod-network-map)Source Network - the name or VLAN ID of the network on your source hypervisor (example:
VM NetworkorVLAN 100)Destination Network - the Karios network you want the VM to connect to after migration
Click Save.
What you see: The mapping appears in the list. If any field is empty, a red INVALID badge appears - fix it before continuing.
Repeat for every source network that any VM you plan to migrate is connected to.
Note
Not sure which source networks your VMs use? Go back to Sources → click your source name → the VM table shows each VM’s network in the detail columns.
Optional shortcut - Suggest: Click ▲ Suggest to have Karios auto-propose mappings by matching similar network names between source and destination. Review and save any suggestions you agree with.
Next: Go to Step 4 to map your storage.
Step 4 - Map Your Storage
A Storage Map tells Karios which Karios storage pool to use for each source datastore. If your Karios environment has only one storage pool, you can skip this step - Karios uses it by default.
In the Migration left panel, click Storage Maps.
What you see: The Storage Maps list. It is empty on your first visit.
Click + Add Mapping.
What you see: A form with a name, source selector, and a repeatable entries section.
Fill in the fields:
Name - a label for this storage map (example:
prod-storage-map)Source - select the source environment this map applies to
Entries - for each source datastore, select the matching Karios storage pool. Click + Add Entry to add more rows.
Click Save.
What you see: The storage map appears in the list with the entry count shown.
Repeat for every source datastore that the VMs you plan to migrate use.
Next: Go to Step 5 to select the VM you want to migrate.
Step 5 - Select the VM to Migrate
In the Migration left panel, click Sources.
Click the name of the source you added in Step 2.
What you see: The Source detail page opens. The left panel lists the hypervisor nodes (ESXi hosts or Hyper-V nodes). The main table shows all discovered VMs from that source.
Browse the VM table to find the VM you want to migrate. Use the grouping toggle (Node grouping / Cluster grouping) to organise the list if it is long.
Click 🔄 Re-test reachability at the top of the page to confirm the VM is currently accessible.
What you see: The reachability status next to each VM refreshes. VMs that are unreachable show a warning badge.
Warning
Only select VMs that are reachable. Migrating an unreachable VM will fail at the pre-flight stage.
Tick the checkbox in the row of the VM you want to migrate.
What you see: The ▶ Migrate button at the top of the table becomes active (clickable).
Next: Go to Step 6 to configure and start the migration.
Step 6 - Configure and Start the Migration
Click ▶ Migrate (top-right of the VM table).
What you see: The migration configuration form opens.
Fill in the form fields:
Destination zone - the Karios zone where the new VM will run
Destination network - must match one of your Network Map entries from Step 3
Service offering - the CPU and RAM profile for the destination VM (choose one that matches or exceeds the source VM’s resources)
Live migration mode - leave on Auto for your first migration. Auto means Karios picks the safest method based on the source VM’s state.
Click Validate.
What you see: Karios runs pre-flight checks without moving any data. Results appear inline in the form.
Warning
Do not click Migrate Now until Validate reports no issues. Common validation failures and how to fix them:
Missing network mapping - go to Network Maps and add the missing entry, then come back and re-validate.
Unreachable host - go to Sources → Re-test reachability → confirm the host goes green.
Incompatible service offering - choose a different service offering with more CPU or RAM.
Once Validate shows no issues, click Migrate Now.
What you see: The form closes. Karios creates a Batch containing your VM and queues it for migration. You are returned to the Sources page.
Next: Go to Step 7 to watch the migration progress.
Step 7 - Watch Migration Progress
In the Migration left panel, click Migrations → Active tab.
What you see: A table with one row for your VM. Columns show: VM name, current status badge (blue = in progress), stage (Queued → Pre-flight → Transferring → Deploying VM → Verifying), progress bar 0–100%, transfer rate in MB/s, time started, and estimated time remaining.
Watch the progress bar advance through the stages. The page updates automatically - you do not need to refresh.
Click the row at any point to open the Migration Detail Drawer on the right side. The drawer shows per-disk transfer status and a live log stream.
Note
If the progress bar stops moving for more than 10 minutes, click the row to open the drawer and check the Logs panel for errors. Do not cancel the migration unless the log shows a definitive failure - some stages (such as disk consolidation on VMware) take longer than expected.
When the status badge turns green and shows Complete, the migration has finished successfully.
Next: Go to Step 8 to verify the destination VM.
Step 8 - Verify the Destination VM
With the Migration Detail Drawer open (click the completed row if it is not already open), note the destination VM ID shown in the drawer header or details panel.
Open a new browser tab and go to Control Center → Virtual Machines.
Find the destination VM by name or ID.
Confirm the following:
VM state is Running
The VM’s IP address is on the expected Karios network
You can reach the VM (ping it or open its console)
Warning
Do not power off the source VM until you have confirmed the destination VM is fully operational and reachable. Once the source is off, rollback is not automatic.
If the destination VM is running and reachable: power off the source VM on your hypervisor (vCenter / ESXi / Hyper-V console). The migration is complete.
Next: Your first migration is done. For subsequent migrations, start at Step 5 - you do not need to repeat Steps 1–4 unless you are adding a new source or network.
Step 9 - If the Migration Failed
If the status badge turned red (Failed) at any point:
Click the failed row in Migrations → Active (or go to Migrations → History if the batch is already closed).
Open the Logs panel in the Migration Detail Drawer.
Set Level = ERROR to jump to the failure message.
Read the
[stage]tag in the error line - it tells you exactly where the failure happened:Stage in log
What to do
[preflight]A Network Map entry is missing, the service offering is incompatible, or the source host is unreachable. Fix the issue in Network Maps, Storage Maps, or Sources, then retry.
[replicating]Disk copy was interrupted - usually a network timeout or source hypervisor error. Click ↻ Retry. If it fails again, check source connectivity.
[verifying]The destination VM failed to boot. Check the service offering (CPU/RAM) and confirm the destination network is reachable.
[deploying]Karios could not register the destination VM. Check available capacity (CPU, RAM, storage) in the destination zone.
Fix the identified issue, then click ↻ Retry on the failed row.
Note
If the failure left a half-built destination VM behind: click ↶ Rollback first to destroy it cleanly, then click ↻ Retry.
If the same failure repeats after two retries: click ⬇ Download logs in the drawer and contact Karios support with the log file and the migration ID.
Guide 2 - Migrate Multiple VMs on a Schedule (Plans)
When to Use
Use this when you want to migrate many VMs together, or schedule the migration to run at a future time (for example, 2 AM Sunday) to reduce business impact. Requires Steps 1–4 of Guide 1 to be complete first.
Steps
Step 1 - Create the Plan
In the Migration left panel, click Plans.
What you see: The Plans list. Empty on your first visit.
Click + Create Plan.
What you see: The plan creation form.
Fill in the form:
Select every VM you want to include - you can pick VMs across multiple sources
Set Live migration mode = Auto
Toggle Schedule = ON and pick your target date and time
Click Save.
What you see: The plan appears in the Plans list with a Scheduled badge showing your chosen date and time.
Step 2 - Validate the Plan
Click ✓ Validate on the plan row.
What you see: Karios runs all pre-flight checks across every VM in the plan. Any issues are listed inline.
Warning
Fix every issue Validate reports before the scheduled time. If validation fails at run time, the entire batch will fail immediately.
Fix any reported issues (missing network maps, unreachable hosts, incompatible offerings) and re-validate until all checks pass.
Step 3 - Wait and Monitor
Leave the plan in place. At the scheduled time, Karios automatically creates a Batch and starts migrating all VMs.
At or after the scheduled time, go to Migrations → Active to watch per-VM progress rows.
When all rows turn green (Complete), verify each destination VM in Control Center → Virtual Machines (same as Guide 1, Step 8).
Expected Outcome
A Batch is created automatically at the scheduled time.
All VMs in the plan migrate and reach Complete (green) status.
Each destination VM is running and reachable in Control Center.
If This Fails
Go to Migrations → History and filter by the batch date - look for red (Failed) rows.
Click each failed row, read the logs, fix the root cause, and click ↻ Retry.
To re-run the entire plan manually: go to Plans → click ▶ Execute / Run on the plan row → confirm.
Troubleshooting
Symptom |
Where to start |
|---|---|
“Failed (last 24h)” card on Dashboard is non-zero |
Click it → History page filtered to failures → read logs for each failed migration |
A migration sits at 0% for a long time |
Open the detail drawer → Logs → filter Stage = |
Transfer started but is very slow |
Open the detail drawer → Transfer Status section → check per-disk MB/s |
Destination VM exists but will not boot |
Open the detail drawer → Logs → filter Stage = |
Source page shows many unreachable hosts |
Click 🔄 Re-test reachability at the top of the Source detail page |
Plan refuses to delete |
The pop-up lists which migrations are blocking; click “View in Active” to cancel them |
Many orphaned staging file warnings |
Contact Karios support to clean up orphaned staging files |
Glossary
Term |
Definition |
|---|---|
Active migration |
A migration whose state is not yet terminal (still running, preparing, or verifying) |
Batch |
A job containing one or many VMs being migrated together. Has its own state (running / paused / complete / failed) |
CBT (Changed Block Tracking) |
A VMware feature that lets Karios copy only the disk blocks that changed since the last copy. Used in Live (Warm) migration mode |
Cold migration |
Power the source VM off first, then copy disks fully. Source is offline for the entire transfer duration |
Destination VM |
The new VM running on Karios at the end of the migration |
ESXi |
VMware’s standalone hypervisor (no vCenter required) |
Hyper-V |
Microsoft’s hypervisor |
Live (Warm) migration |
Copy disks while the source VM is running, then take a brief final cutover. Source is online almost the entire time |
Network Map |
A rule mapping a source network identifier to a destination Karios network |
Plan |
A saved migration configuration that can be validated, scheduled, and executed |
Rollback |
Destroy a half-built destination VM after a failed migration so you can retry cleanly |
Service offering |
A Karios compute profile that defines how much CPU and RAM a destination VM receives |
Source |
A saved connection to a hypervisor (vCenter / ESXi / Hyper-V) |
Stage |
Human-readable label for the current phase: Queued · Pre-flight · Transferring · Deploying VM · Verifying · Complete |
State |
The underlying technical status: pending · preflight · replicating · deploying · verifying · complete · failed · cancelled · rolled_back |
Storage Map |
A rule mapping a source datastore to a destination Karios storage pool |
vCenter |
VMware’s central management console that controls many ESXi hosts |
Verifying |
The last phase of a migration where Karios boots the destination VM and confirms it works before declaring success |
Zone |
A Karios region or location where VMs run |