UDP Backup
1 |
5 |
||
2 |
6 |
||
3 |
7 |
||
4 |
8 |
Overview
UDP Backup protects your Karios virtual machines with scheduled, policy-driven backups. The system discovers VMs automatically, ships their disks to an S3-compatible repository, and lets you restore either the full VM or individual disks - without taking a downtime window unless the restore itself requires one.
Supported backup destinations:
Karios RGW - the built-in Local Ceph object storage. Recommended for most clusters; data stays on-cluster with full Ceph durability.
Custom S3 Endpoint - the platform RGW, MinIO, AWS, or any S3-compatible storage. Use when you need offsite copies or your compliance policy requires it.
How to Open UDP Backup
In the left sidebar of the Karios web console, click UDP Backup.
What you see: The UDP Backup module opens on the Dashboard page. The left navigation panel shows six pages: Dashboard, Repositories, Policies, Backups, Operations, and Audit. On a fresh installation all tile counts are zero - this is expected.
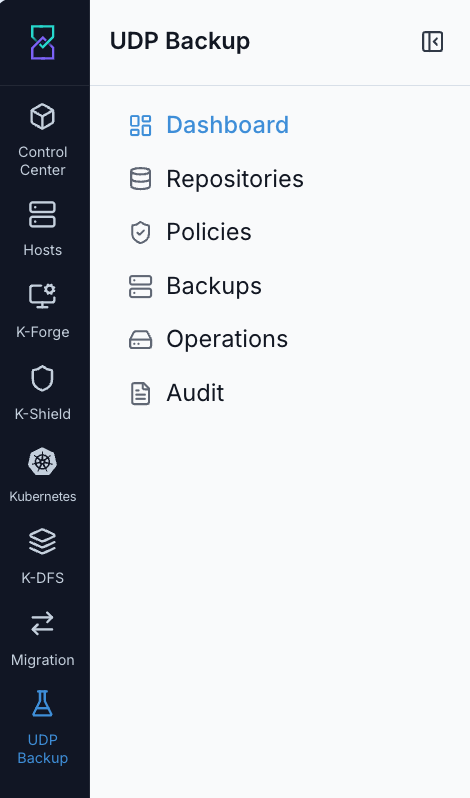
What this shows: The UDP Backup navigation panel. Use it to move between all UDP Backup pages.
Important
First time here? You land on the Dashboard but do not start there. Follow this order: Repositories → Policies → Backups → Operations. The Dashboard reflects the result of work you do on those pages - tiles will show zero until at least one repository is connected and one backup has run.
First-time setup - follow this order:
Step |
Page |
What you do |
|---|---|---|
1 |
Connect an S3/RGW bucket. Every policy needs at least one repository before it can be created. |
|
2 |
Create a schedule: which VMs to back up, when, and which repository to use. |
|
3 |
Confirm VMs are appearing as Protected after the first scheduled run - or go to Policies and click the ▶ icon on the policy row to trigger one immediately. |
|
4 |
Monitor the activity stream, investigate failures, and trigger restores. |
All pages at a glance:
Page |
Purpose |
|---|---|
Repositories |
Connect and manage the S3/RGW buckets that store your backup data - start here |
Policies |
Schedules that define which VMs get backed up, when, and to which repository |
Backups |
Per-VM view of protection state, last backup time, snapshot count, and restore actions |
Operations |
Full chronological activity stream - every backup and restore job, with per-disk drill-down |
Dashboard |
At-a-glance backup health: protected VMs, active operations, success rate, recent activity |
Audit |
Immutable log of who did what to backup configuration and data |
Repositories
When to Use
Go to Repositories when:
You are setting up UDP Backup for the first time - this is step 1
You want to add a new S3 or Ceph RGW bucket as a backup destination
You need to verify a bucket has Object Lock enforcement enabled
You want to remove a repository that is no longer in use
Purpose
A repository is the S3-compatible bucket where Karios writes your backup data. Every backup policy points at exactly one repository. You must add at least one repository before you can create any policies.
What You See When You First Arrive
When you click Repositories for the first time, the Backup Repositories list is empty and two tiles at the top show Total Repositories: 0 and Object Lock Verified: 0. The empty state shows a button labelled + Add your first repository. A ? icon in the top-right corner opens a help panel with a quick reference for this page.
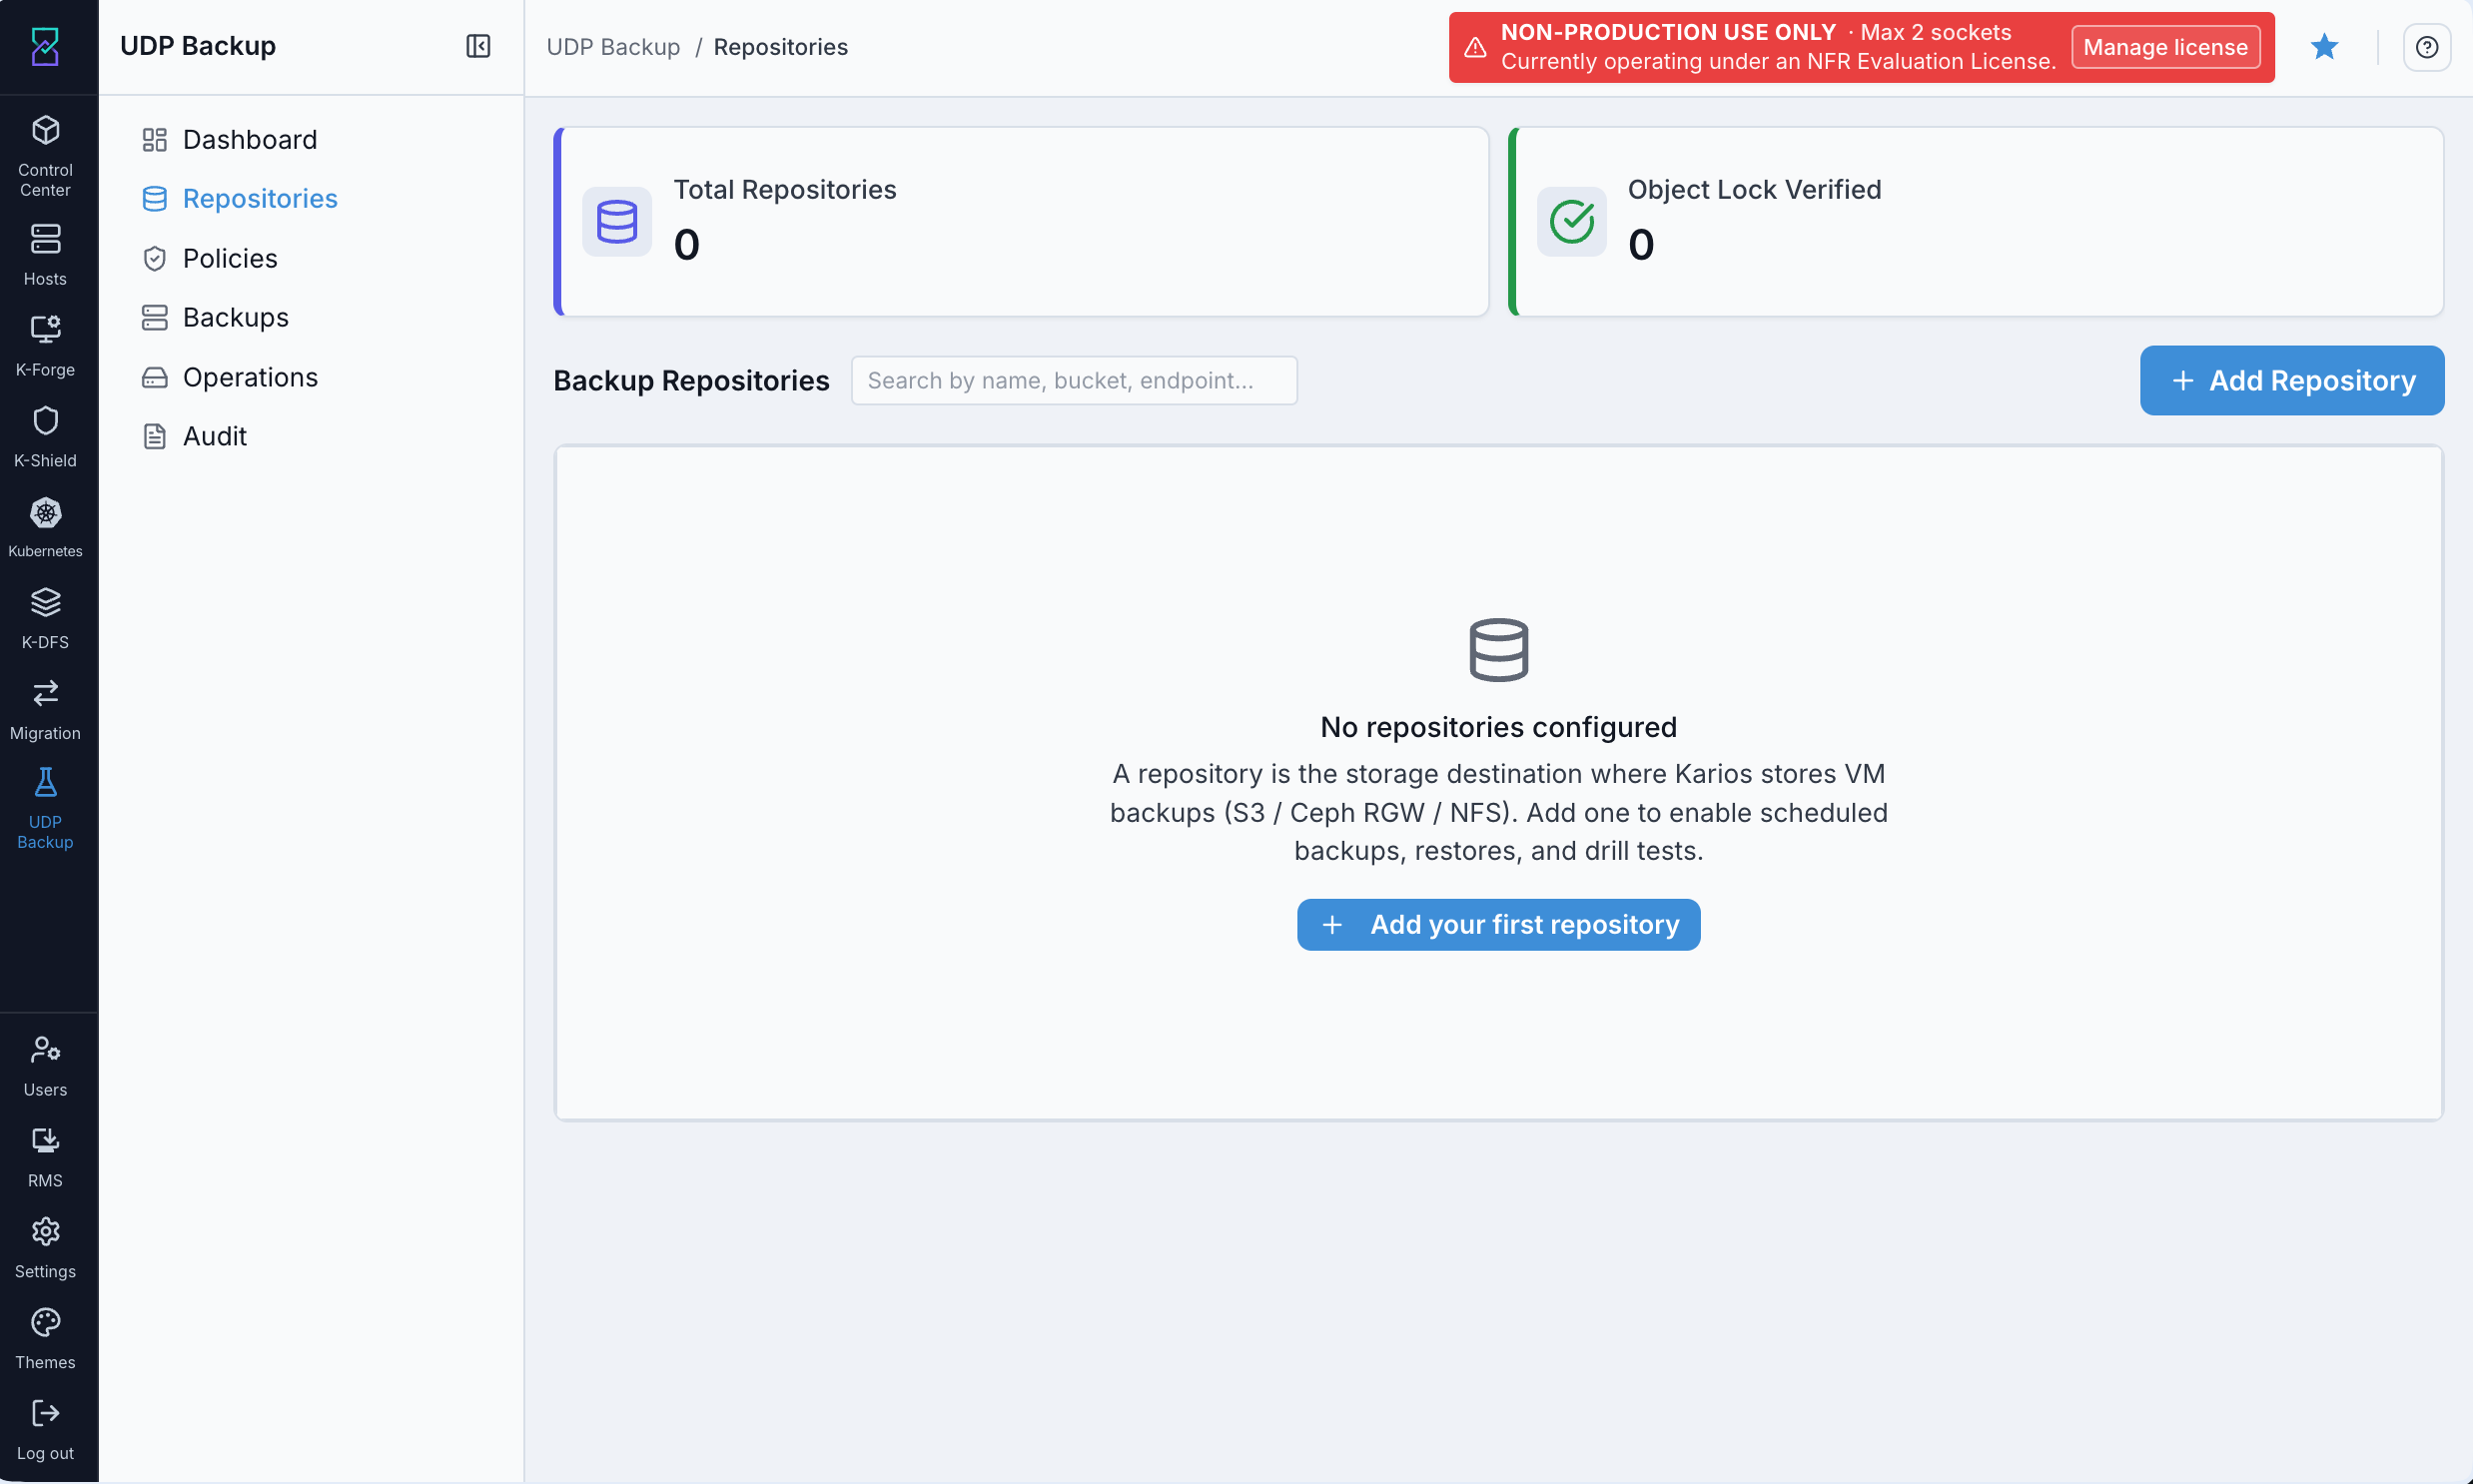
What this shows: The Repositories page on a fresh installation. The Total Repositories and Object Lock Verified tiles both read 0. Click + Add your first repository (or + Add Repository in the top-right corner once rows exist) to open the Connect Backup Storage form.
Steps - Add a Repository
Step 1 - Open the Connect Backup Storage Form
Click + Add Repository (top-right corner), or + Add your first repository if the list is empty.
What you see: The Connect Backup Storage dialog opens.
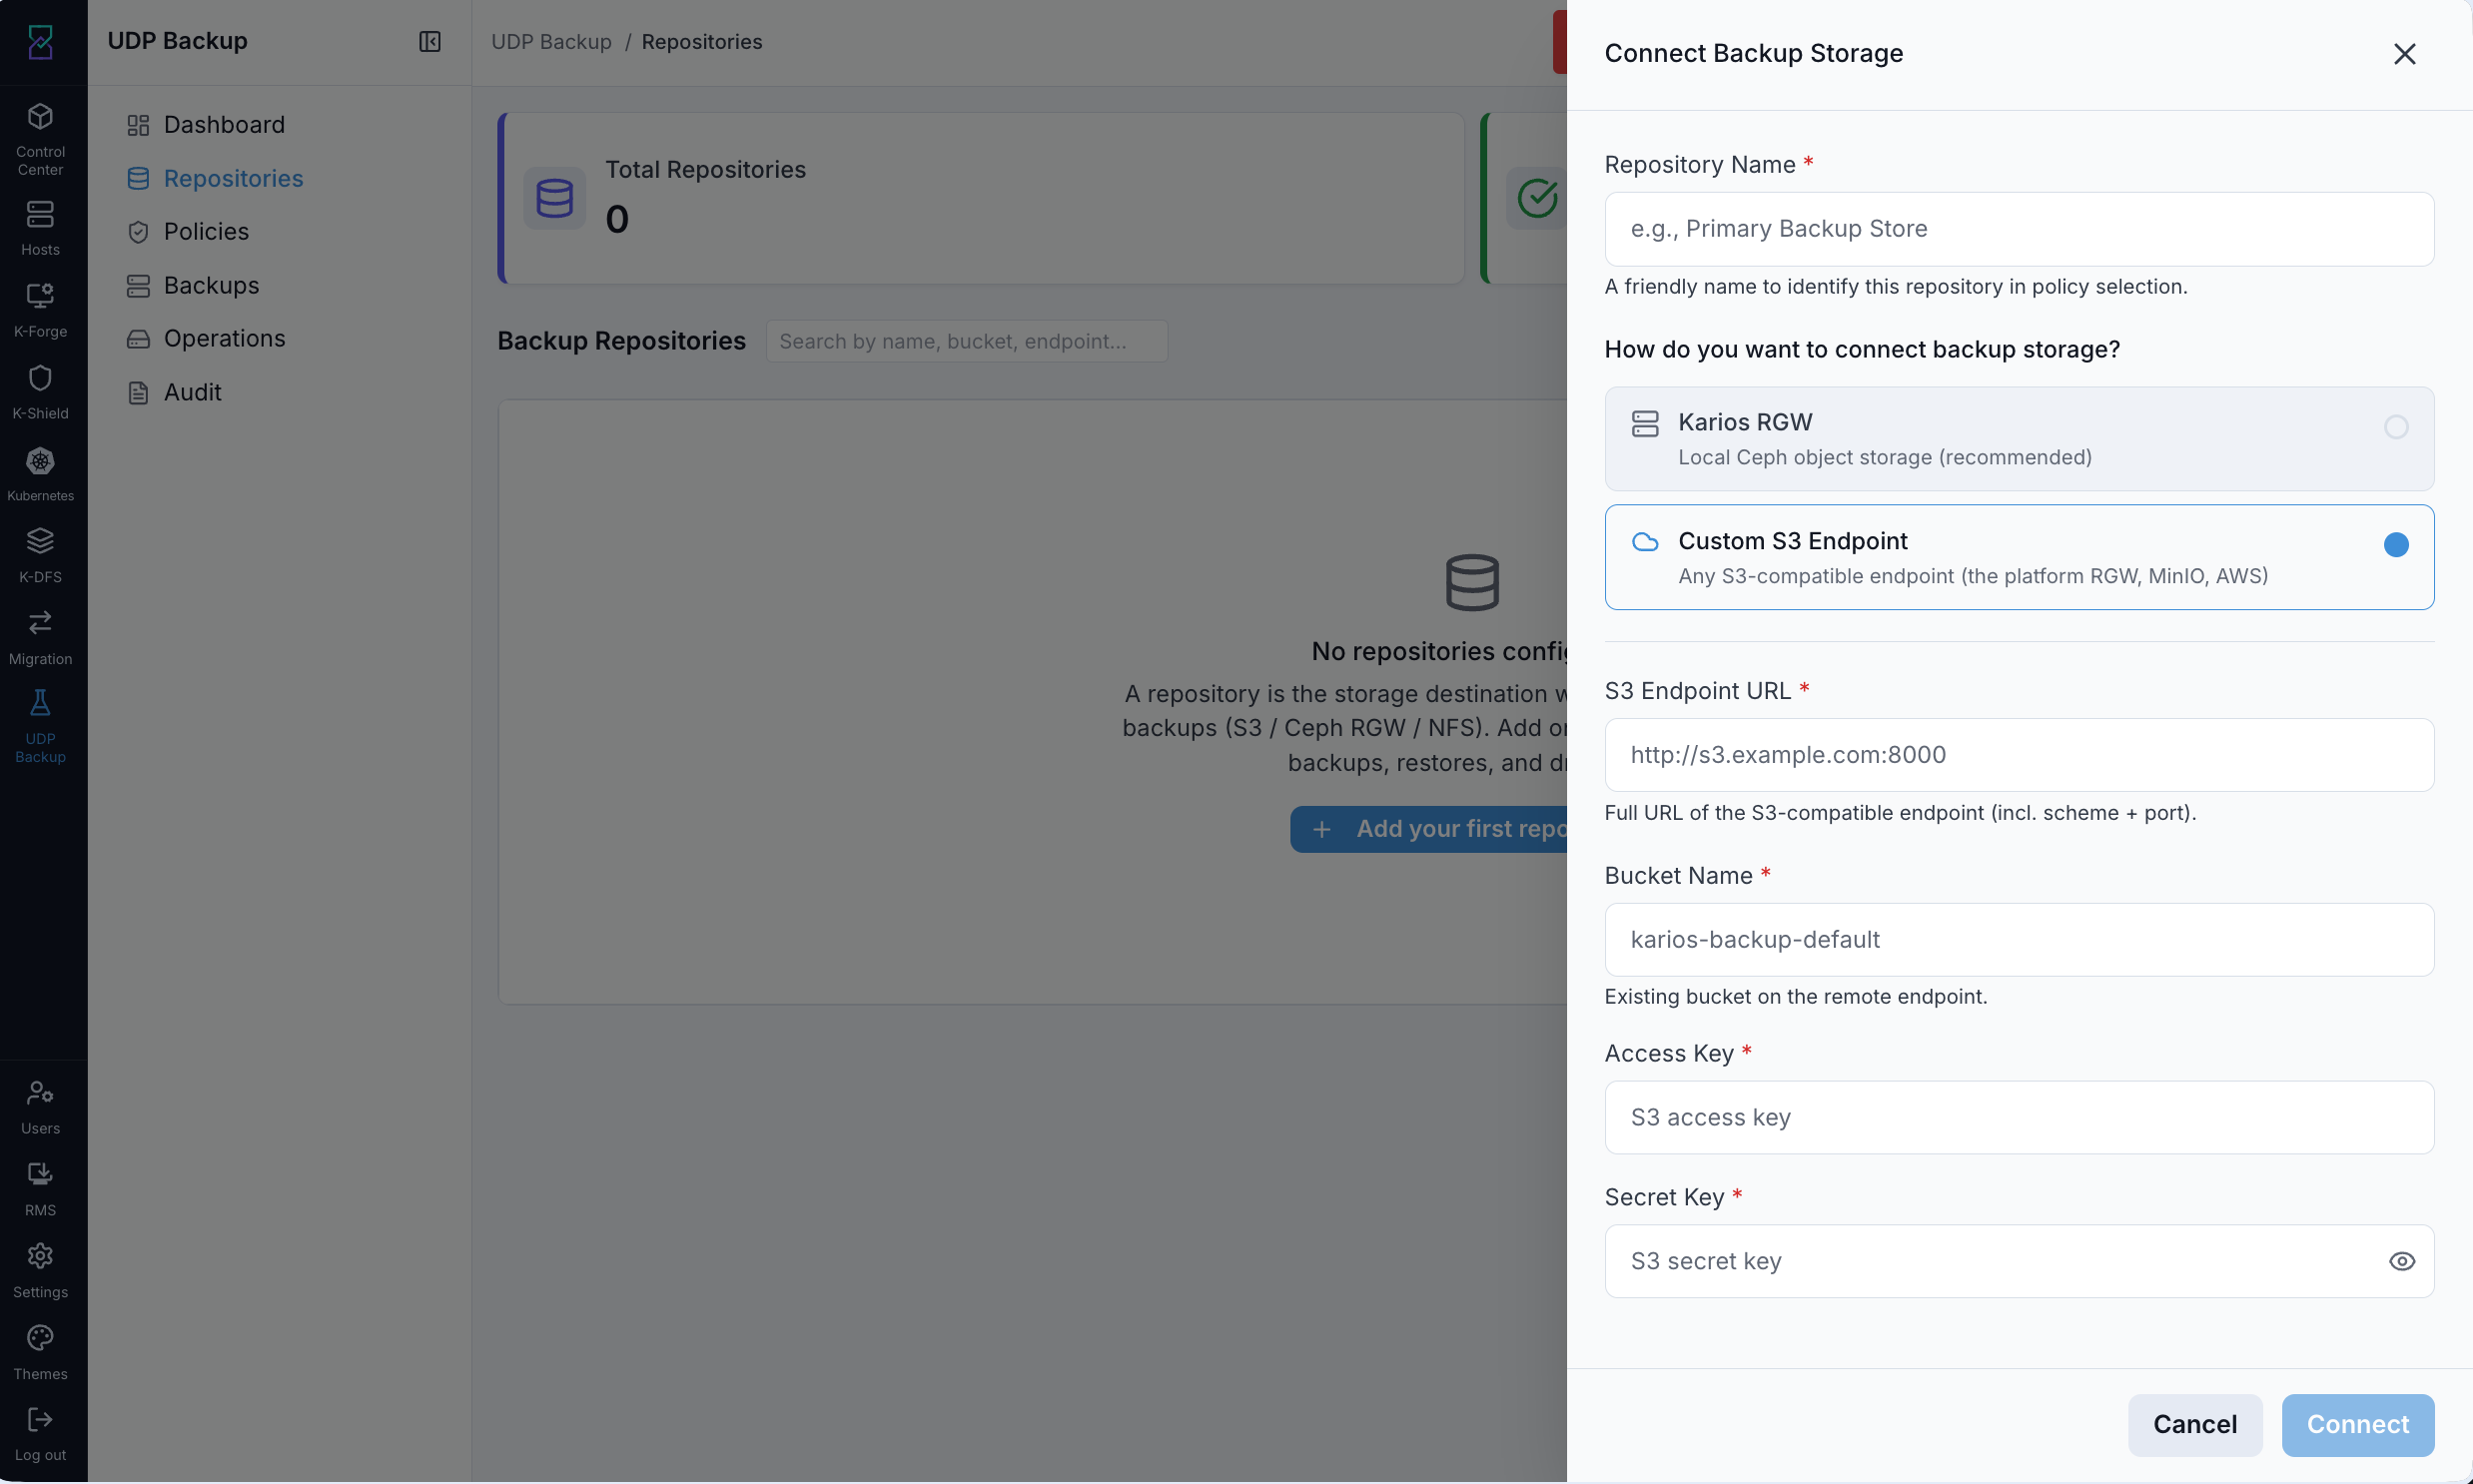
What this shows: The Connect Backup Storage dialog. Enter a Repository Name first, then choose how to connect. Selecting Custom S3 Endpoint reveals the S3-specific fields shown here. Selecting Karios RGW replaces them with an RGW user and bucket picker.
Step 2 - Fill in the Repository Details
Repository Name - a short, friendly label that appears in the Policy create form. Example:
Primary Backup Store.How do you want to connect backup storage? - choose your path:
Karios RGW - Local Ceph object storage (recommended). Best for most clusters; data stays on-cluster.
Custom S3 Endpoint - Any S3-compatible endpoint (the platform RGW, MinIO, AWS).
Fill in the fields for your chosen path:
Karios RGW fields:
Field
What to enter
RGW User
The Ceph RGW user that will own the bucket. The dropdown is populated from Ceph. If it shows “Couldn’t reach the Ceph dashboard” with a Retry button, the Ceph manager is failing over - wait a few seconds and click Retry.
Bucket
An existing bucket owned by the selected user. If no buckets appear, go to K-DFS → Object Storage → Buckets to create one first.
Custom S3 Endpoint fields:
Field
What to enter
S3 Endpoint URL
Full URL of the S3-compatible endpoint, including scheme and port (e.g.
http://s3.example.com:8000). The endpoint must already exist - UDP does not create remote buckets.Bucket Name
Name of the existing bucket at that endpoint.
Access Key
The S3 access key ID.
Secret Key
The S3 secret access key.
Step 3 - Connect the Repository
Click Connect.
What you see: Karios connects to the bucket and verifies the credentials work. If the connection succeeds, the new repository appears in the Backup Repositories list and the Total Repositories tile increments. If it fails (wrong credentials, unreachable endpoint, bucket policy mismatch), an error message explains which field to correct.
Step 4 - Check the Object Lock Verified Tile
After the repository is connected, check the Object Lock Verified tile at the top of the page:
Count matches Total Repositories - all connected buckets have S3 Object Lock confirmed. Backup snapshots cannot be overwritten or deleted until their retention window expires.
Count is lower than Total Repositories - one or more buckets do not have Object Lock verified. Backups will still run, but they will not be immutable against deletion.
Important
If immutability is a compliance requirement, resolve Object Lock on the bucket before creating any policies that use this repository.
What You Can Do From This Screen
Action |
How |
|---|---|
Add a new repository |
Click + Add Repository (top-right) |
Search repositories |
Use the search box - filters by name, bucket, or endpoint |
Delete a repository |
Click the trash icon on the row. The system pre-checks how many policies reference this repository. If any policy still points to it, the delete is refused - remove the policy first. |
Open the help panel |
Click the ? icon (top-right corner) |
Warning
The delete confirmation includes a force option that wipes the bucket prefix and drops the row. This is irreversible - every backup snapshot in that bucket prefix becomes unrestorable. Only use force when you are certain the data is no longer needed.
Expected Outcome
After connecting: the repository appears in the Backup Repositories list and Total Repositories increments
If the bucket has Object Lock enabled: Object Lock Verified tile increments to match
The repository name appears in the Repository dropdown on the Policies create form
If This Fails
Problem |
What to do |
|---|---|
“Couldn’t reach the Ceph dashboard” on the RGW User dropdown |
The Ceph manager is failing over. Wait five seconds and click Retry. If it persists, check Ceph health in the Storage section. |
Connect fails with a credentials error |
Re-enter the |
Bucket dropdown is empty (Karios RGW) |
The selected RGW user has no buckets. Go to K-DFS → Object Storage → Buckets to create one, then return here. |
Object Lock Verified count stays at 0 |
Enable S3 Object Lock on the bucket in your S3 console or Ceph RGW settings, then reconnect the repository. |
Policies
When to Use
Go to Policies when:
You want to schedule automatic backups for a set of VMs - this is step 2 after adding a repository
You want to change the schedule, retention, or VM scope of an existing policy
You want to trigger an immediate backup outside of the schedule
You want to enable or disable a schedule without deleting it
Purpose
A backup policy answers three questions: which VMs to back up (by zone, cluster, or host), when to back them up (a schedule you pick), and where to send the data (a repository you already added). When the schedule fires and a VM is in scope, Karios creates one backup job per disk automatically.
What You See When You First Arrive
When you click Policies, you see the Policies list. Three tiles at the top show Total Policies, Enabled, and Disabled counts. On a fresh environment, all three are 0 and the empty state reads “No backup policies yet”. A ? icon in the top-right corner opens a help panel with a quick reference for this page.
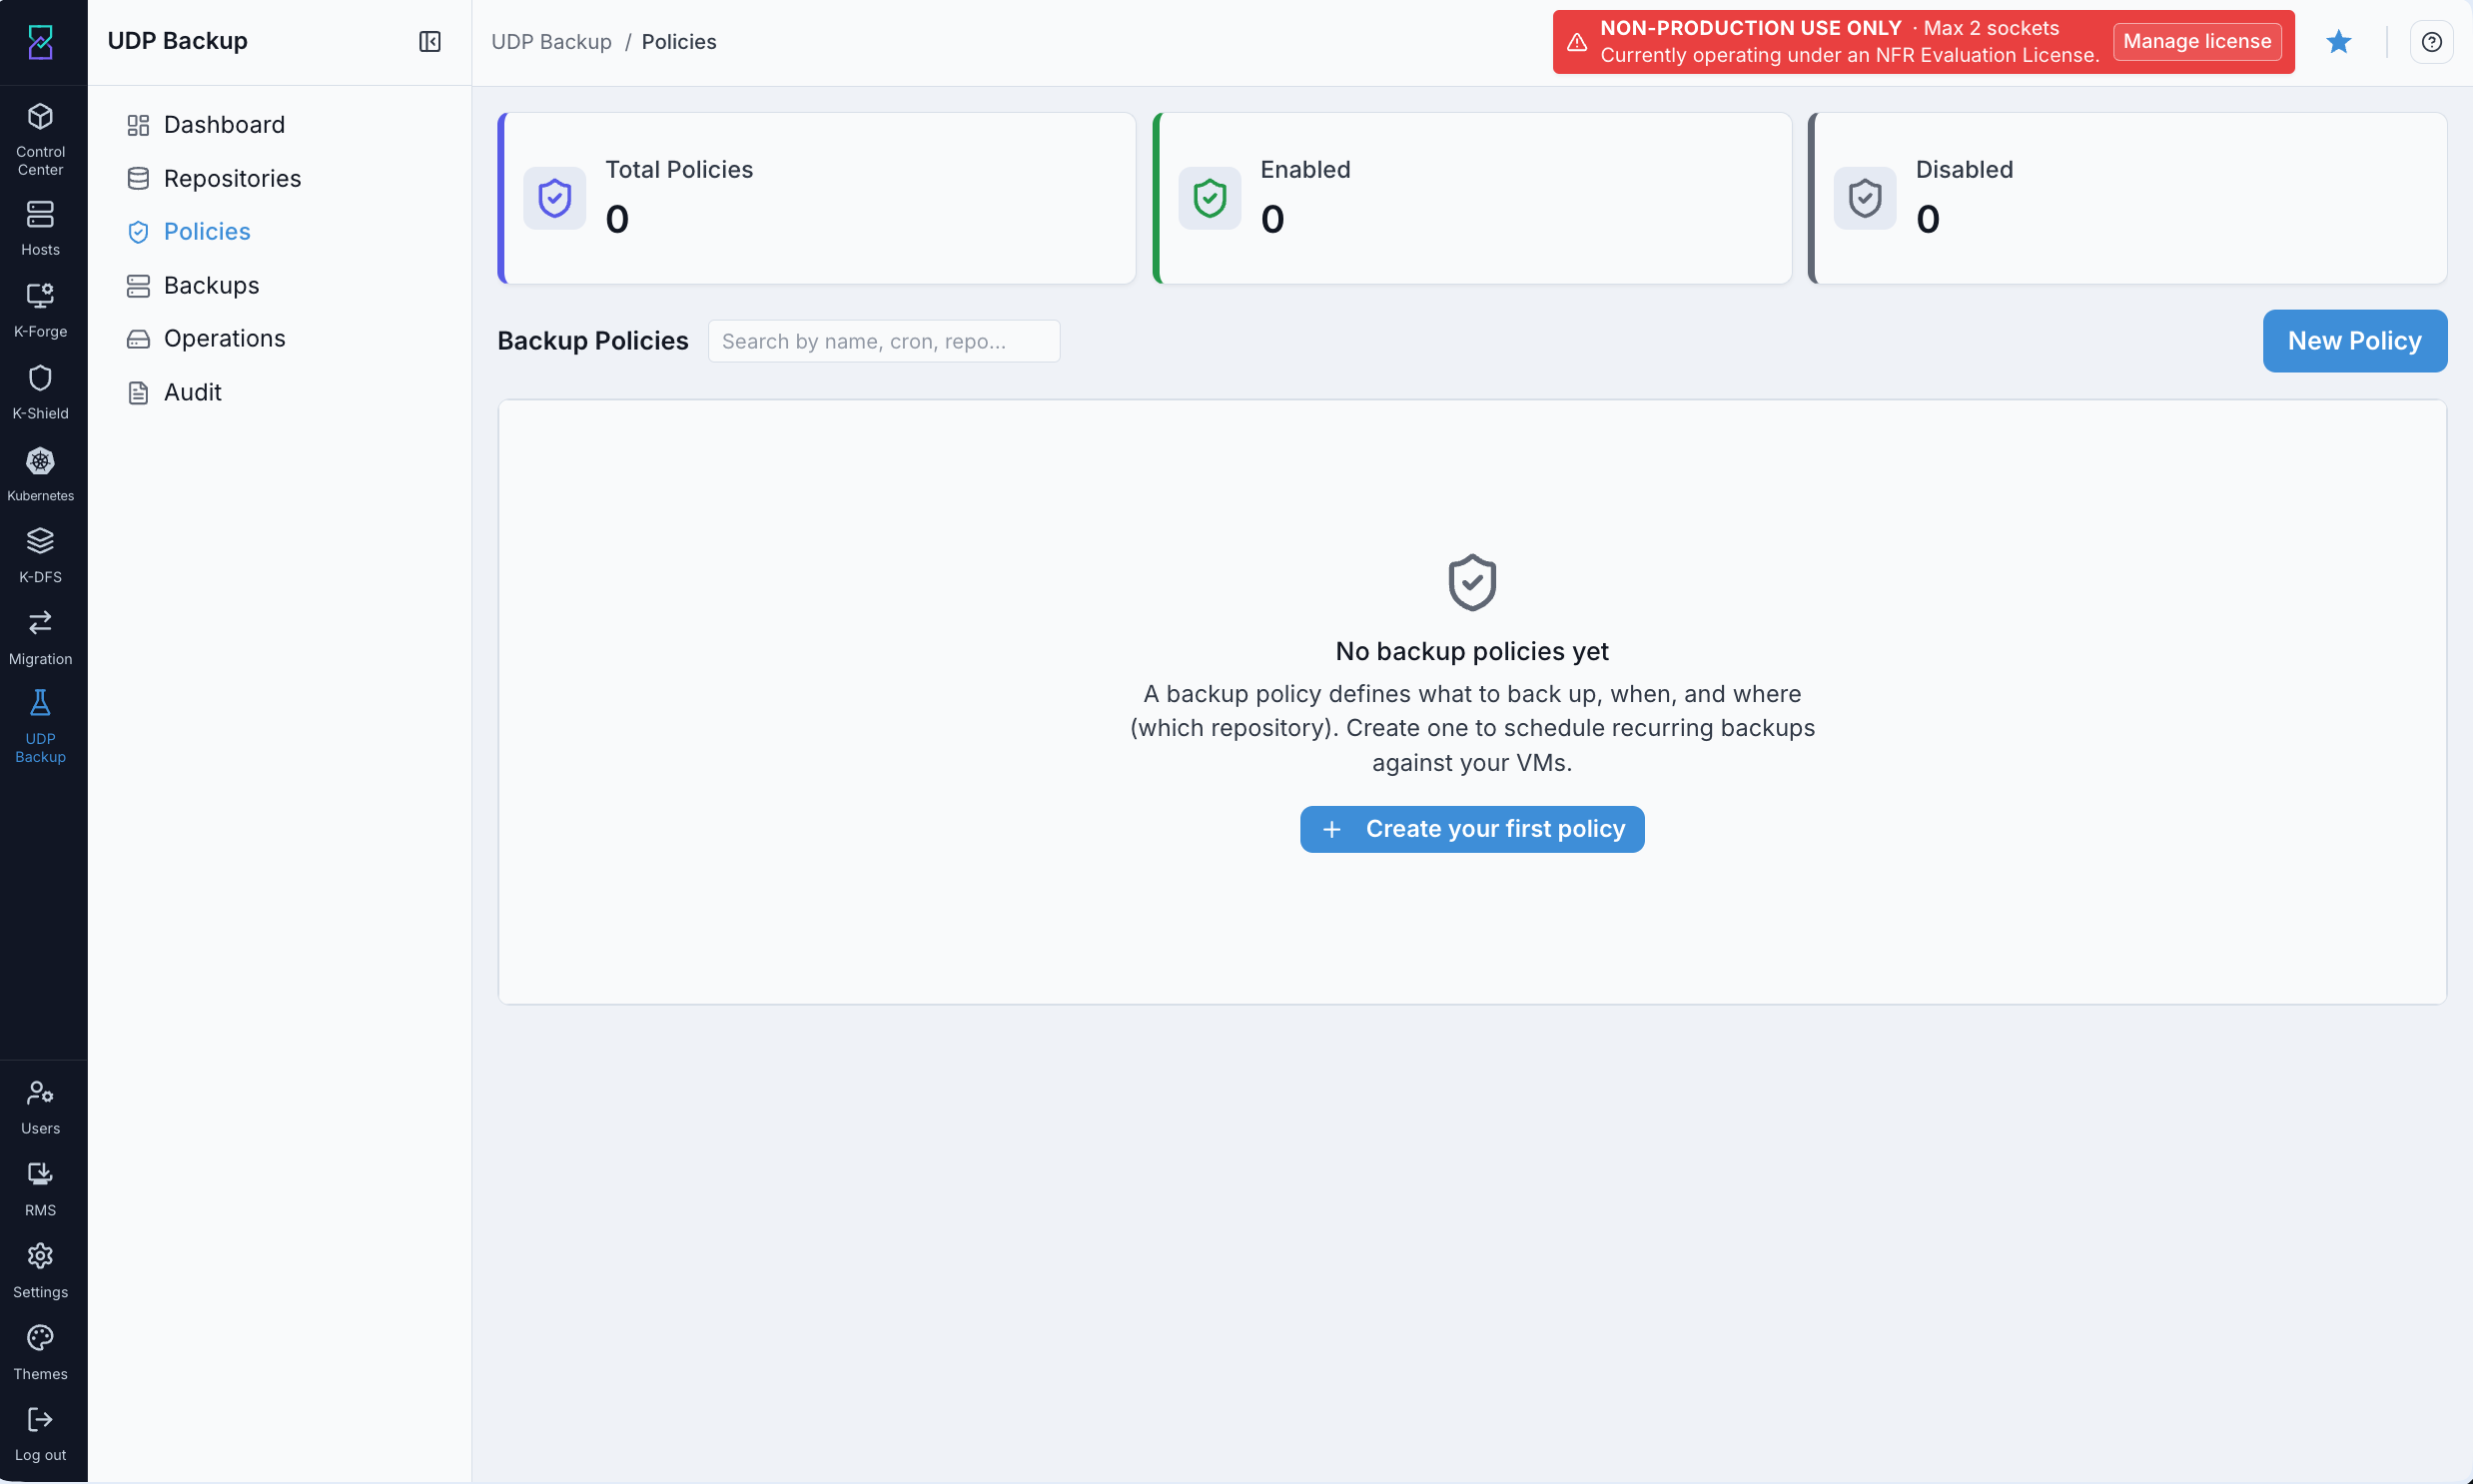
What this shows: The Policies page on a fresh installation. The Total Policies, Enabled, and Disabled tiles all read 0. The + Create your first policy button (or New Policy once rows exist) opens the Create Backup Policy form. The search box filters by name, cron, or repo.
Steps - Create a Policy
Step 1 - Open the Create Backup Policy Form
Click New Policy (top-right), or + Create your first policy if the list is empty.
What you see: The Create Backup Policy dialog opens.
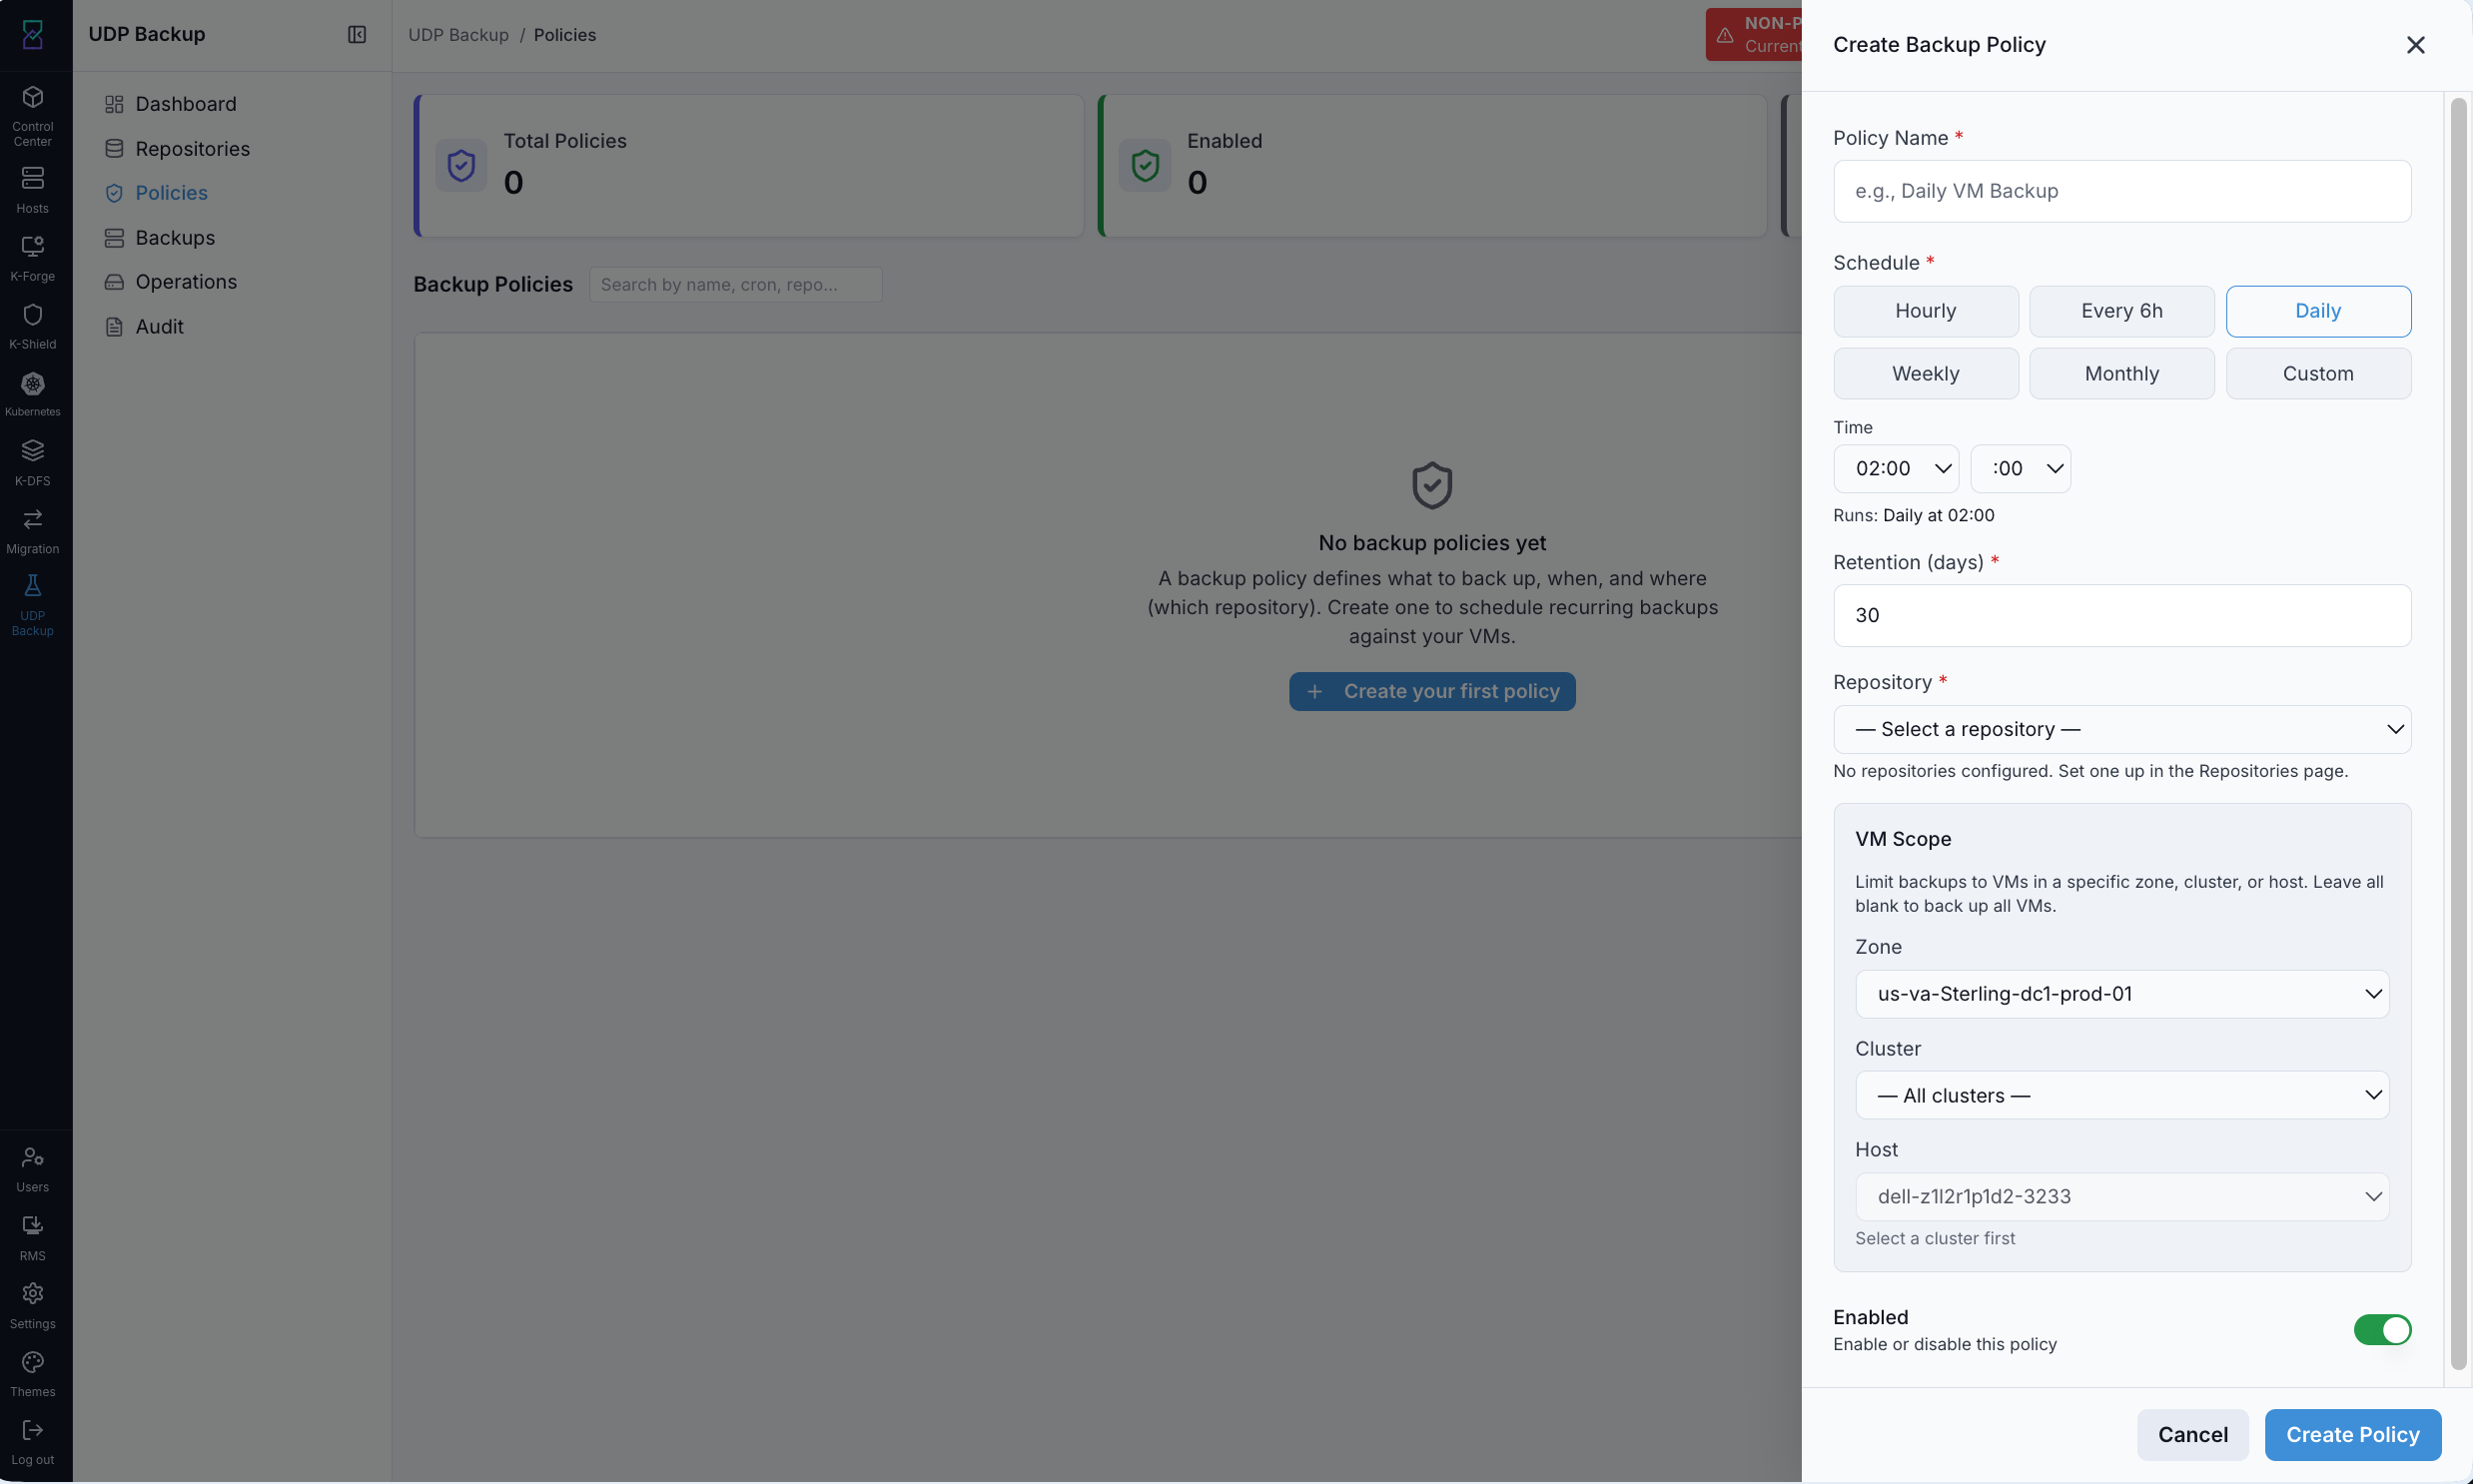
What this shows: The Create Backup Policy form. Fill in every field. The Schedule buttons let you pick a preset and set the time, or choose Custom for full control. Set Enabled on to make the schedule live immediately on save.
Step 2 - Fill in the Policy Fields
Field |
What to enter |
|---|---|
Policy Name |
Short and human-readable. Appears in Trigger Backup and Audit. Example: |
Schedule |
Click a preset: Hourly, Every 6h, Daily, Weekly, Monthly, or Custom. Then set the Time (HH:MM) when the backup should run. The form shows a plain-English summary below the time fields (e.g. “Runs: Daily at 02:00”). |
Retention (days) |
How many days backup snapshots are kept. Snapshots older than this are pruned at the next maintenance pass. Default is 30. |
Repository |
Pick from the repositories you have already added. If the dropdown shows “No repositories configured”, go to Repositories and add one first. |
VM Scope |
Limit backups to VMs in a specific Zone, Cluster, or Host. Leave all three blank to back up all VMs. Each VM can match at most one policy at a time. |
Enabled |
Toggle on to make the schedule live on save. Toggle off to stage the policy without activating it. |
Important
Schedule time is local time on the Karios server - not UTC. If a policy fires at an unexpected hour, verify the node’s clock with date on the Karios server. The scheduler only looks back one minute - if the management service was down at the scheduled time, the policy will not auto-catch-up. Use the ▶ icon on the policy row to run it immediately and recover.
Step 3 - Save the Policy
Click Create Policy.
What you see: The new policy appears in the Policies list. If Enabled was toggled on, the status dot is green and the schedule is live immediately.
Step 4 - Run a Backup Now (Optional)
To trigger an immediate backup without waiting for the schedule:
Click the ▶ (Play) icon on the policy row.
What you see: The policy fires immediately. A new run appears in Operations within seconds.
Note
If a previous run for this policy is still in flight, the action returns “already running.” No duplicate is dispatched. Wait for the in-flight run to finish first.
What You Can Do From This Screen
Action |
How |
|---|---|
Create a new policy |
Click New Policy (top-right) |
Run a policy immediately |
Click the ▶ (Play) icon on the policy row |
Enable or disable a policy |
Edit the policy and toggle the Enabled field |
Search policies |
Use the search box - filters by name, cron, or repo |
Delete a policy |
Click the trash icon. The backend refuses delete while any of this policy’s jobs are in flight. Wait for the run to finish, or stop the job from Operations. |
Open the help panel |
Click the ? icon (top-right corner) |
Expected Outcome
After saving: the policy appears in the Policies list with the correct schedule and repository
After the first schedule fires (or after Run Now): a run appears in Operations and the matching VMs appear on the Backups page
Protected VMs count on the Dashboard increases
If This Fails
Problem |
What to do |
|---|---|
Repository dropdown is empty |
No repositories are connected yet. Go to Repositories and add one first. |
Policy fires at the wrong hour |
Schedule time is local time on the Karios server. Check the node’s clock with |
Run Now returns “already running” |
A previous run for this policy is in flight. Go to Operations to see its status. |
Delete refused |
A job for this policy is still active. Wait for it to finish or stop it from the Operations page, then retry the delete. |
No VMs are being picked up by the policy |
Confirm the VM is in the Zone, Cluster, or Host selected in the policy’s VM Scope. If all three are blank, all VMs are in scope - check that at least one backup job ran in Operations. |
Backups
When to Use
Go to Backups when:
You want to see which VMs are Protected, Stale, or Unprotected / failed
You want to check when a VM was last successfully backed up
You want to restore a VM - either replacing the original or deploying a fresh copy
You want to view the full backup history for a specific VM
Purpose
The Backups page shows every VM that UDP is aware of, grouped by protection state. It is the fastest way to answer “when was this VM last backed up?” and to start a restore.
What You See When You First Arrive
When you first click Backups, the page is empty if no policies have run yet - the empty state reads “No backups yet. VMs will appear here once a backup policy runs against them.” Three tiles at the top show Protected VMs, Stale (>7d), and Unprotected / failed counts - all zero on a fresh environment. A ? icon in the top-right corner opens a help panel with a quick reference for this page.
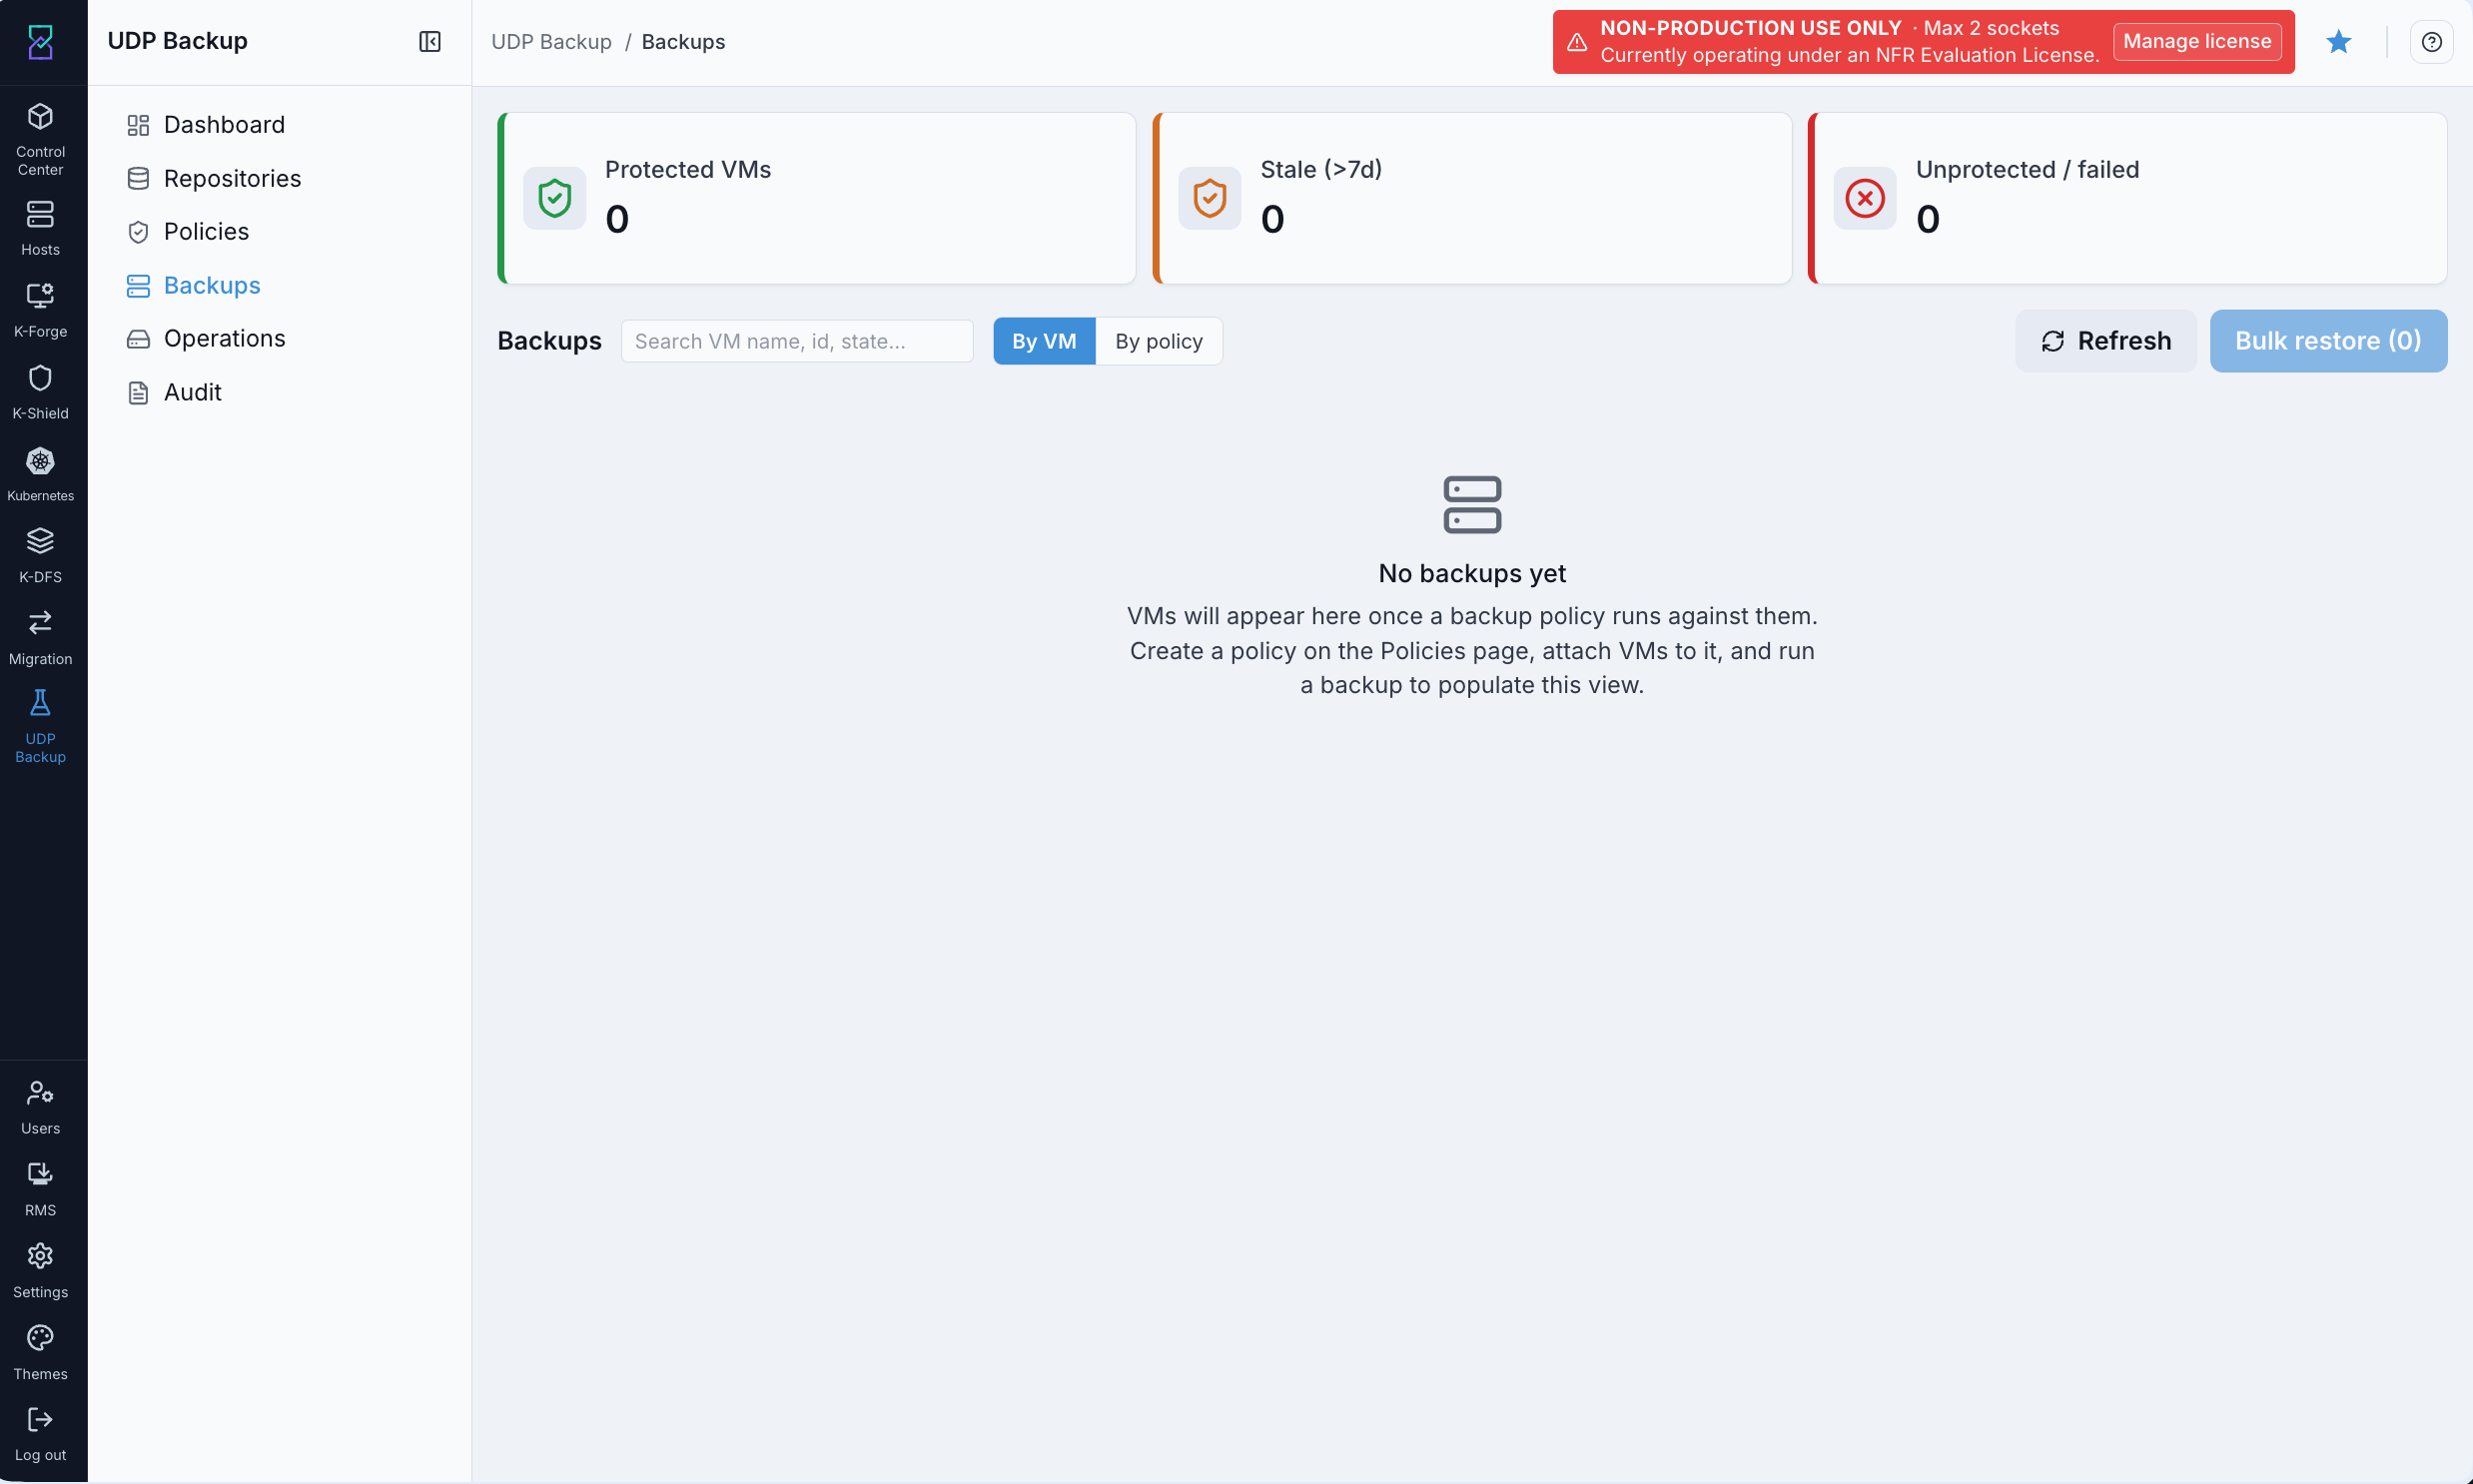
What this shows: The Backups page before any backups have run. The three tiles track protection health across all VMs. The By VM / By policy toggle (top of the list) changes how rows are grouped. Bulk restore becomes active when rows are selected.
Protection states:
State |
What it means |
|---|---|
Protected VMs |
Most recent backup completed and fits the policy’s expected frequency. |
Stale (>7d) |
Last backup is more than 7 days old. Either the policy was paused, recent runs failed, or the VM was unreachable. |
Unprotected / failed |
VM is visible to UDP but no policy matches it, or the most recent backup attempt errored out. |
Steps - View Backup Status and Restore a VM
Step 1 - Find the VM
Use the Search VM name, id, state… box or the By policy toggle to locate the VM. Click the VM row to open the Backup History Drawer.
Note
If the list is still empty, no backup has run yet. Go to Policies and click the ▶ icon on your policy row to trigger one immediately, then return here.
What you see: Every backup and restore action ever run against that VM, newest first. Click any row in the drawer to drill into the full Job Detail view - same per-disk progress and error messages as the Operations page.
Step 2 - Restore a Single VM
On the VM row (or inside the Backup History Drawer), click the Restore VM action.
What you see: The restore panel opens with two mode options.
Choose your restore mode:
Mode
When to use
Restore (identity preserved)
The source VM is stopped, then a replacement is deployed from the backup with the same name, MAC, and IP. Use this when the original is broken or compromised. If the restore itself fails, the source is started back up automatically.
New VM (fresh identity)
A new copy is deployed with a new MAC and IP. Safe to run while the source is still running. Use this for testing a backup, cloning to a dev environment, or selective recovery.
Optionally change the zone, service offering, network, or host in the override fields before confirming.
Note
The New VM Name must be lowercase letters, digits, and hyphens only; 1–63 characters; starts with a letter; cannot end with a hyphen. The form validates this for you.
Click Restore.
What you see: The restore job appears in Operations immediately. Go to Operations to monitor progress.
Alternatively - Restore Multiple VMs at Once
To restore several VMs in one action instead of repeating Step 2 for each:
Select multiple VMs using the row checkboxes.
Click Bulk restore (N).
What you see: The bulk restore modal opens. Pick a default mode (Restore vs New VM) that applies to every selected VM, with per-row overrides for name, zone, and backup version. The Submit button stays disabled until validation passes on every row.
What You Can Do From This Screen
Action |
How |
|---|---|
View a VM’s full backup history |
Click the VM row to open the Backup History Drawer |
Restore a VM (replace original) |
Click the VM row → Restore VM → select Restore (identity preserved) |
Deploy a fresh copy from backup |
Click the VM row → Restore VM → select New VM (fresh identity) |
Bulk restore multiple VMs |
Select checkboxes → click Bulk restore (N) |
Switch between By VM and By policy views |
Use the By VM / By policy toggle at the top of the list |
Search for a VM |
Use the Search VM name, id, state… box |
Refresh the list |
Click Refresh (top-right of the list) |
Open the help panel |
Click the ? icon (top-right corner) |
Expected Outcome
Protected VMs show a non-zero Protected VMs tile count and a recent last backup timestamp on each row
After triggering a restore: a restore job appears in Operations within seconds
If This Fails
Problem |
What to do |
|---|---|
VM shows in Stale (>7d) |
Check Operations for the most recent failed run against this VM. Fix the root cause and use the ▶ icon on the Policies page to re-run. |
VM shows in Unprotected / failed |
Confirm the VM is in the zone, cluster, or host that the policy’s VM Scope targets, or that a backup run has errored - open the Operations page and filter by Failed. |
Restore fails immediately (0 disks) |
The restore stopped before per-disk jobs were created - usually a missing template or insufficient zone capacity. Open the Job Detail Drawer in Operations to read the error message. |
Recent action does not appear in the drawer |
Click Refresh - the drawer may show a cached view. |
Operations
When to Use
Go to Operations when:
You want to see every backup and restore action that has run
You want to investigate why a backup failed and read the per-stage error detail
You want to trigger an immediate backup for a specific VM or policy
You want to retry a failed job
You want to export backup activity to CSV or JSON for reporting
Purpose
Operations is the full activity stream for UDP Backup. Every scheduled and manual backup and restore action appears here, newest first. Multi-disk VMs collapse into a single row - click the row to expand it and see per-disk detail. Click any row to open the Job Detail Drawer - which shows the per-stage progress (Queued → Streaming → Done), per-disk progress, and error details.
What You See When You First Arrive
When you first click Operations, the list is empty (“No activity yet for the current filter”). Three tiles at the top show Active Jobs, Completed, and Failed counts - all zero on a fresh environment. A ? icon in the top-right corner opens a help panel with a quick reference for this page.
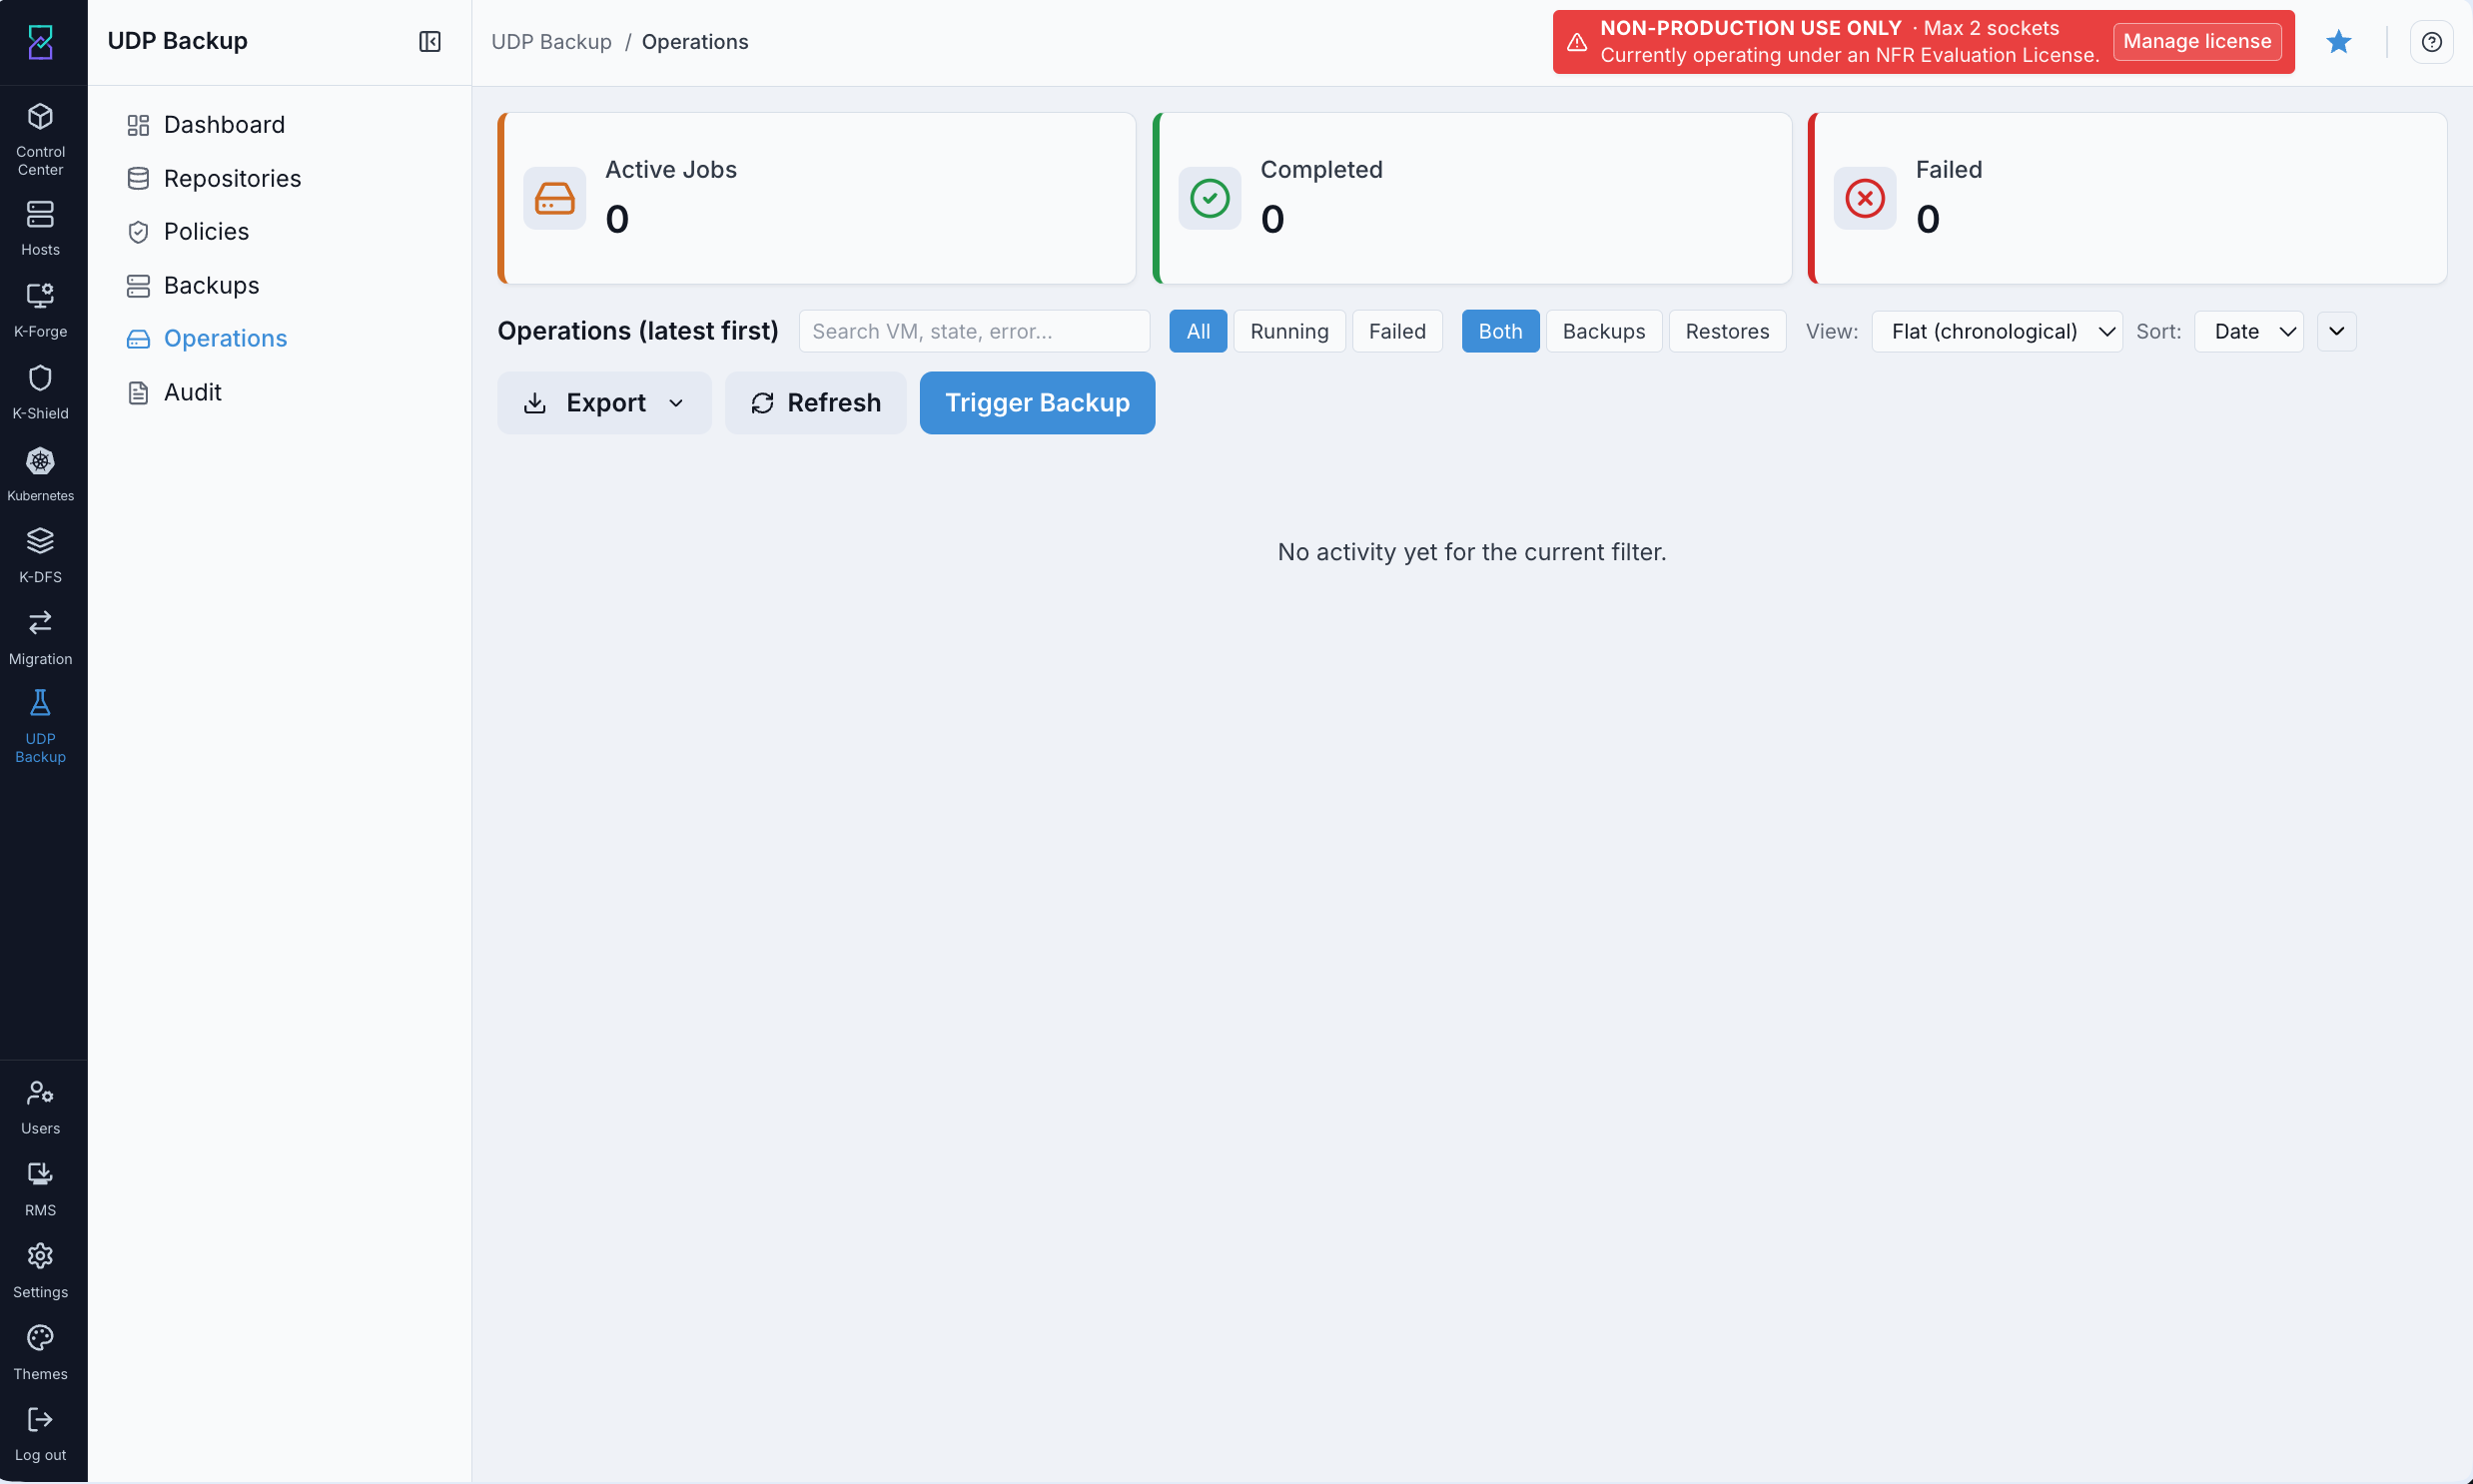
What this shows: The Operations page. The three summary tiles always reflect the unfiltered total. State chips (All / Running / Failed) and action chips (Both / Backups / Restores) narrow the list independently. The View dropdown toggles between Flat (chronological) and Grouped by VM. Trigger Backup fires an immediate run.
Steps - Trigger a Backup and Investigate a Failure
Step 1 - Trigger an Immediate Backup
Click Trigger Backup (top-right).
What you see: A small drawer opens with a Policy picker and an optional VM picker.
Select a Policy from the dropdown.
Note
Only enabled policies are selectable - disabled policies are listed but greyed out. Enable the policy on the Policies page if it does not appear as selectable.
Optionally specify Specific VMs - leave blank to back up every VM the policy’s VM Scope matches. If you specify VMs, only those are dispatched.
Click Trigger.
What you see: A new run row appears in the list within seconds, starting in Running state.
Step 2 - Investigate a Failed Job
Click the Failed chip to filter the list, then click the failed row to open the Job Detail Drawer.
What you see: A step-by-step progress indicator shows which backup stage stopped (e.g. Queued, Streaming to S3, Done). Below it: an events log, the repository name, source backup reference, and the full error message.
Read the error message to identify the root cause.
Click Retry (inside the Job Detail Drawer) to re-run the job from scratch.
Warning
Retry re-runs the job from the beginning - it does not pick up where the previous attempt left off. For restore failures, fix the root cause (delete a stale template, free up zone capacity) before retrying.
Note
Rows whose error message starts with
recovered at startup:are shown as Recovering - the recovery loop already re-queued them. Do not retry manually; wait for the next attempt to complete.
Step 3 - Export Activity (Optional)
Click the Export dropdown to download the activity feed:
Format - CSV or JSON
Date range - From / To fields accept
YYYY-MM-DDor full date-time values. Bounds are inclusive.
What You Can Do From This Screen
Action |
How |
|---|---|
Trigger an immediate backup |
Click Trigger Backup → select policy → optionally select VMs → Trigger |
Investigate a failed job |
Click the Failed chip → click the failed row → read the Job Detail Drawer |
Retry a failed backup |
Open the Job Detail Drawer → click Retry |
Filter by state |
Use the All / Running / Failed chips |
Filter by action type |
Use the Both / Backups / Restores chips |
Search |
Use the Search VM, state, error… box - free-text across VM name, state, and error message |
Switch view mode |
Use the View dropdown - Flat (chronological) or Grouped by VM |
Sort |
Use the Sort dropdown with the direction arrow |
Refresh the list |
Click Refresh |
Export activity |
Click Export → choose format → set optional date range |
Open the help panel |
Click the ? icon (top-right corner) |
Expected Outcome
After triggering: a new run row appears within seconds in Running state
After completion: the row state badge updates to Completed automatically (the drawer polls every 5 seconds)
Failed rows show a readable error message in the Job Detail Drawer
If This Fails
Problem |
What to do |
|---|---|
Policy not selectable in Trigger Backup |
The policy is disabled. Go to Policies and enable it, or use the ▶ icon on the Policies page directly. |
Job stuck in Running state |
Check Ceph and network health. If the job has not progressed for more than 30 minutes, retry after confirming the underlying issue is resolved. |
Restore row shows “0 disks” |
The restore stopped before per-disk jobs were created. Open the Job Detail Drawer and read the error message - it will name the stage that stopped. |
Row marked “Recovering” (not Failed) |
The recovery loop already re-queued this job. Do not retry - wait for the next attempt to complete. |
Dashboard
When to Use
Go to the Dashboard when:
You want a quick health check - “is everything backed up right now?”
You want to see counts for protected VMs, total data stored, and recent run results at a glance
You want to check whether any operations are currently in flight
You want to review recent backup and restore activity without clicking through each page
Purpose
The Dashboard rolls up the state of every VM under protection, every recent backup and restore, and the health of your repositories into one page. It does not change any state on its own - all actions (run now, restore, delete) live on their respective pages.
What You See When You First Arrive
When you click UDP Backup in the sidebar, you land on the Dashboard. On a fresh installation every tile shows 0 or 0 B and the sections below are empty. This is normal - numbers populate after repositories and policies are configured and the first backup runs.
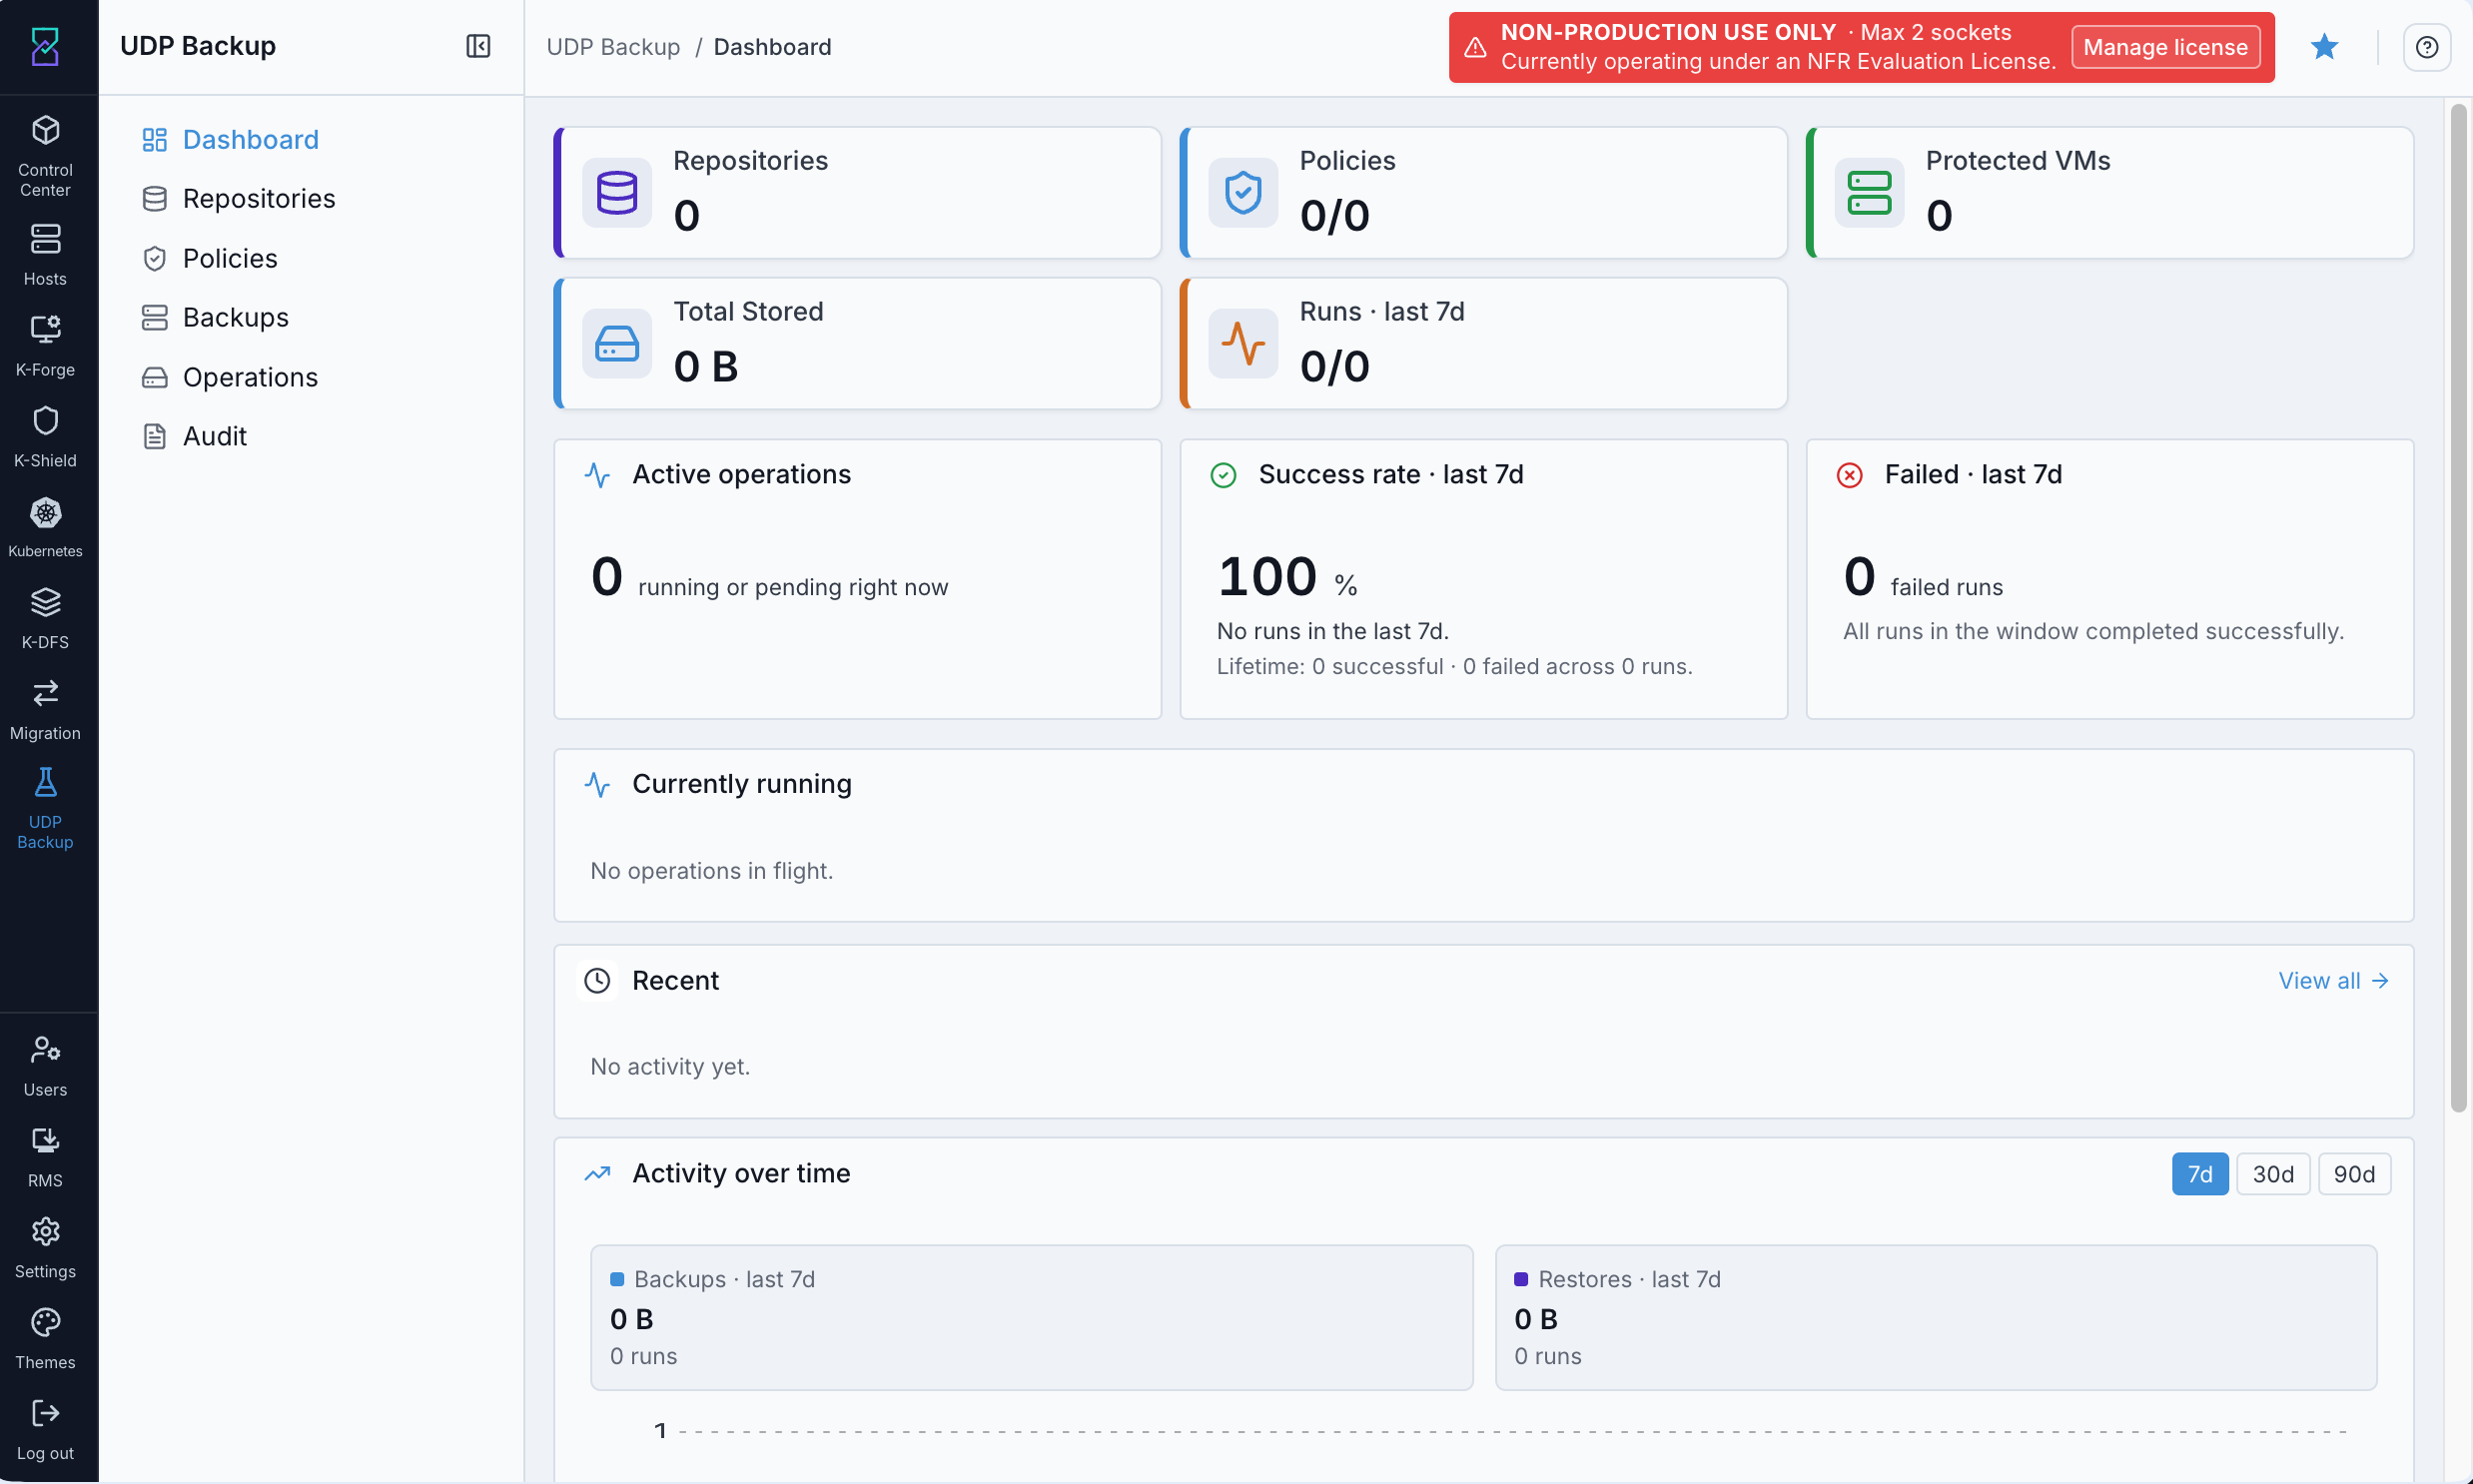
What this shows: The UDP Backup Dashboard. An attention banner appears at the top when something needs a look (for example a single-node cluster or an auto-disabled policy). The top row of tiles shows current counts. The metrics row below shows operational health for the last 7 days. The Currently running, Recent, and Activity over time sections update as jobs run.
Steps - Read the Dashboard
Step 1 - Read the Summary Tiles
The six tiles across the top show the current state at a glance:
Tile |
What it means |
|---|---|
Repositories |
Count of connected backup repositories (S3 / Ceph RGW). |
Policies |
Count of backup policies that exist (enabled and disabled combined). |
Protected VMs |
VMs with at least one recent successful backup that fits the policy schedule. |
Total Stored |
Combined size of all backup data written to repositories. |
Runs - last 7d |
Successful runs / total runs in the last 7 days (e.g. |
Capacity Guard |
Reads |
Step 2 - Check the Metrics Row
Below the tiles, three metrics summarise operational health for the last 7 days:
Metric |
What it means |
|---|---|
Active operations |
Jobs currently running or pending right now. |
Success rate - last 7d |
Percentage of backup runs that completed without error in the last 7 days. |
Failed - last 7d |
Count of runs that ended in failure in the last 7 days. Click to jump to Operations filtered by Failed. |
Step 3 - Review the Activity Sections
Three sections below the metrics give a live view of what is happening:
Section |
What it shows |
|---|---|
Currently running |
Jobs that are active right now. Empty when nothing is in flight. |
Recent |
The latest completed backup and restore actions. Click View all → to open the full Operations list. |
Activity over time |
A bar chart of backup and restore volume. Use the 7d / 30d / 90d toggle (top-right of the chart) to change the window. |
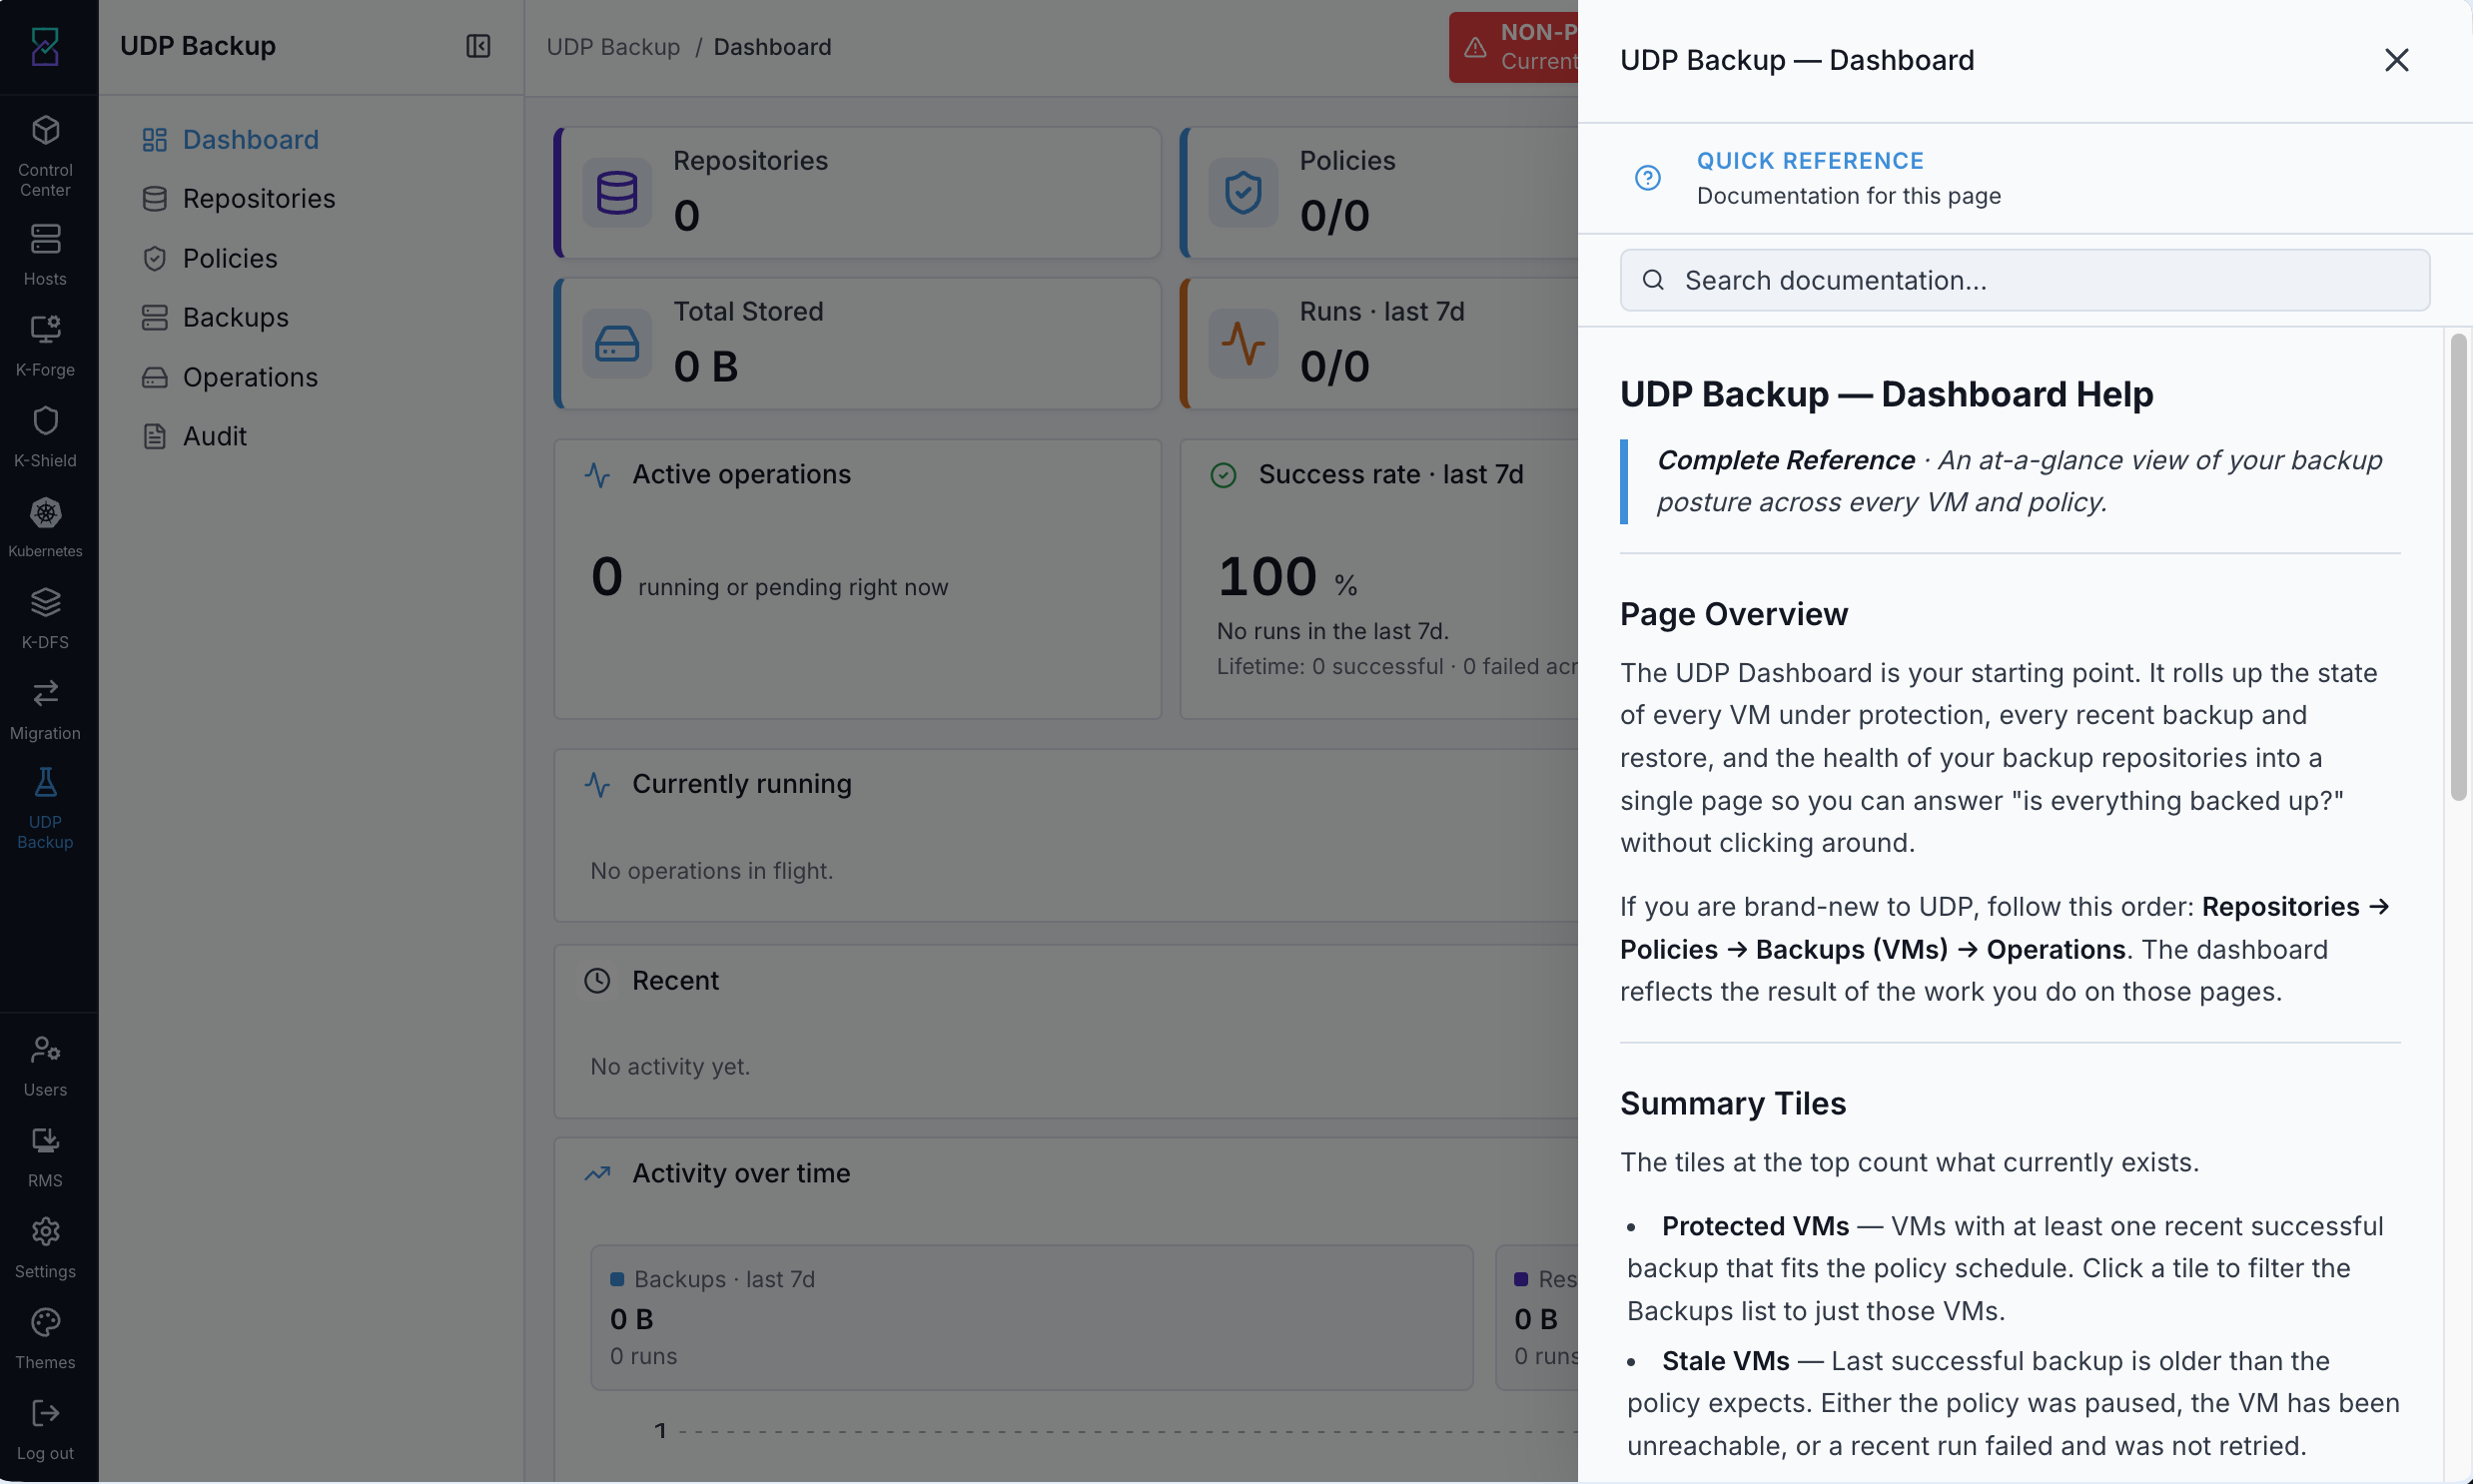
What this shows: The Dashboard help panel. Open it by clicking the ? icon (top-right of the page). It explains each tile and the recommended first-time setup order.
What You Can Do From This Screen
Action |
How |
|---|---|
Open the full operations list |
Click View all → in the Recent section |
Open the help panel |
Click the ? icon (top-right corner) |
Change the Activity over time window |
Click 7d, 30d, or 90d in the chart header |
Expected Outcome
After at least one backup has completed:
Protected VMs count ≥ 1
Runs - last 7d shows at least
1/1The Recent section shows a completed backup row
If This Fails
Problem |
What to do |
|---|---|
All tiles show 0 after setup |
Go to Policies, confirm at least one policy is Enabled, then click the ▶ icon to run it immediately. Refresh the Dashboard after the job completes. |
Runs - last 7d shows 0/0 |
No backup runs have been triggered yet. Create a policy and use Trigger Backup from the Operations page. |
Active operations stuck at a non-zero count |
Go to Operations to see which jobs are in flight and check for errors. |
Audit
When to Use
Go to Audit when:
You need to see who created, modified, or deleted a policy or repository
You want to confirm that a configuration change actually committed
You are reviewing an incident and need to know who triggered a specific backup or restore and from which IP
You need an activity log for compliance purposes
Purpose
The Audit page is an immutable, read-only log of every configuration and data action in UDP Backup. Every policy create/update/delete, every repository registration, every backup trigger, and every restore trigger writes a row here. Rows cannot be edited or deleted from the UI.
What You See When You First Arrive
When you click Audit, you see the Recent Audit Events list. Three tiles at the top show Total Events, Distinct Actors, and Filtered counts. On a fresh environment, all three are 0 and the empty state reads “No audit events yet.” A ? icon in the top-right corner opens a help panel with a quick reference for this page.
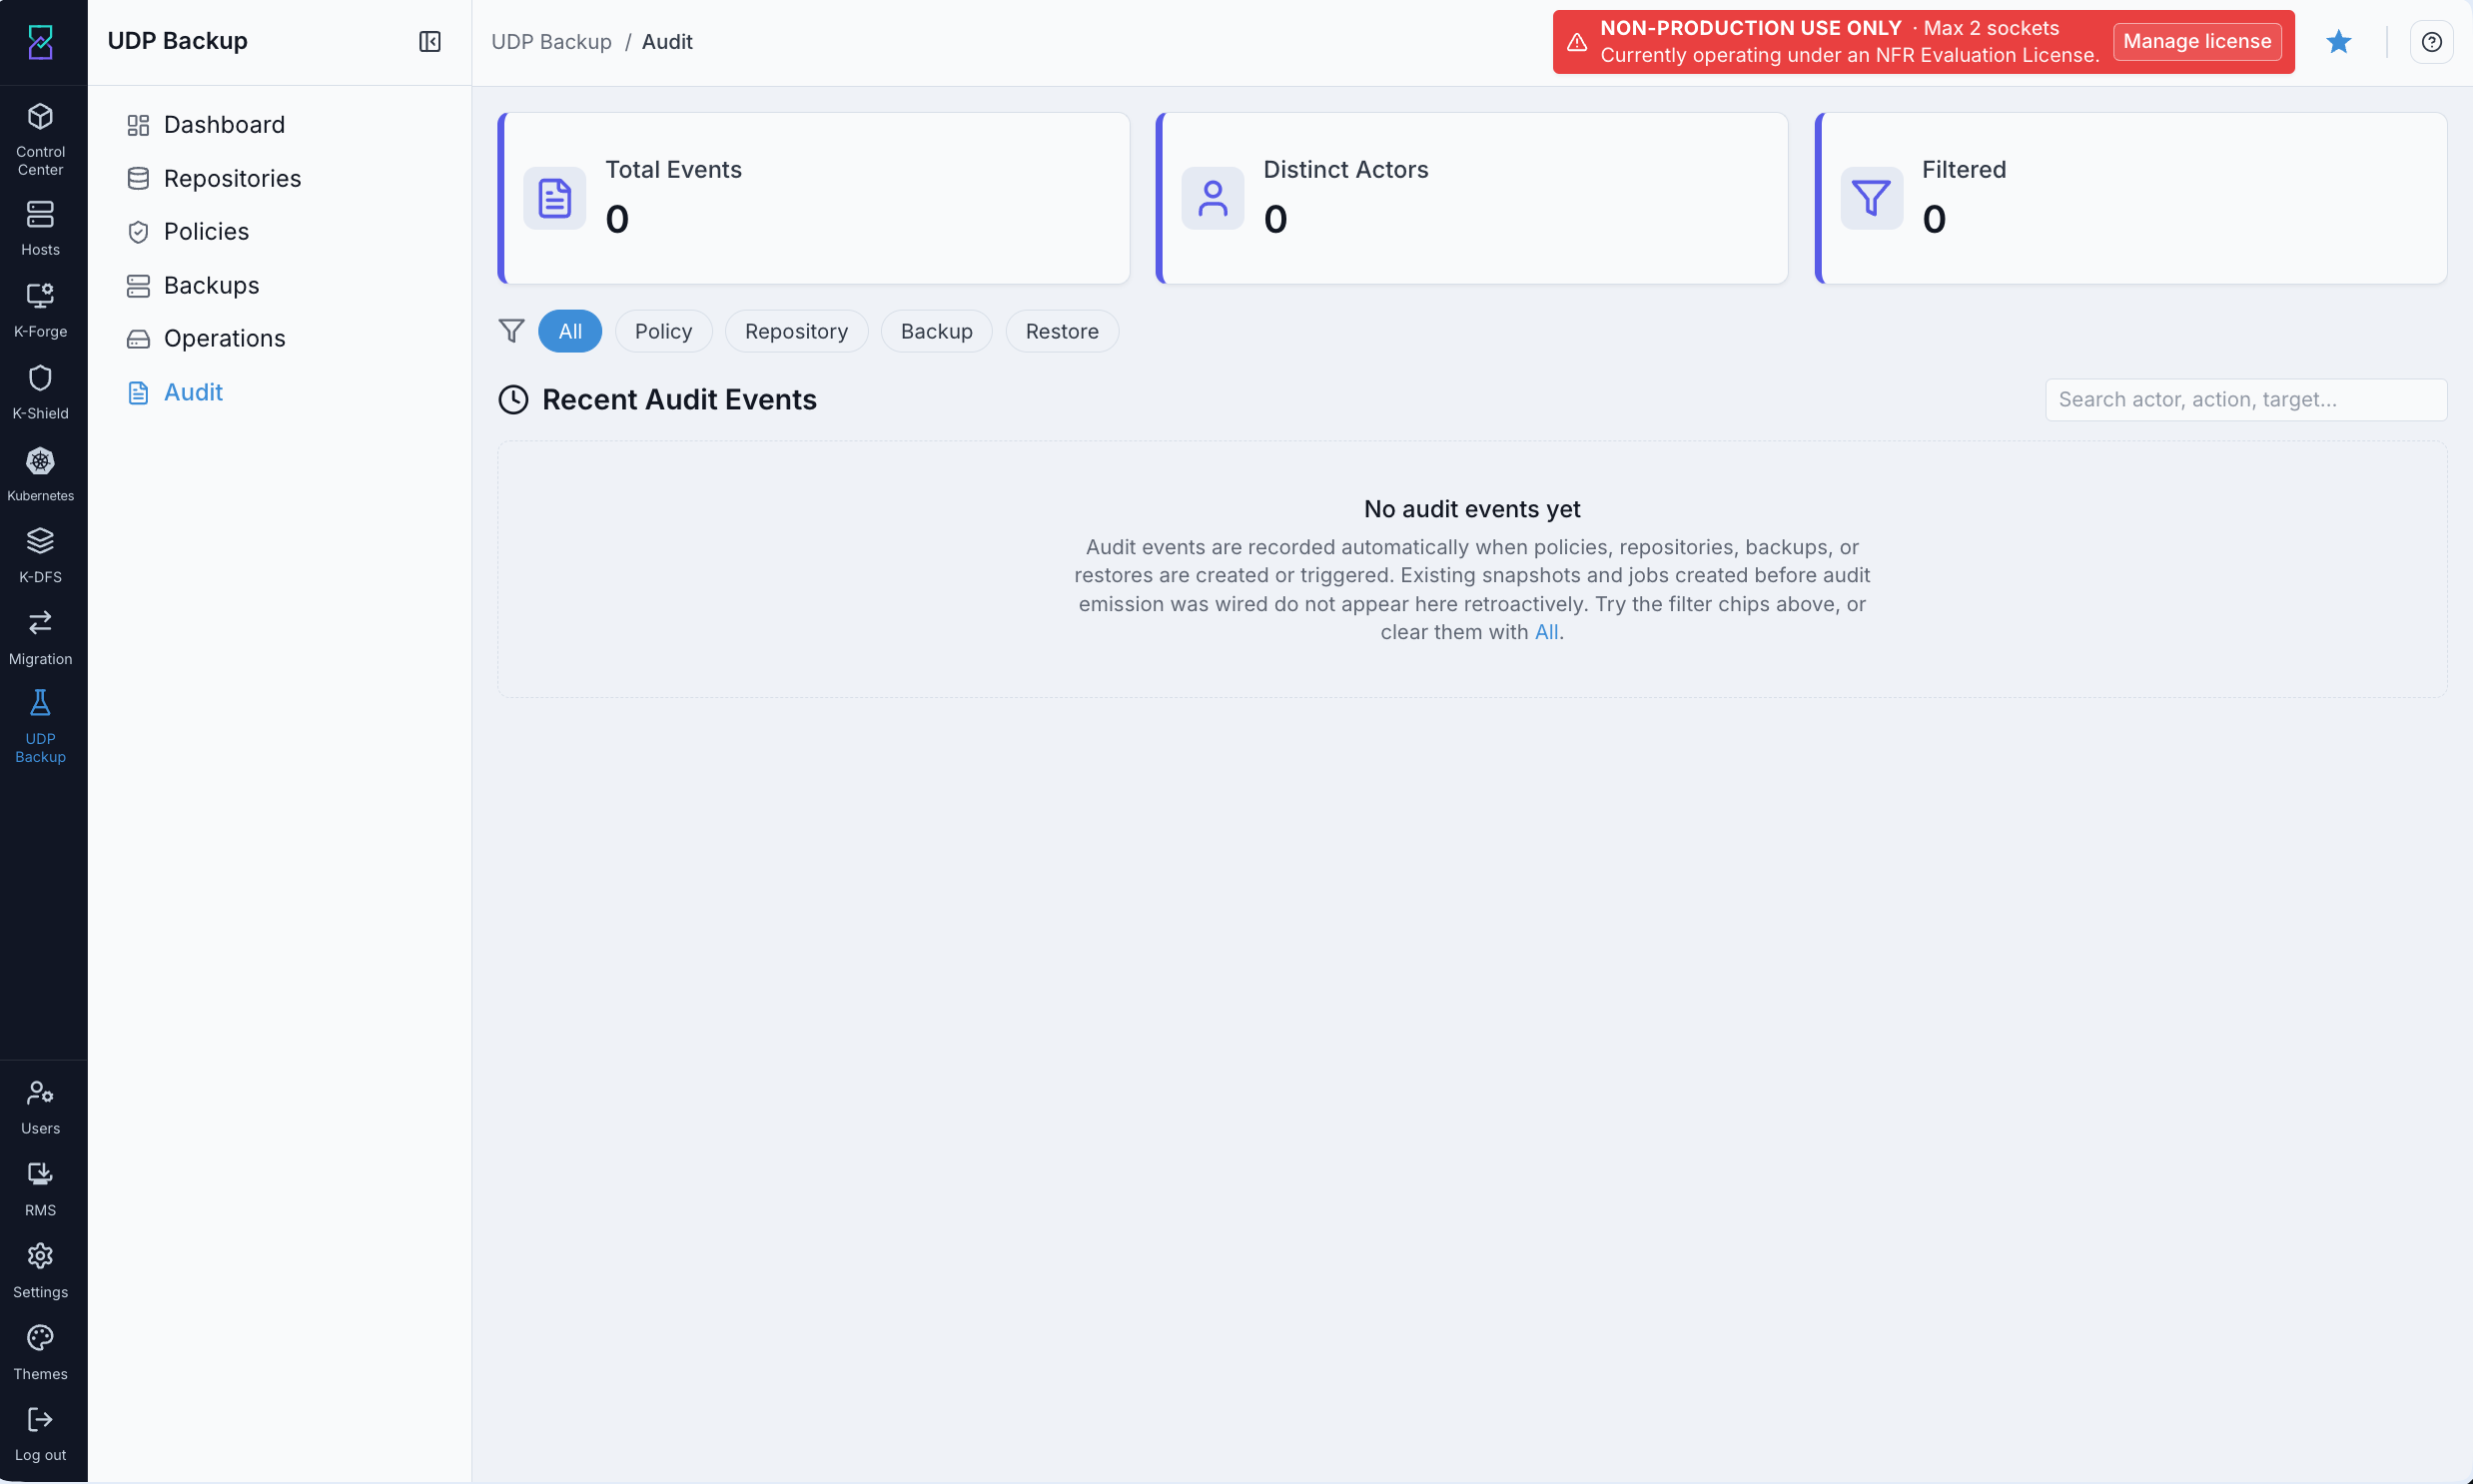
What this shows: The Audit page. The Total Events, Distinct Actors, and Filtered tiles reflect the current view. Filter chips along the top (All / Policy / Repository / Backup / Restore) scope the list by action type. The Search actor, action, target… box searches across all fields.
Steps - Search and Review the Audit Log
Step 1 - Filter by Action Type
Click a filter chip to scope the list:
Chip |
What it shows |
|---|---|
All |
Every audit event |
Policy |
Policy create / update / delete / enable / disable |
Repository |
Repository register / verify / delete |
Backup |
Backup trigger / complete / fail |
Restore |
Restore trigger / complete / fail |
Step 2 - Search for a Specific Actor or Target
Use the Search actor, action, target… box to search across actor, action, target type/id, and resolved target name. Examples:
admin- all actions by the admin userpolicy.create- all policy create eventsA VM id or name - all events touching that VM
Step 3 - Read an Audit Row
Each row contains:
Column |
What it shows |
|---|---|
Time |
When the action happened (local time on the Karios server) |
Actor |
The user who performed the action, or |
Action |
What was done (e.g. |
Target |
What was affected - resolved to a friendly name (policy name, repository name) where possible |
Source IP |
Where the request originated |
What You Can Do From This Screen
Action |
How |
|---|---|
Filter by action type |
Click the chips: All / Policy / Repository / Backup / Restore |
Search by actor, action, or target |
Use the Search actor, action, target… box |
Confirm a configuration change committed |
Search by policy or repository name - a create/update row confirms the action landed |
Open the help panel |
Click the ? icon (top-right corner) |
Expected Outcome
After creating a policy: refresh the Audit page and search the policy name - a
policy.createrow appearsAfter triggering a backup: a
backup.triggerrow appears within seconds
If This Fails
Problem |
What to do |
|---|---|
An expected event is not in the log |
Actions performed before audit logging was enabled will not appear retroactively. For full history, use the Operations Export with a date range. |
The list is empty after setup |
Confirm you have not applied a filter chip that excludes the event type. Click All to reset. |
Times look wrong |
All times are local time on the Karios server. Run |
Troubleshooting
Symptom |
Resolution |
|---|---|
Dashboard tiles show 0 after full setup |
Confirm at least one policy is Enabled and has run. Use the ▶ icon on the Policies page to run immediately, then refresh the Dashboard. |
“Couldn’t reach the Ceph dashboard” in Repositories |
Ceph manager is failing over. Wait five seconds and click Retry. If it persists, check Ceph health in the Storage section. |
Policy fires at the wrong time |
Schedule time is local time on the Karios server, not UTC. Verify with |
Backup job stuck in Running |
Check Ceph cluster health and network connectivity to the repository endpoint. Retry after fixing the underlying issue. |
Restore fails (0 disks) |
The restore stopped before per-disk jobs were created. Open the Job Detail Drawer in Operations - the error message names the stage and reason. |
Delete repository refused |
A policy still references this repository. Remove or update the policy first, then retry the delete. |
Delete policy refused |
A job for this policy is still active. Wait for it to finish or stop it from the Operations page, then retry. |
Audit log missing old events |
Audit logging was added after the initial UDP release. Actions from before it was enabled are not retroactively available. |