BMO - Bare-Metal Onboarding
Note
BMO (Bare Metal Orchestration) takes a physical server with a reachable BMC
and turns it into a working Karios node, without a console cable or a manual
operating-system install. You run the whole flow from one screen.
Where This Fits in Karios
You give K-Forge a server’s BMC - its out-of-band management address and
credentials. K-Forge then registers the host, reveals its hardware by booting a
lightweight discovery image over that BMC, and configures it: installs Karios,
wires the networks, and joins it to the cluster as compute and storage.
The module is K-Forge in the left navigation; the screen it opens is titled
Karios Forge.
See also
Decommission - the reverse of this flow: removing a node and returning it to
DiscoveredInfrastructure - zones, pods, clusters, hosts
Prerequisites
The target server is powered on, and its BMC is reachable from the Karios management node over
IPMIport623.The BMC can also reach the management node in the other direction. Reveal and configure both report progress by calling back to it, so a one-way path is not enough - a host whose BMC cannot call back stalls in
Discovered.You have the BMC address, username, and password.
Your account can view and manage K-Forge nodes. Confirm this with your administrator if you are unsure.
The Lifecycle
Add Host ──▶ Discovered ──▶ (automatic) Reveal ──▶ Ready ──▶ Configure ──▶ Configured
    │                                                             │
    └── BMC address + credentials                                 └── Karios installed, cluster-joined
Every stage is visible on the dashboard, both in the state cards and in each
host’s Current State. Reveal and configure both report a live percentage
while they run.
The K-Forge Dashboard
When to Use:
First, and as the screen you return to throughout.
Purpose:
See every host K-Forge knows about and where each one is in the flow.
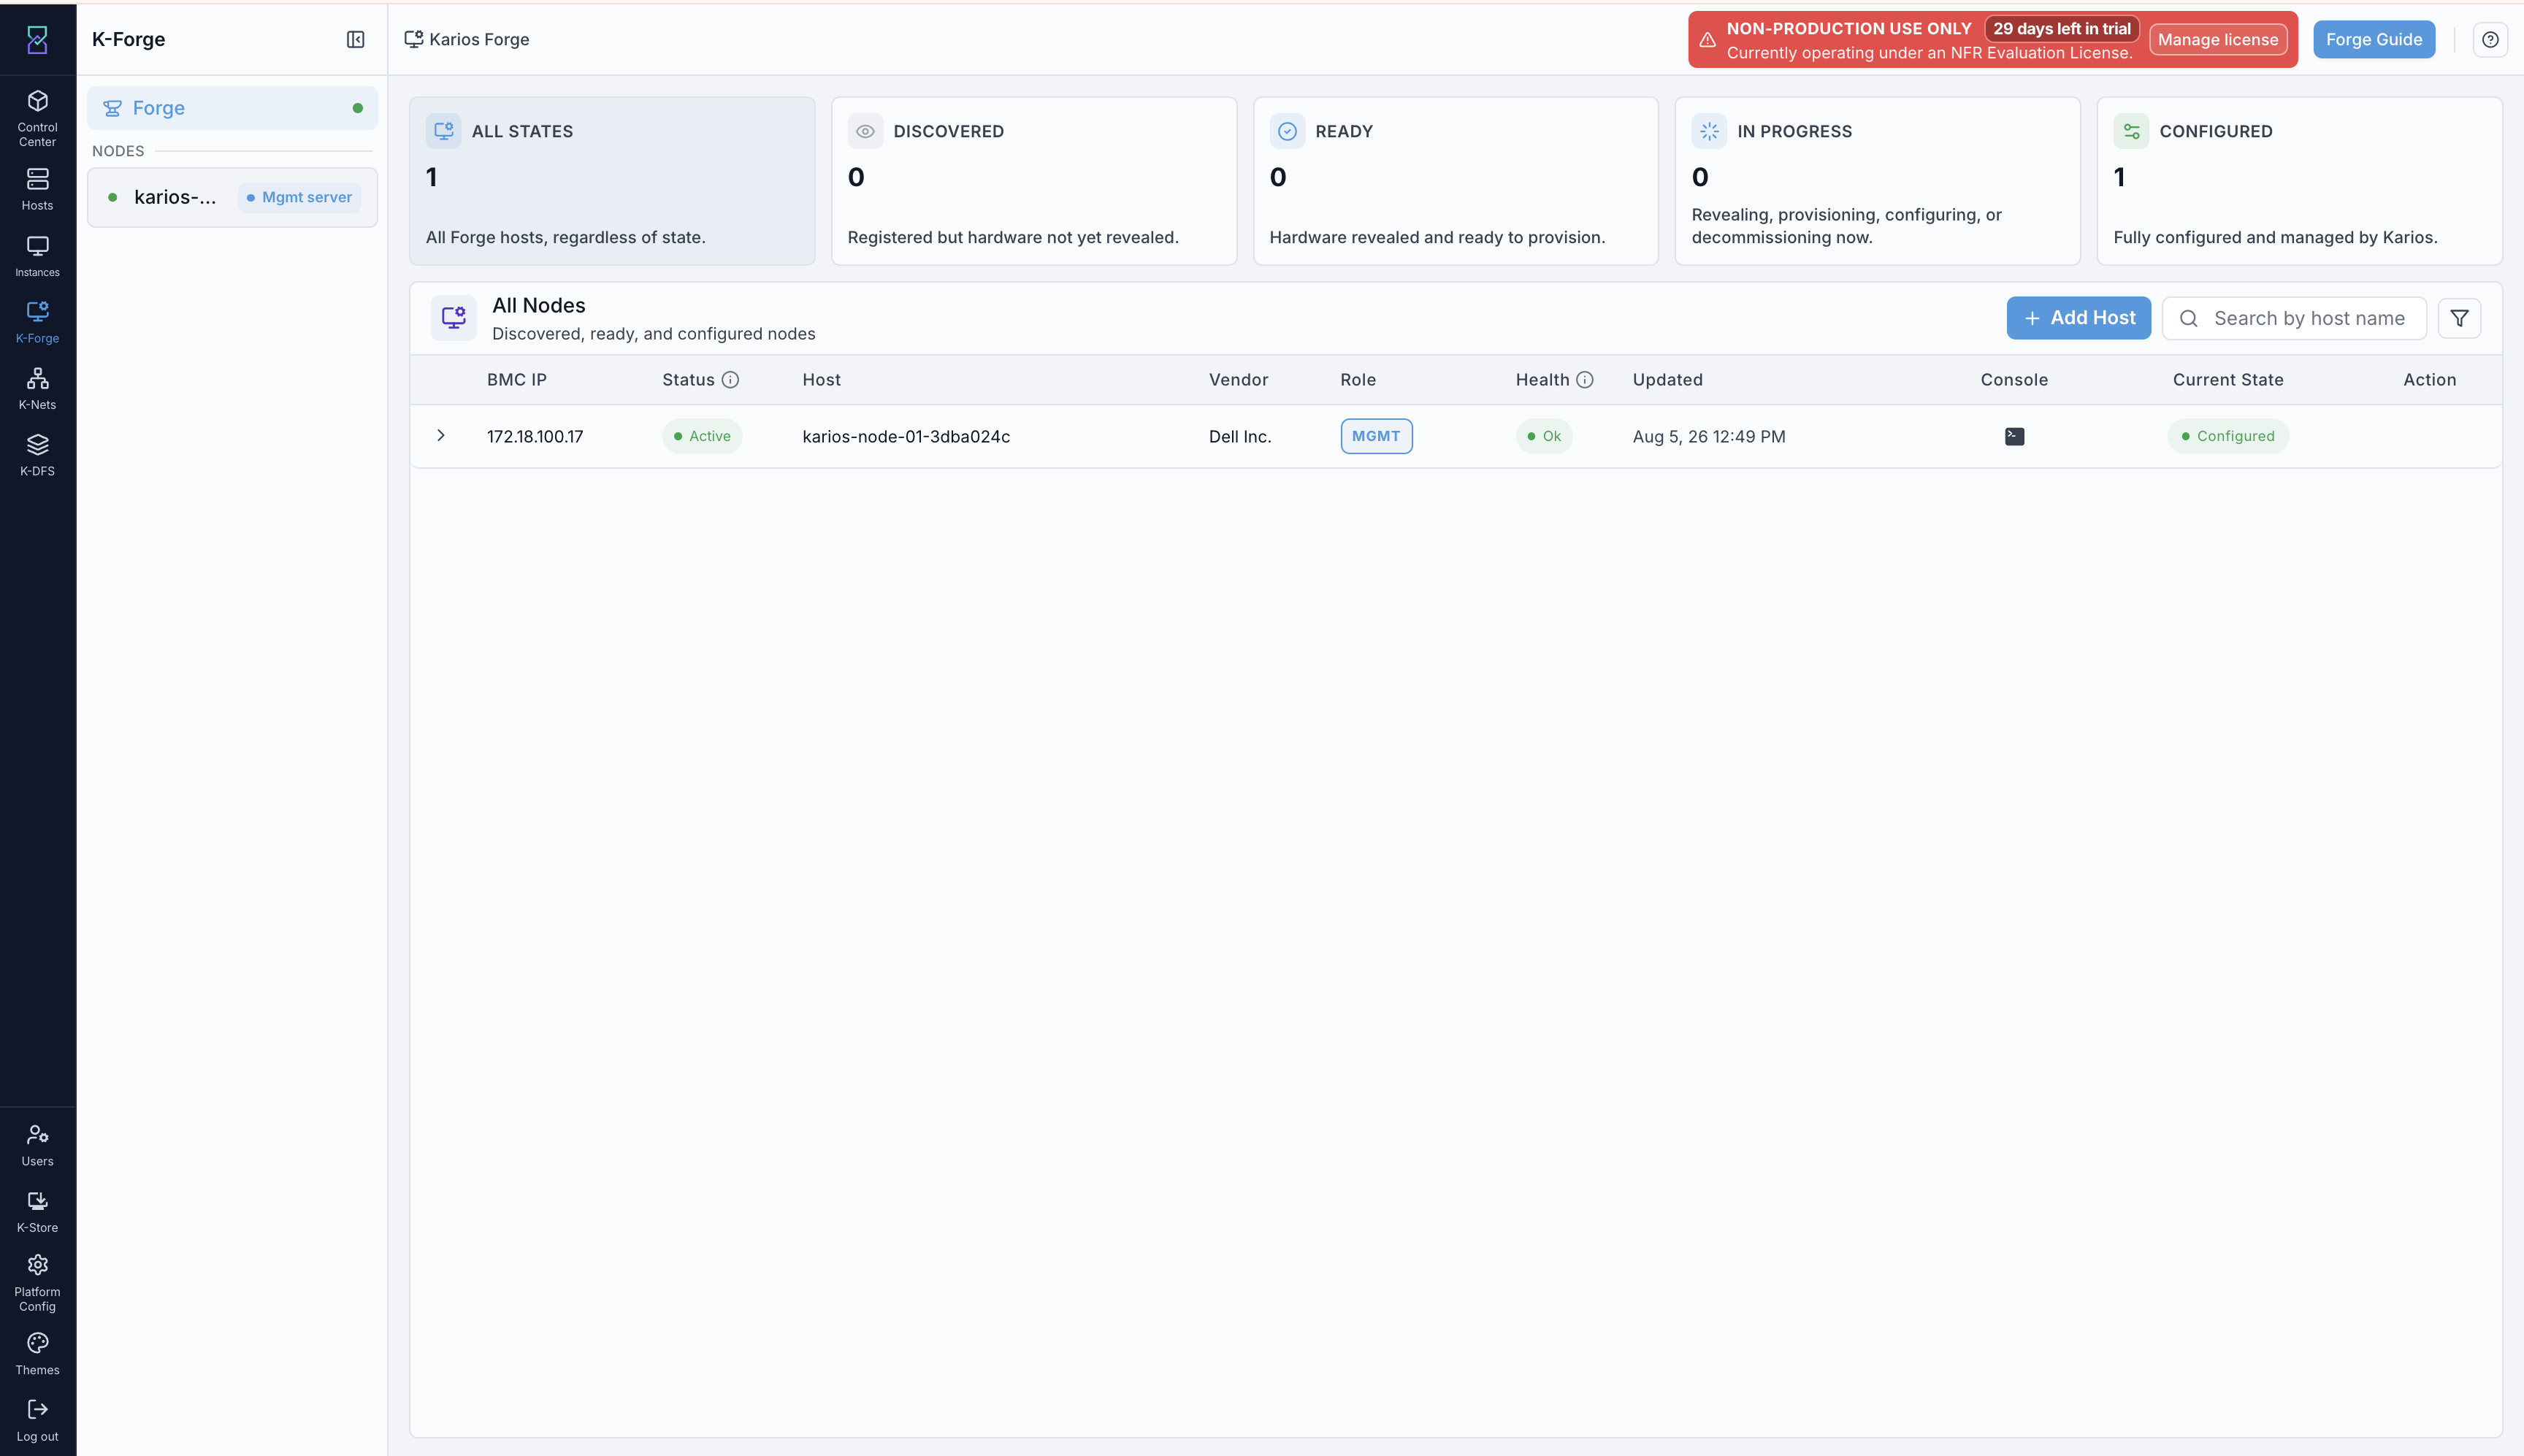
K-Forge -> Karios Forge: the state cards, and the All Nodes table beneath.
State Cards
The cards across the top count hosts by stage. Each is also a filter - select one to narrow the table to that stage.
Card |
What it counts |
|---|---|
|
Every K-Forge host, regardless of state |
|
Registered, but hardware not yet revealed |
|
Hardware revealed and ready to provision |
|
Revealing, provisioning, configuring, or decommissioning now |
|
Fully configured and managed by Karios |
The All Nodes Table
All Nodes lists every host, described on screen as “Discovered, ready, and
configured nodes”.
Column |
Description |
|---|---|
|
The out-of-band address K-Forge reaches the machine on |
|
Whether the host record is active |
|
The host name. Configuring renames the host, appending a unique suffix |
|
Detected hardware manufacturer |
|
|
|
Health summary for the host |
|
When the row last changed |
|
Opens the live boot and serial output for that host |
|
The stage the host is in. During reveal and configure this shows a live
percentage with a |
|
Per-host actions. See Node Actions |
Above the table are + Add Host, a Search by host name box, and a filter
control.
Important
The Action menu appears only on SERVER rows. A management node has no
action menu - it was not onboarded through this flow and is not managed by it.
Add A Host
When to Use:
To bring a new physical server under Karios management.
Purpose:
Register the server and point K-Forge at its BMC.
Steps:
Select
+ Add Host. A two-step wizard opens.On
Details, place the host -Site,Location,Rack,Manufacturer,Device Type, andPosition- then enter the BMC address, username, and password underBMC Credentials.Select
Continue.On
Review, check every value, then selectAdd Host.
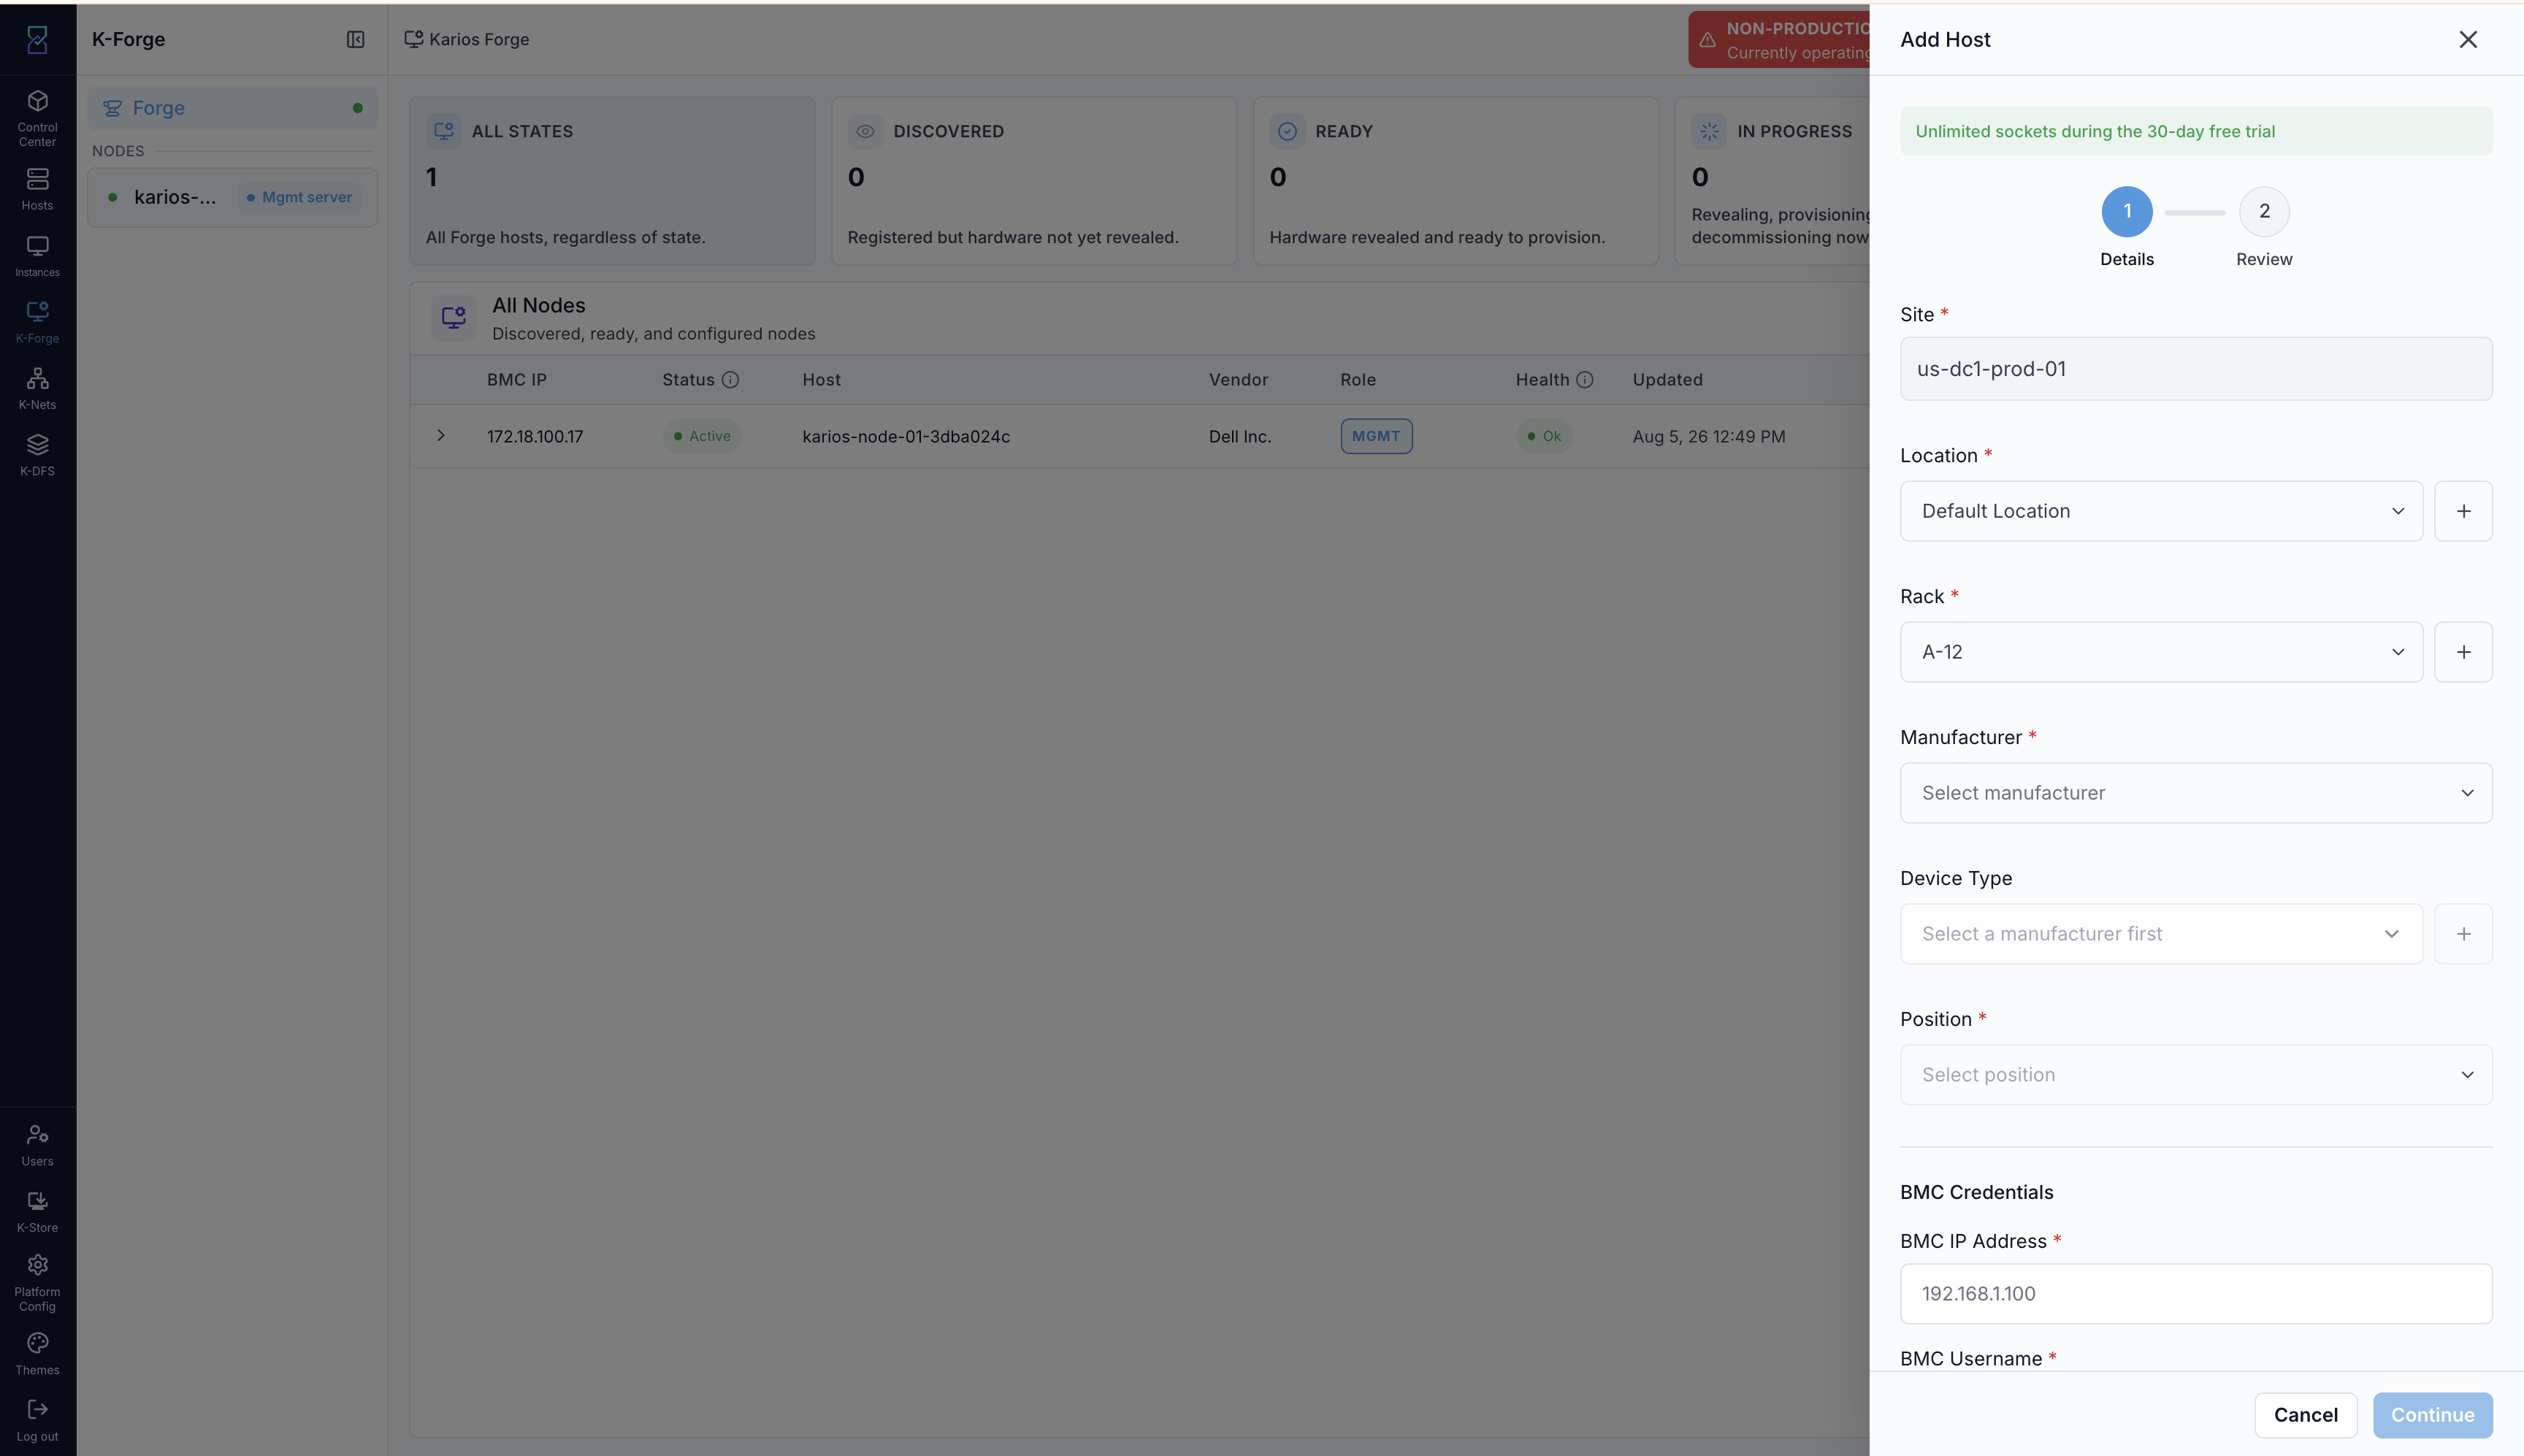
Step 1 of 2: where the server lives, and how K-Forge reaches it.
What the UI means:
Siteis pre-filled from the deployment and cannot be edited here.Location,Rack, andDevice Typeeach offer a+control to create a new entry without leaving the wizard.Device Typebecomes selectable only once aManufactureris chosen - until then it readsSelect a manufacturer first.
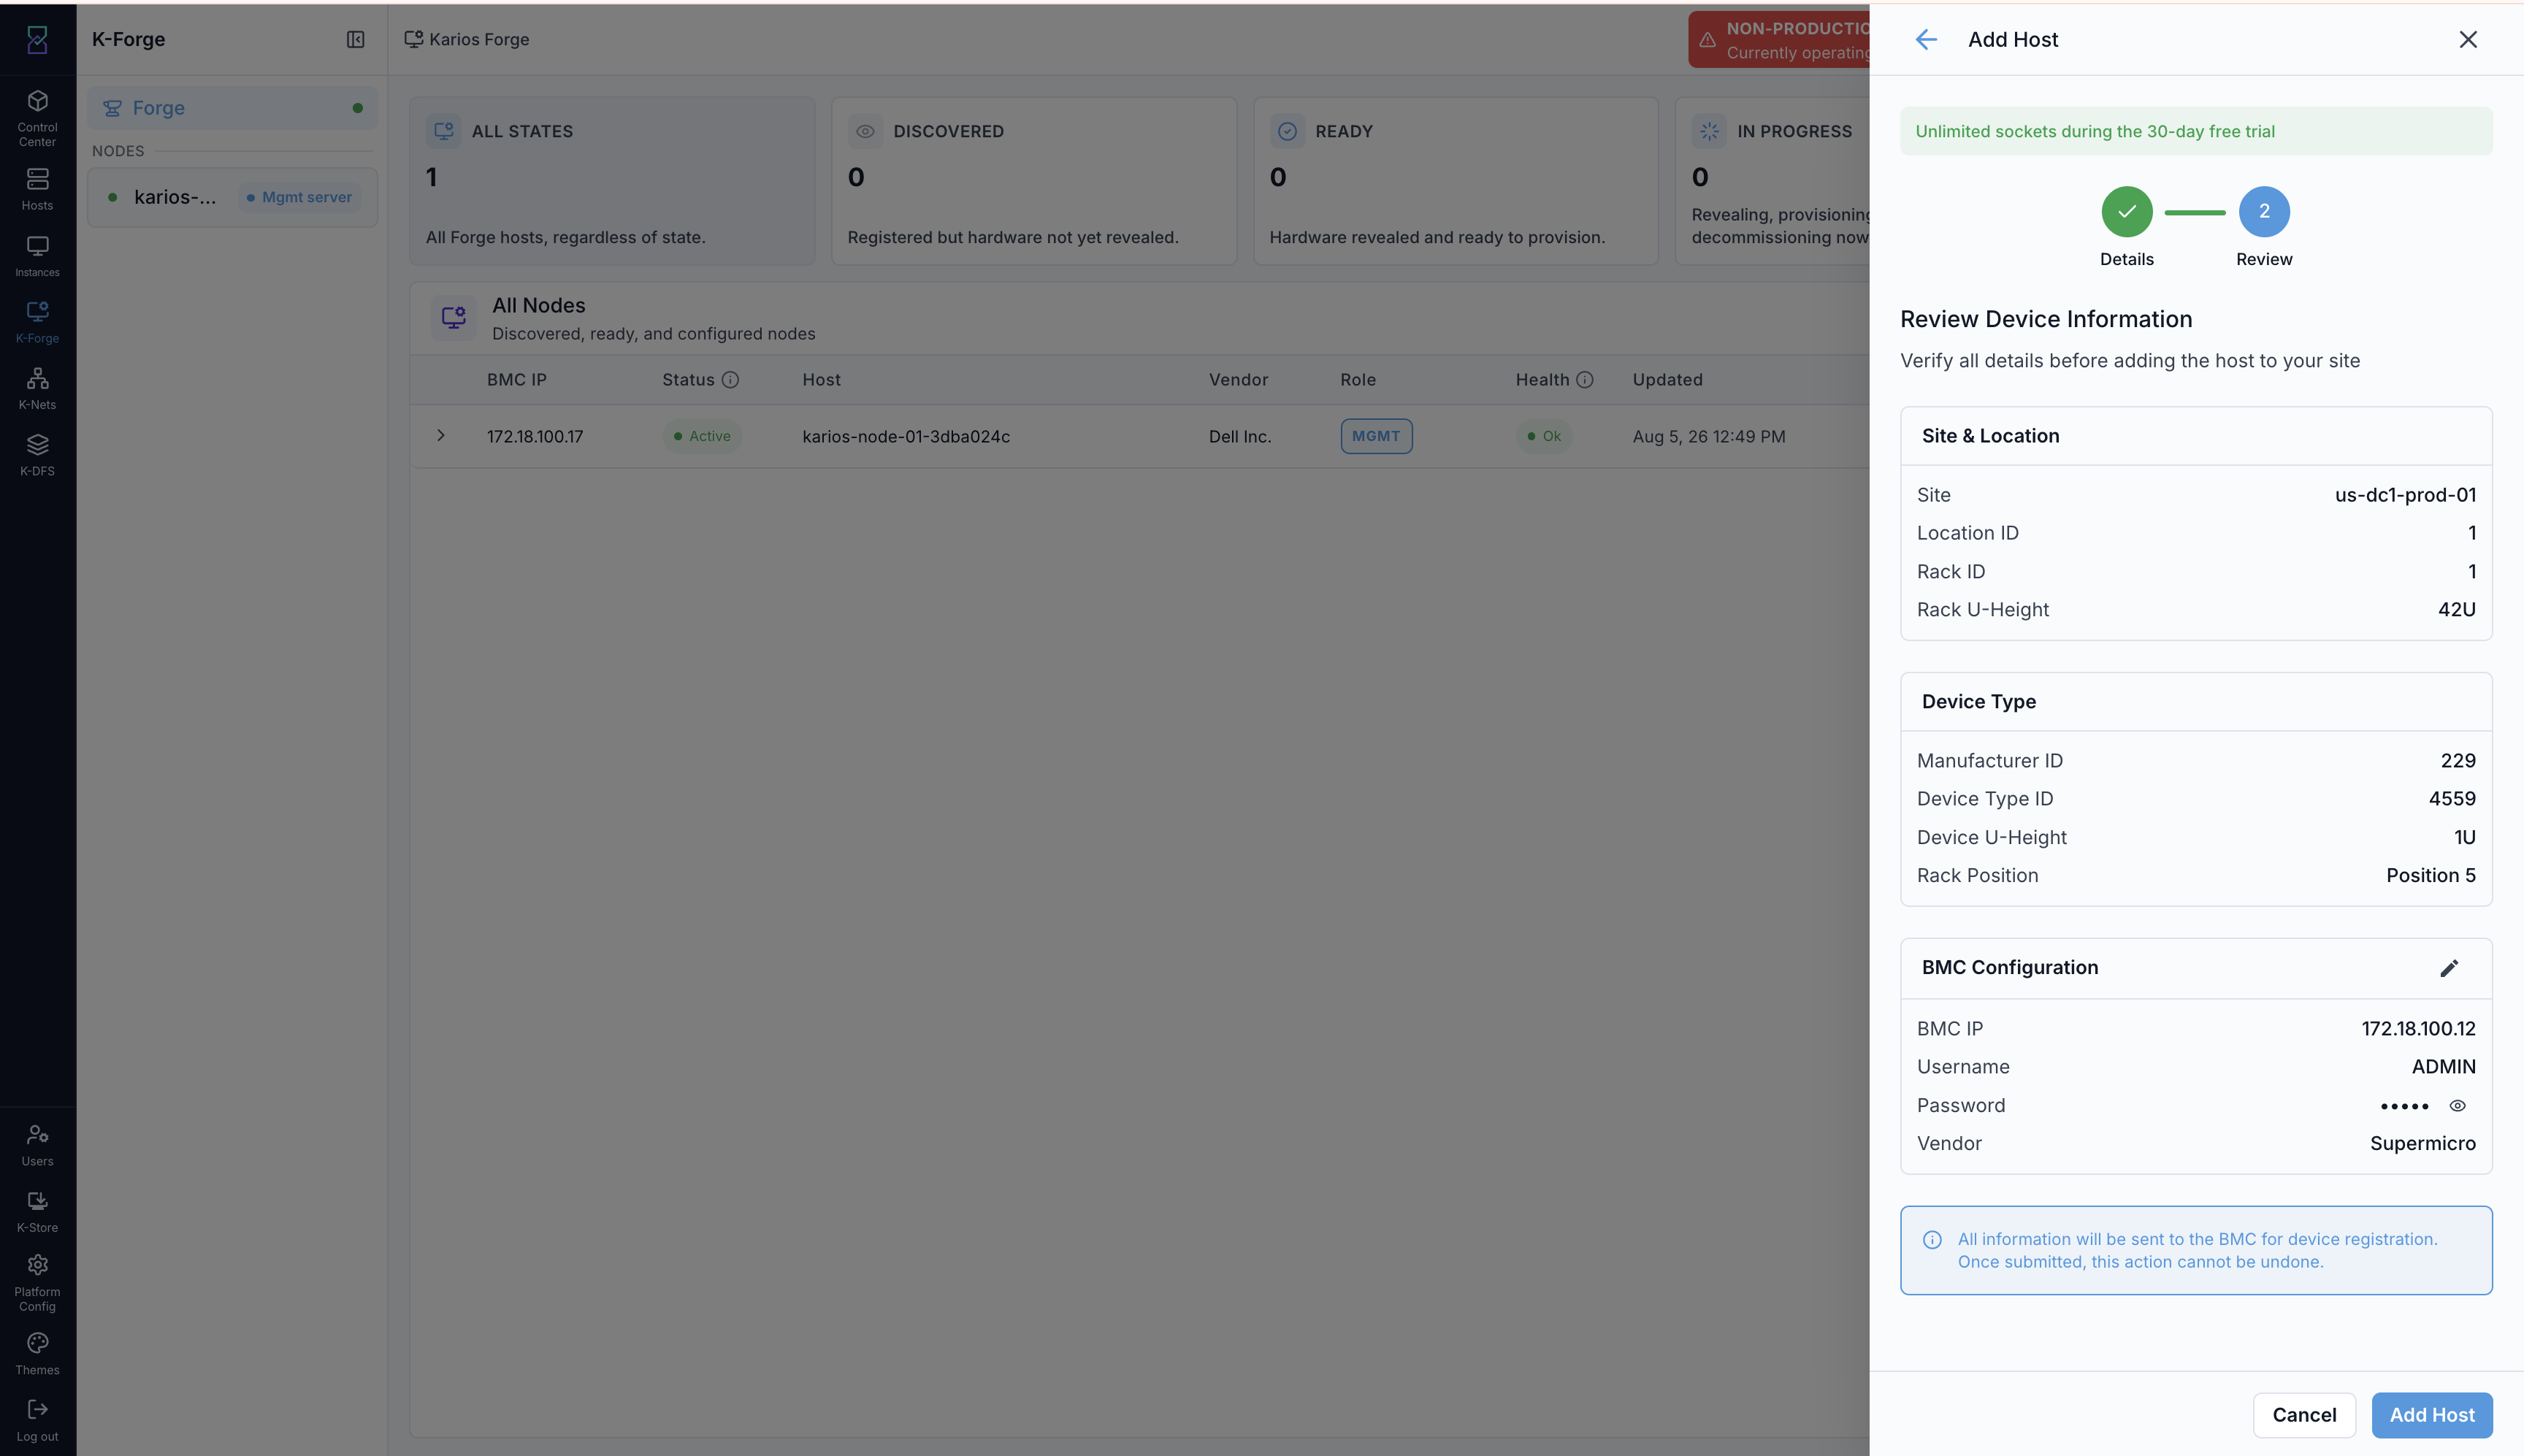
Step 2 of 2: review before submitting. The BMC card can be edited from here.
Warning
The review screen states that all information is sent to the BMC for device
registration, and that the action cannot be undone once submitted. That refers
to the registration push itself; the host record can still be removed
afterwards with Unregister. Check the BMC address in particular - it is how
every later stage reaches the machine.
Expected Outcome:
The host appears in All Nodes and K-Forge starts the hardware reveal
automatically. No further action is needed to begin it.
If this fails:
Confirm the BMC is reachable from the management node, that the credentials are correct, and that no firewall blocks the path. For the full form reference, see Add Host (Infrastructure).
Hardware Reveal
When to Use:
Automatically, as soon as a host is added.
Purpose:
Boot a small discovery image on the server over its BMC and read the real hardware - disks, network cards, CPU, and memory.
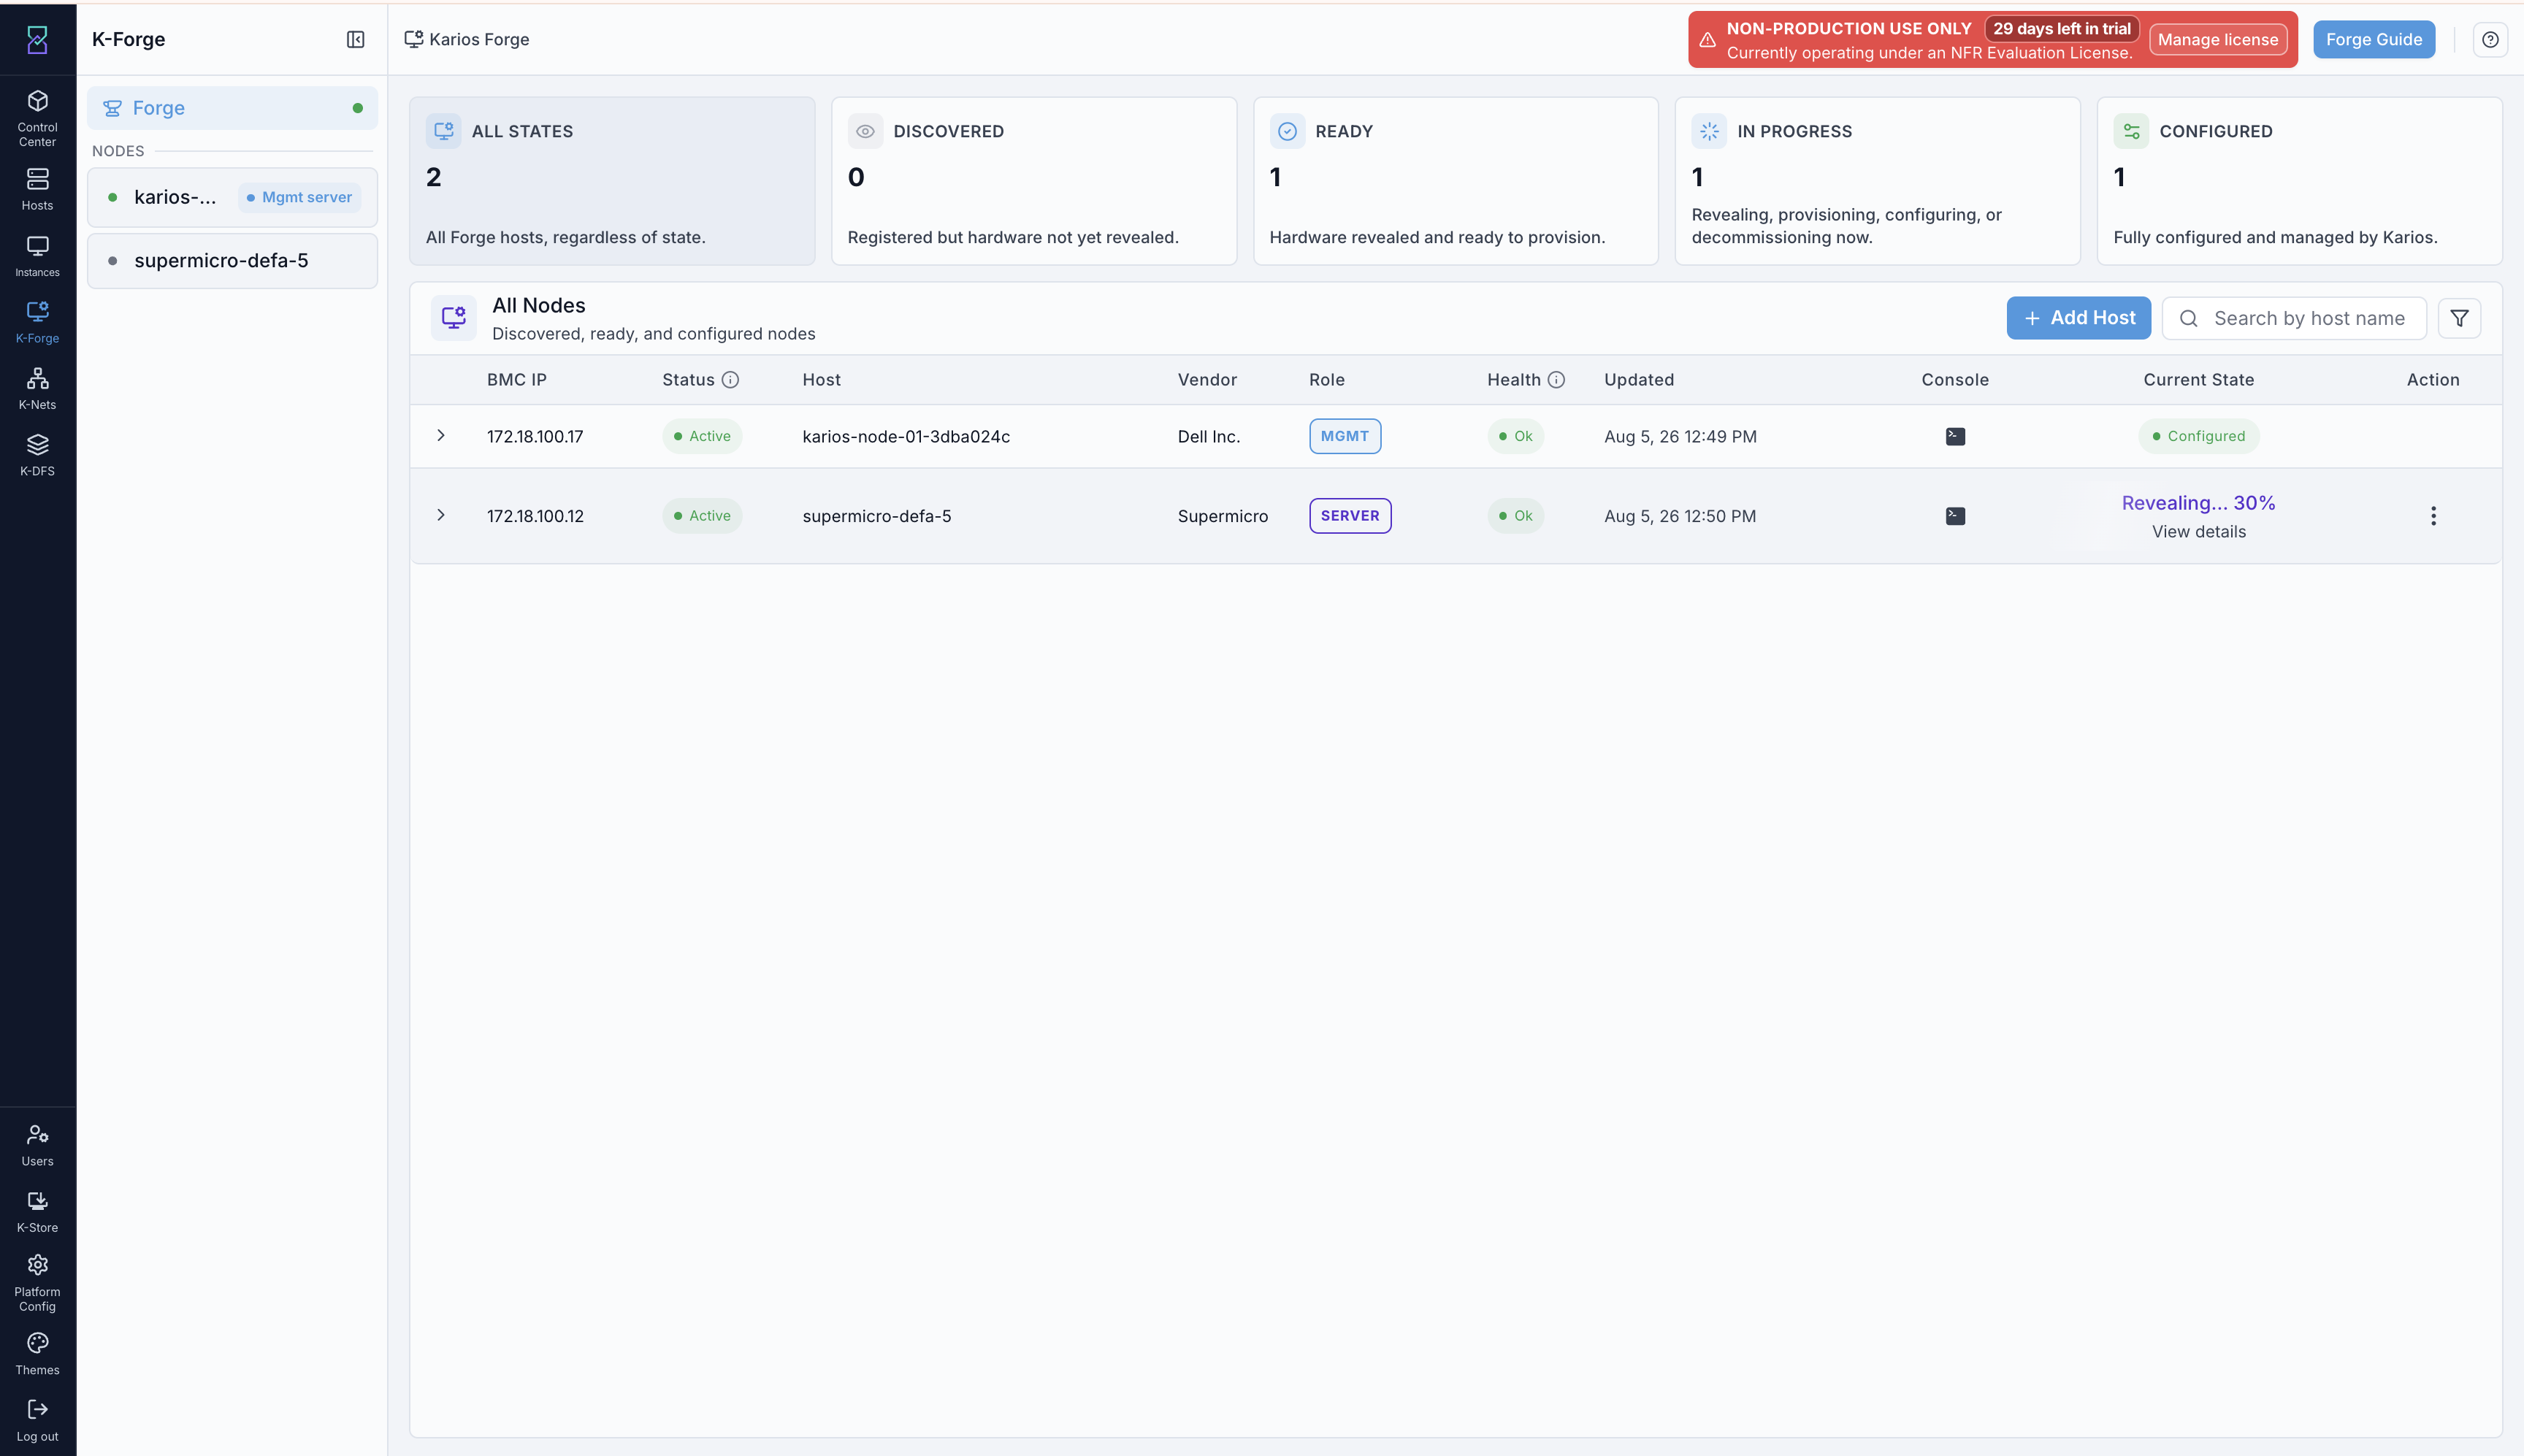
A host mid-reveal, with its live percentage and a View details link.
Select View details on the row, or the row itself, to open the progress
dialog.
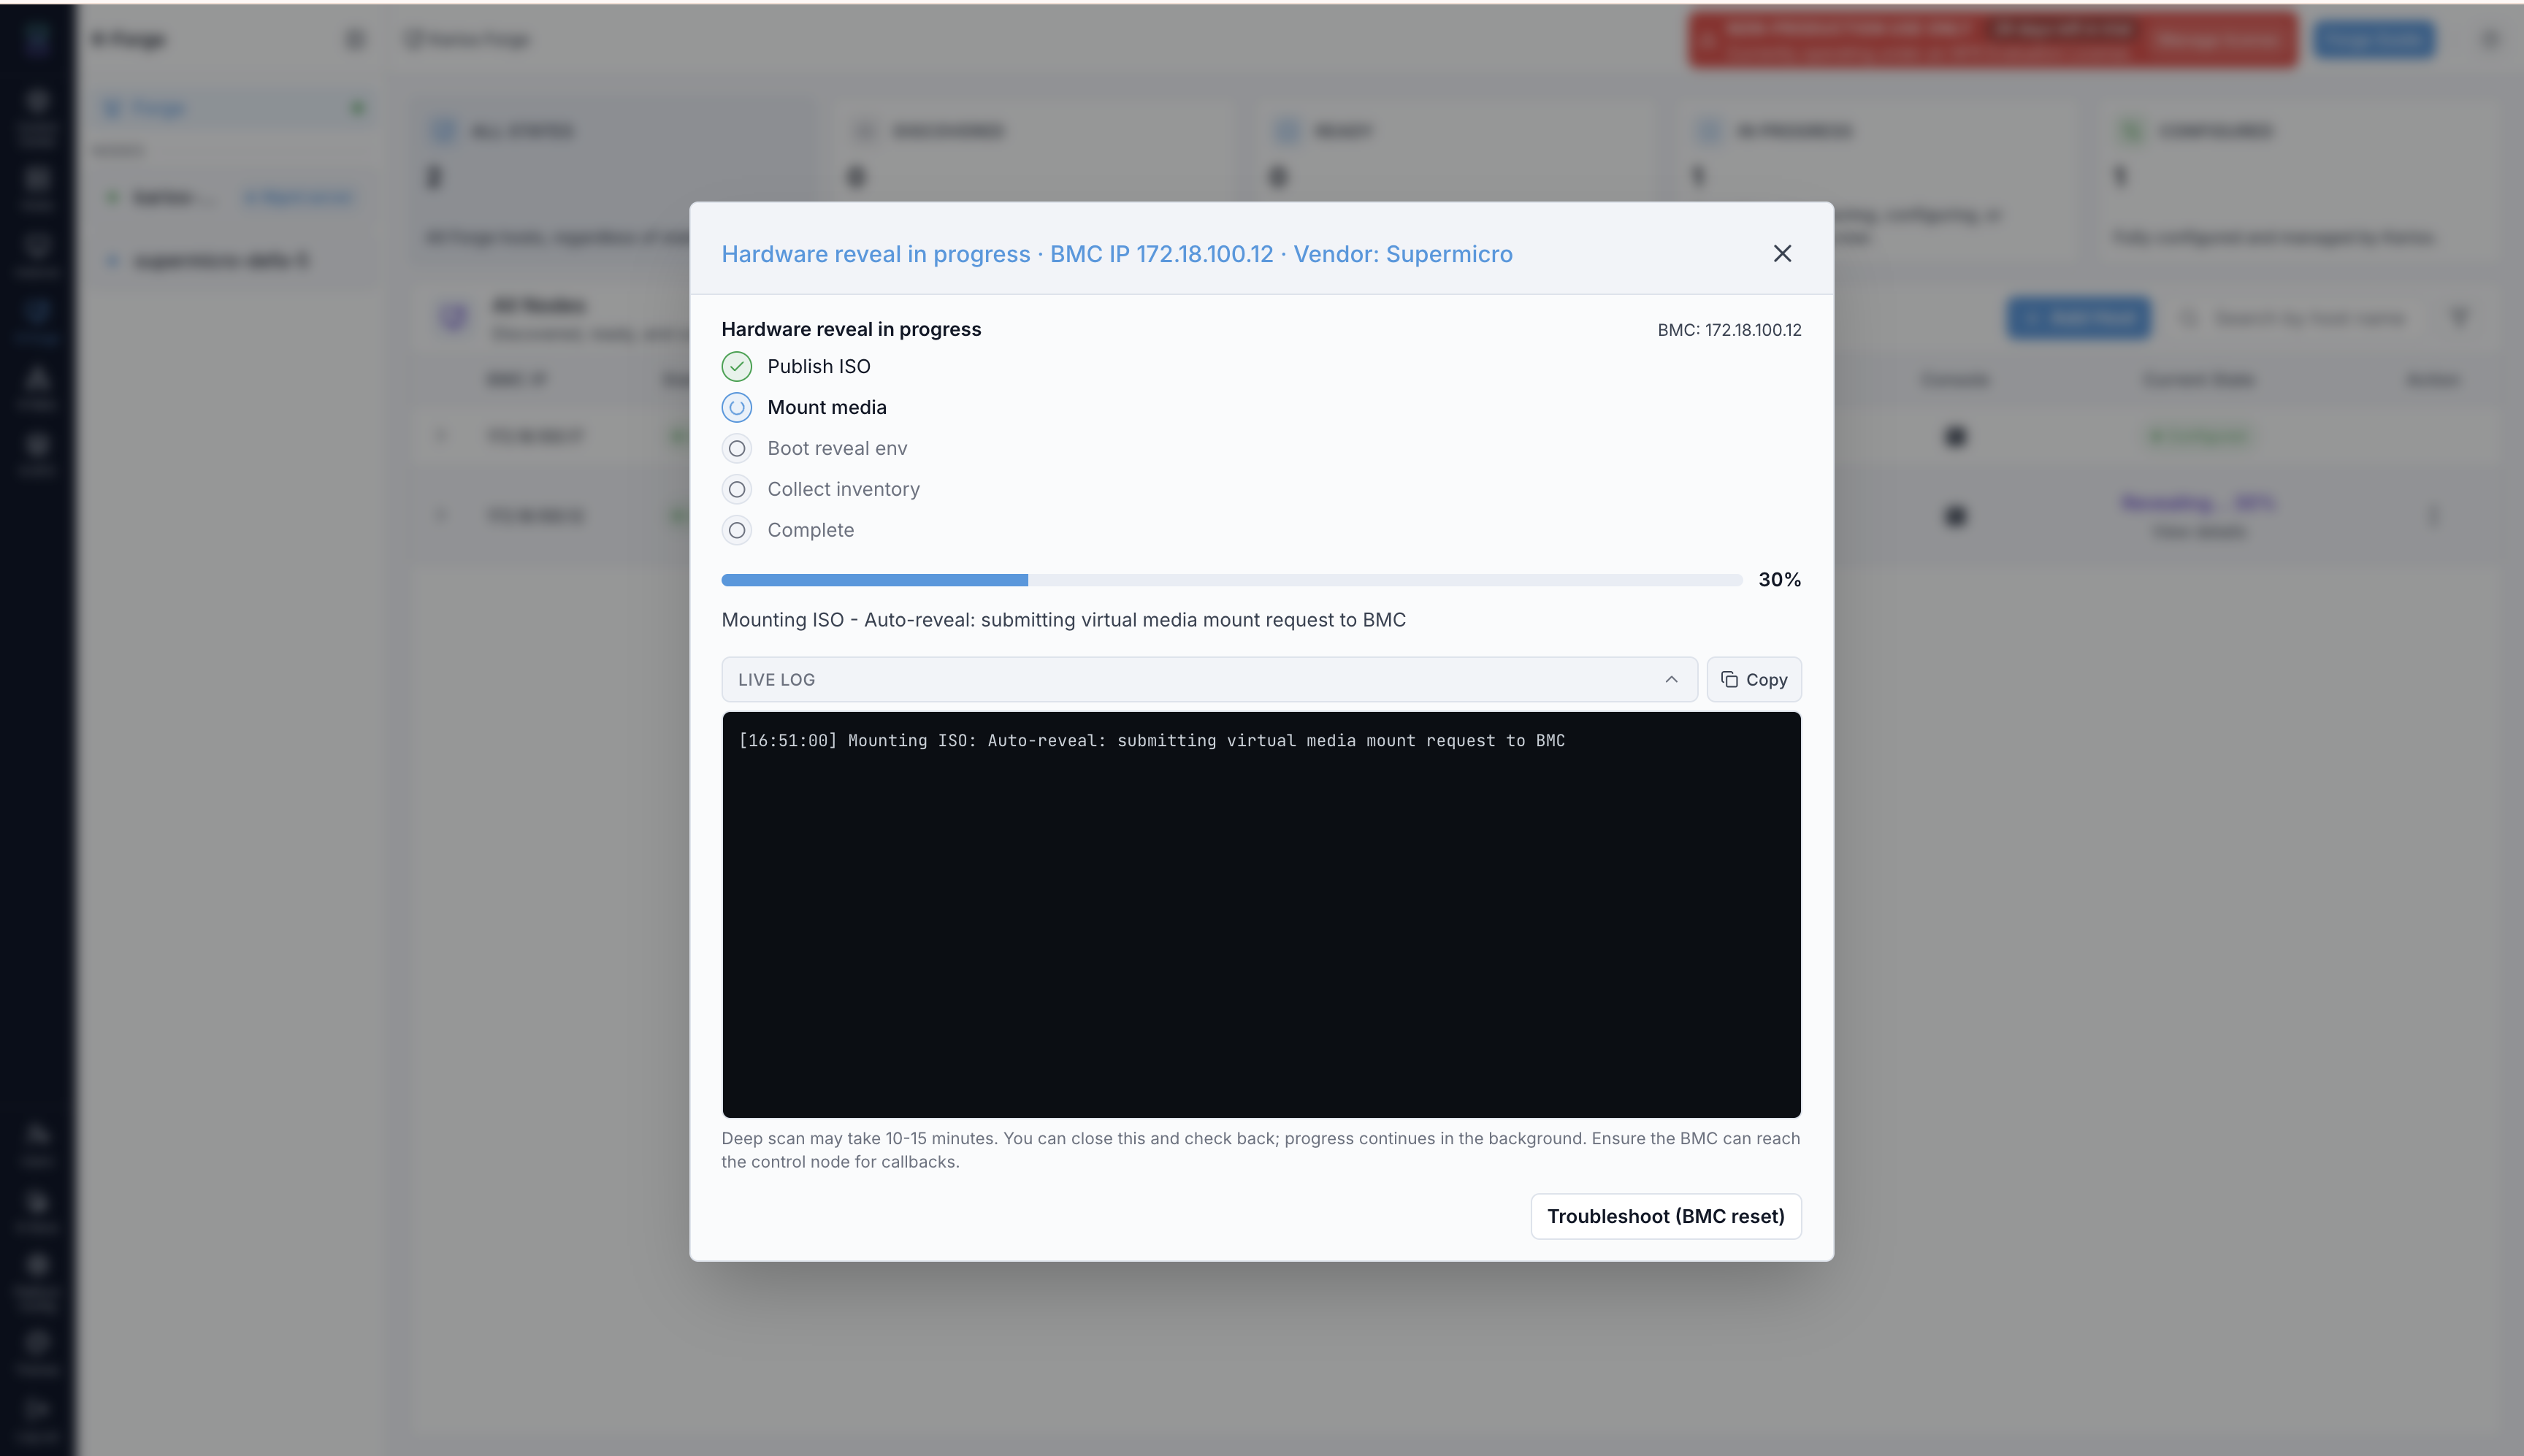
The reveal dialog: a five-stage checklist, a percentage, and the live log.
What the UI means:
The reveal runs five stages -
Publish ISO,Mount media,Boot reveal env,Collect inventory, andComplete- with the current one marked and a percentage beside it.LIVE LOGexpands to a timestamped log of what the reveal is doing, with aCopycontrol for support.The dialog states that a deep scan may take 10 to 15 minutes, and that you can close it and come back - progress continues in the background.
It also warns that the BMC must be able to reach the
control nodefor callbacks. That is the Karios management node, the same machine named in the prerequisites above.
Expected Outcome:
The host’s Current State becomes Ready.
If this fails:
The dialog offers Troubleshoot (BMC reset).
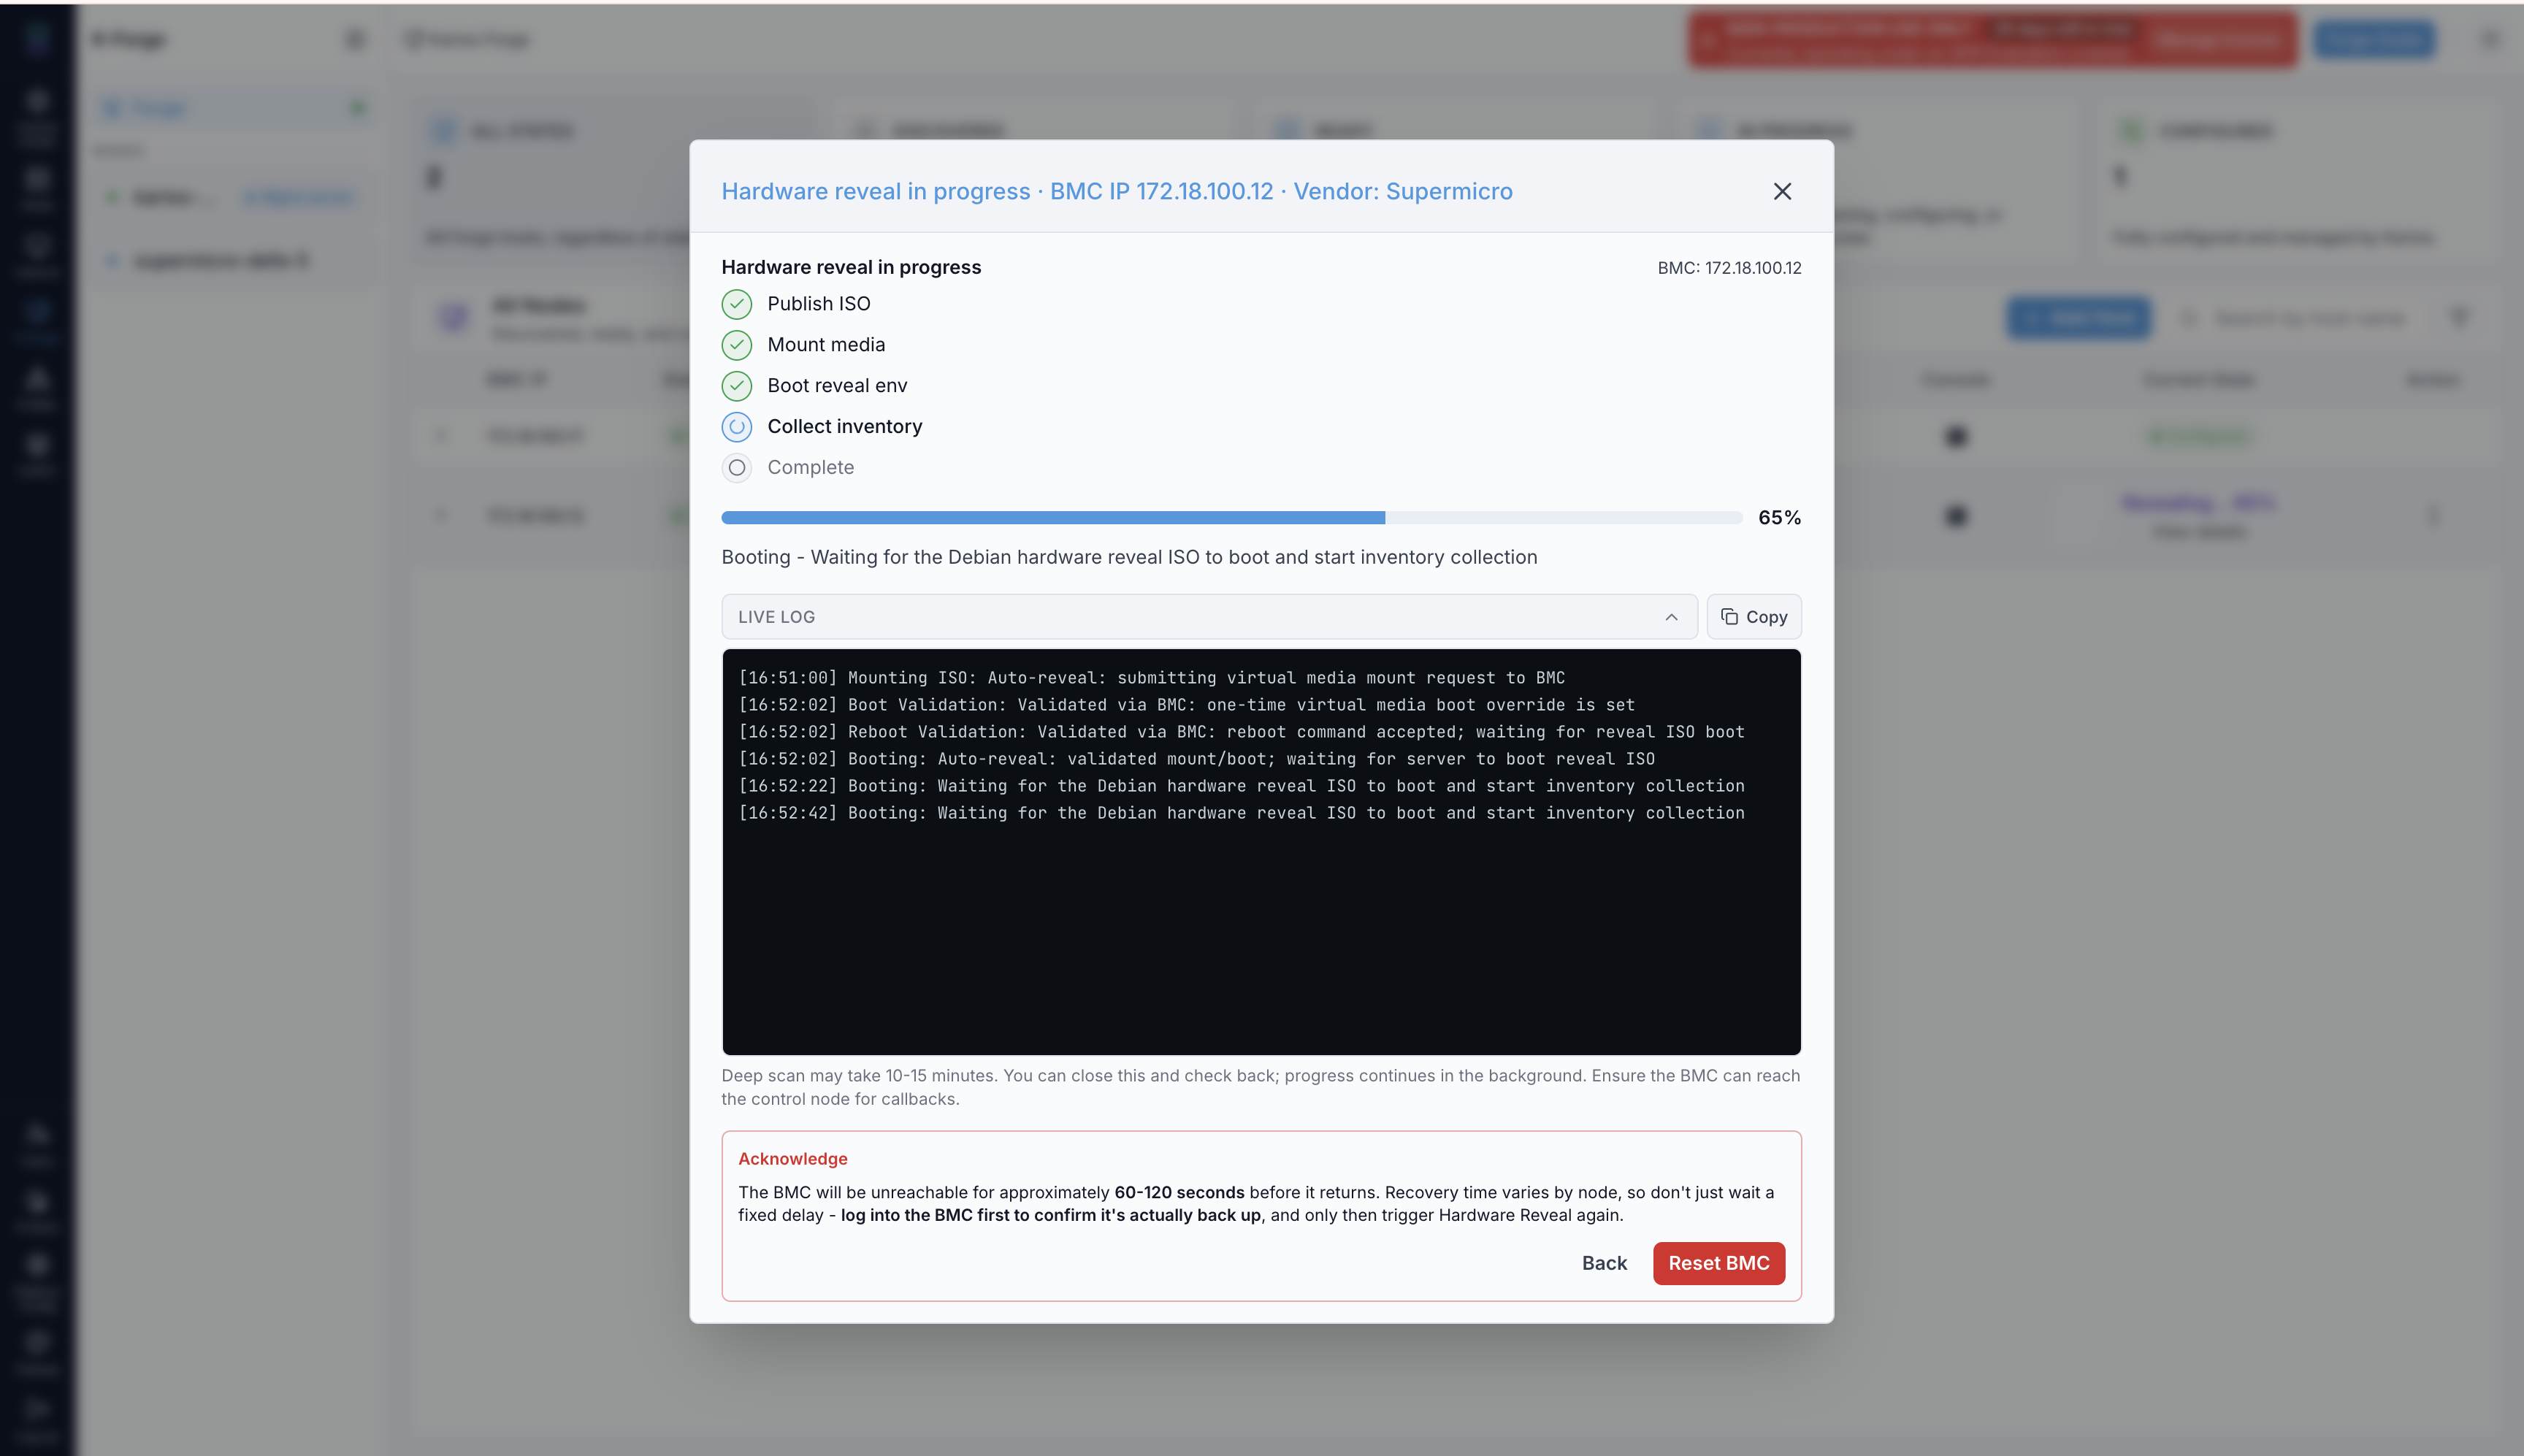
The BMC reset path, with its acknowledgement.
Warning
Resetting the BMC makes it unreachable for roughly 60 to 120 seconds, and recovery time varies by machine. Do not simply wait a fixed delay - sign in to the BMC to confirm it is back before triggering the reveal again.
Configure The Host
When to Use:
Once a host reports Ready.
Purpose:
Install Karios on the host and join it to the cluster as compute and storage.
Warning
Configuring erases every disk on the host. The disks you select are wiped and repartitioned for the operating system, and the disk you leave unselected is wiped as well when Ceph claims it for storage. Confirm you are configuring the machine you think you are, and that nothing on it needs keeping.
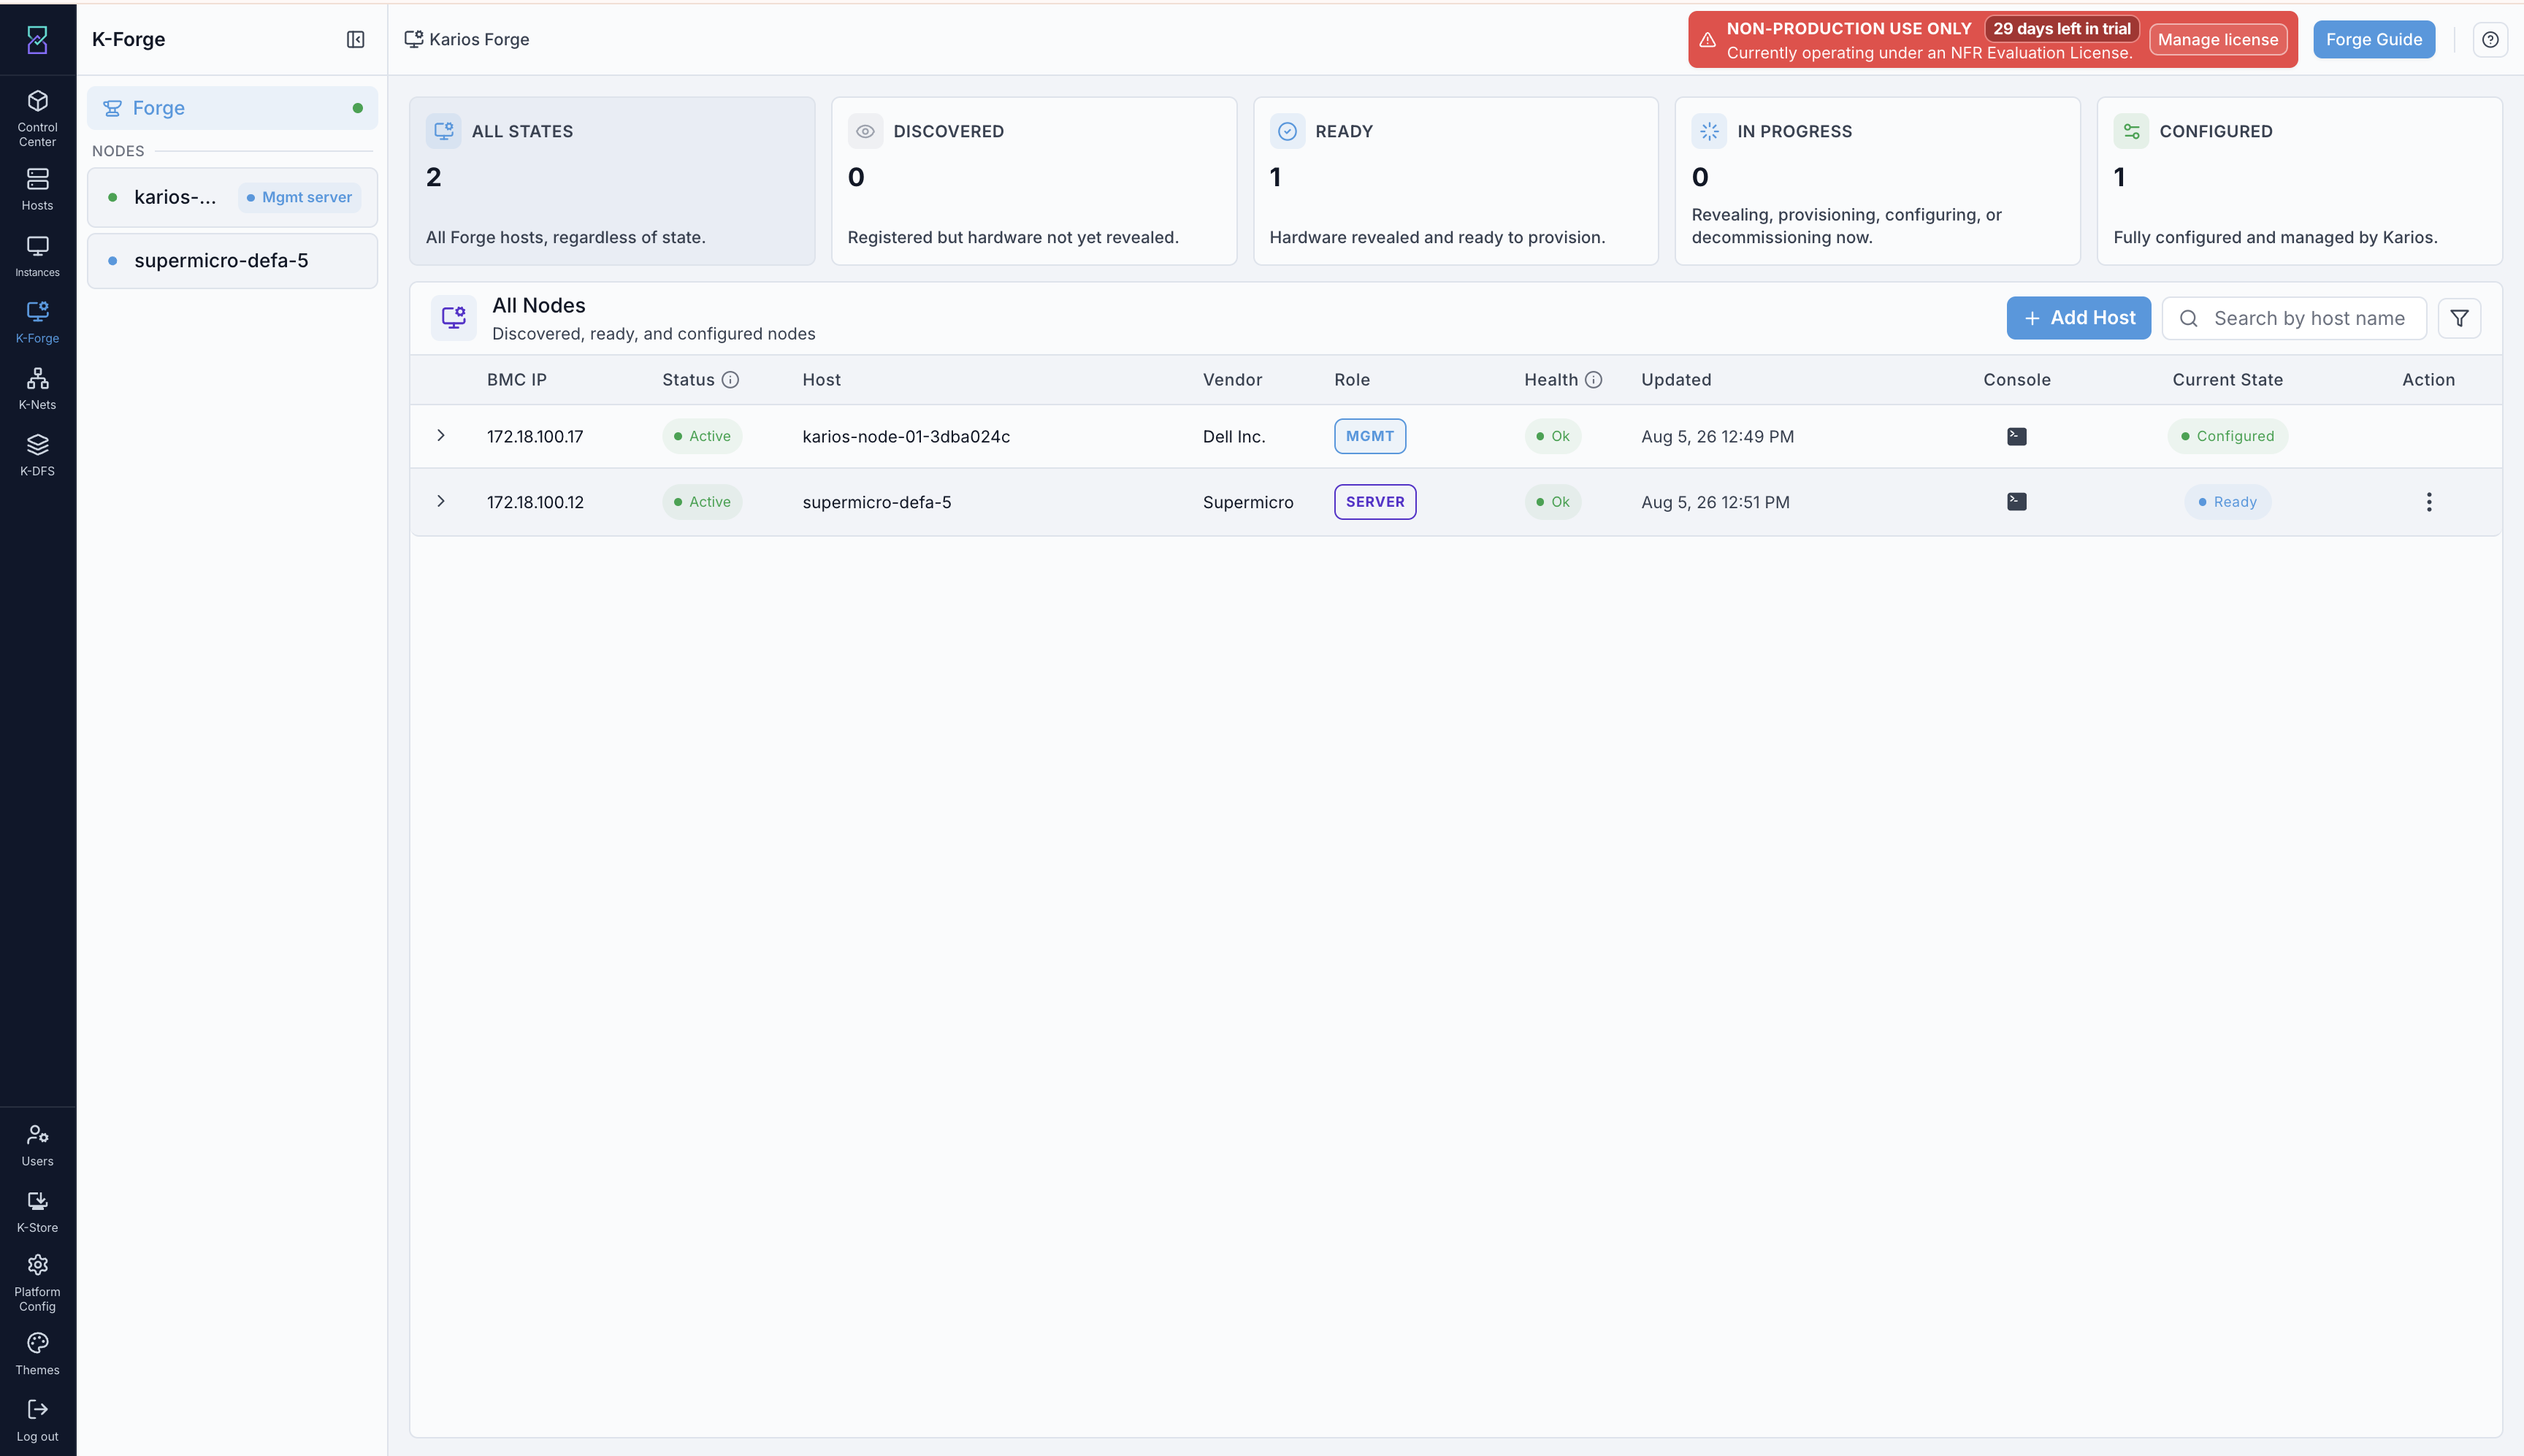
A revealed host, ready to configure.
Steps:
Open the host’s
Actionmenu and selectConfigure.Under
OS disks, select the disks that will hold the operating system.Choose a
RAID layout.Under
Network, validate every role.Under
Credentials, set the administrator password.Select
Configure node.
Important
Configure node stays unavailable until every requirement is met. The
footer of the dialog names what is still outstanding - for example
To continue: acknowledge the disk warning, validate every network role and
set an administrator password
. Read that line rather than hunting for the
problem.
Choosing OS Disks
Each disk is listed with its device path, size, type, model, and serial.
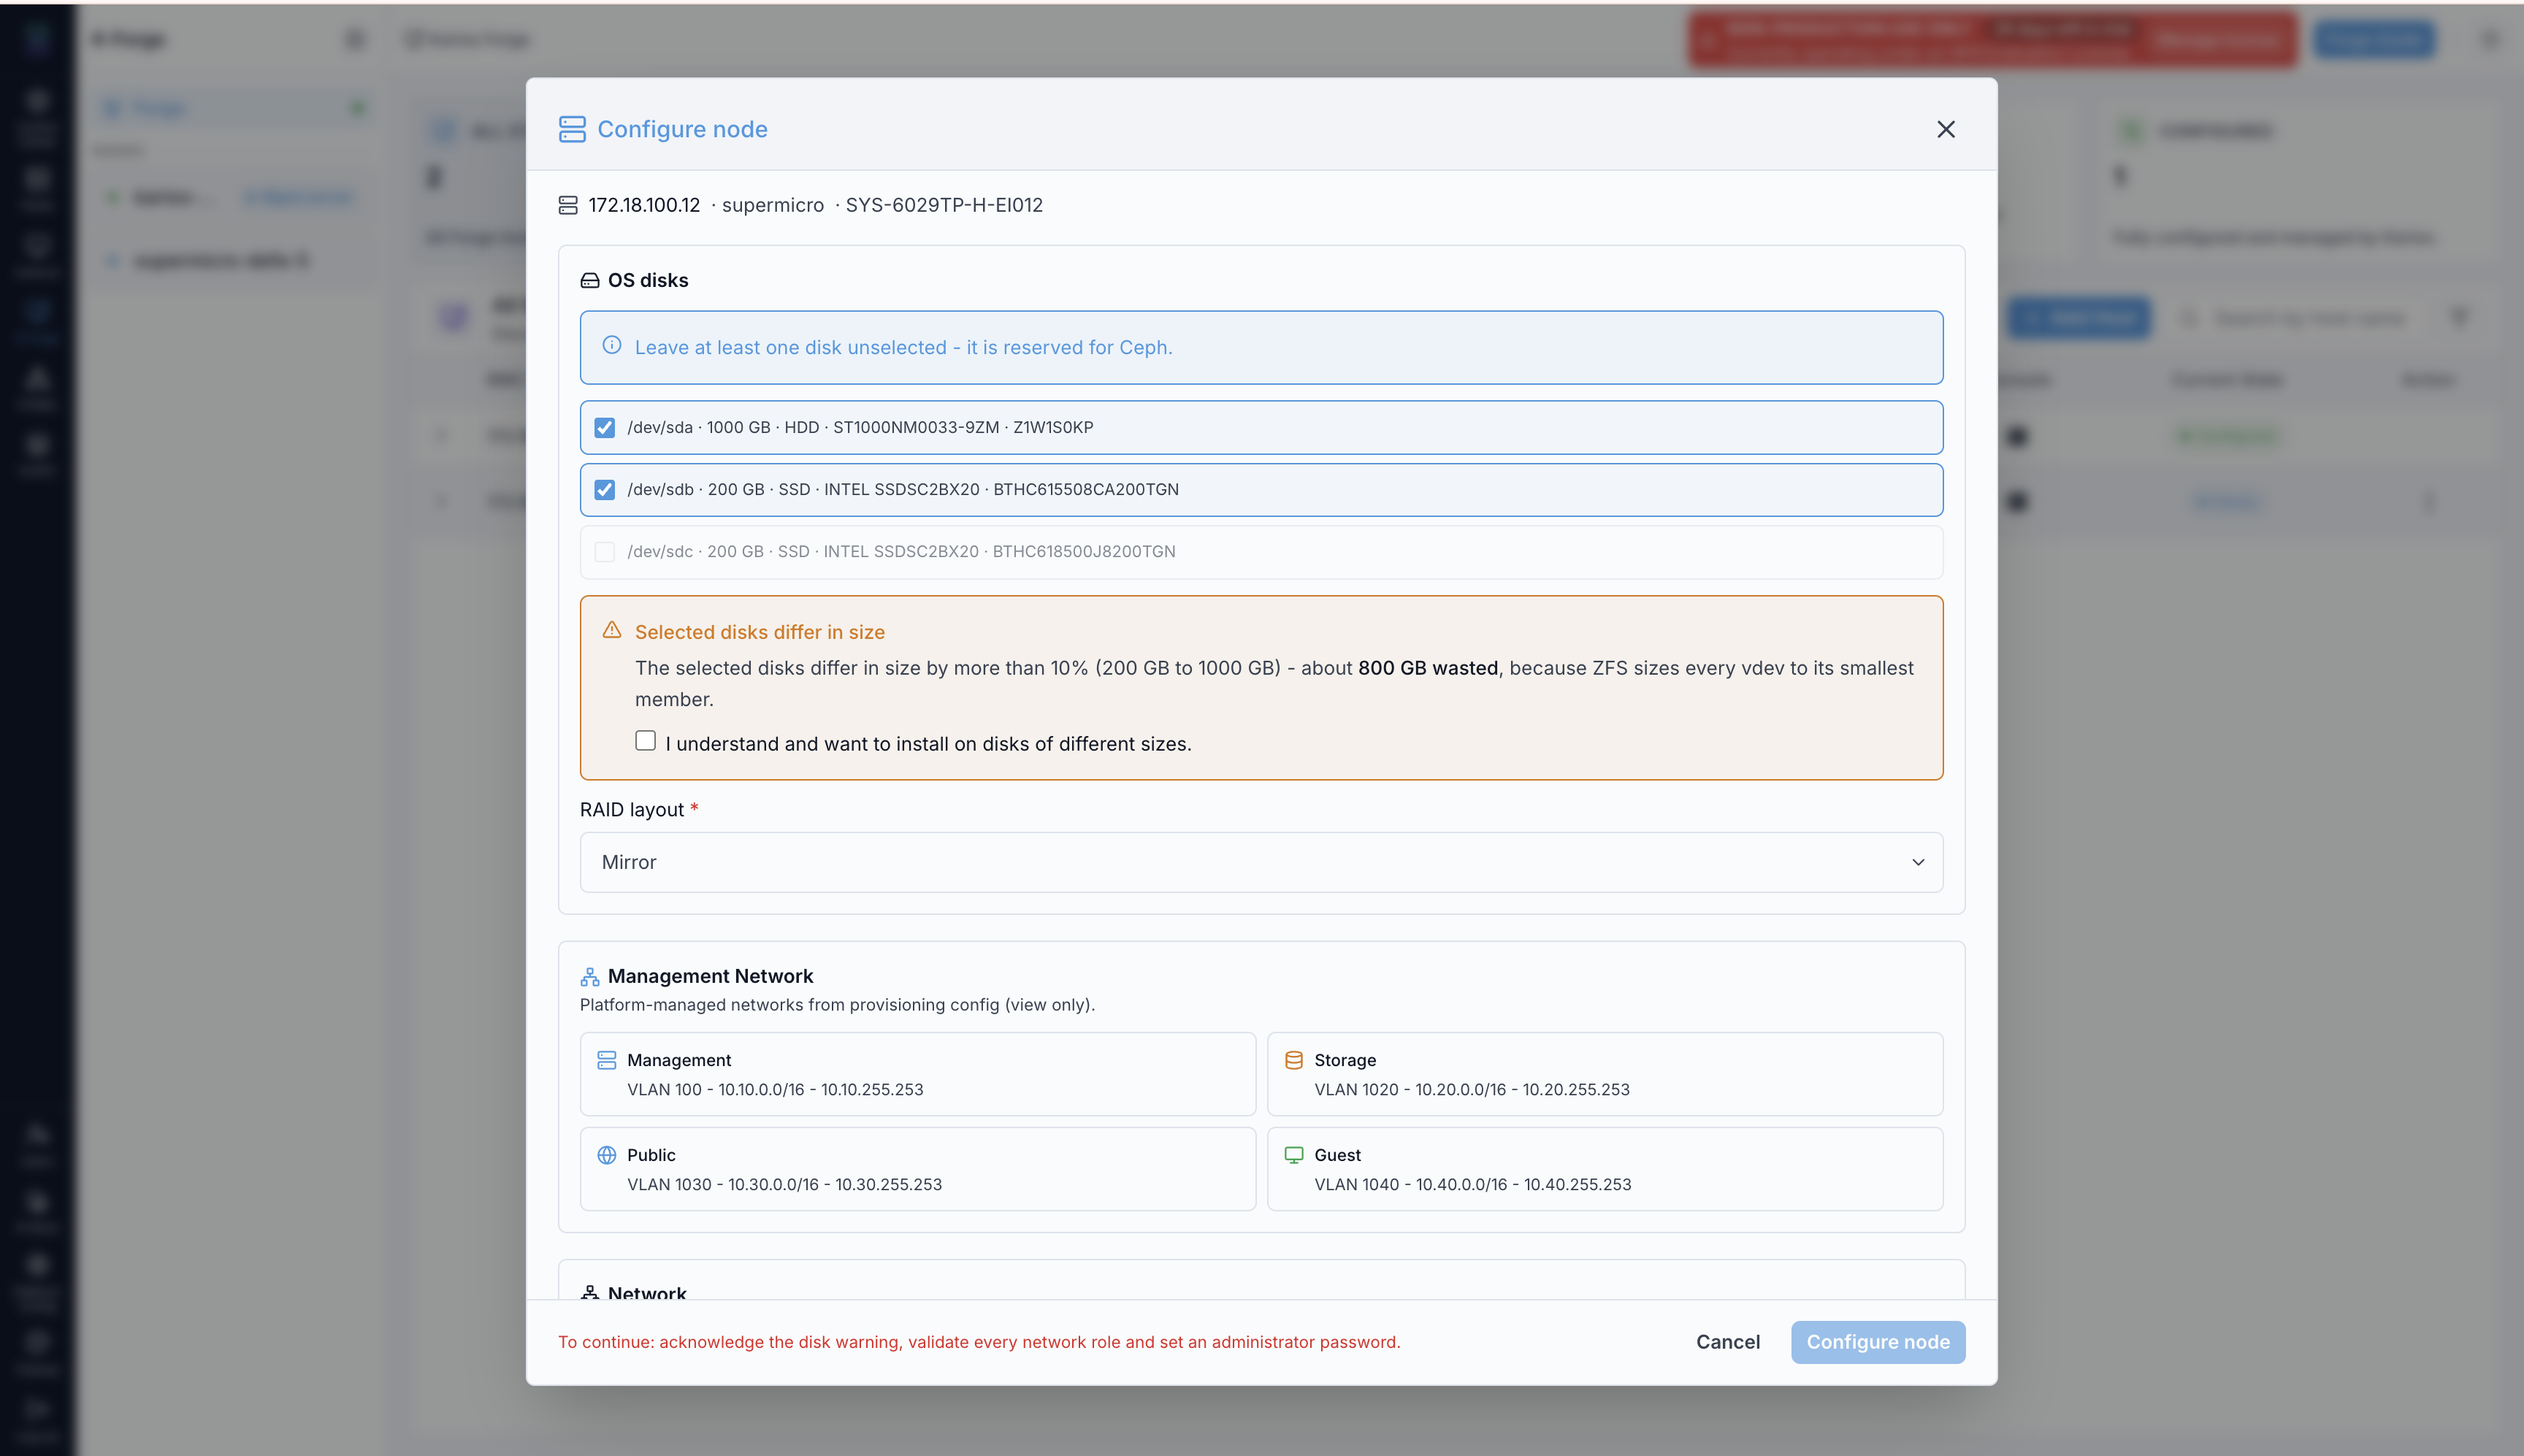
Disk selection, with the size-mismatch warning raised.
Important
Leave at least one disk unselected. It is reserved for Ceph, which provides the node’s storage. The dialog says so above the disk list.
RAID layout becomes selectable once disks are chosen - it reads
Select disks first until then. The layout offered depends on how many disks
you select.
Warning
Selecting disks that differ in size by more than ten percent raises a warning you must acknowledge. ZFS sizes every vdev to its smallest member, so the excess capacity on the larger disk is wasted - the dialog quantifies how much.
Validating The Network
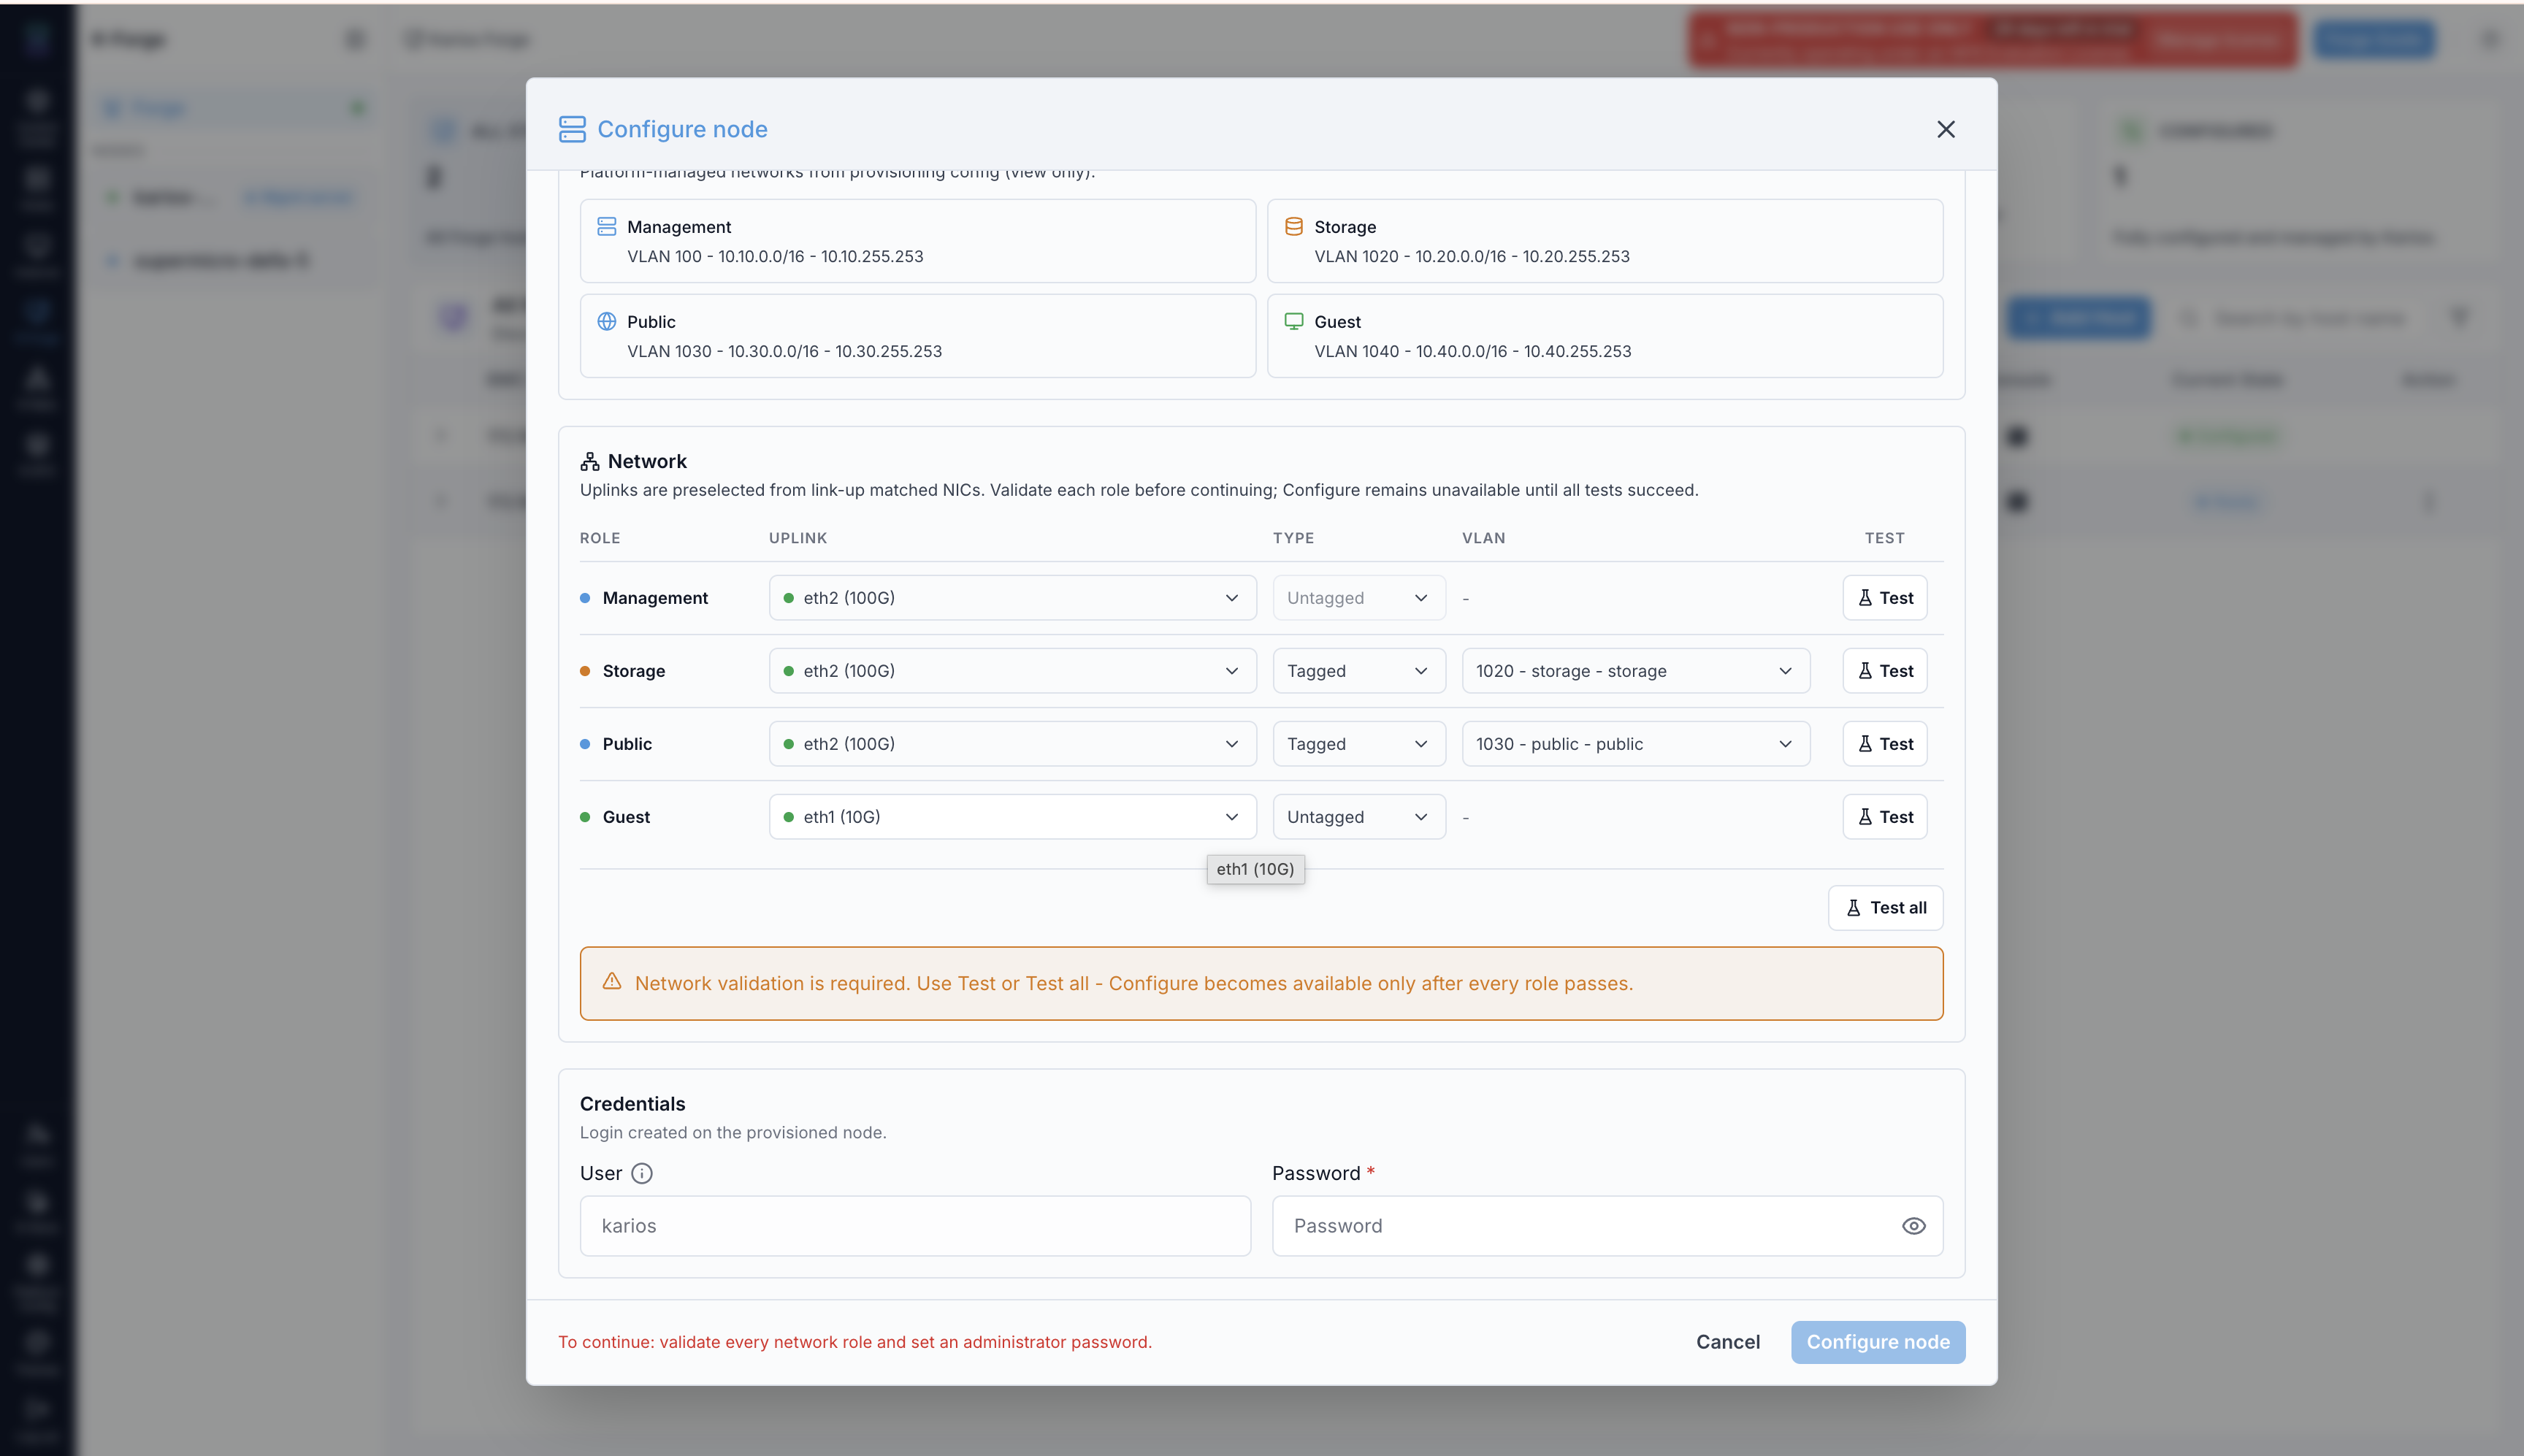
The four network roles, each with its uplink, tagging, VLAN, and a test.
The dialog shows two network blocks:
Management Networklists the four platform-managed networks -Management,Storage,Public, andGuest- with their VLAN and address range. These come from the provisioning configuration and are read only.Networkmaps each role onto a physical uplink. Uplinks are preselected from NICs that have link up.
Steps:
Check the
UPLINK,TYPE, andVLANon each role against your network design.Select
Teston each role, orTest allto run them together.Wait for every role to report
Pass.
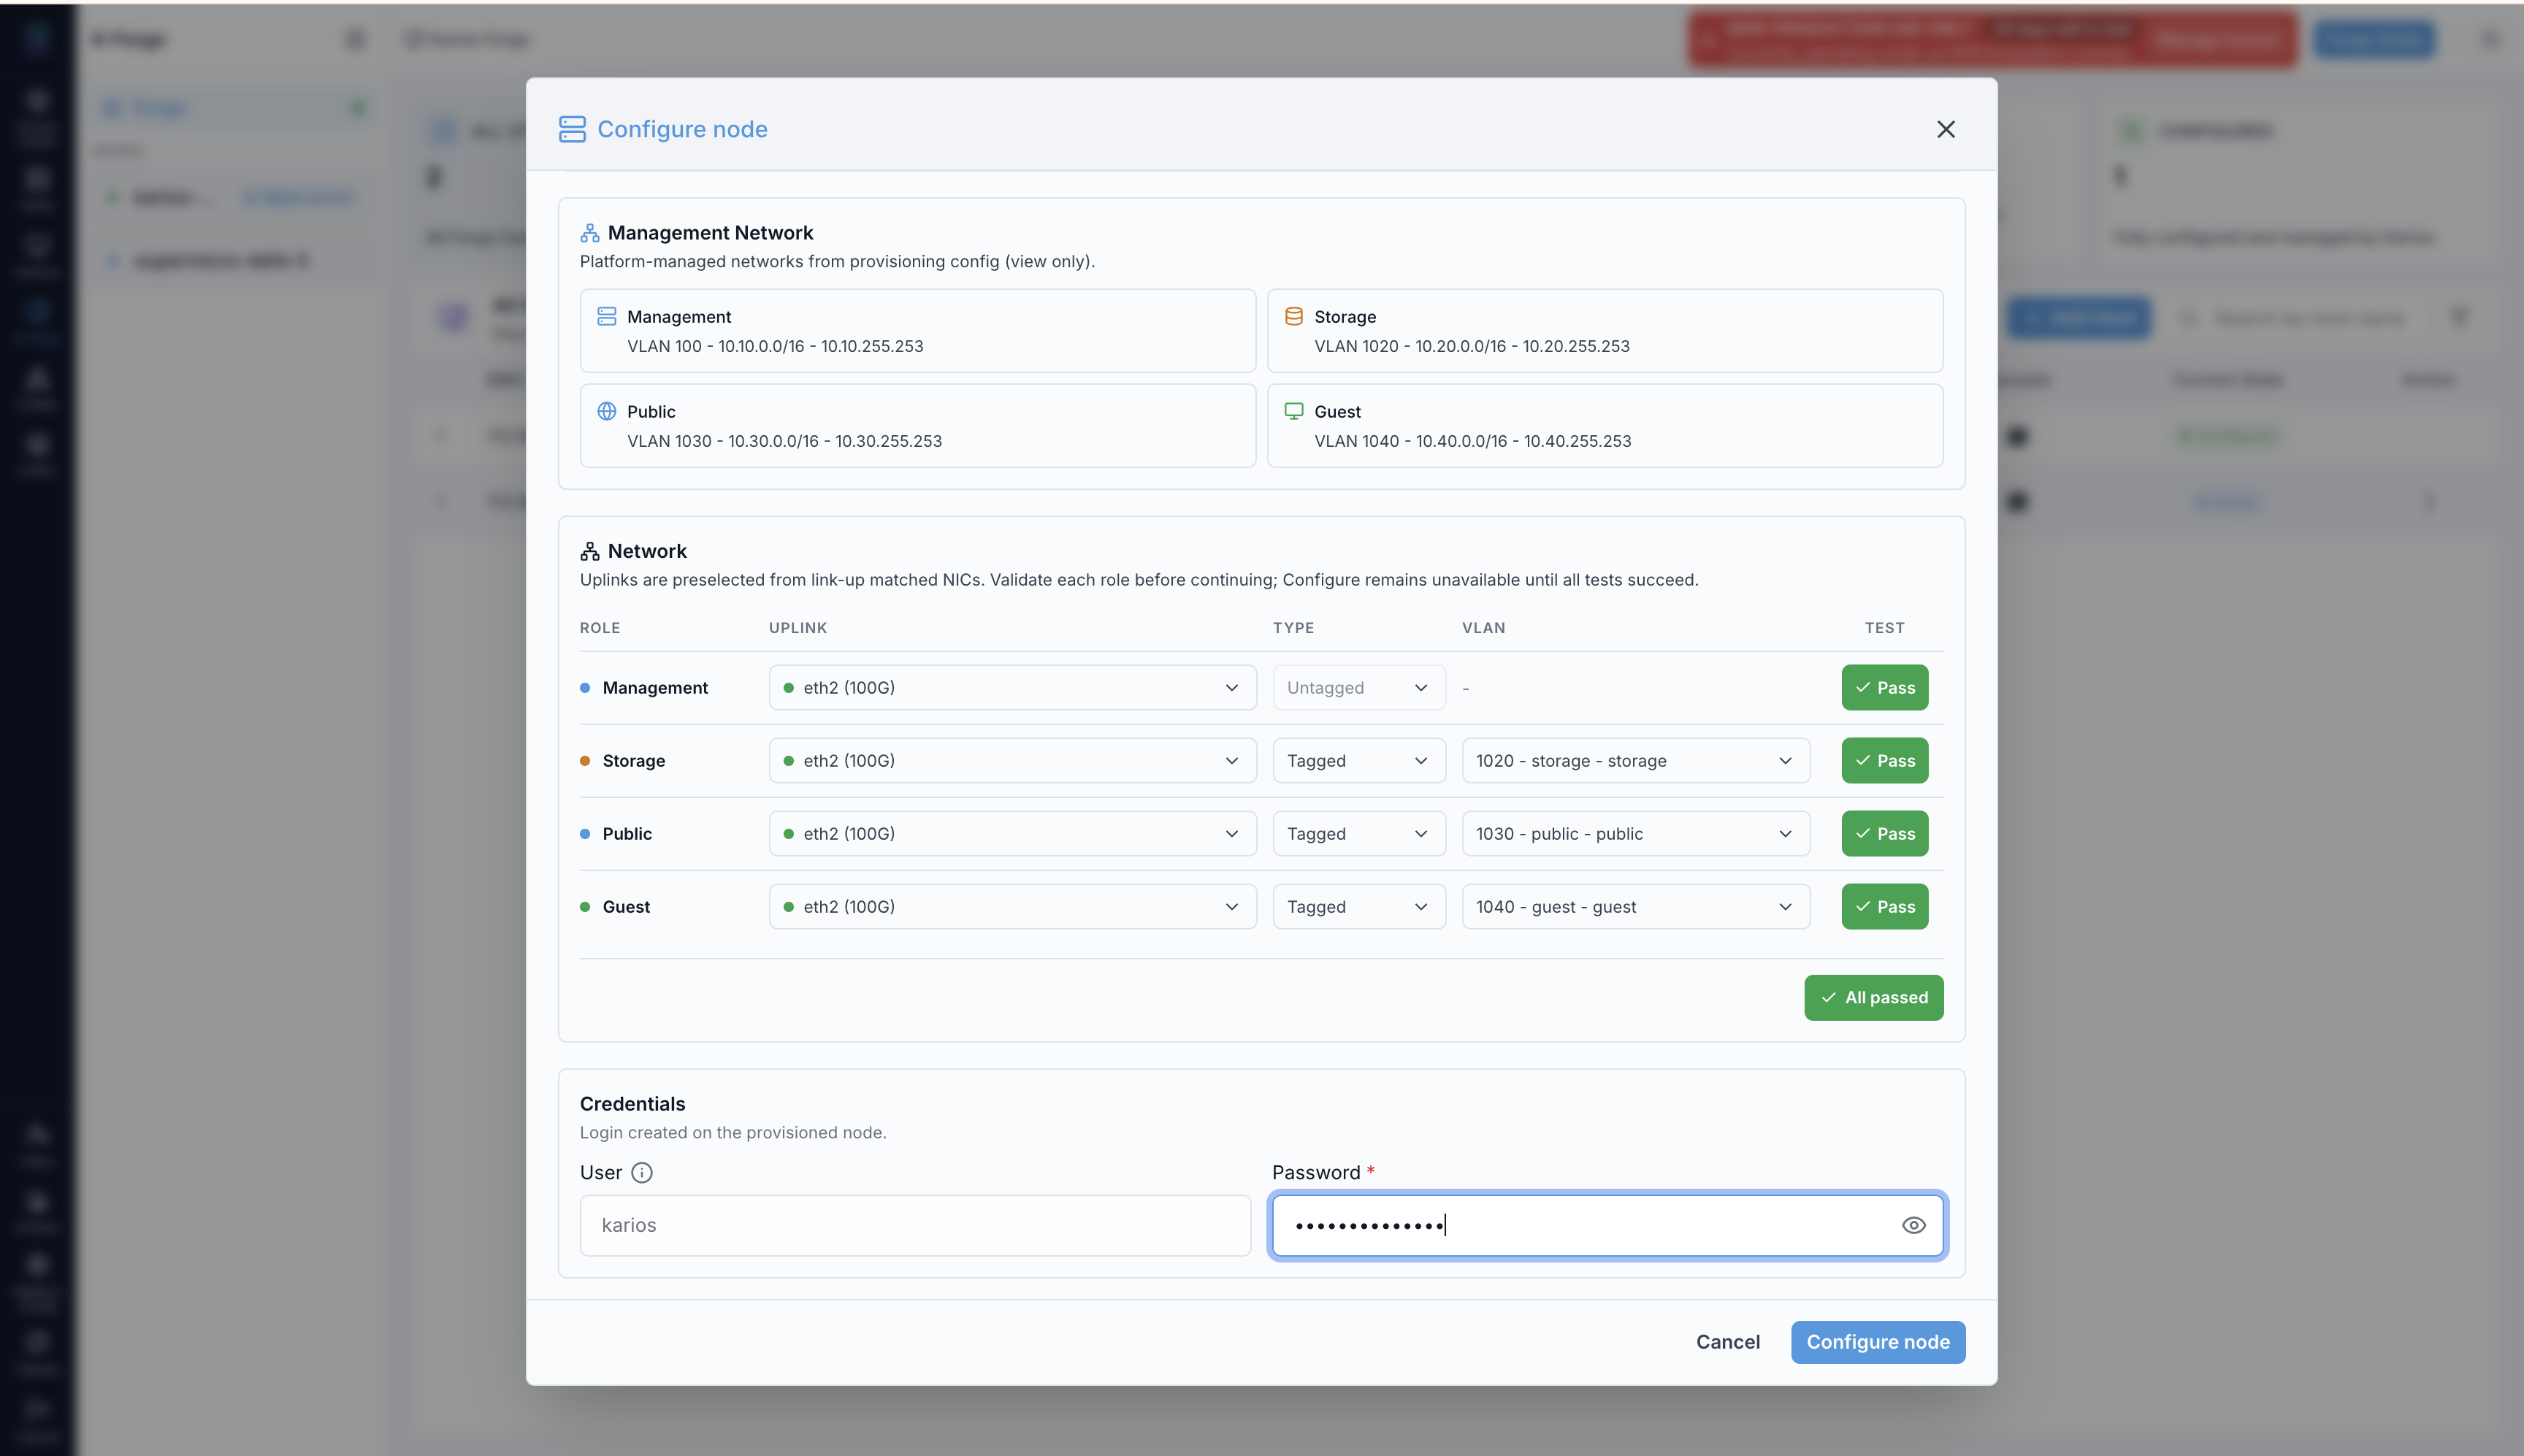
Every role passing, and Configure node enabled.
Important
Network validation is a hard gate, not advice. Configure node becomes
available only after every role passes.
Setting Credentials
Credentials creates the login on the node being configured. The user is
karios; you set the password. It is required before configuring can start.
Watching The Install
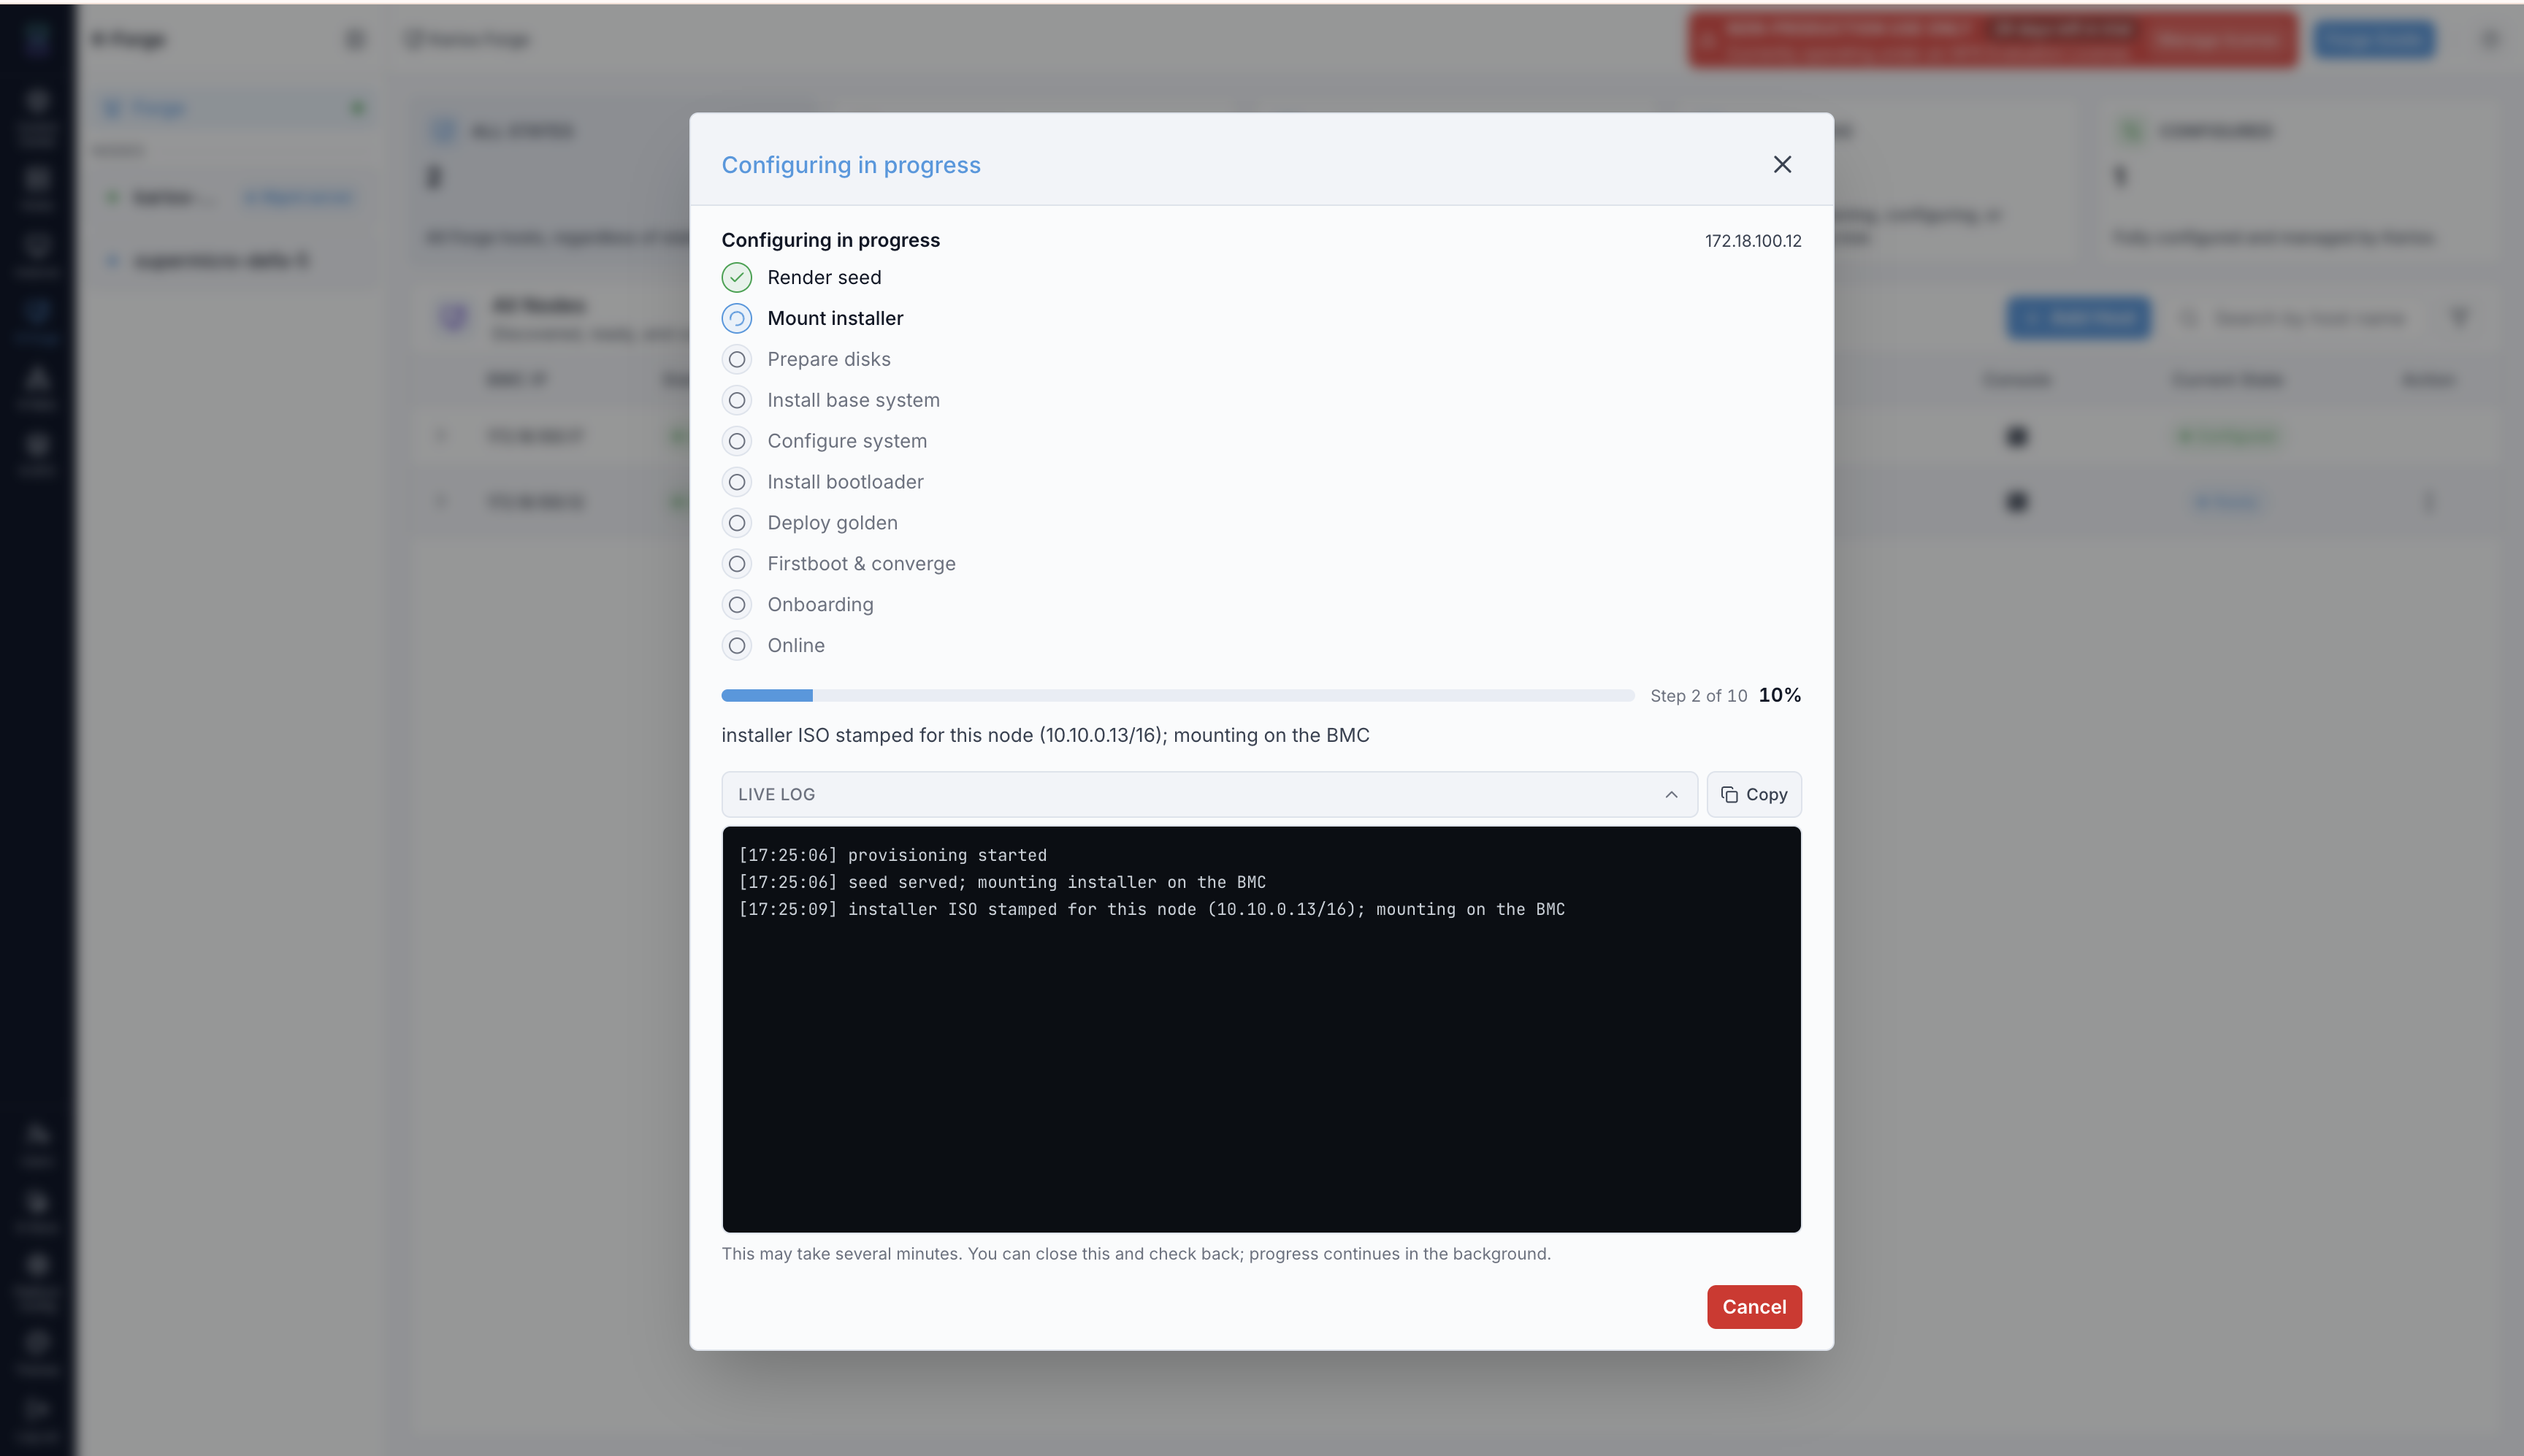
Configuring runs ten named stages, with a live log throughout.
The install runs ten stages: Render seed, Mount installer,
Prepare disks, Install base system, Configure system,
Install bootloader, Deploy golden, Firstboot & converge,
Onboarding, and Online. The dialog reports the current step, a
percentage, and a live log.
The host’s row shows the same progress, so you can close the dialog and let it
run. A Cancel control is available while it is in progress — see
Canceling The Install for what happens when you use it.
Note
The server cold power-cycles and runs a BIOS POST partway through, which takes several minutes with no visible movement. This is expected.
Expected Outcome:
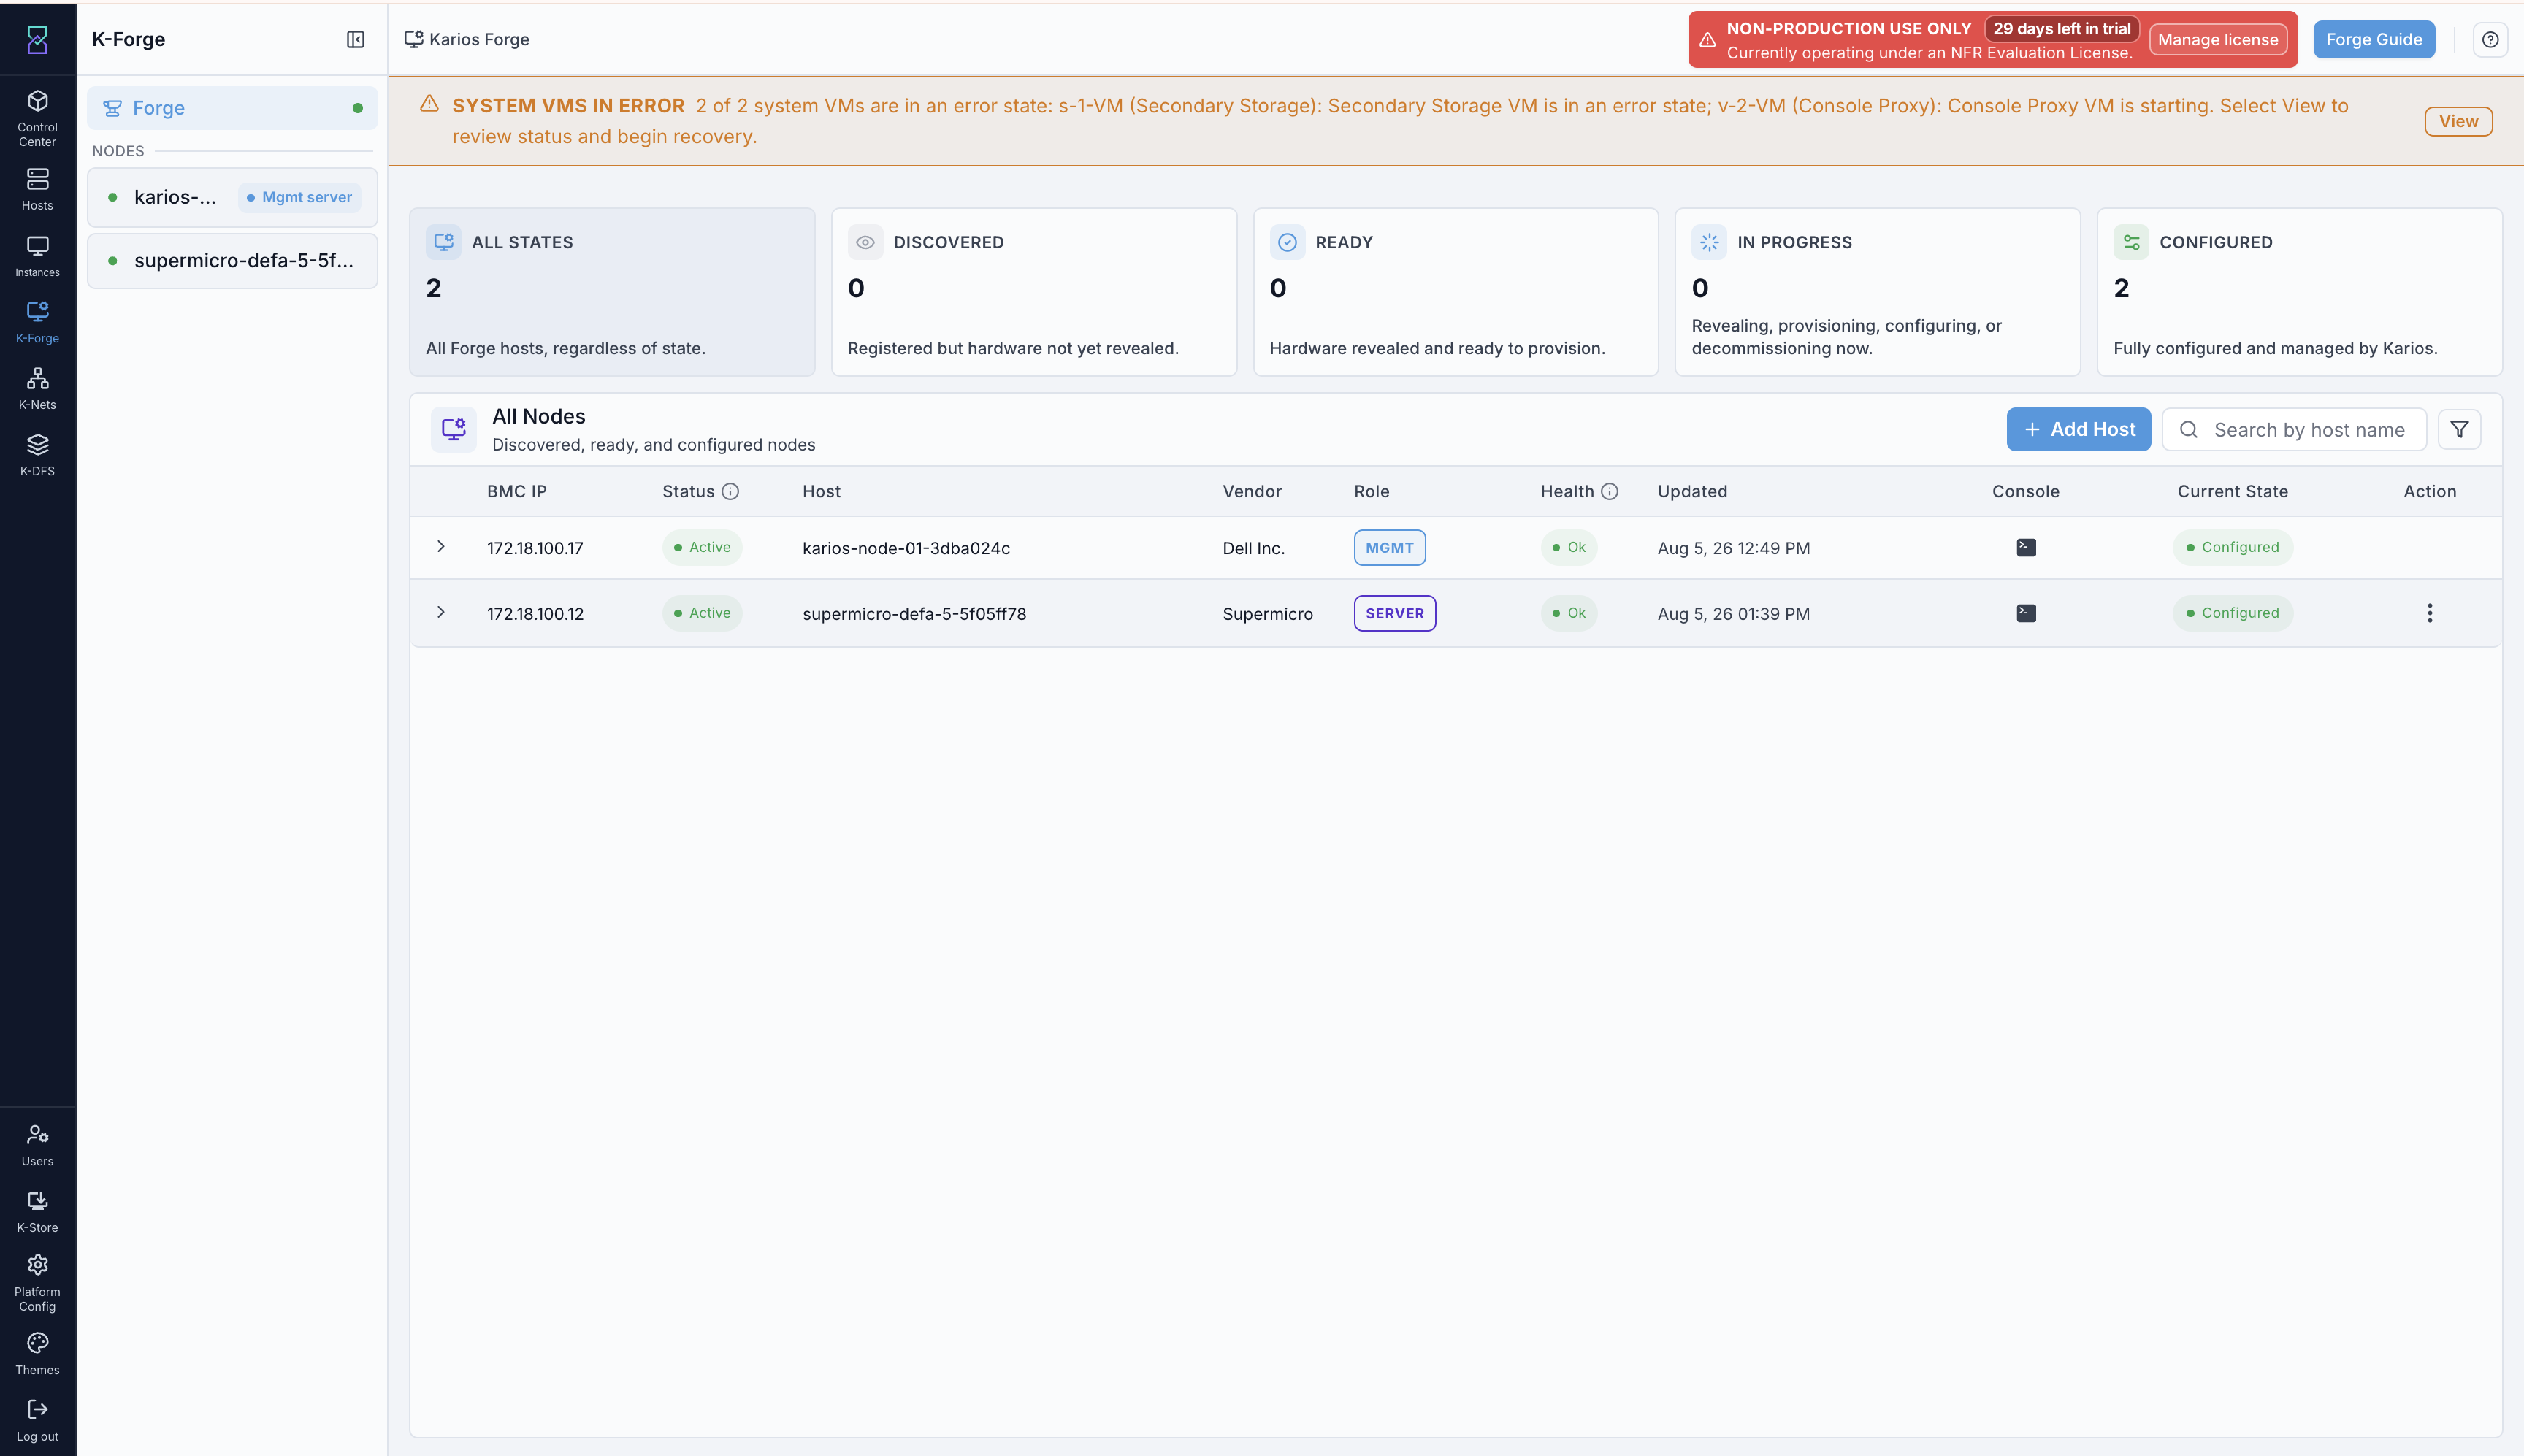
The host reaches Configured and is managed by Karios.
The host’s Current State becomes Configured and the Configured card
count increases. The host name gains a unique suffix during this stage, so the
row will not read exactly as it did before.
Note
A SYSTEM VMS IN ERROR banner may appear across the top of the dashboard at
this point, naming the Secondary Storage and Console Proxy VMs. This is
expected while those system VMs start, and does not mean the node failed to
configure.
If this fails:
By the time configuring starts, the disks are being written to - stage three of
ten is Prepare disks - so a failure part-way leaves a machine that is
neither the server you started with nor a working node.
Read the live log for the stage that failed. The
Copycontrol gives you the whole log for a support case.To start the host over, use
Decommission. It returns the host toDiscoveredwith its disks wiped - see Decommission.Discoveredmeans registered but not yet revealed, andConfigurerequiresReady, so the host’s hardware must be revealed again before it can be configured.Use
Re-run Hardware Revealonly if the hardware inventory itself looks wrong; it does not undo a partial install.
Canceling The Install
Clicking Cancel does not just stop the install — it triggers an automatic
Rolling back provision job that undoes the partial install and wipes the
node, reusing the same named stages as Decommission.
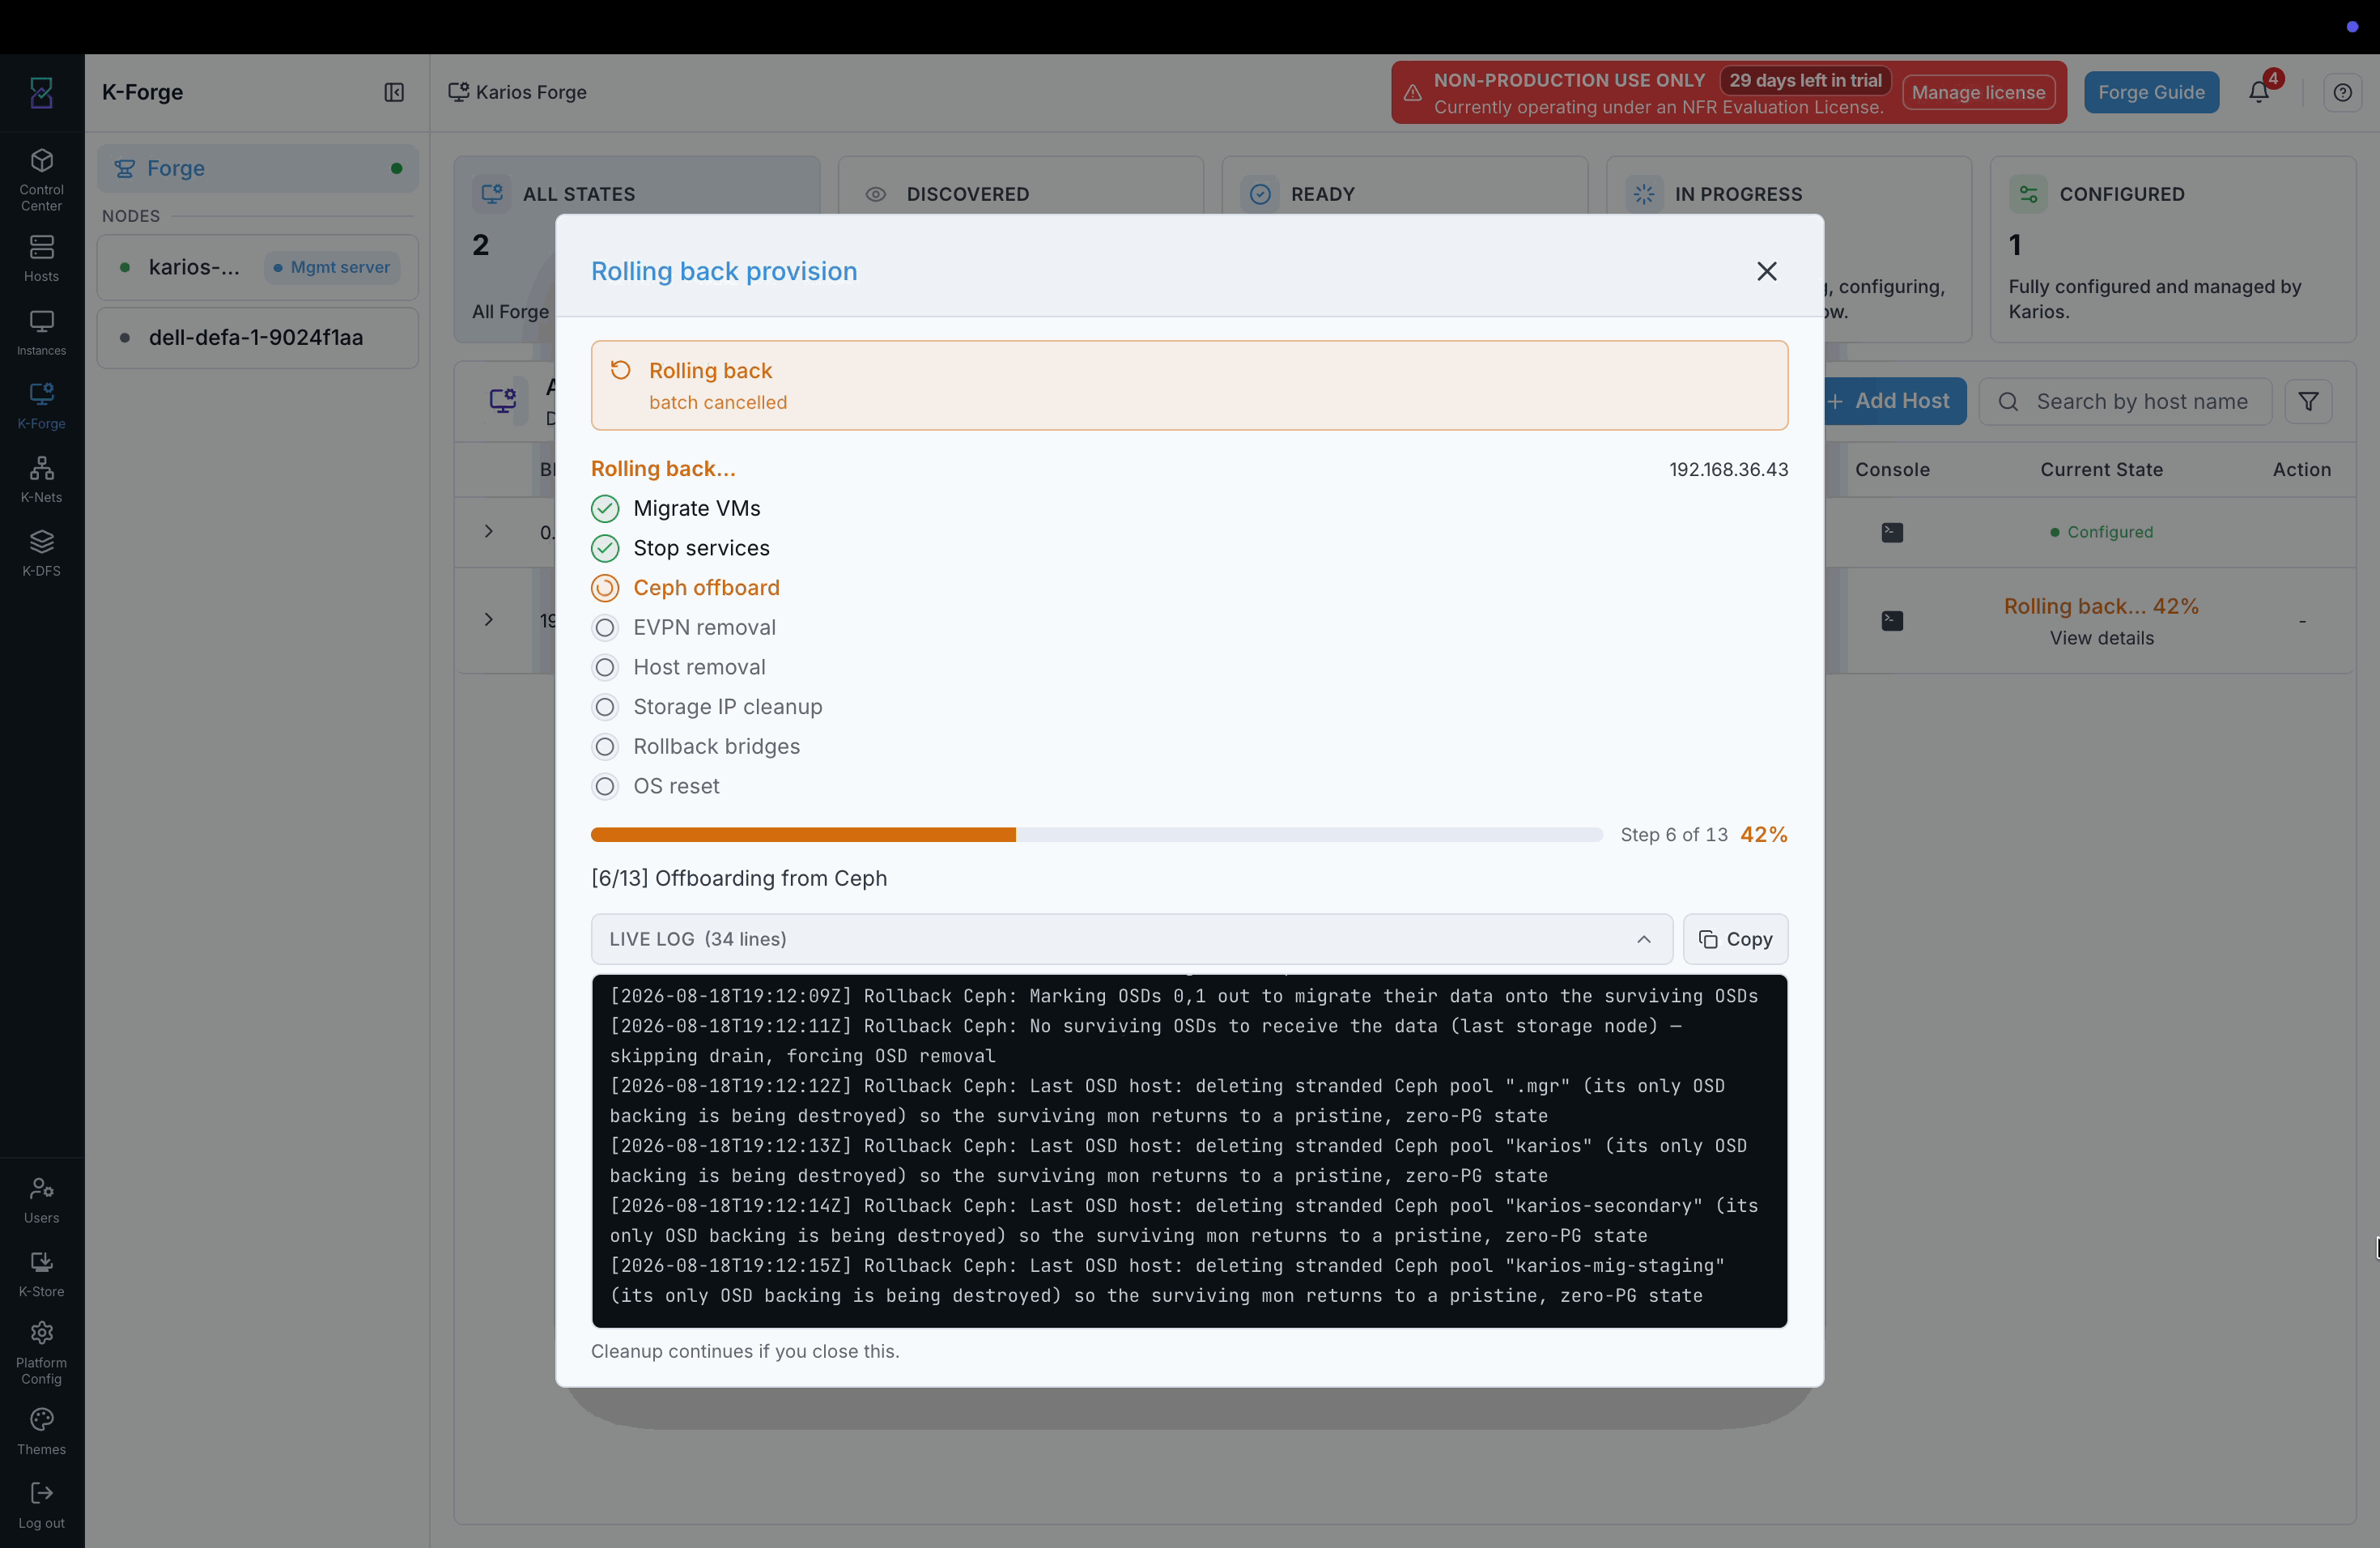
Rollback in progress after Cancel, with the same stage checklist, step counter, and live log used by decommission.
The rollback runs Migrate VMs, Stop services, Ceph offboard,
EVPN removal, Host removal, Storage IP cleanup, Rollback
bridges, and OS reset, then continues through firmware and IP cleanup.
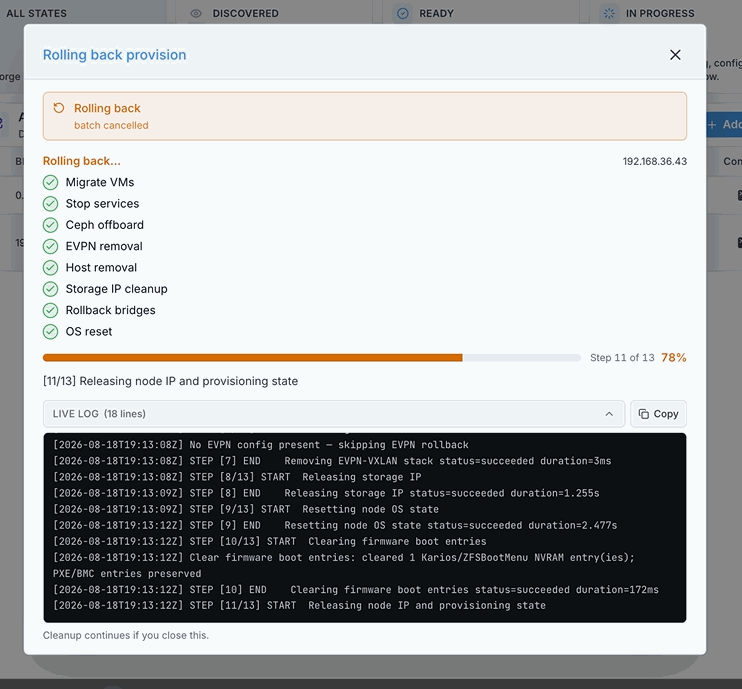
Later stages clear firmware boot entries and release the node’s IP and provisioning state.
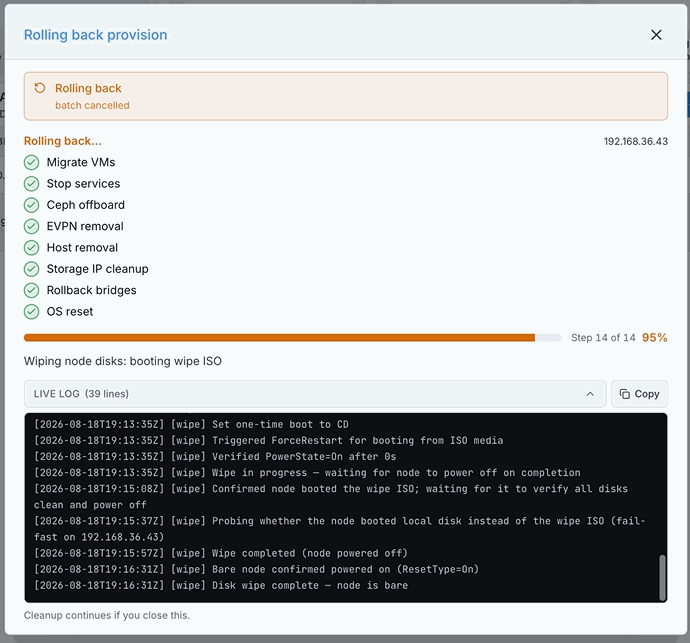
The rollback ends the same way decommission does: the node’s disks are wiped.
As with decommission, closing the dialog does not stop the rollback — cleanup continues in the background.
Expected Outcome:
The node’s disks are wiped and it returns to
Discovered, the same outcome as a Decommission. Reveal the hardware again before configuring it.
Node Actions
Open a host’s Action menu from the end of its row.
Note
The menu’s contents depend on the host’s state. The actions below are those
offered on a Ready host.
At
Discoveredthe host is registered but its hardware has not been revealed.ConfigurerequiresReady, so aDiscoveredhost - including one returned by a decommission - cannot be configured until its hardware has been revealed and it reportsReady.At
Configuredthe menu offersDecommissionalone - see Decommission.
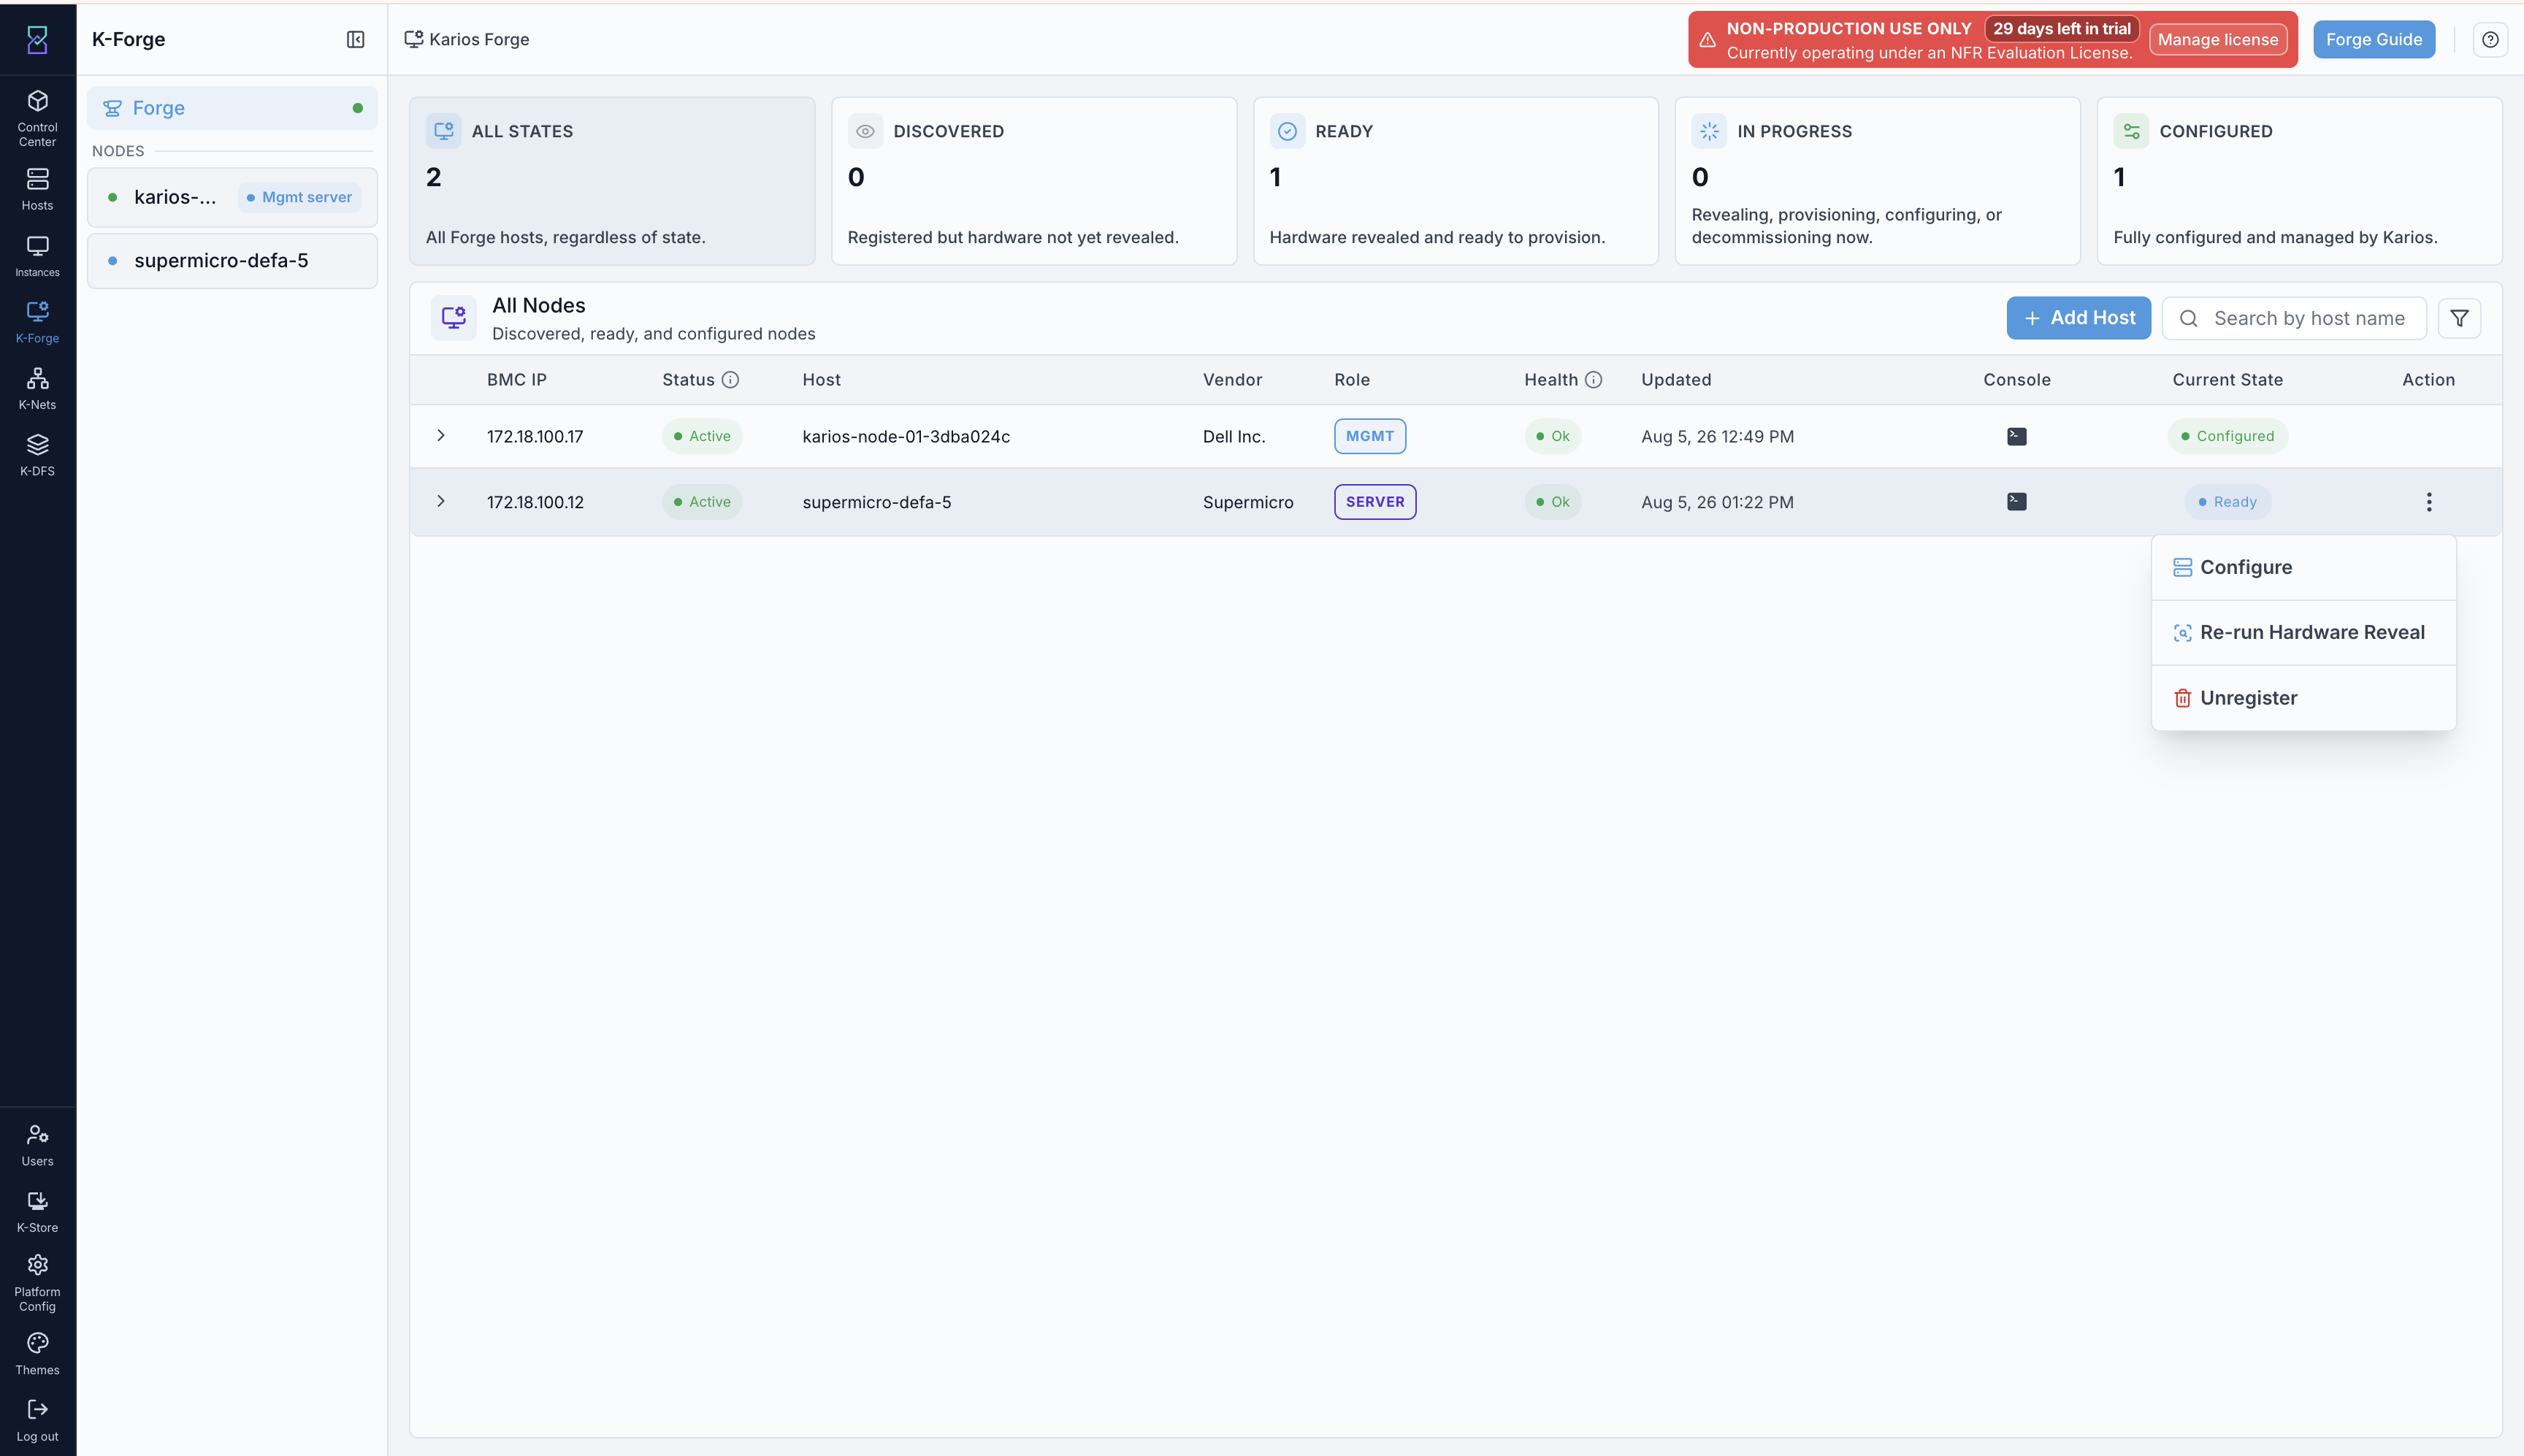
The per-host action menu.
Action |
What it does |
|---|---|
|
Installs Karios and joins the host to the cluster. See Configure The Host |
|
Runs the discovery boot again. Use it when a reveal failed or returned incomplete hardware |
|
Removes the host record from K-Forge so it can be added again from
scratch. It removes the record, not the installation - it does not undo a
configure or clean the machine. To reset a host that has already been
configured, use |
Troubleshooting
What you see |
What to do |
|---|---|
A newly added host never leaves |
The reveal has not started or cannot reach the machine. Confirm the BMC
address and credentials, that |
Reveal stalls, or the log stops advancing |
Open the reveal dialog and read the live log for the current stage. A deep
scan can legitimately take 10 to 15 minutes. If it is stuck, use
|
Reveal finished but the hardware looks wrong or incomplete |
Run |
|
Read the red line in the dialog footer - it names exactly what is outstanding. The usual causes are an unacknowledged disk-size warning, a network role that has not passed its test, and a missing administrator password. |
No disks can be selected, or the layout you want is unavailable |
|
A network role will not pass its test |
Check the uplink, tagging mode, and VLAN for that role against your switch configuration. Uplinks are preselected from NICs with link up, so a role on the wrong NIC will not pass. |
The host has no |
Only |
→ Next: Decommission