Network Config
Use Network Config to declare the cluster-wide MTU, and to manage the zone DNS
resolver and NTP time source. This page covers all three tabs: Cluster MTU,
DNS, and NTP.
Network Config helps with:
Setting one packet size per role bridge for the whole cluster
Rolling the new size out to every node under supervision, proven per node before it is kept
Detecting and correcting nodes that drift from the declared value
Term Definitions:
Declaration: the fleet-wide MTU value recorded per role. There is one declaration for the cluster, not one per zone or per pod.Rollout: the supervised job that raises every node to the declared value and proves the path before committing.Divergence: a device carrying a different value than declared.Role bridge: the bridge a declared value applies to -Management(cloudbr0),Storage(cloudbr1), orPublic bridge(cloudbr2).
Step: Open Network Config
When to Use: Use this to check or change the cluster MTU.
Purpose:
Open the Cluster MTU tab to read current agreement and rollout state before
making a change.
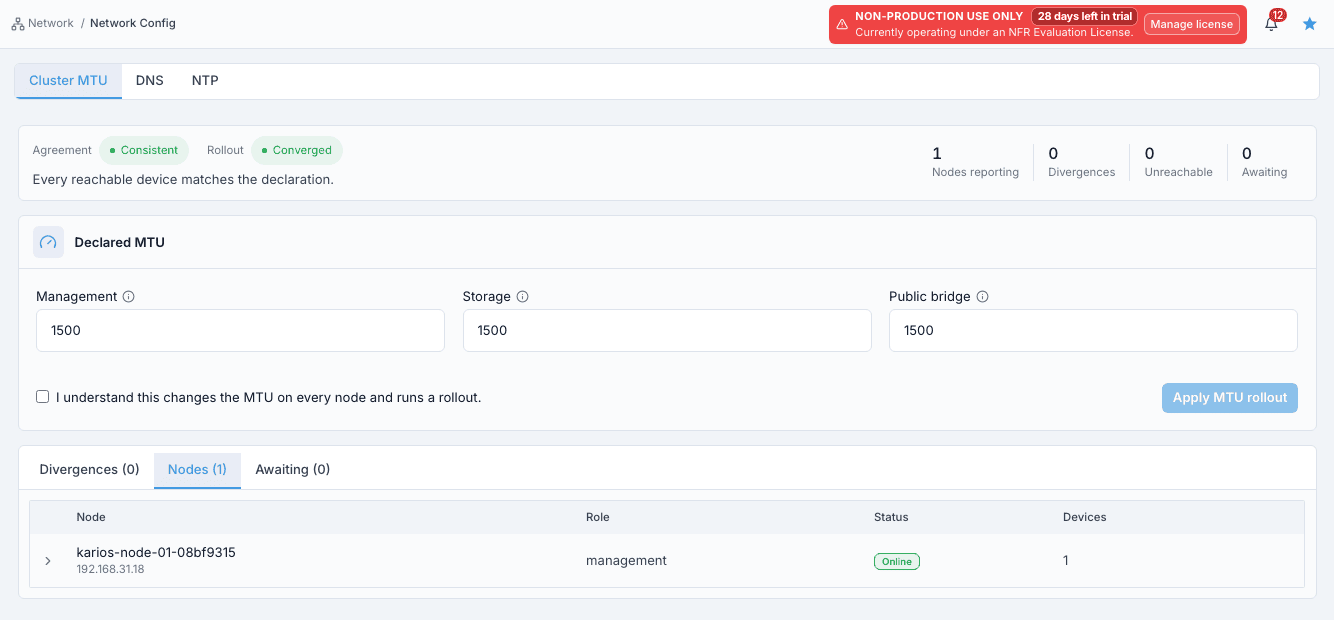
Steps:
In the left rail, click
K-Nets.In the K-Nets menu, click
Network Config.Network Config opens on the
Cluster MTUtab.
Expected Outcome:
The status strip,
Declared MTUform, and device inventory are visible.
If this fails:
Confirm your role has the network view permission.
Confirm you are in the correct site/environment context.
Reading the Status Strip
The strip answers one question: does the cluster match what is declared.
Item |
Meaning |
|---|---|
|
Whether every reachable device carries the declared value - |
|
State of the current or last rollout: |
|
Nodes that answered the collection. |
|
Devices carrying a different value than declared. A rollout can correct them. |
|
Nodes that did not answer. Not counted as agreeing. |
|
Devices that are correct but still waiting on something outside the platform’s control. |
Device Inventory
The inventory has three tabs. Nodes lists every node with its role, status,
and device count - click a row to expand it and see each device. Divergences
lists every device that does not match, with a Detail column explaining the
mismatch. Awaiting lists devices that are correct but not yet settled.
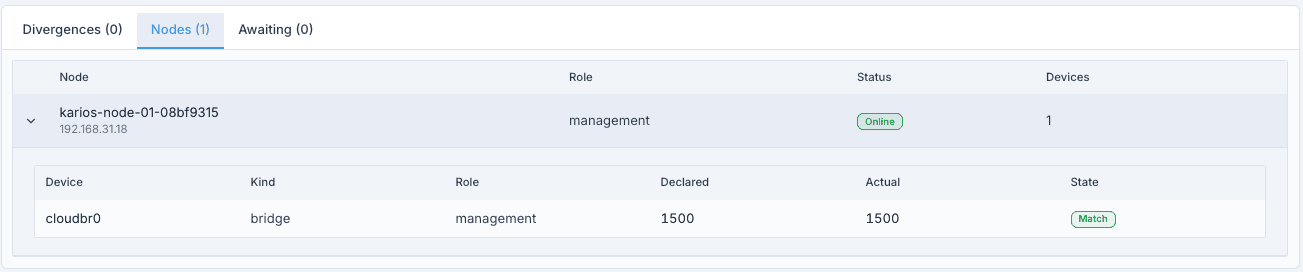
Table columns:
Column |
Meaning |
|---|---|
|
The bridge or interface name, for example |
|
The device type, for example |
|
|
|
The value in the declaration. |
|
The value the device carries now. |
|
|
What You Declare
Field |
Bridge |
Carries |
|---|---|---|
|
|
Node-to-node control plane traffic. |
|
|
Storage replication and client traffic. |
|
|
The host public bridge. |
A blank field means the role is not managed, and the rollout leaves that bridge
as-is (sent as 0 through the API). Two values are declared elsewhere, not
here:
Guest networks: a guest network’s MTU is chosen per network, on that network’s page.Underlay: the fabric underlay is not part of this declaration - see SDN Fabric.
Rule |
Value |
|---|---|
Minimum |
|
Maximum |
|
Format |
Whole number |
Blank |
Not managed |
Step: Change the Cluster MTU
When to Use: Use this to raise or lower the MTU on one or more roles.
Purpose: Declare the new value and run a supervised rollout that proves every node’s path before keeping it.
Steps:
Enter the new value in one or more fields. A value outside
1280-9216is rejected under the field before anything is sent, for exampleManagement MTU must be between 1280 and 9216.

Tick
I understand this changes the MTU on every node and runs a rollout.Click
Apply MTU rollout. The button is enabled only when a value differs from the declaration (or a device is divergent), no field has an error, the box is ticked, and no rollout is running.

Review the roles listed in the
Start MTU rollout?dialog, then clickStart rollout.
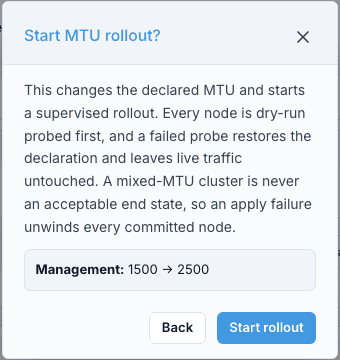
Expected Outcome:
A supervised rollout starts and the dialog closes.
If this fails:
Check the field errors named in red under the form.
Confirm no other rollout is already running.
Step: Monitor and Confirm the Rollout
While the rollout runs, a Rollout in progress card shows the current step,
a progress bar, and how many node/role pairs are done. The form is locked, and
guest network creation, role bridge edits, and a second rollout are refused
until it settles. Cancel rollout stops the run and restores nodes that
already committed.
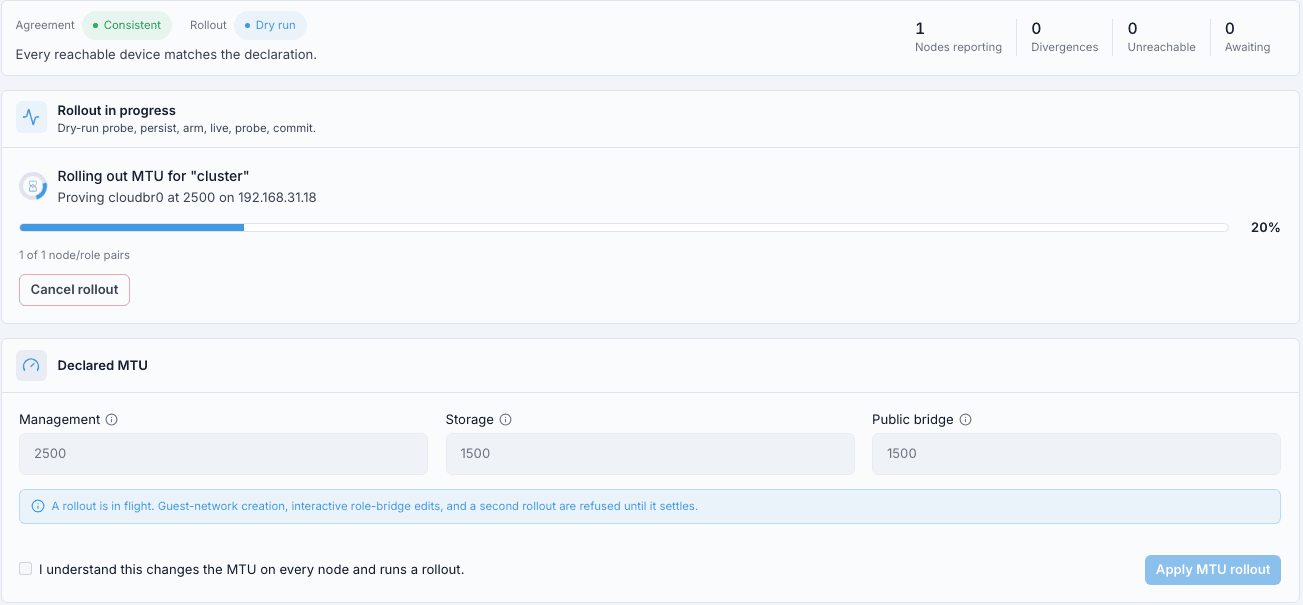
Stage |
What happens |
|---|---|
|
The declaration is recorded and the job starts. |
|
Every node’s bridges and addresses are gathered, and each node is paired with a probe target. |
|
Every node raises the value, sends a full-size frame to its probe target, and reverts. Nothing is kept. |
|
Every node raises the value again and keeps it, each proving its own path. |
|
The value is applied to platform settings and existing guest networks. |
|
The run succeeded. |
When the rollout succeeds, the card reads MTU rollout converged. Nodes and
downstream both done. and the status strip shows Agreement: Consistent /
Rollout: Converged.
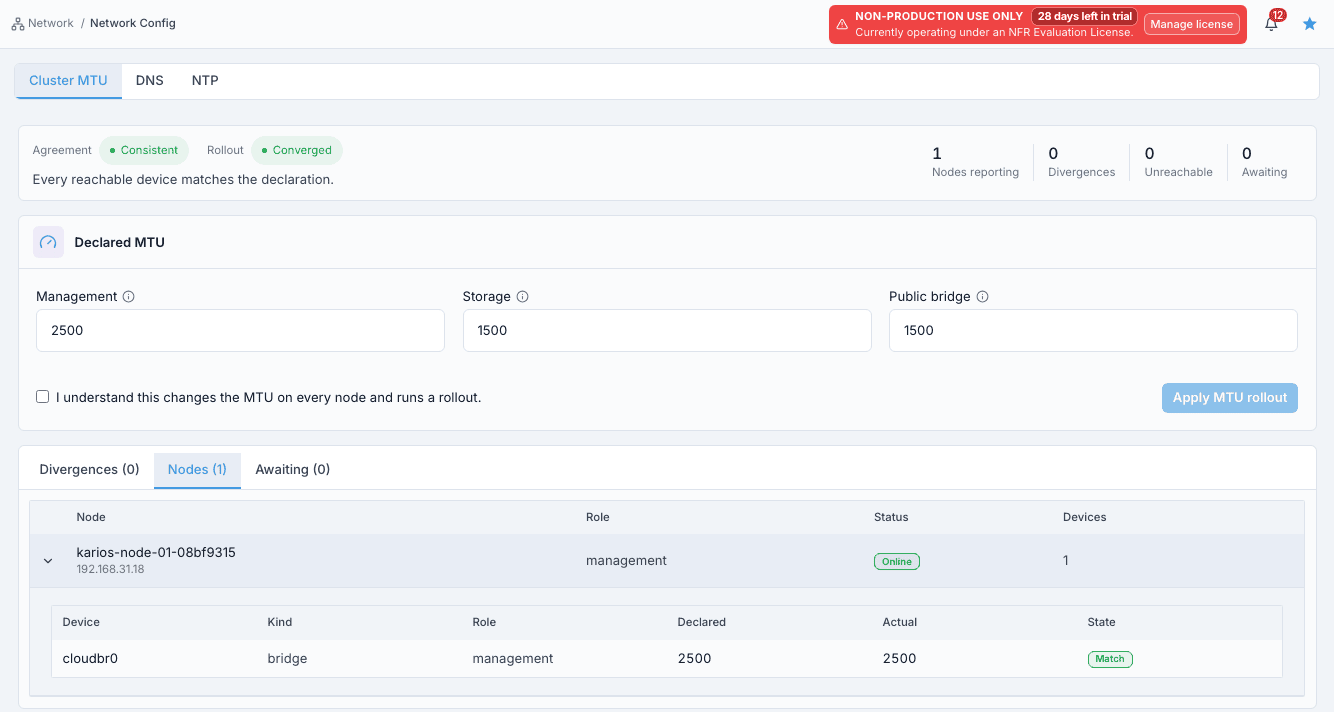
If the dry run fails on any node, nothing is kept anywhere and the previous
declaration is restored. If applying fails on any node, every node that
already committed is restored - the Rollout status shows Unwinding
while that happens. If only the downstream stage fails, nodes are not
unwound (the data path is already correct); the rollout reports Partial -
submit the same values again to finish.
Probing and Safety Limits
Each node is paired with a peer on the same role network, or with that role’s
gateway when there is no peer. When a role bridge exists but has no probe
target, the rollout is refused unless you tick Acknowledge unverifiable
roles and start rollout.
Limit |
Value |
Purpose |
|---|---|---|
Storage health |
Checked before the run starts and again after nodes converge |
A cluster still moving data is not resized |
Node self-restore |
660 seconds |
A node that raised its MTU restores itself if the run does not confirm it |
Job budget |
10 minutes |
Bounds the whole run |
One rollout at a time |
A second request while one is running is refused |
Step: Correct a Divergence
When to Use:
Use this when the status strip shows Agreement: Divergent, for example
after a manual change on a node.
Purpose: Re-apply the current declaration to bring drifted devices back in line.
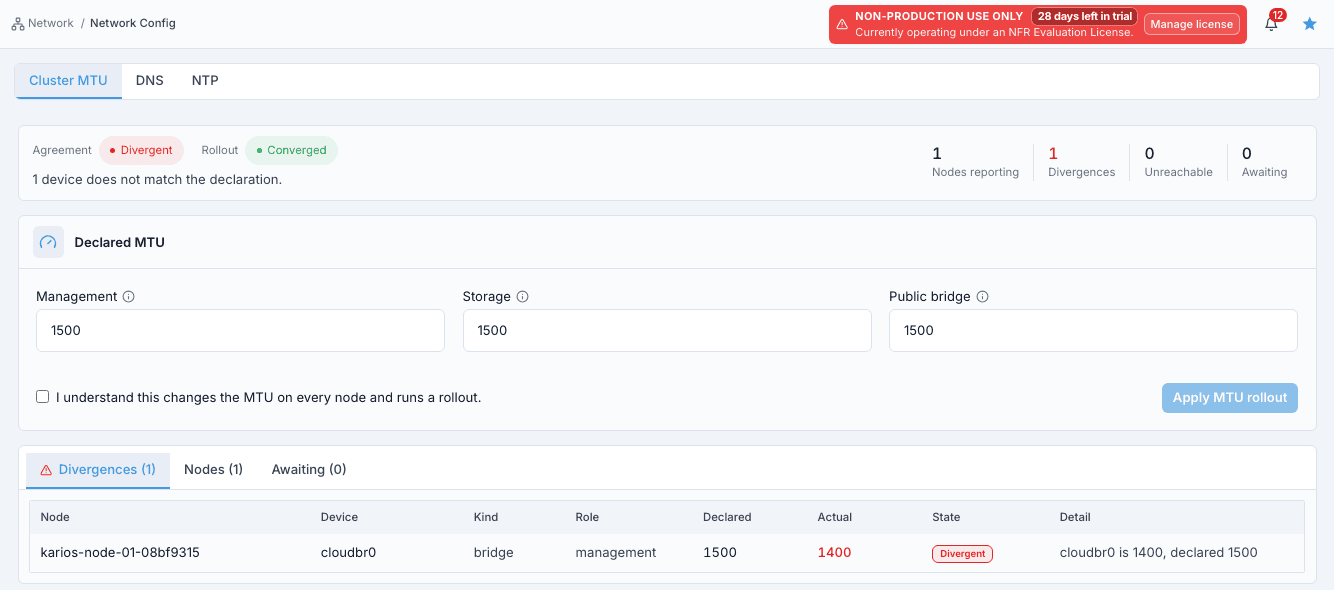
Steps:
Leave the values as they are.
Tick
I understand this changes the MTU on every node and runs a rollout.Apply MTU rolloutis enabled while any device is divergent, even with no value changed.
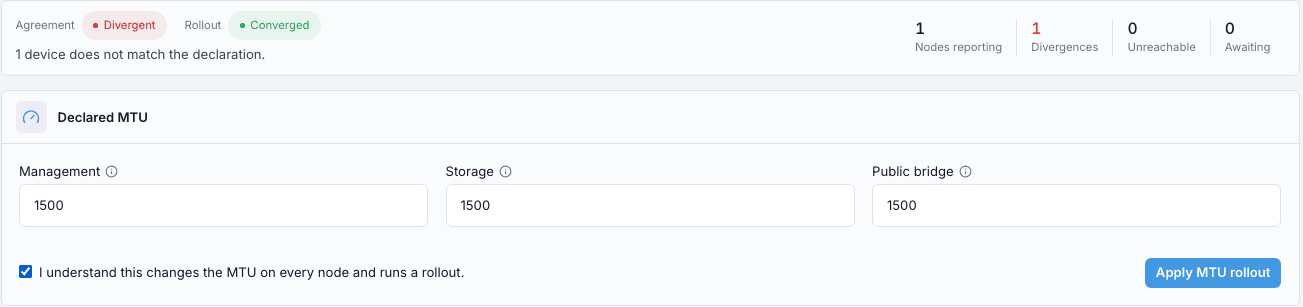
Click
Apply MTU rollout. TheStart MTU rollout?dialog showsRe-applywith the number of divergent devices. ClickStart rollout.
Expected Outcome:
Nodes that already match are left alone; the drifted node is brought back to the declared value.
Nodes That Join Later
The declaration governs every node configured after it. A new node is
configured with the declared values, and the Check MTU step in the
Configure dialog tests them against the node before Configure is allowed.
Troubleshooting
Symptom |
Meaning |
Action |
|---|---|---|
|
A field has an error, nothing changed, the box is not ticked, or a rollout is running |
Correct the field, change a value, tick the box, or wait for the running rollout |
Last rollout failed |
The dry run or apply failed on a node |
Nothing was kept, or every committed node was restored. Fix the path for the named node, then retry |
Last rollout was partial |
Every node converged, but platform settings or guest networks did not |
Submit the same values again to finish |
|
A role bridge has no peer or gateway to prove the path against |
Add a reachable target on that network, or acknowledge and proceed without proof |
Refused because storage is not settled |
The storage cluster is still moving data |
Wait for storage to settle, then retry |
A device is listed under |
The device is correct but has not picked up the value yet |
No action - it takes the new size when it next renews its address or restarts |
Rules to Remember
The declaration is fleet-wide - there is no per-zone or per-pod MTU.
Role values are
1280-9216, or blank for not managed. The underlay does not cap them.Guest network MTU is set per network, not here.
A rollout proves the value on every node before keeping it on any node.
A downstream-only failure does not unwind the nodes - submit the same values again to finish.
Only one rollout runs at a time.
API access
The same declare-and-roll-out flow is available through /network/mtu
(GET/PUT), /network/mtu/l2probe, and /network/mtu/node-apply
in the API Reference. A rollout started this way
returns 202 with a job ID and appears in the jobs list as type
mtu_rollout.
Code |
Meaning |
|---|---|
|
The rollout started. Follow it by the returned job ID. |
|
The body is malformed, a value is outside |
|
No token on the request. |
|
The caller lacks the network manage permission. |
|
A rollout is already running, or the storage cluster is not settled. |
|
The database is not available. |
Zone DNS
Use the DNS tab to set the name servers a zone hands out and uses, see
which machines are still on older values, and roll a change out to the ones
you choose.
With this tab you can:
Set the public and internal resolver pairs for a zone, with each address checked before it is stored.
See the live resolvers of every router, system VM, and host in the zone, and which of them are out of date.
Roll a change out to the devices you choose, immediately or at a scheduled time, and read the record of what the run did.
What a Zone Holds
A zone holds four addresses in two pairs. The first address of a pair is the one in use, the second is the fallback.
Setting |
Used by |
|---|---|
|
The resolvers handed to guest networks, and the resolvers the zone’s hosts use. |
|
The resolvers the system VMs are built from. |
Saving and applying are separate on purpose. Saving records the addresses on the zone and leaves every running machine alone - a router built with yesterday’s resolvers keeps them until something restarts it. Applying is the half that reaches running machines, and it restarts them, which is why you scope and time it yourself.
Action |
What it touches |
Disruption |
|---|---|---|
|
The zone record only |
None. No running device is touched. |
|
Each host rewrites its resolver configuration in place |
None. Nothing restarts and no workload moves. |
|
The zone’s virtual routers, one network at a time |
About 30-90 seconds per affected network without gateway, NAT, or DHCP. |
|
The console proxy and the secondary storage VM are rebuilt |
Console access and secondary storage transfers are interrupted while each is replaced. |
Note
Tenant machines are never restarted by this tab. They take new resolvers when they renew their address lease or reboot, so a machine on a permanent lease keeps the old values until it is restarted.
Step: Open the DNS Tab
When to Use: Use this whenever you need to read or change the name servers a zone uses.
Purpose: Reach the tab that holds the zone’s resolvers and the state of every machine that consumes them.
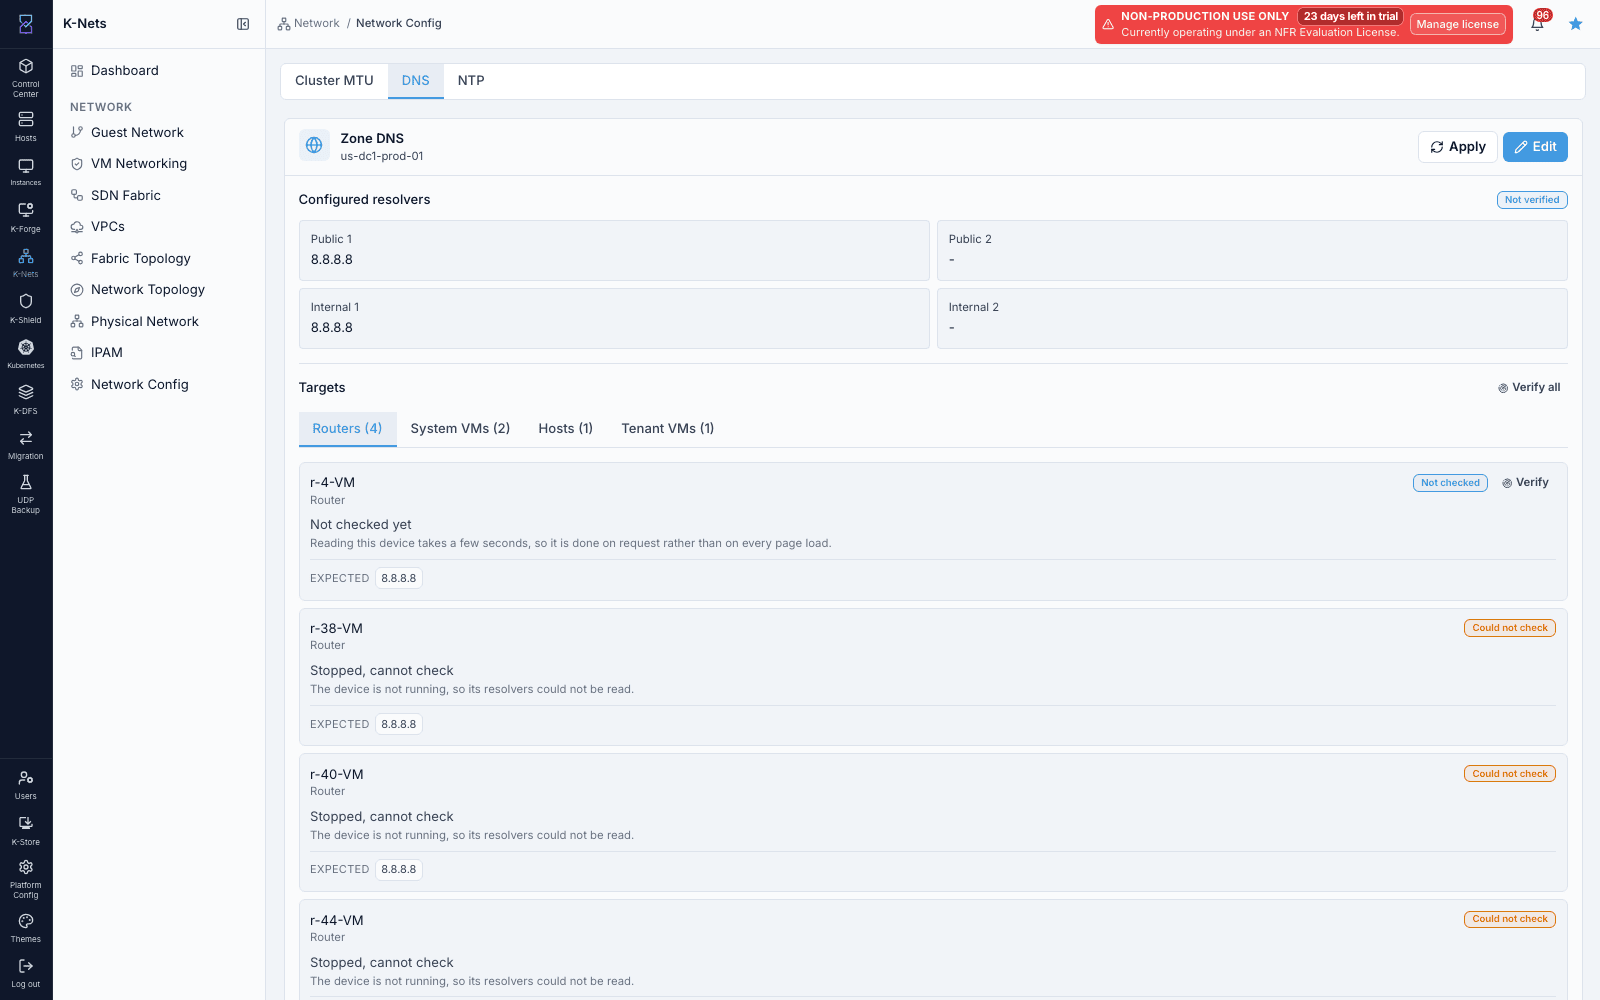
Steps:
Open
Control Center -> Network -> Network Config.Click the
DNStab. The page opens onCluster MTUby default, which is a separate setting.
Expected Outcome:
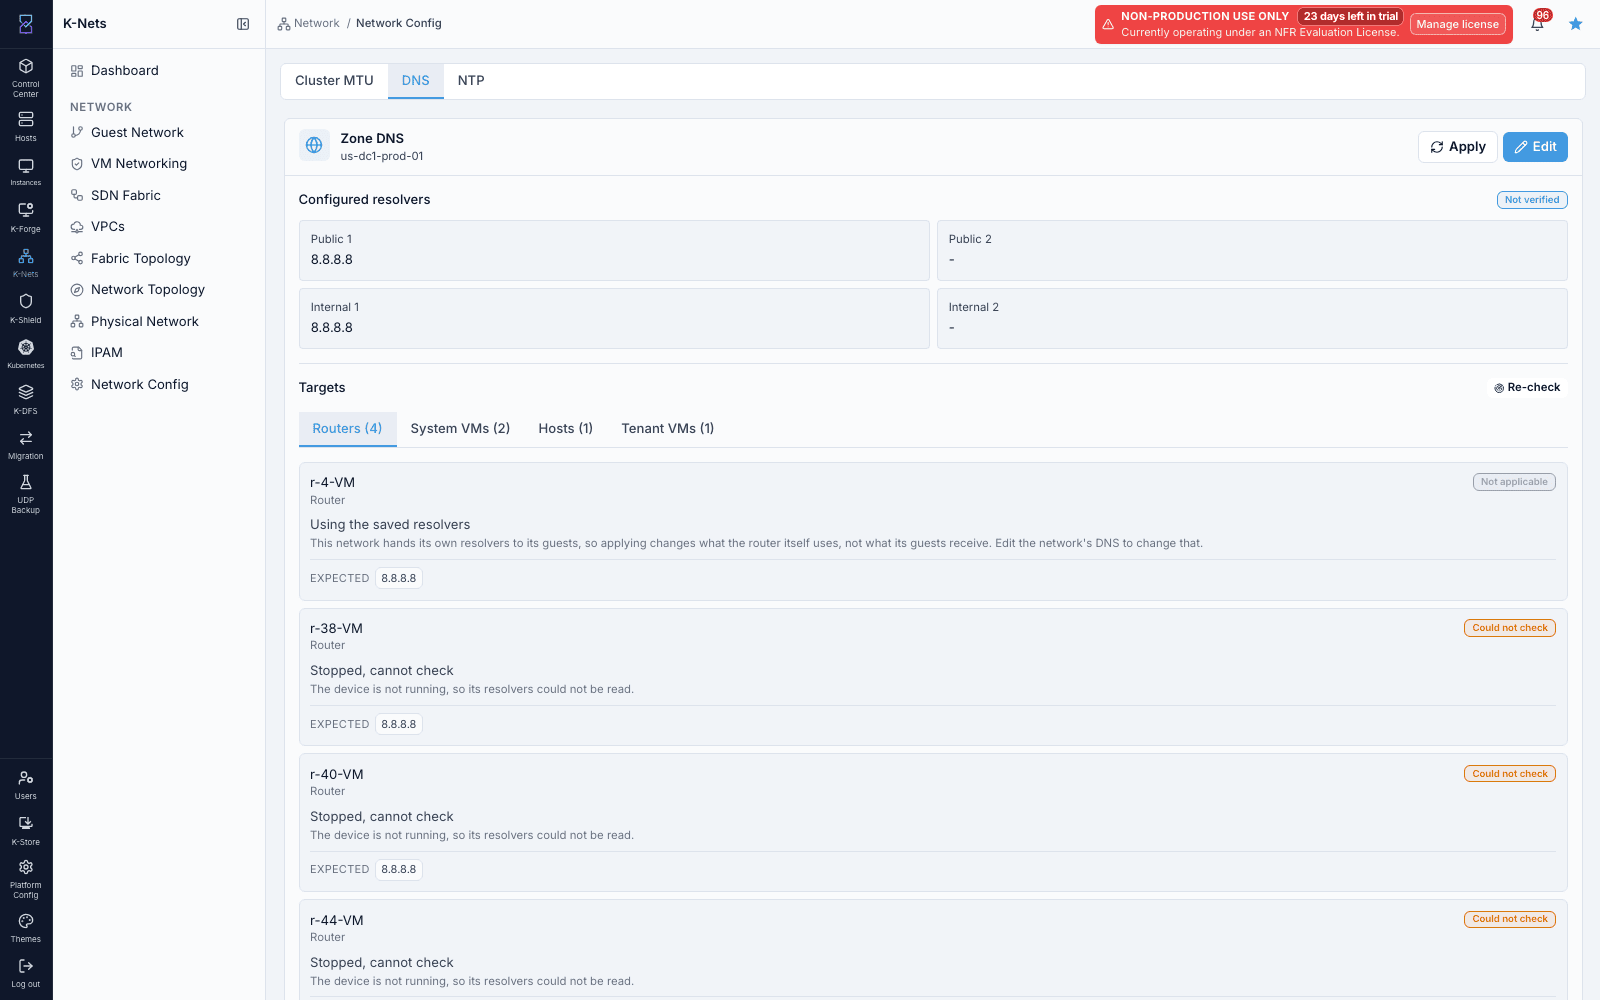
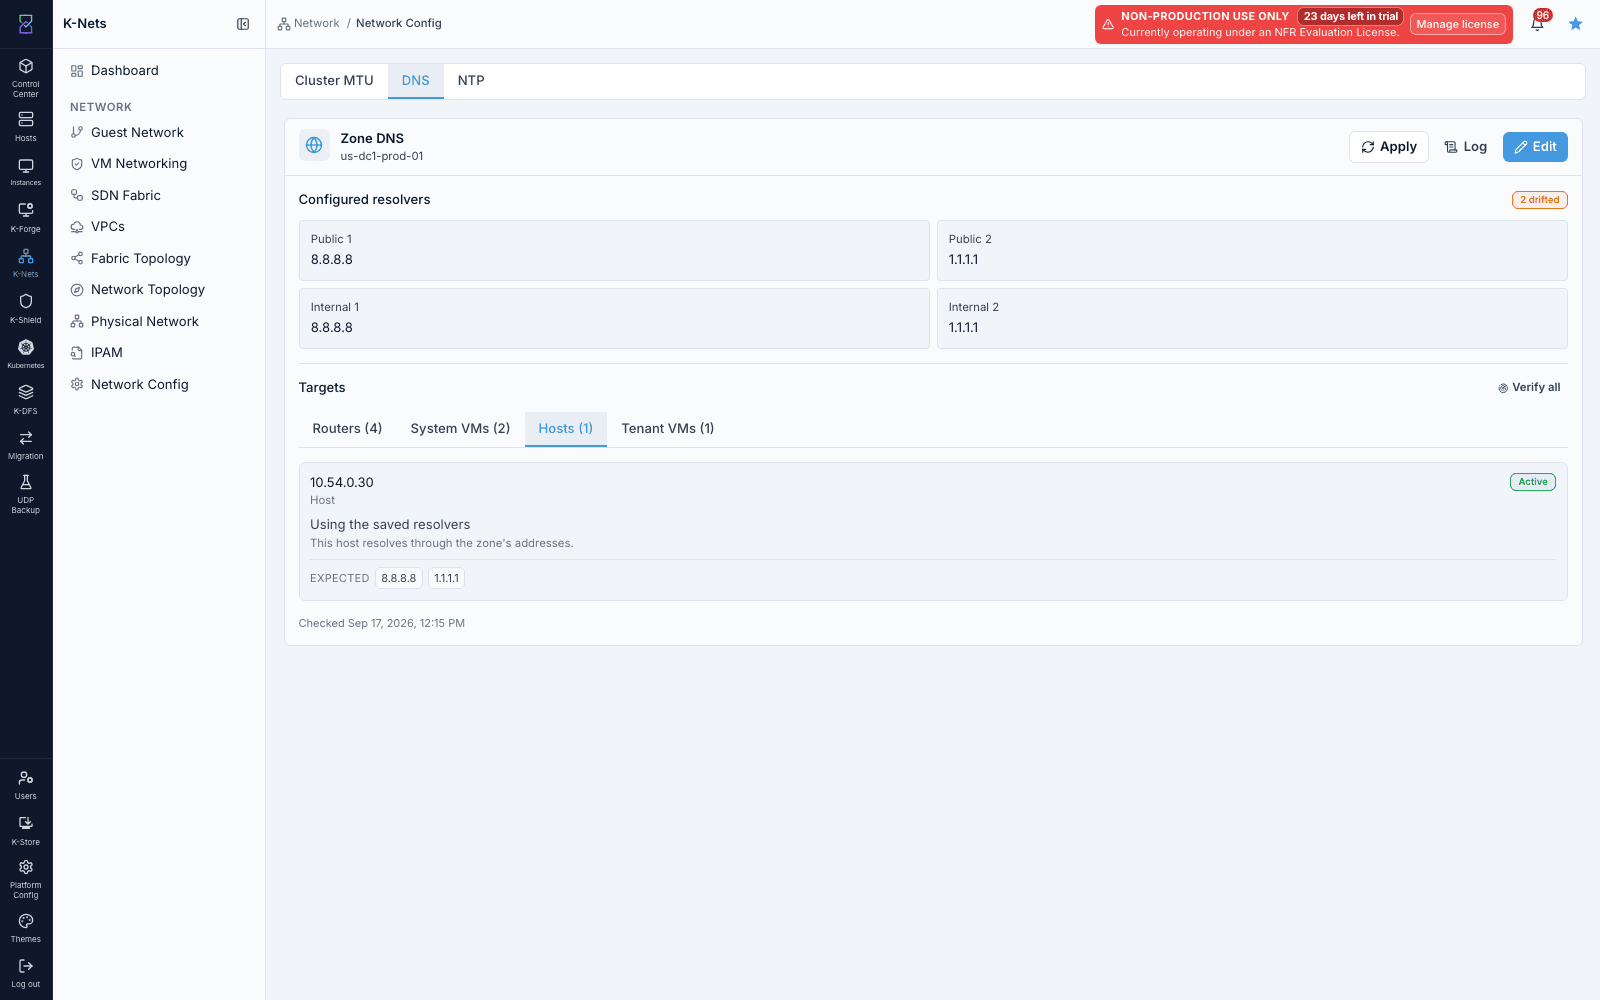
The
Zone DNScard lists the four configured addresses, and theTargetslist shows the zone’s routers, system VMs, hosts, and tenant machines.
If this fails:
The tab is missing: your account needs the network view permission.
EditandApplyare missing: changing values needs the network manage permission.
Item |
What it shows |
|---|---|
|
The four saved addresses. A dash means the slot is empty. |
|
The badge beside the addresses - |
|
The devices that consume the values, grouped as |
|
Reads the live resolvers from each device. Runs on request, not on every page load. |
|
The record of the most recent apply. Shown once an apply has run. |
State |
What it means |
What to do |
|---|---|---|
|
The device is on the zone’s saved addresses |
Nothing |
|
The device is on older values |
Run an apply for the scope that device is in |
|
The device does not take the zone’s values - a guest network handing out its own resolvers is the usual case |
Edit that network if it should follow the zone |
|
The device could not be read, for example because it is stopped. The last good reading is kept |
Verify again once the device is running |
|
No reading has been taken yet |
Use |
Step: Change the Resolvers
When to Use: Use this when the zone must resolve through different name servers, or when a pair has no fallback.
Purpose: Record new addresses on the zone after proving each one answers.
Steps:
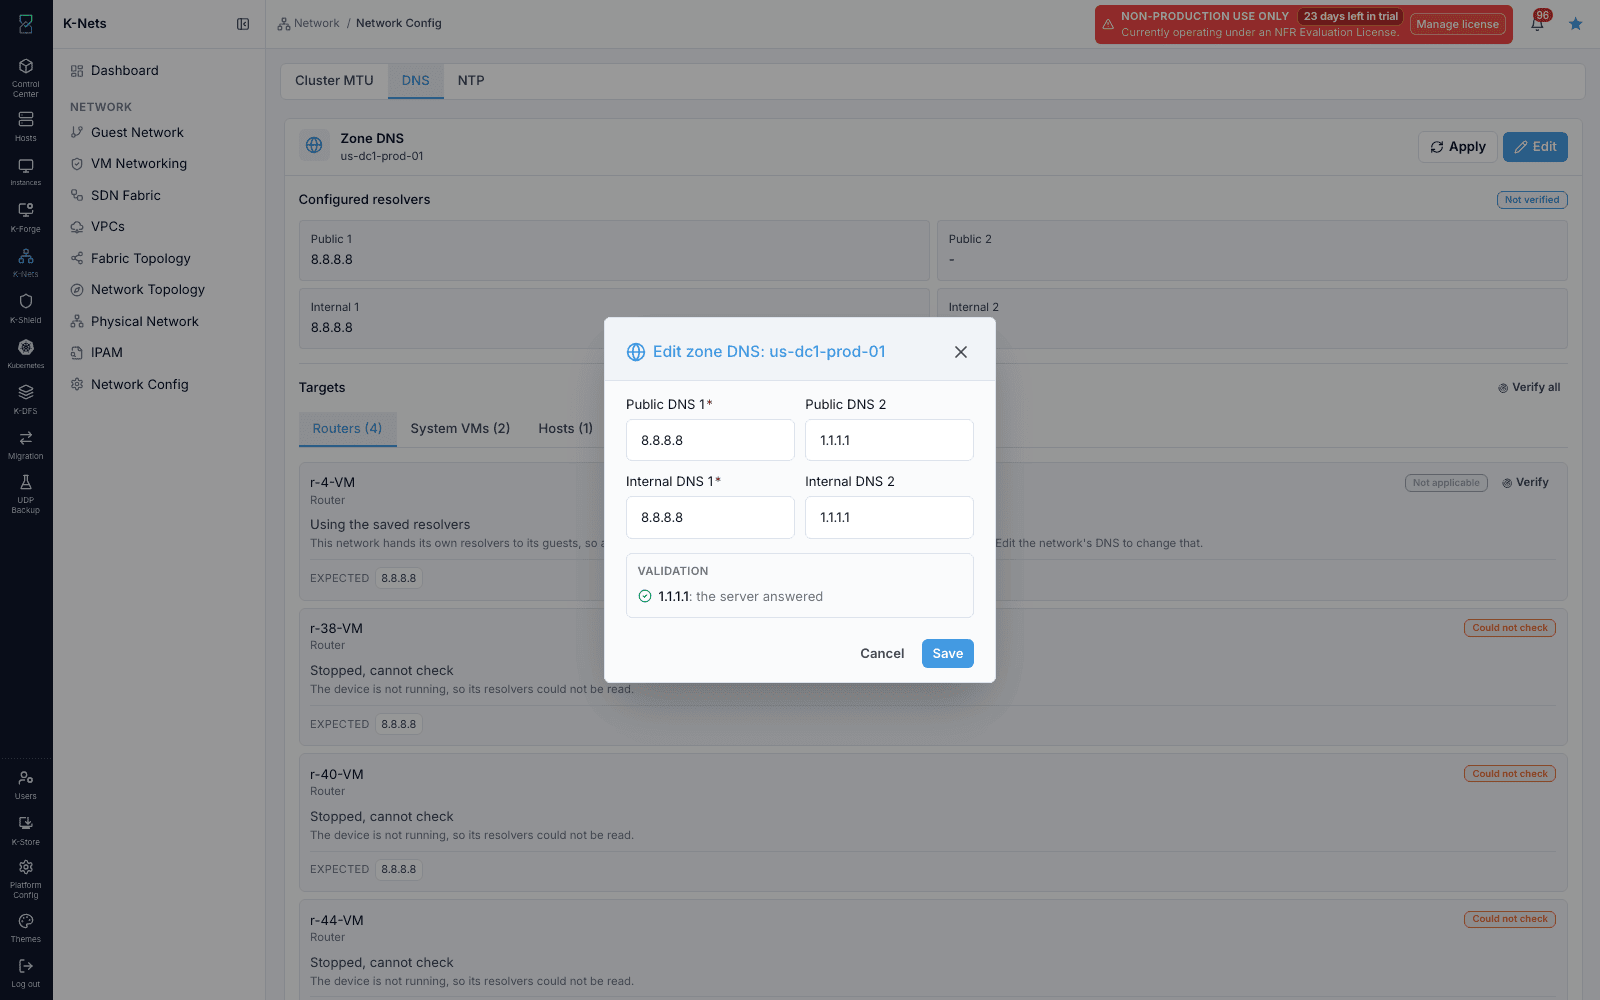
Click
Edit.Enter the addresses.
Public DNS 1andInternal DNS 1are required and can be replaced but not emptied.Click
Validate. Each new address is probed and reported; nothing is saved yet.When every new address reads
the server answered, clickSave.
Expected Outcome:
The card shows the new addresses, and the badge reports how many devices are now known to be on older values. No running machine has changed yet.
If this fails:
A primary field is empty: enter a value - a zone with no primary resolver cannot resolve anything.
Saveis refused with a conflict: an apply is pending or running for the zone. Wait for it, or cancel it, then save.The probe reports an address as unreachable: this is advisory, measured from a host. Confirm the address is reachable from the routers and system VMs that will use it.
Warning
The platform refuses to clear a primary resolver, and refuses to clear the last address in a pair the zone can still reach. A zone with no reachable resolver cannot be repaired from the interface, because the interface needs name resolution to load. Set a working replacement first, then clear the address you no longer want.
Step: Roll the Change Out to Devices
When to Use: Use this after saving addresses, once you have a window for the machines that will restart.
Purpose: Bring the devices you name onto the saved addresses.
Steps:
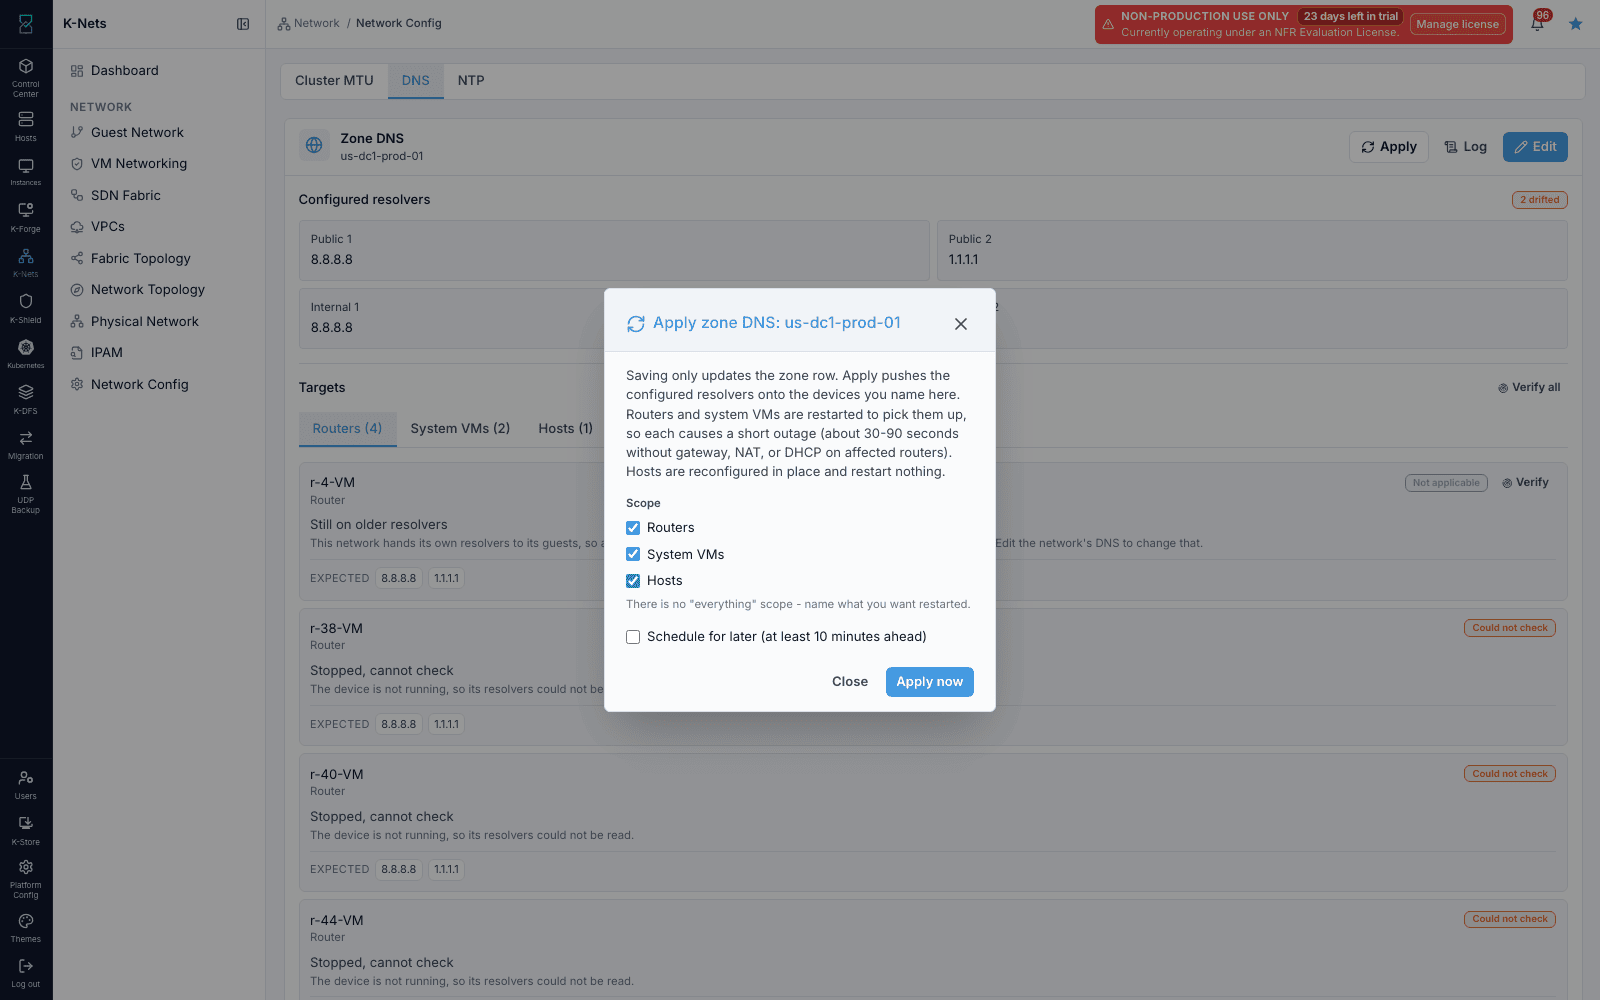
Click
Apply.Tick the scopes to act on. For a change that restarts nothing, untick
RoutersandSystem VMsand leaveHosts.Leave
Schedule for laterclear to run now, or tick it and choose a time at least 10 minutes ahead.Click
Apply now, orSchedule applywhen scheduling.
Expected Outcome:
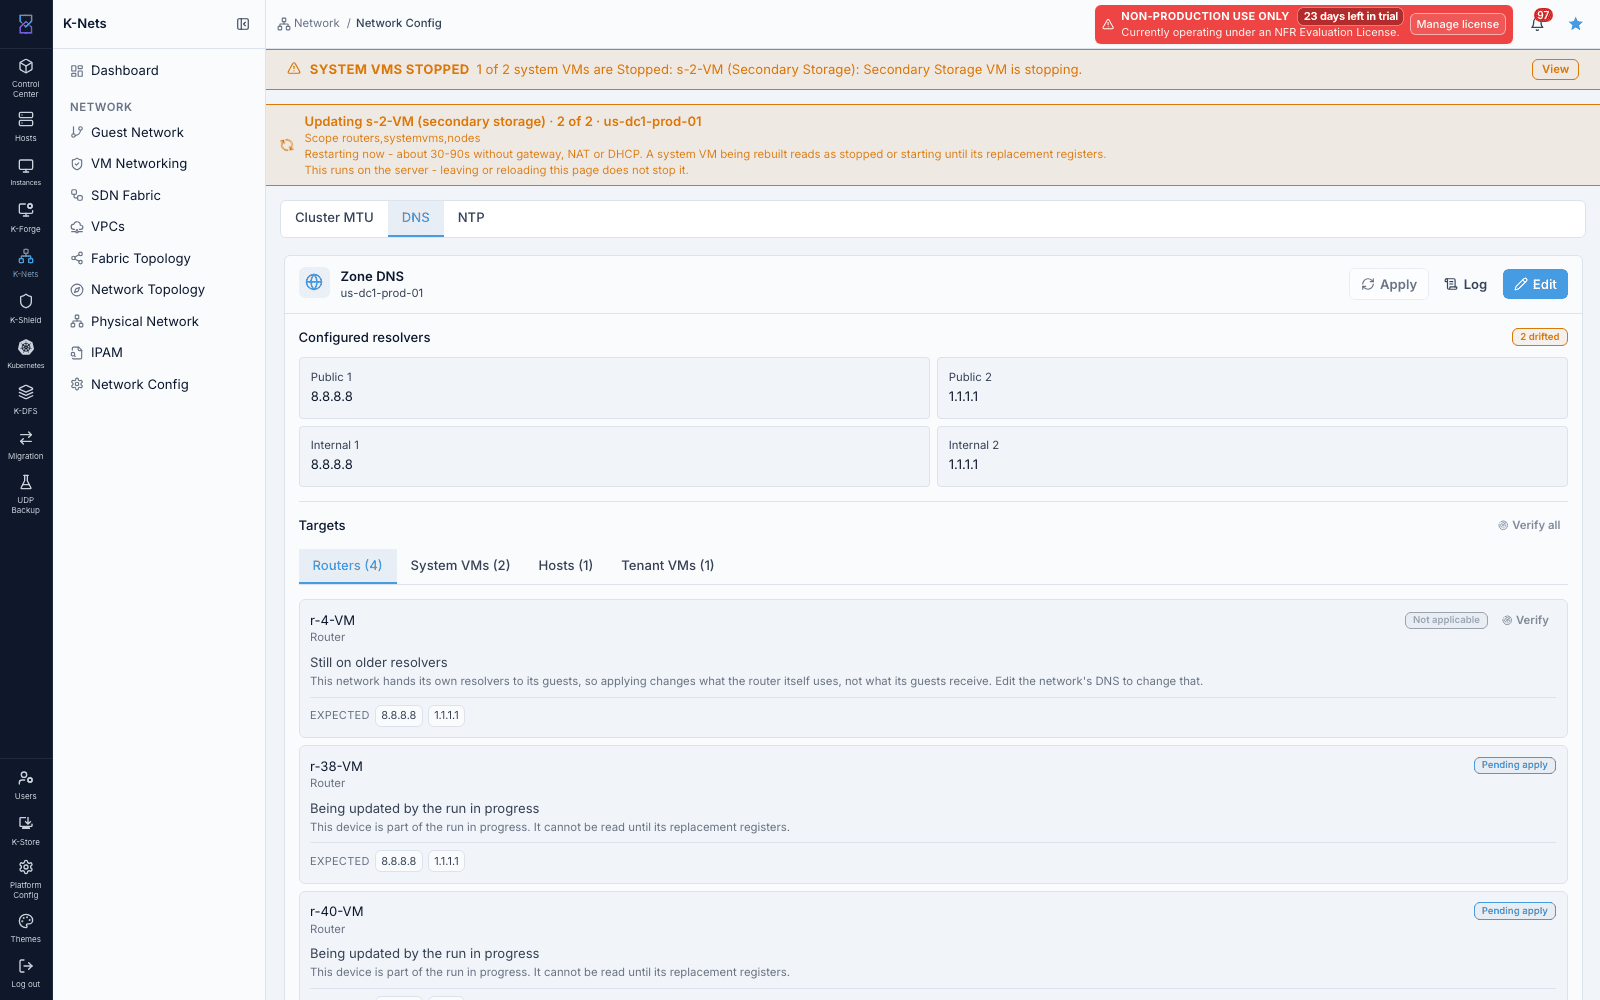
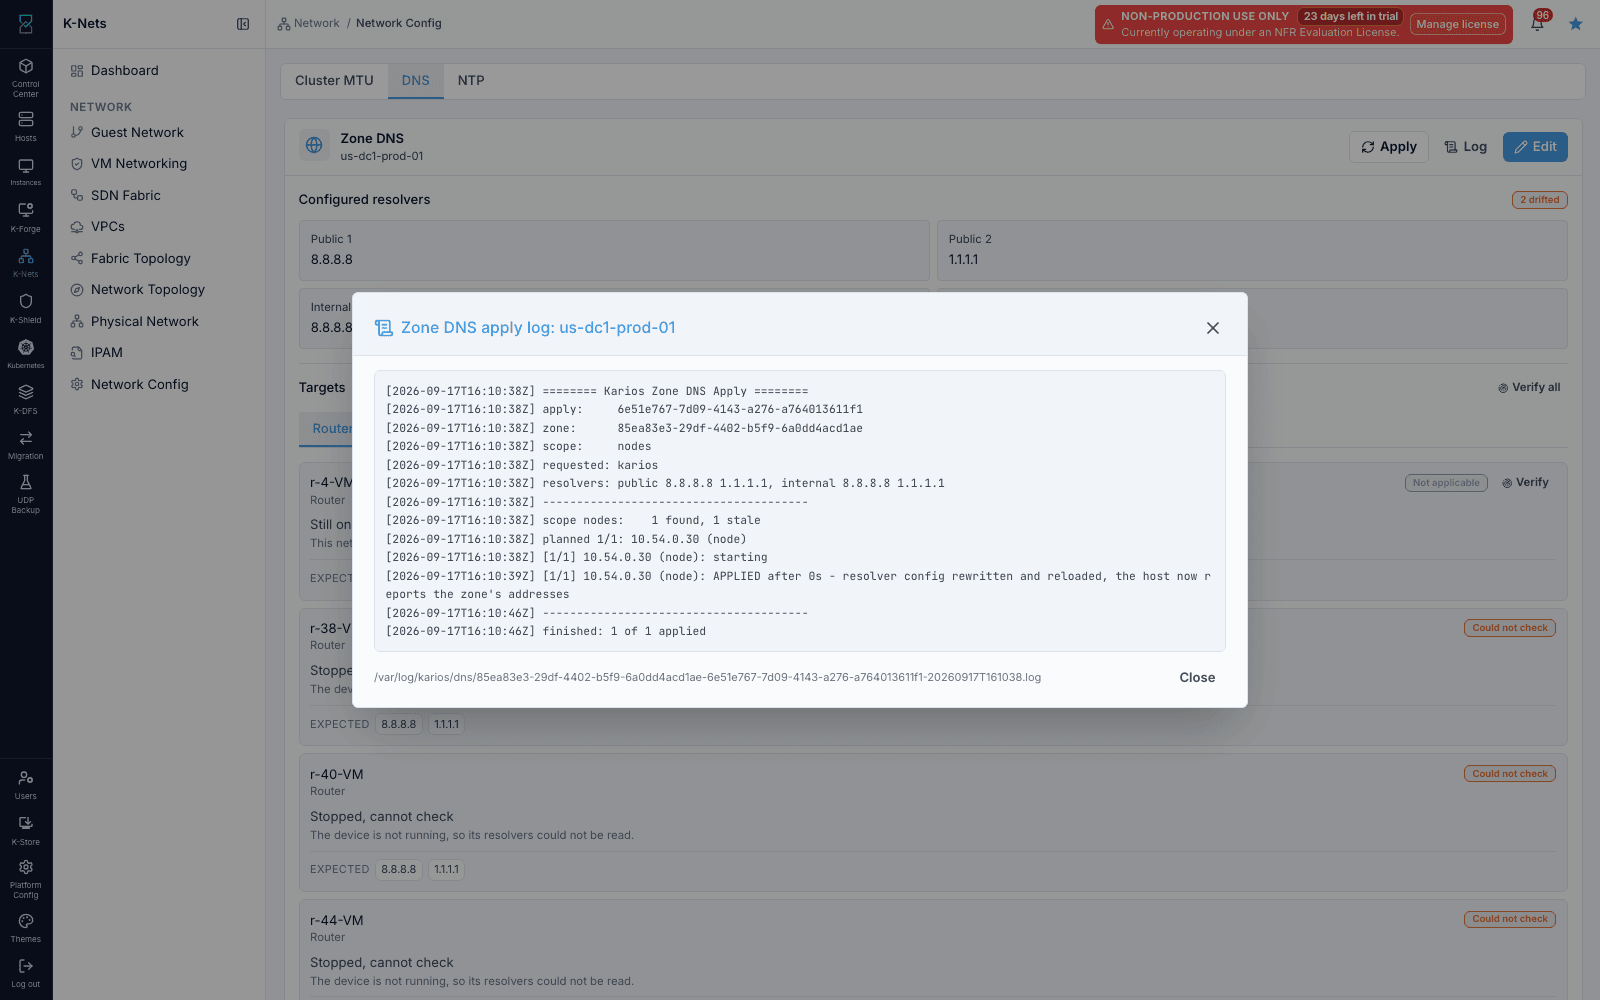
A banner names the scope and the device being worked on. When the run ends, the devices report they are using the saved resolvers, and
Logholds the record of the run.
If this fails:
The run is refused: the zone already has an apply pending or running. Check the latest run and cancel it if it is no longer wanted.
A device is reported as skipped: it was already on the saved addresses, or it could not be read - the log names the reason.
A system VM reads as stopped: it is being rebuilt and the replacement is a new machine. Wait for the replacement to register, then verify.
Work runs cheapest and least disruptive first: routers one network at a time, then system VMs (console proxy before secondary storage), then hosts. A device already on the saved addresses is skipped and reported as skipped. The run continues on the server whether or not you stay on the page, and a scheduled run survives a platform restart.
Zone DNS Rules to Remember
Give each pair a working fallback - an empty second slot has nothing to fall back to, and the card says so.
Choose internal resolvers the system VMs can reach, and public resolvers the hosts and guest networks can reach. The two pairs serve different machines.
Change in two stages: save and verify first, then apply in a window.
Start with
Hosts, which restarts nothing, before scoping routers or system VMs.An apply restarts infrastructure - affected networks lose gateway, NAT, and DHCP for up to about 90 seconds, and each system VM is replaced.
There is no scope meaning everything, so one action cannot take every network and both system VMs down at once - name what you want restarted.
One apply runs per zone at a time; an edit is refused while one is in flight.
Tenant machines are never restarted - a machine with a permanent lease keeps the old resolvers until it reboots.
Zone DNS Troubleshooting
Symptom |
Cause |
What to do |
|---|---|---|
A device shows |
Saving records the addresses only |
Run an apply for the scope that device is in |
Clearing an address was refused |
It was a primary, or the last address the zone can reach in that pair |
Set a working replacement first, then clear the other |
An edit was refused with a conflict |
An apply is pending or running for that zone |
Wait for it to finish, or cancel the pending run, then save |
An apply was refused |
The zone already has an apply pending or running |
Check the latest run and cancel it if it is no longer wanted |
A device shows |
It could not be read at that moment, for example it is stopped |
Verify again later - the last good reading is kept |
A network row says it has its own DNS |
That network hands its own resolvers to its guests |
Edit that network if it should follow the zone |
Tenant machines still use the old resolvers |
An apply never restarts tenant machines |
They pick the values up on lease renewal or restart |
A system VM reads as stopped during a run |
It is being rebuilt, and the replacement is a new machine |
Wait for the replacement to register, then verify |
Zone Time (NTP)
Use the NTP tab to set the time sources a zone keeps, see whether every
node is synchronized and how far each clock is from its source, and change
the list without restarting the time service or stepping a clock.
With this tab you can:
Set up to three time servers for a zone, each one proved from a real node before it is stored.
See the zone’s sync state, the clock offset per node, and which server each node is actually using.
Add, change, or remove a server and have it reach every node in the zone at once.
Why the Zone’s Clock Matters
Distributed storage refuses to trust peers whose clocks disagree, certificates fail validation outside their window, and audit records lose their order. Correcting a clock can be more disruptive than the drift - the usual way restarts the time service, which can step the clock. This tab writes the server list to a file the time service reloads in place, so a change never restarts the service and never steps a clock. A server is therefore validated from every node that will use it, and stored only if all of them can reach it.
Action |
What it touches |
Disruption |
|---|---|---|
|
Nothing - one time sample is taken from the candidate server |
None. No clock is touched and nothing is stored. |
Add, change, or remove a server |
The zone’s nodes take the new list at once |
None. The time service reloads its sources; it is not restarted. |
|
Re-pushes the stored list to every node in the zone |
None. A node already on the list is left untouched. |
A change is refused while a node setup, rollback, or decommission is running on a node in the zone, since those are sensitive to clock movement. A node that is individually busy when the list is pushed is skipped rather than forced, and converges on a later pass.
What a Zone Holds
Setting |
Rule |
|---|---|
|
Up to three per zone - a hostname or an IP address. |
|
Lower case only. An upper-case entry is rejected rather than silently rewritten. |
|
Letters, digits, dot, hyphen, underscore, and colon only. |
|
Rejected, compared without regard to case. |
|
Network Time Security. Off by default; turn it on only for servers known to support it. |
Inherited list |
A zone with no list of its own uses the platform-wide default, and the card says so. |
Three is the maximum - a fourth is refused rather than silently replacing an entry. Two background activities keep the zone in line: every 5 minutes the platform records each node’s live source state, and every 15 minutes it re-pushes the list to every node, so a newly added or drifted node converges without anyone applying anything. A node that fails three of those passes in a row (roughly 45 minutes) raises an alert.
Step: Open the NTP Tab
When to Use: Use this whenever you need to read or change the time sources a zone keeps.
Purpose: Reach the tab that holds the zone’s time servers and the sync state of every node.
Steps:
Open
Control Center -> Network -> Network Config.Click the
NTPtab.
Expected Outcome:
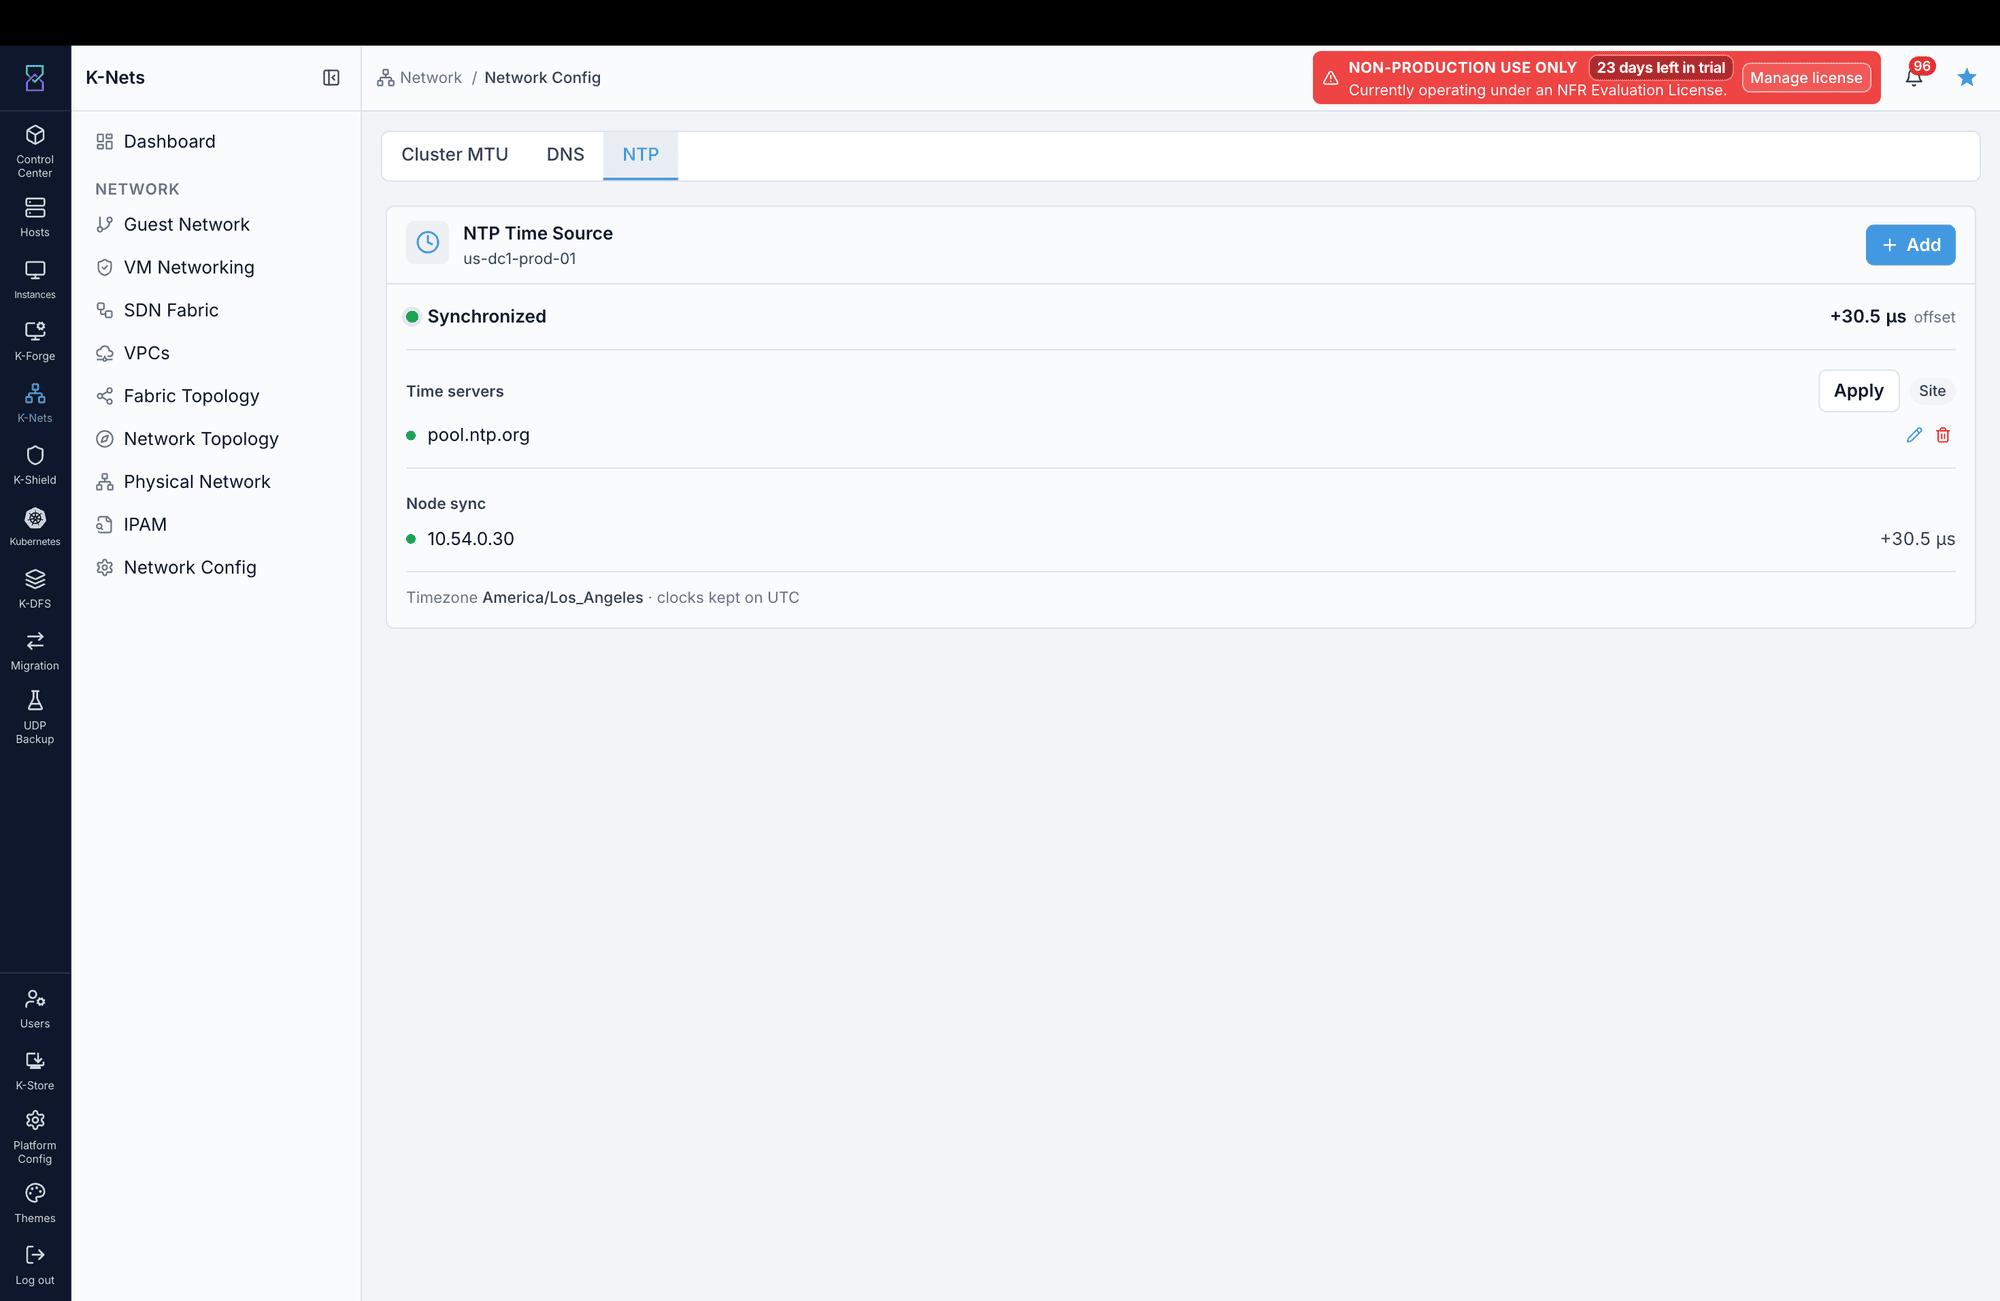
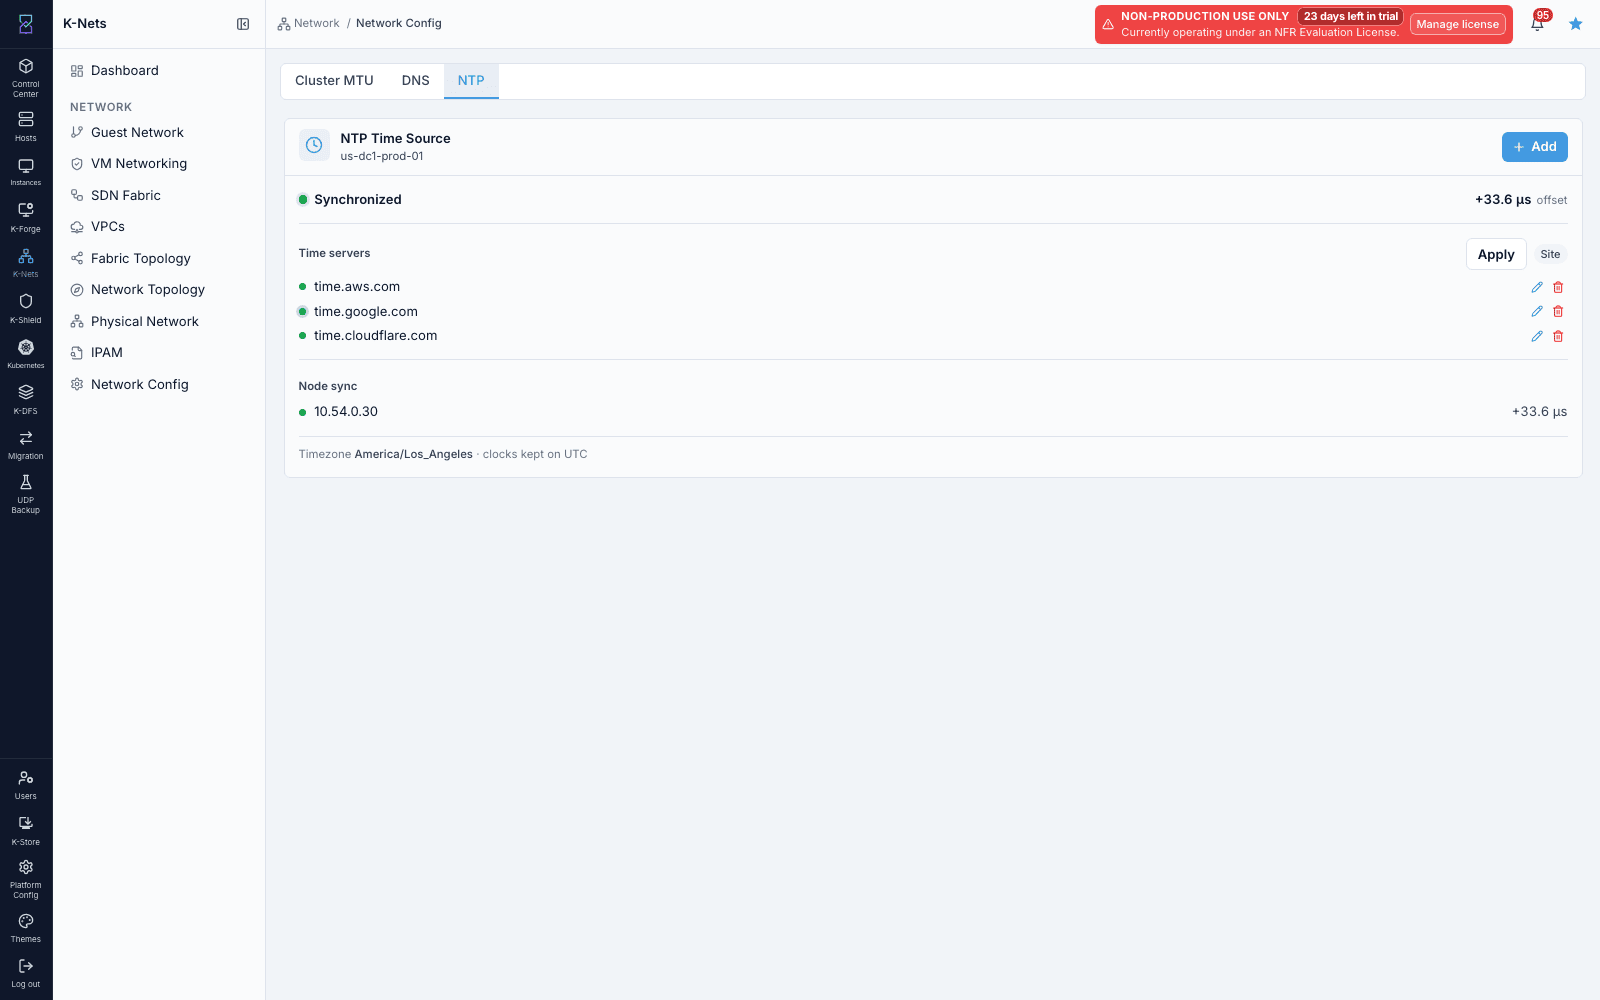
The
NTP Time Sourcecard shows the sync state, the configured servers, each node’s clock offset, and the zone’s timezone.
If this fails:
The tab is missing: your account needs the network view permission.
Add,Apply, and the row icons are missing: changing servers needs the network manage permission.
Item |
What it shows |
|---|---|
|
Every node is synchronized and within the skew threshold (100 ms).
|
|
A node’s clock offset from its source. With more than one node, the worst offset in the zone. |
|
The configured servers in priority order. The time service picks the source it uses by measured quality, so the one in use is not always the first. |
|
Where the list comes from: the zone’s own list, the platform-wide default it inherits, or neither. |
Server dot |
Green when a node reaches the server, red when a node reports it unreachable. A ring marks the source in use. |
|
Each node with its clock offset. Red when the node is not synchronized or its skew is exceeded. |
|
The zone’s timezone, set at installation and read only here. Clocks are kept on UTC. |
Note
A name that rotates through many addresses, such as a public pool, can
resolve to a different address than the one a node is using, and its dot
then reads red while the node is perfectly synchronized. Synchronized
and Node sync are read from each node’s time service and are the
reliable answer.
Step: Add a Time Server
When to Use: Use this when a zone has no list of its own, or has fewer than three servers and you want another source.
Purpose: Store a server that has been proved to answer from the zone’s nodes, and put it in use immediately.
Steps:
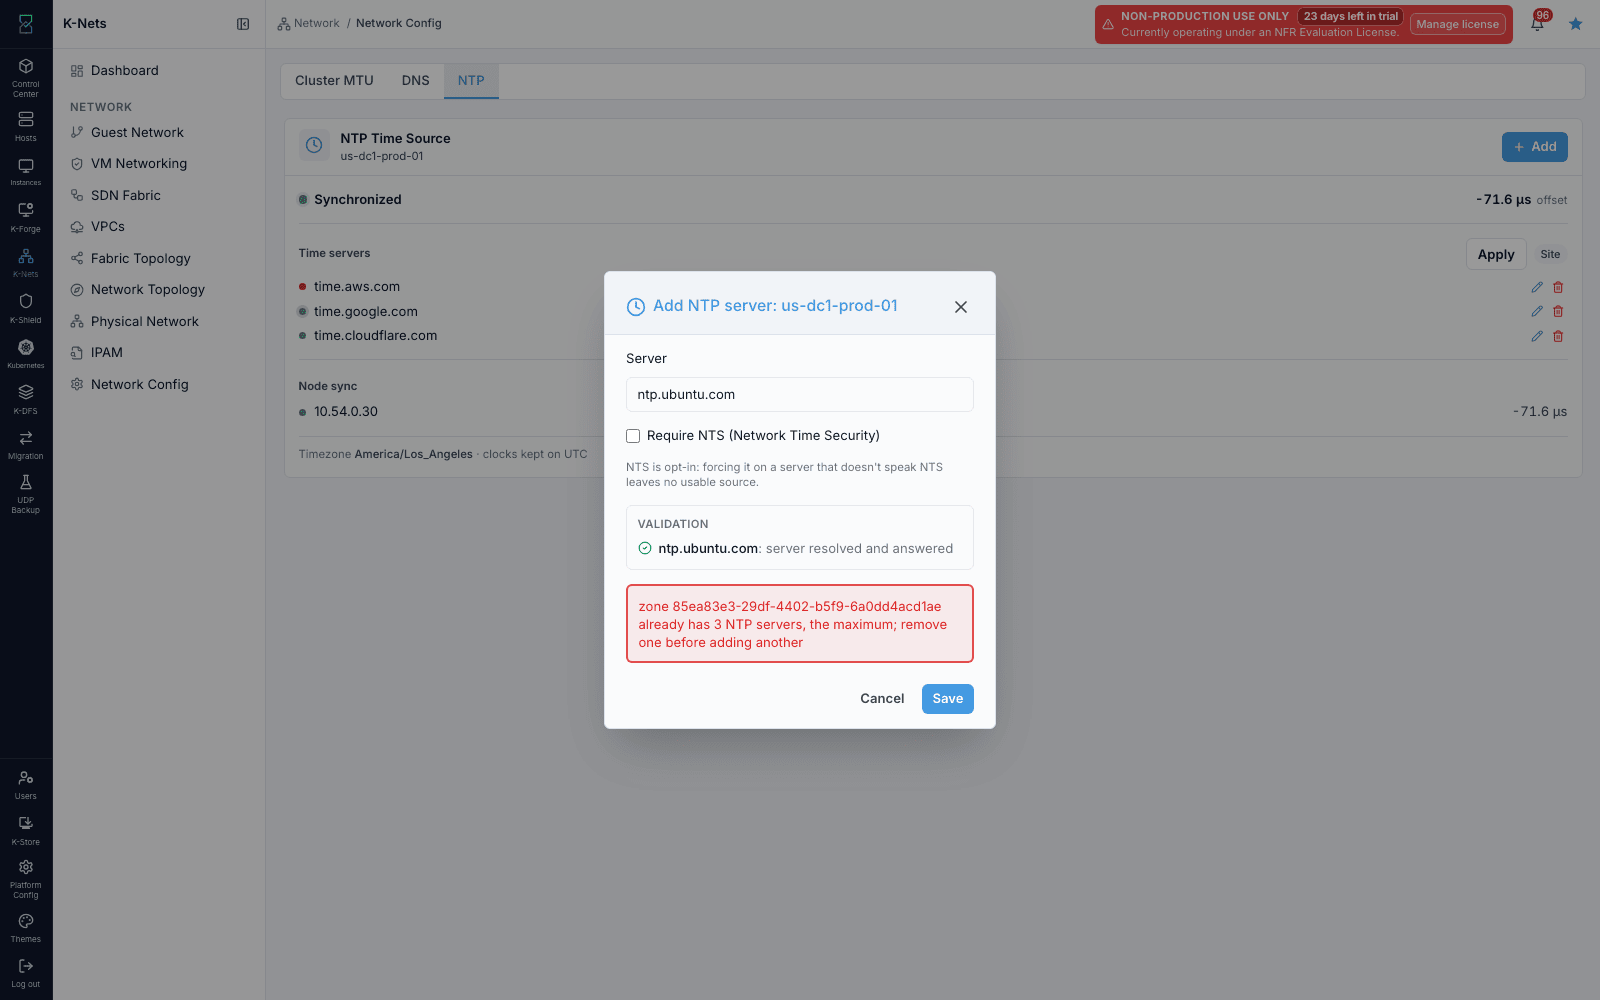
Click
Add.In
Server, enter the hostname or IP address in lower case.Leave
Require NTSunticked unless the server supports NTS.Click
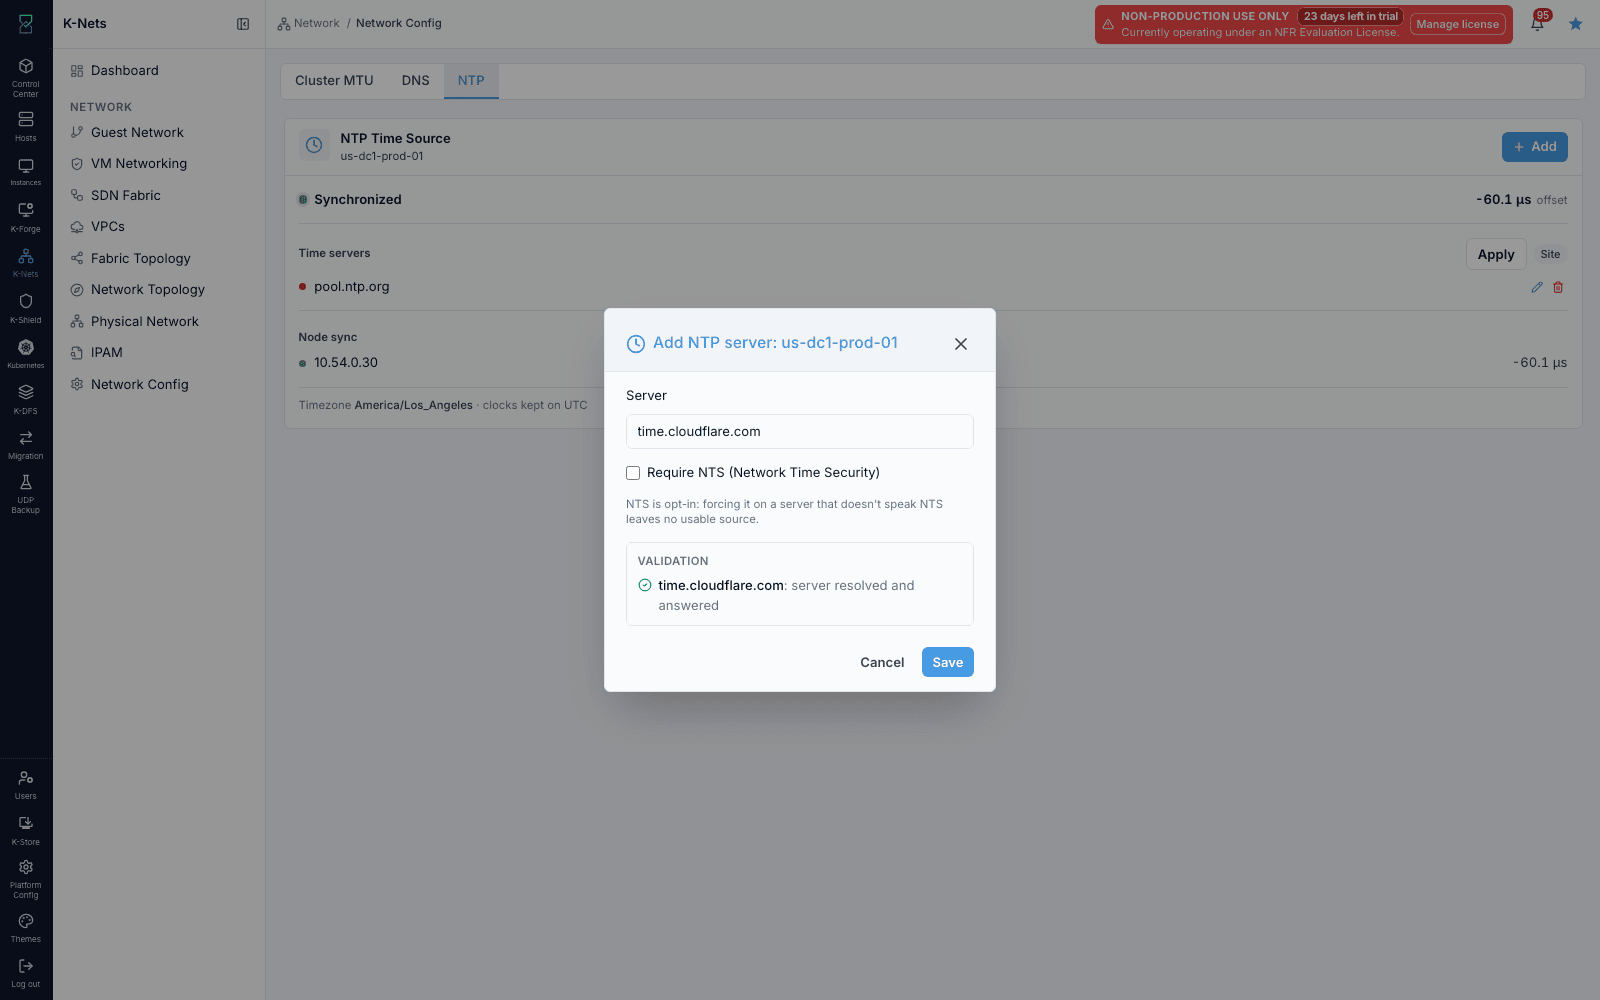
Validate. The server is resolved with a node’s own resolver, then one time sample is taken without touching that node’s clock.When the result reads
server resolved and answered, clickSave.
Expected Outcome:
The server appears at the end of the list and is in use on the zone’s nodes straight away. No separate apply is needed.
If this fails:
Validation reports the name as unresolvable: fix name resolution on that node, or enter the server by IP address.
Validation reports no usable response: check the server is running and the network path allows time traffic.
Save reports the server must be reachable from every node: it answered one node but not another. Fix the path from the named node.
A fourth server is refused: remove one before adding another - three is the maximum.
Step: Change or Remove a Time Server
When to Use: Use this when a source is being retired or replaced.
Purpose: Replace a server in place (keeping its position in the list), or take one out of the list entirely.
Steps:
To change a server, click the edit icon on its row, enter the new value, then click
ValidateandSave. The replacement takes the same position and reaches the zone’s nodes immediately.To remove a server, click the delete icon on its row, check the name, then click
Remove. The remaining list reaches the zone’s nodes straight away.
Expected Outcome:
The list updates and every node picks up the change without a separate apply.
If this fails:
The change is refused because a job is running: a setup, rollback, or decommission is in progress on a node in the zone. Wait for it, then repeat.
The button stays on
Validate: the check failed, or a field changed after it passed. Correct the value and validate again.You removed the last server: the zone falls back to the platform-wide default. If there is no default, nodes keep their current time configuration rather than being left without a source.
Step: Re-push the List
When to Use: Use this after a node was unreachable during a change, or to be sure every node holds the stored list.
Purpose: Push the stored list to every node in the zone again.
Steps:
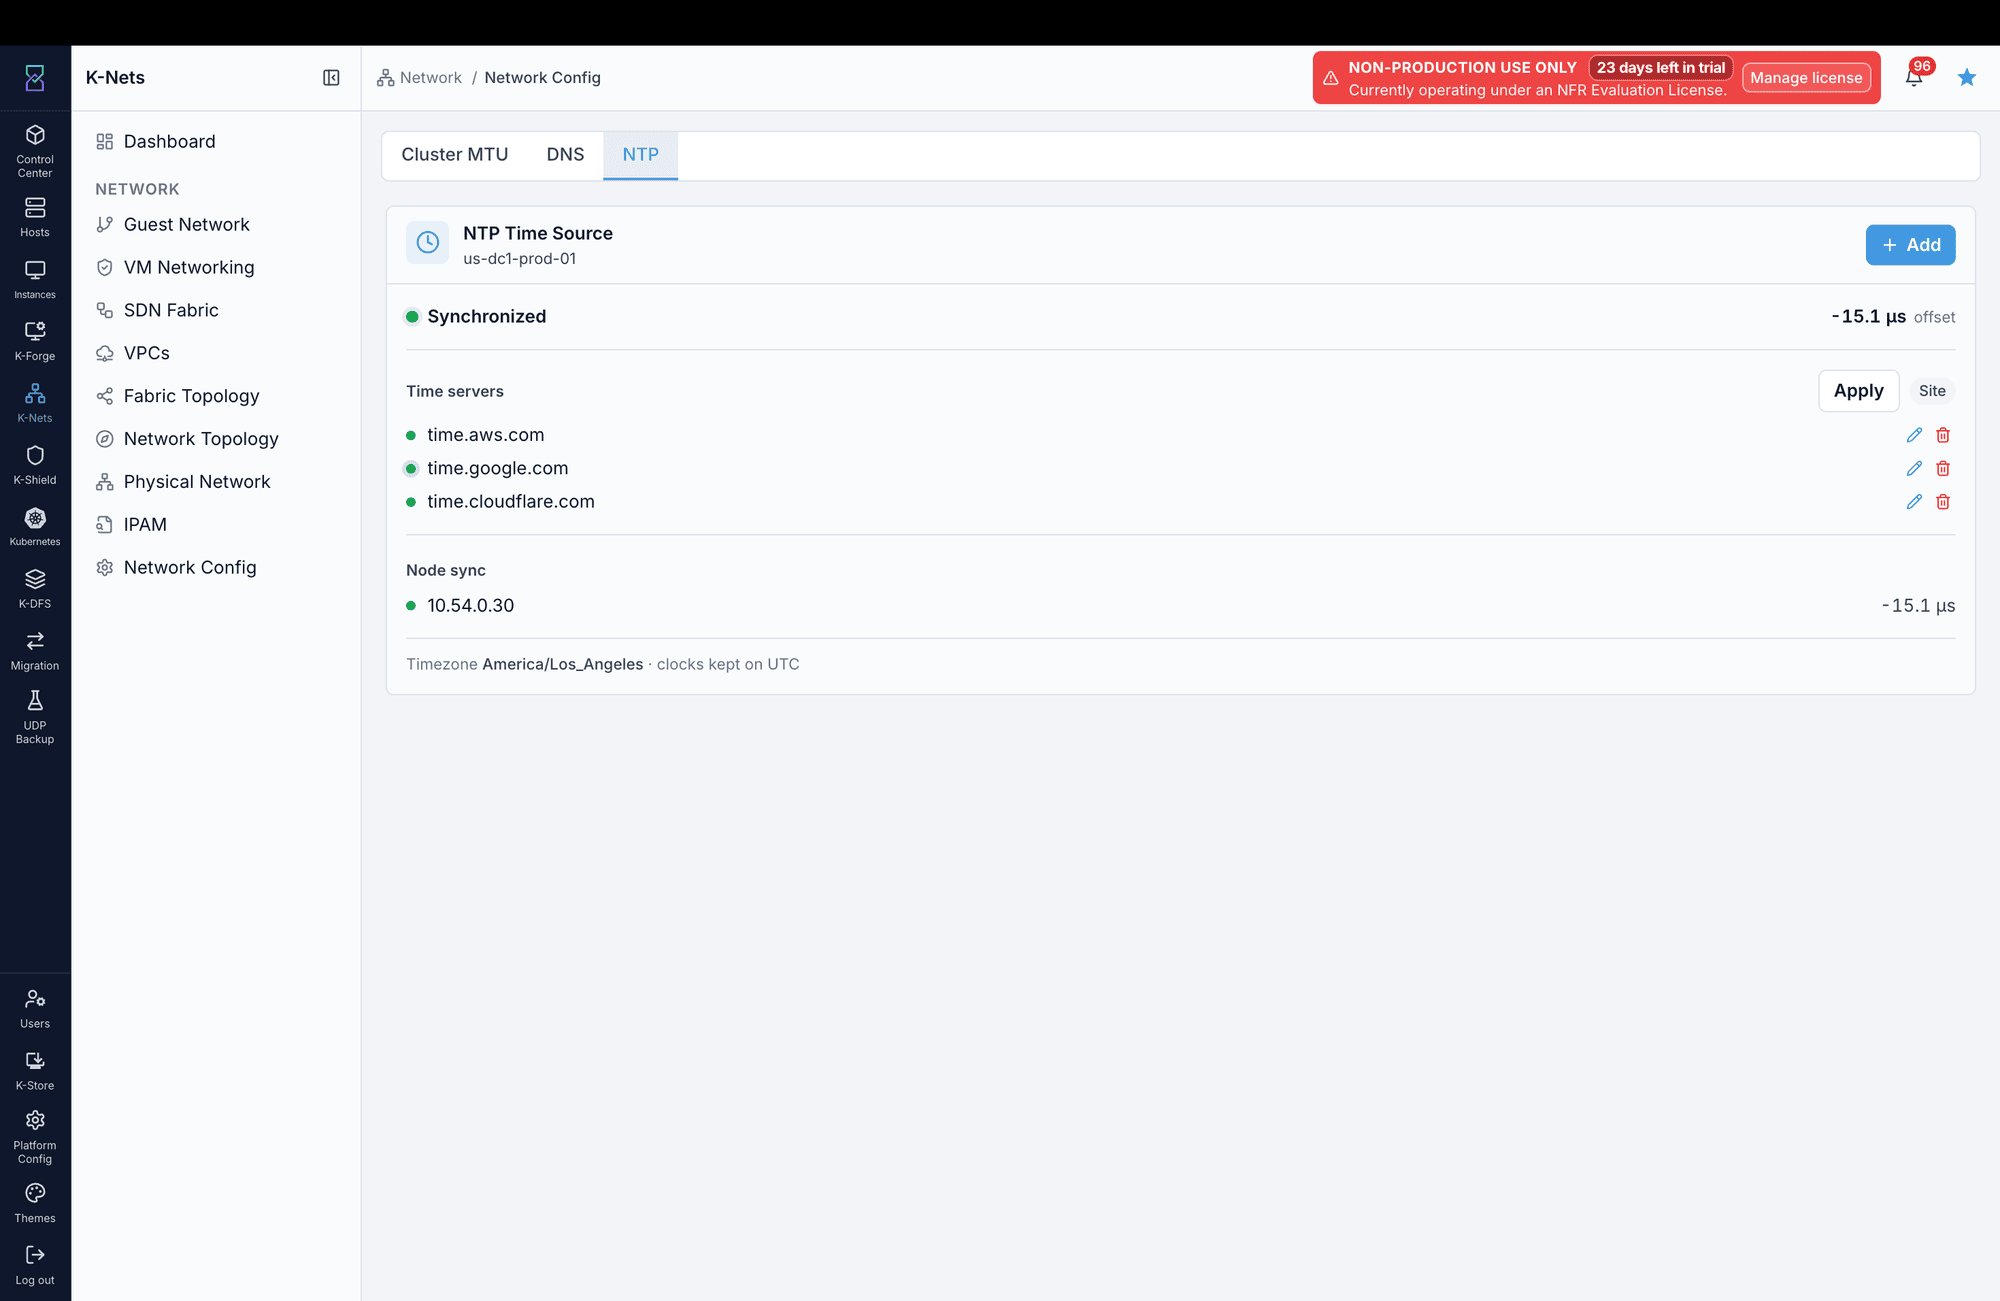
Click
Apply.
Expected Outcome:
Every node holds the stored list. A node already on it is left untouched.
If this fails:
A node is reported as skipped: it had a job running at that moment - the 15-minute re-push brings it into line.
A node is reported as failed: investigate that node, then use
Applyagain.
Message |
What to do |
|---|---|
|
Re-enter the name in lower case. |
|
Use letters, digits, dot, hyphen, underscore, and colon only. |
|
Fix name resolution on that node, or enter the server by IP address. |
|
Check the server is running and the network path allows time traffic. |
|
Remove a server before adding another. |
|
The server is already in the list. |
|
The server answered one node but not another - fix the path from the named node. |
|
A setup, rollback, or decommission is in progress. Wait for it, then repeat. |
Zone Time Rules to Remember
Configure more than one server so a node keeps a source when one stops answering - three is the maximum and a reasonable target.
Keep NTS off for pool addresses. A pool rotates through many servers that do not support it; requiring it can leave a node with no usable source.
Prefer servers every node can reach directly - a server is stored only if all of them can.
Use an IP address when a node’s own resolver cannot resolve the name.
Read the zone state from
SynchronizedandNode syncrather than from a single server dot.A change is refused while a node setup, rollback, or decommission is running in the zone.
The timezone on this card is read only, set at installation - the platform never changes a node’s timezone or its clock.
Zone Time Troubleshooting
Symptom |
Cause |
What to do |
|---|---|---|
The button stays on |
The last check failed, or a field changed after it passed |
Read the result, correct the value, validate again |
A server reads red while the zone is |
A rotating name could not be matched to the address in use |
No action while |
Not synchronized, or an offset keeps growing |
The node is not synchronized to any source |
Check which configured servers that node can reach |
One node reported as skipped |
It had a job running when the list was pushed |
No action - the 15-minute re-push brings it into line |
A change reported partial success |
At least one node failed to take the list |
Investigate the named node, then use |
An alert says a node keeps failing |
The node failed three re-pushes in a row (about 45 minutes) |
The node is unreachable or its time service is not responding - investigate that node |