IPAM
Use IPAM (IP Address Management) to audit IP addresses, VLANs, and DHCP scopes across your environment.
IPAM helps with:
Address-capacity planning
Assignment and ownership audit
VLAN/subnet consistency checks
DNS and DHCP alignment validation
Term Definitions:
IPAM: IP Address Management, inventory and lifecycle tracking of IP resources.Prefix: subnet in CIDR form (for example192.168.10.0/24).VRF: Virtual Routing and Forwarding instance that isolates routing tables.Gateway: default next hop for traffic leaving a subnet.
Step: Open IPAM
When to Use: Use this for IP, VLAN, and DHCP capacity and assignment audits.
Purpose: Open IPAM to baseline address inventory, segmentation, and scope utilization.
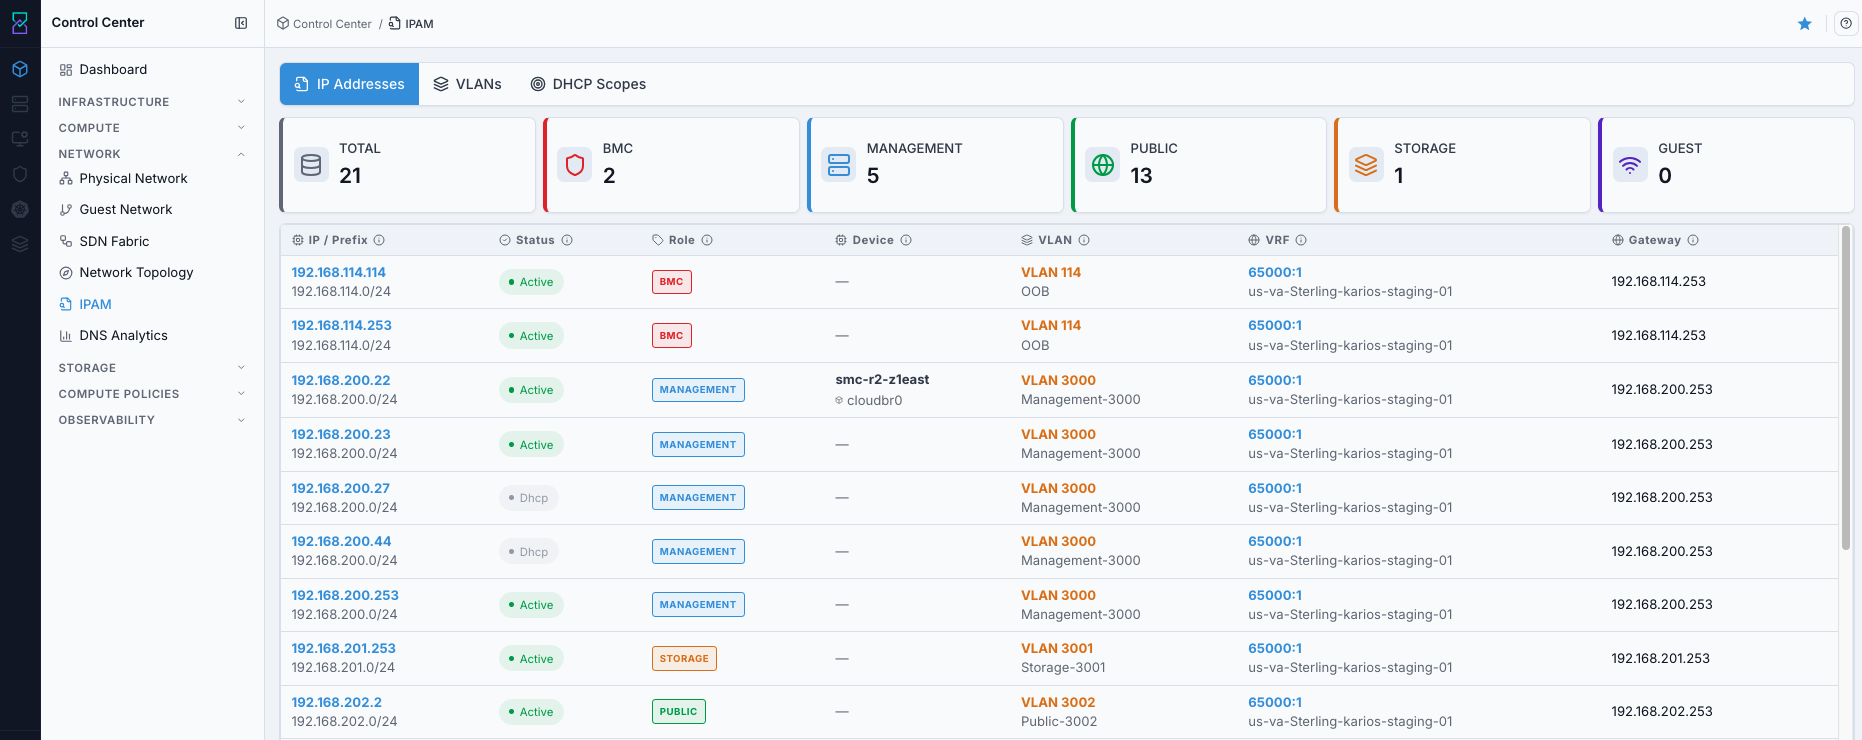
Dashboard shows:
Summary cards for total counts and role-based filters.
Four operational tabs:
IP Addresses,VLANs,DHCP Scopes, andPublic IPs.Addressing inventory and utilization context across the environment.
What you can do from this screen:
Audit address ownership and availability.
Validate VLAN/subnet/gateway consistency.
Check DHCP scope utilization before deployment.
Steps:
Open
Control Center -> Network -> IPAM.Review the top summary cards.
Switch between
IP Addresses,VLANs,DHCP Scopes, andPublic IPstabs.
Expected Outcome:
You can baseline addressing health, segmentation, and DHCP utilization from one page.
If this fails:
Reopen
IPAMand return toIP Addressesbefore retrying tab navigation.Confirm your account can access
IPAM.Confirm IPAM data sources are available in your environment.
Step: Open IPAM Help Panel
When to Use: Use this after opening IPAM when you need field and role definitions.
Purpose: Open page help separately from dashboard review.
Steps:
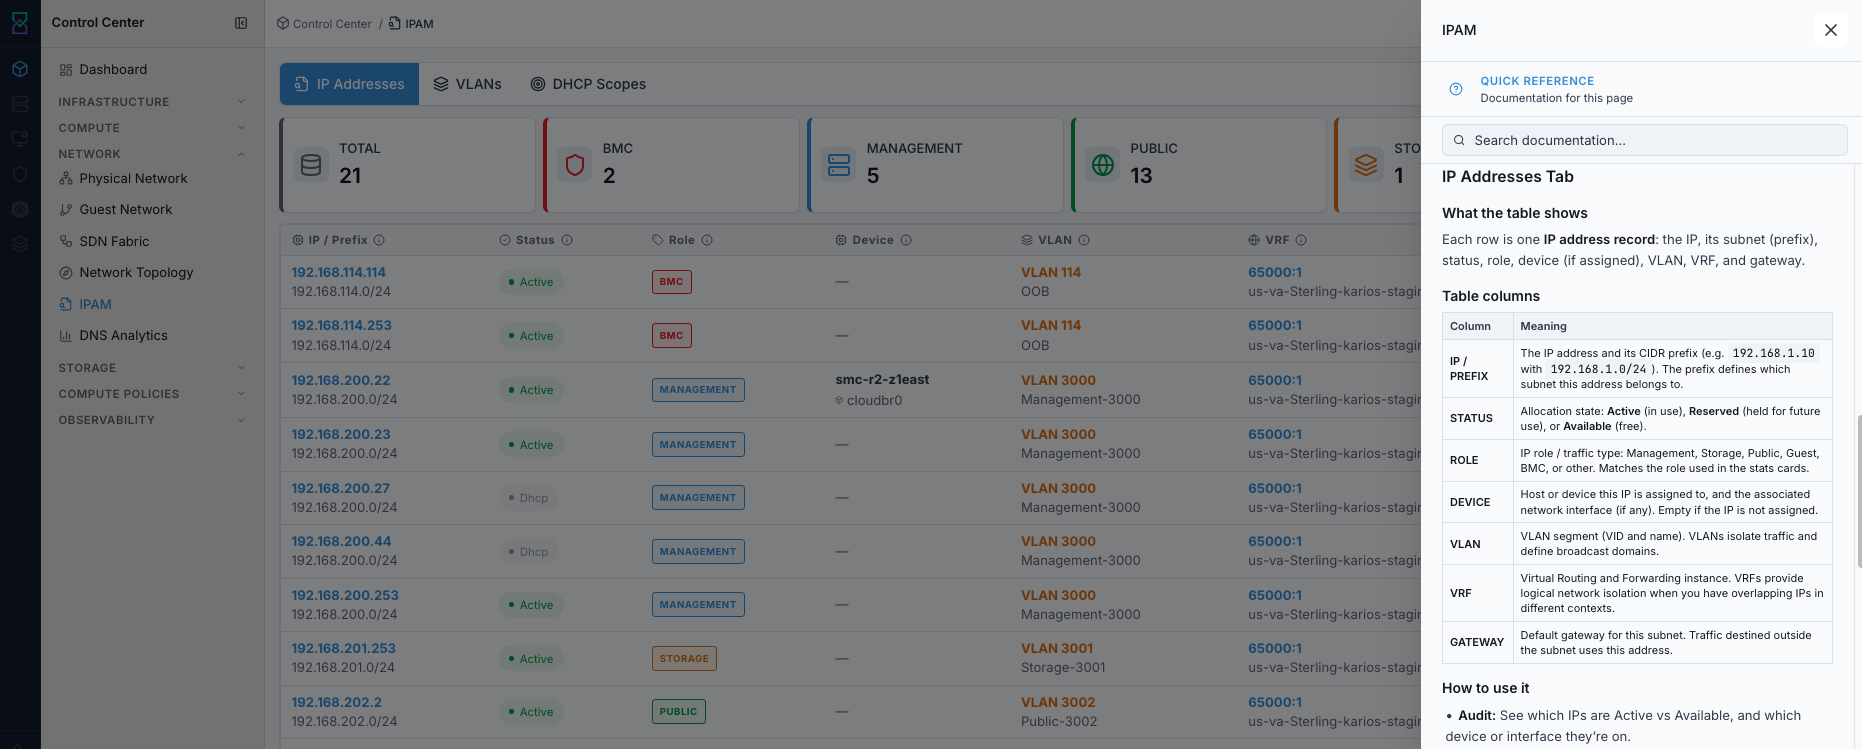
Open
Control Center -> Network -> IPAM.Click the top-right help icon.
Review and search the help panel content.
Expected Outcome:
IPAM help opens in the right-side panel.
You can continue tab-level operations with clearer context.
If this fails:
Refresh the page and click the help icon again.
Confirm your account can access in-product help content.
Retry after reopening
IPAM.
Tabs Overview
When to Use:
Use this before analysis when deciding which IPAM tab matches your goal.
Purpose:
Select the correct tab first so you review the right dataset.
Steps:
Open
Control Center -> Network -> IPAM.Review available tabs:
IP Addresses,VLANs,DHCP Scopes,Public IPs.Select the tab that matches your current task.
Expected Outcome:
You select the correct tab before filtering or troubleshooting.
If this fails:
Refresh IPAM and confirm tabs render correctly.
Confirm your account can access all IPAM tabs.
Reopen IPAM and retry tab selection.
Tab |
What It Shows |
|---|---|
IP Addresses |
IP records with status, role, device, VLAN, VRF, and gateway. |
VLANs |
VLAN segments with role, prefix, gateway, DNS zone, and linked DHCP scope. |
DHCP Scopes |
DHCP subnets with role, VLAN, gateway, and utilization. |
Public IPs |
Public-IP inventory across the pool, with allocation and role context. |
Stats Cards (Summary Bar)
When to Use:
Use this to get a quick role-based snapshot before drilling into table rows.
Purpose:
Use card counts and role filters to narrow data quickly.
Steps:
Open
Control Center -> Network -> IPAM.Stay on the target tab (
IP Addresses,VLANs, orDHCP Scopes).Click
TOTALto show all rows.Click a role card (
BMC,MANAGEMENT,PUBLIC,STORAGE,GUEST) to filter.Click the same role again or
TOTALto clear filter.
Expected Outcome:
Card counts provide immediate distribution context.
Table rows are filtered to the selected role.
If this fails:
Clear filters with
TOTALand retry.Refresh the page and reapply the role filter.
Confirm role-tagged data exists for the current tab.
At the top of each tab, cards show counts and provide role-based filters. The cards are
labelled in capitals (TOTAL, BMC, MANAGEMENT); the table column headers below
them are not - they read as IP / Prefix, DNS Zone, and so on.
TOTAL card:
Meaning: total row count for the current tab.
Click action: clears role filtering (shows all rows).
Role cards (BMC, MANAGEMENT, PUBLIC, STORAGE, GUEST):
Meaning: item count for that role category.
Click action: filter current tab to selected role.
Click the same role again or click
TOTALto clear filter.
Role guidance:
BMC: out-of-band management addressing.MANAGEMENT: control-plane and host-management addressing.PUBLIC: external/public addressing.STORAGE: storage-network addressing.GUEST: workload/tenant network addressing.
IP Addresses Tab
When to Use
Use this when auditing IP ownership, allocation state, and subnet context.
Purpose
Review IP-level records to identify active, reserved, released, and DHCP-tracked addresses.
Steps
Open
Control Center -> Network -> IPAM.Click
IP Addresses.Optional: apply role filter cards.
Review key columns:
IP / Prefix,Status,Role,Device,VLAN,VRF,Gateway.Open row details for deeper assignment context when needed.
Expected Outcome
You can confirm IP assignment, state, and routing context for affected records.
If this fails
Clear role filters by clicking
TOTAL.Verify the expected subnet exists in
VLANs.Refresh and reopen
IP Addresses.
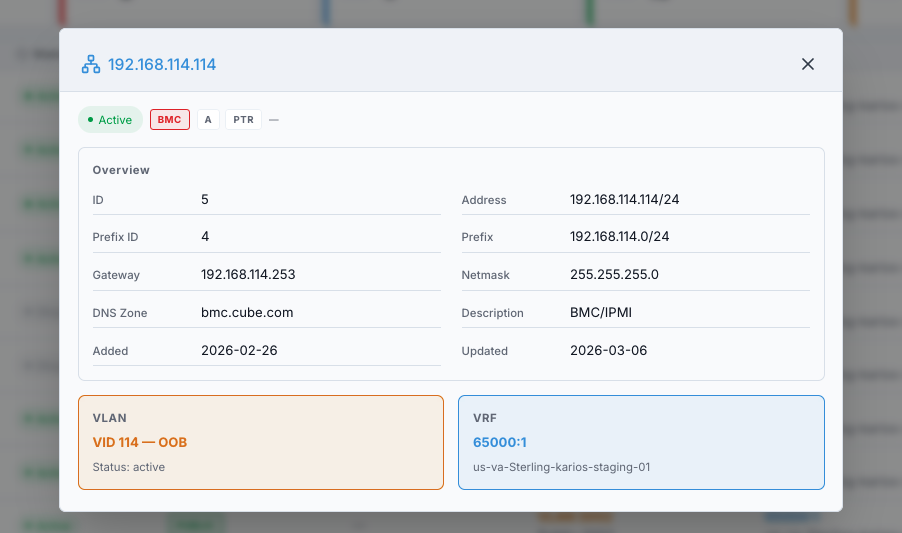
Each row represents one IP address record and its network context.
Table columns:
Column |
Meaning |
|---|---|
IP / Prefix |
IP address and associated CIDR subnet. |
Status |
|
Role |
Traffic/purpose role of the IP. |
Device |
Assigned host/device and interface context when allocated. |
VLAN |
VLAN segment identifier and name. |
VRF |
Routing-instance context recorded in IPAM for this address. This is IPAM bookkeeping; it does not, on its own, imply a separate routing table on the fabric. |
Gateway |
Default gateway for the subnet. |
How to use:
Audit how much of each prefix is already recorded as active or reserved.
Filter by role cards for targeted views.
Open row details for full assignment context.
VLANs Tab
When to Use
Use this when validating VLAN segmentation, subnet mapping, and DNS/DHCP linkage.
Purpose
Review VLAN-level design and ensure prefix, gateway, and service mappings are consistent.
Steps
Open
Control Center -> Network -> IPAM.Click
VLANs.Optional: apply role filter cards.
Review
VID / Name,Status,Role,Prefix,Gateway,DNS Zone, andDHCP Scope.
Expected Outcome
You can verify VLAN segmentation and associated L3/service mappings.
If this fails
Clear role filters with
TOTAL.Confirm VLAN inventory is available for the current environment.
Refresh and reopen
VLANs.
Each row represents one VLAN segment and its L3/DNS/DHCP associations.
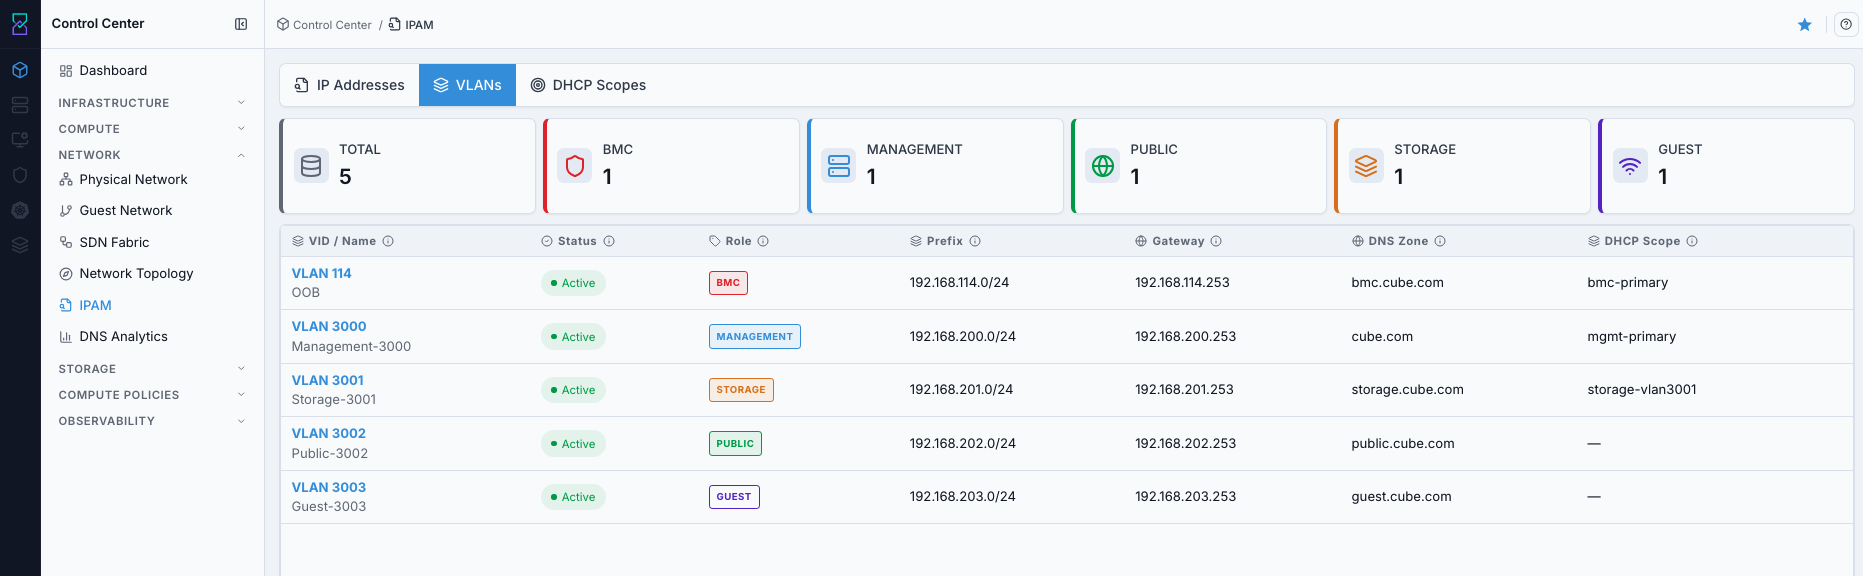
Table columns:
Column |
Meaning |
|---|---|
VID / Name |
VLAN identifier and VLAN name. |
Status |
Operational or reserved state. |
Role |
Traffic role for this VLAN. |
Prefix |
Associated CIDR subnet. |
Gateway |
Default gateway for the VLAN subnet. |
DNS Zone |
DNS zone associated with this subnet. |
DHCP Scope |
Linked DHCP scope name when DHCP is in use. |
How to use:
Validate segmentation design by role.
Confirm VLAN prefix and gateway values.
Verify DNS zone and DHCP scope alignment.
DHCP Scopes Tab
When to Use
Use this before provisioning workloads to check scope utilization and exhaustion risk.
Purpose
Review DHCP capacity and subnet consistency for reliable IP assignment.
Steps
Open
Control Center -> Network -> IPAM.Click
DHCP Scopes.Optional: apply role filter cards.
Review
Prefix,Status,Role,VLAN,Gateway, andUtilization.
Expected Outcome
You can identify scopes approaching exhaustion and plan expansion before deployments fail.
If this fails
Clear role filters with
TOTAL.Confirm DHCP scope data exists for the selected environment.
Refresh and reopen
DHCP Scopes.
Each row represents a DHCP scope and its subnet utilization.
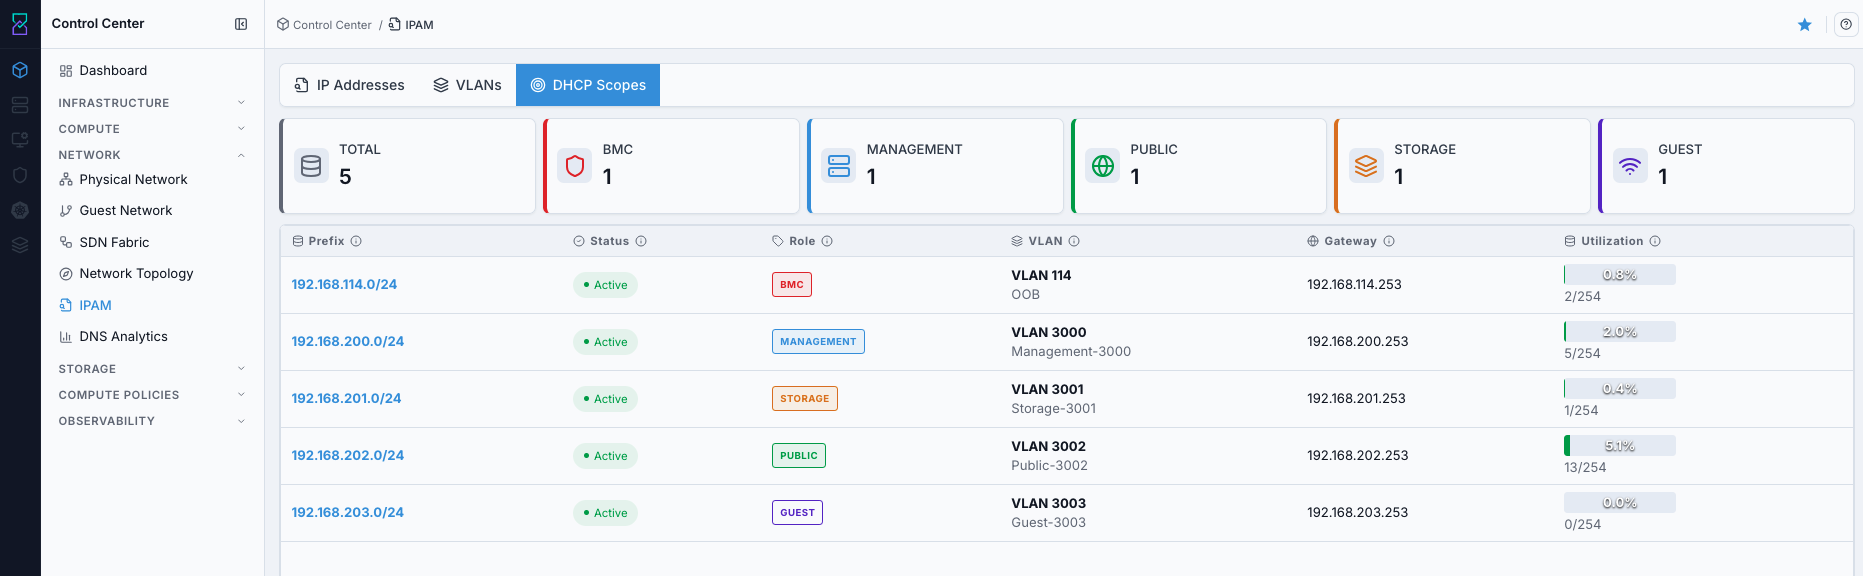
Table columns:
Column |
Meaning |
|---|---|
Prefix |
CIDR subnet used for the DHCP scope. |
Status |
Scope state. |
Role |
Traffic role for the scope. |
VLAN |
VLAN tied to this scope. |
Gateway |
Default gateway for the scope subnet. |
Utilization |
Used addresses vs total available in scope. |
How to use:
Track utilization to prevent scope exhaustion.
Confirm subnet/gateway/VLAN consistency.
Use role filters for targeted capacity review.
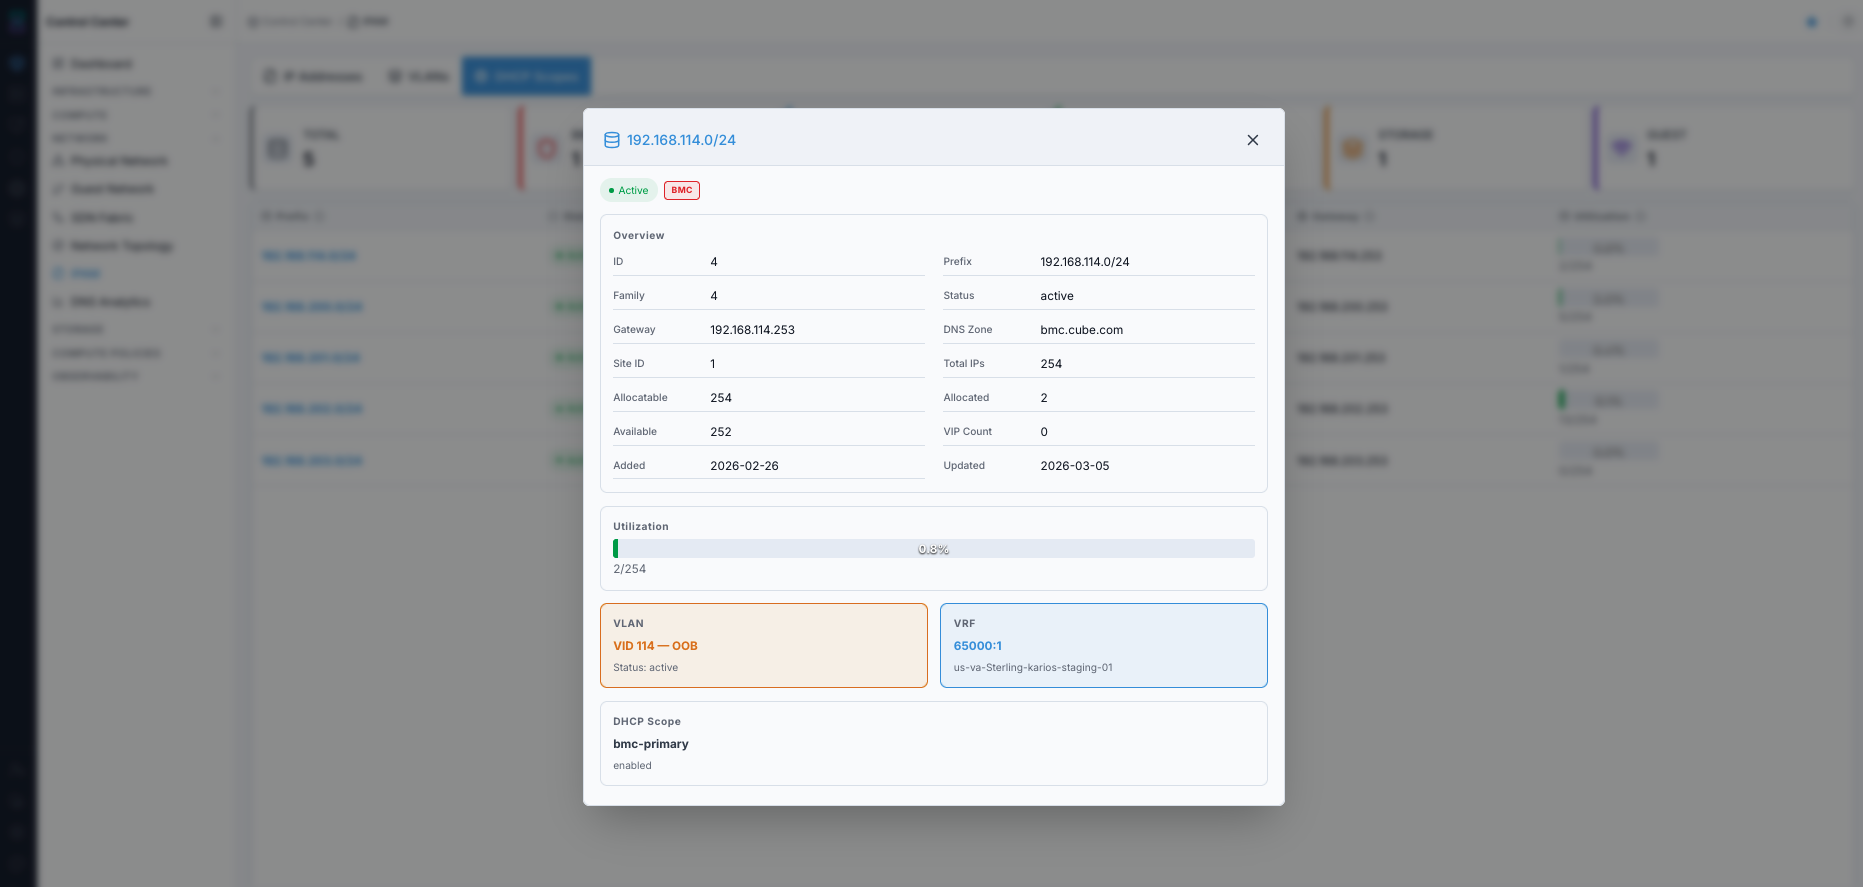
Public IPs Tab
When to Use
Use this for a cluster-wide view of the public IP pool - across every VPC and guest network, not scoped to one VPC.
Purpose
Audit how much of the public prefix is free vs allocated, and acquire a fresh public IP without opening a specific VPC.
Steps
Open
Control Center -> Network -> IPAM.Click
Public IPs.
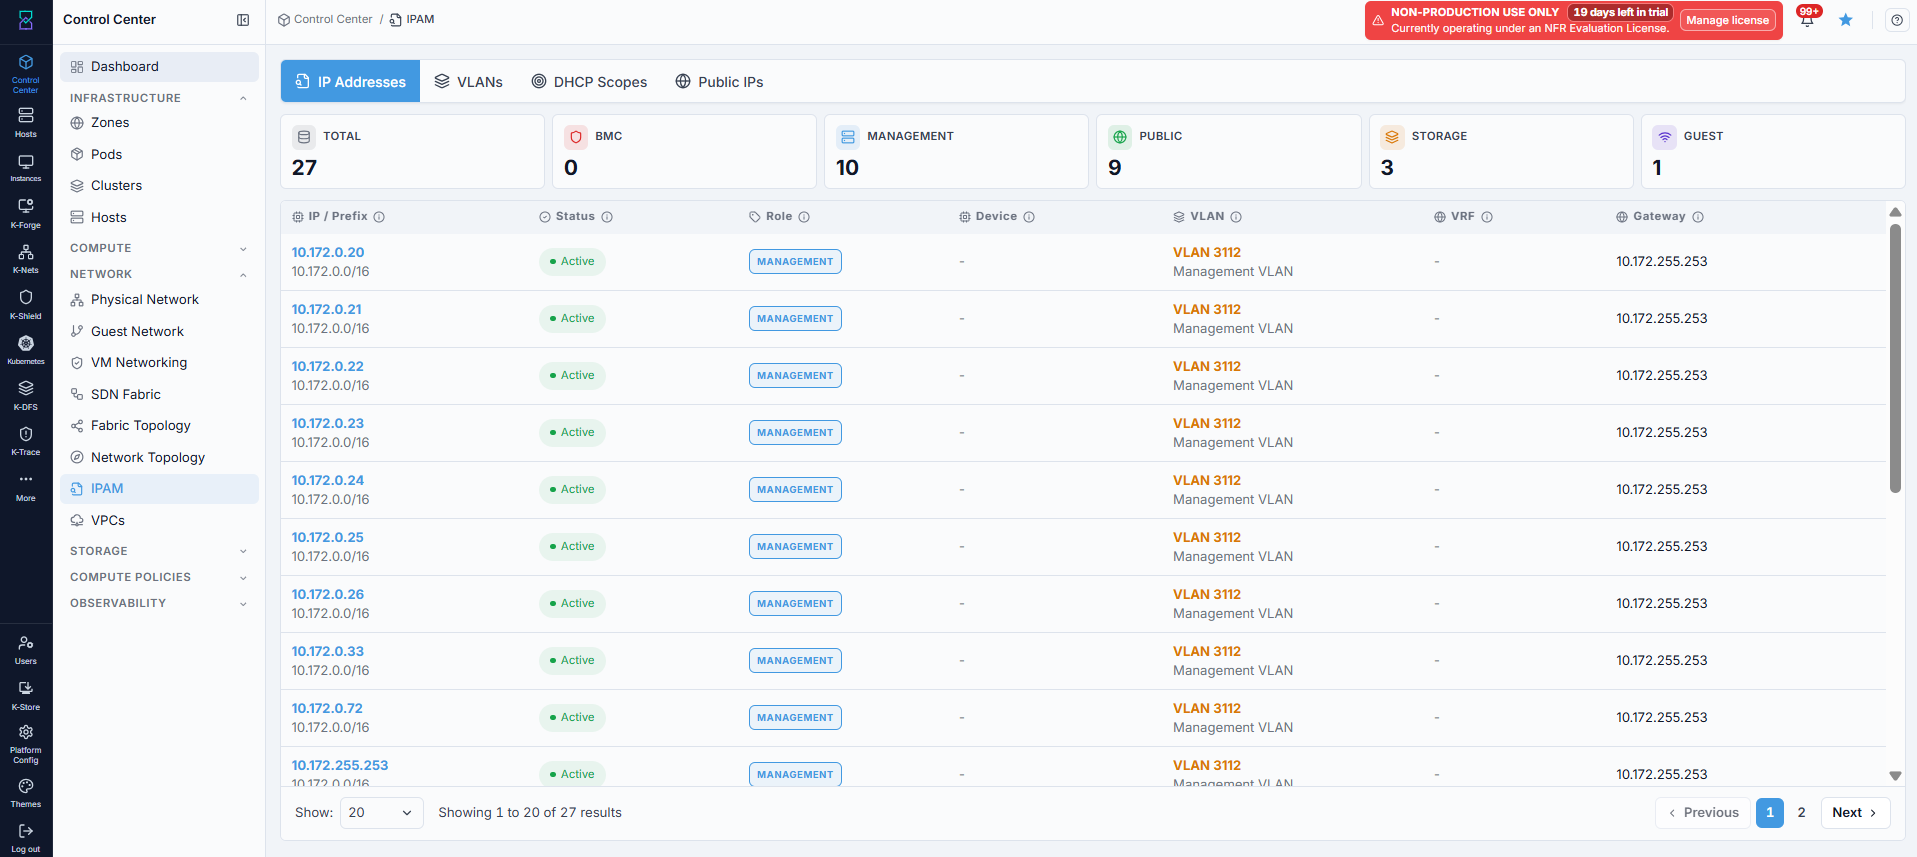
The Public IP pool card lists each public prefix with Prefix, Free IPs,
VLAN, Status, Description, and an Acquire action. Acquire is disabled
on an exhausted prefix (Prefix is exhausted - no free IPs) and for accounts without
the network-management permission. Below the card, TOTAL/ALLOCATED/FREE
cards summarise usage, and the Public IPs table lists every IP with its Public IP,
Role, VPC, Network, and bound Instance.
Role is one of:
Free- no source NAT, static NAT, port-forwarding, or load-balancer rule on this IP yet. This covers both unallocated pool addresses and acquired addresses you have not built a rule on.Source nat- the VPC’s egress IP.Static nat- statically mapped to one instance.Has rules- carries port-forwarding or load-balancer rules.
Note
The Source nat IP is platform-managed. It cannot take port-forwarding, firewall, or
load-balancer rules - acquire a separate public IP for those. An IP with Static NAT
enabled also refuses those rules until Static NAT is disabled.
Acquire a Public IP
Click
Acquireon the target prefix row. TheAcquire Public IPdialog opens.Choose a target type. The two options are mutually exclusive - you pick one, and only that one’s picker appears:
VPC- the IP attaches to the VPC’s router. There is no tier or network field: the IP is not pinned to a tier until you add the first rule (port forwarding, static NAT, or load balancer) against a VM on that tier.Guest network (isolated)- the IP attaches directly to one standalone guest network. Only non-VPCIsolatednetworks whose offering provides Source NAT or Static NAT are offered here. Shared networks, L2 networks, and VPC tiers never appear in this list - a VPC tier gets its public IP through the VPC instead.
Pick the specific VPC or guest network.
Finish:
For a VPC, click
Continue, then confirm withAcquire. The confirmation has no input fields. When it completes it shows the allocated address; clickDone.For a guest network, click
Acquire. Karios opens the new IP’s detail page on itsStatic NATtab.
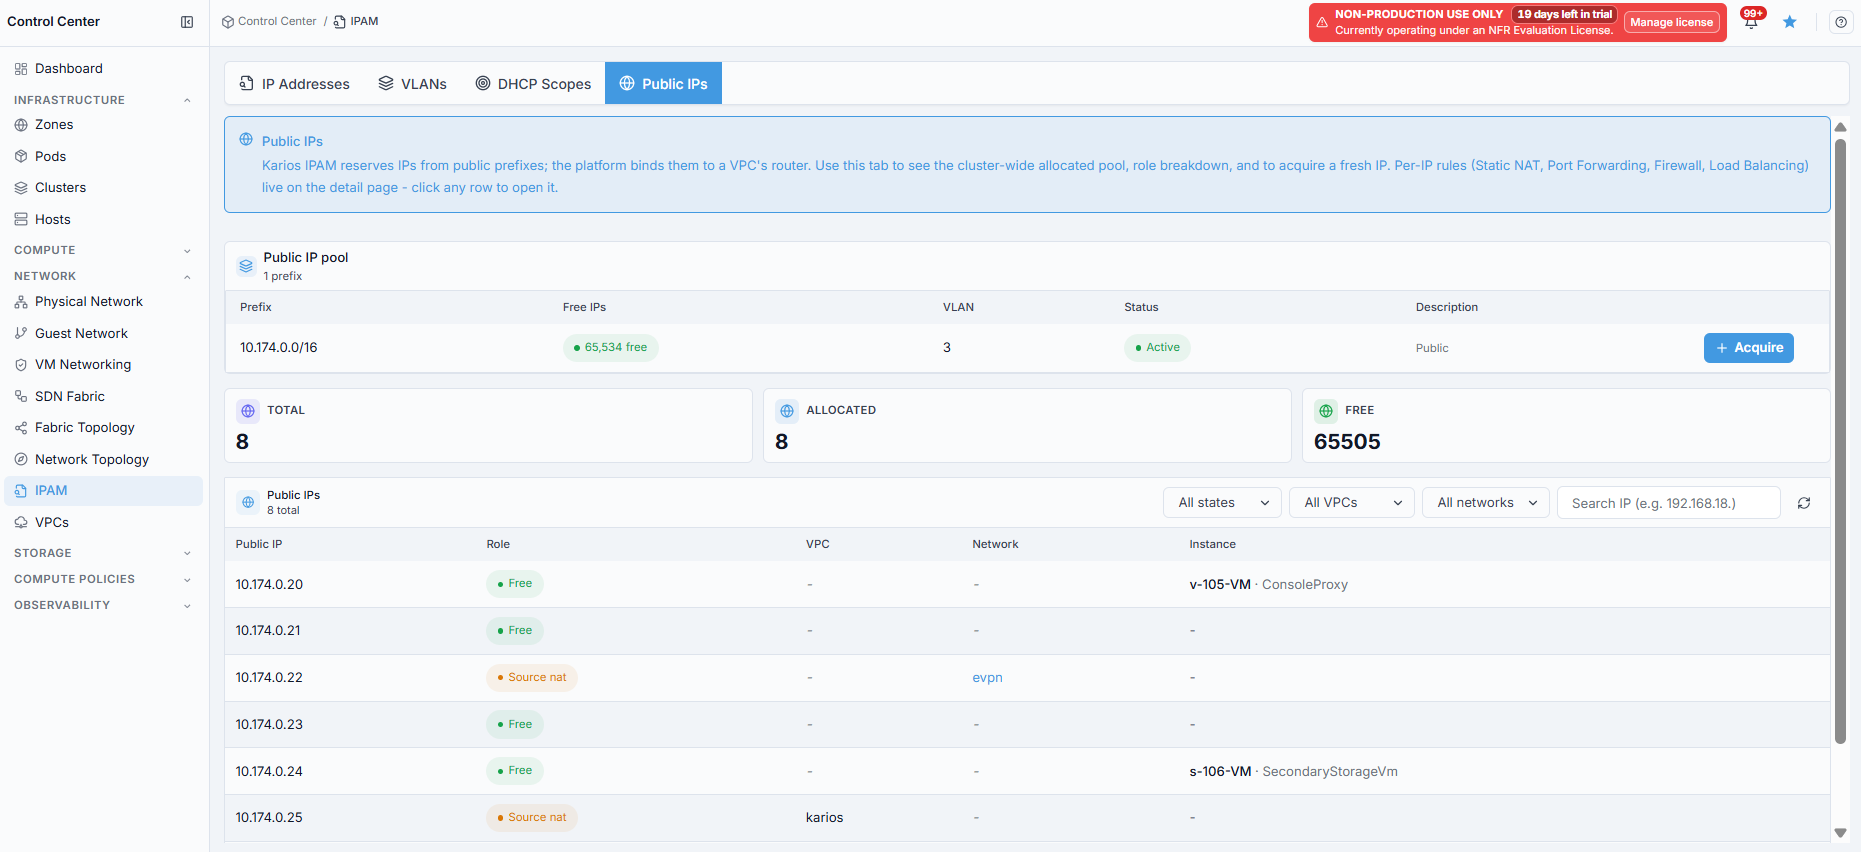
Click a row to open the IP’s detail page, which carries Static NAT,
Port Forwarding, Firewall, Load balancing, and VPN tabs. See
Public IPs under VPCs for the rule workflows.
If this fails
Confirm the zone’s public prefix has free capacity.
Confirm your account has permission to acquire public IPs.
Refresh and reopen
Public IPs.
Quick Reference
Goal |
Where to Go |
|---|---|
Audit IP assignments by role |
|
Review VLAN segments and prefixes |
|
Prevent DHCP exhaustion |
|
Check VLAN DNS/DHCP linkage |
|
Audit or acquire public IPs cluster-wide |
|
Tips
Start with
TOTALfirst, then apply role cards to avoid false conclusions from filtered views.Review
DHCP Scopesutilization before adding new VM batches.Use
IP Addressestab when validating host/VM assignment issues.
Warnings
DHCP scope utilization near exhaustion can block new VM IP allocation.
Inconsistent
VLAN/Prefix/Gatewayvalues across tabs can indicate configuration drift.
Troubleshooting
Empty table unexpectedly: clear role filter by clicking
TOTALand verify no search filter is active.Expected IP missing: check the correct role card and confirm the subnet exists in
VLANs.Scope running out of addresses: expand the subnet scope or add a new scope before provisioning more workloads.
→ Next: VPCs