IaC
IaC (Infrastructure as Code) lets you build racks of Karios servers from a
written description instead of clicking through each server one at a time. You
list your servers in a small text file, preview exactly what will change, approve
it, and Karios builds them. Because the description is a file, you can keep it,
review it, and reuse it for the next rack.
Where This Fits in Karios
IaC is a plugin you turn on from K-Store. It does not replace K-Forge: IaC drives the same bare-metal onboarding that K-Forge performs by hand, for many servers at once, and every server it builds appears in K-Forge as it goes. Read Getting Started and the Glossary first if a term here is new.
Prerequisites
ISO Install completed and Control Center reachable
Access to
Control Centerwith an administrator account (only an administrator can add a management server)The servers visible in K-Forge as
DiscoveredEach server’s BMC address, user and password
Key Concepts
You write down the servers you want, the way a shopping list says what you want to buy. IaC first shows the list of changes it would make: the plan. Nothing happens until you approve the plan. Only then does it apply the plan and build the servers.
IaC runs your list with Terraform or OpenTofu, chosen when you create a
workspace. Both work the same way in IaC. The versions installed on the node
are shown at the bottom of the IaC sidebar under Engines on this node.
Once IaC is enabled, its sidebar lists the working order. A green check on a step means that step is ready.
Step |
Page |
What you do there |
|---|---|---|
1 |
|
Create a workspace, from a ready-made template or from scratch. |
2 |
|
Check the locations and racks that your scripts will name. |
3 |
|
Download the starter scripts, edit your servers, upload the result. |
4 |
|
Import the BMC logins so a plan can reach each server. |
5 |
|
Plan, approve and apply. |
6 |
|
Review every run: each step’s time and any failure reason. |
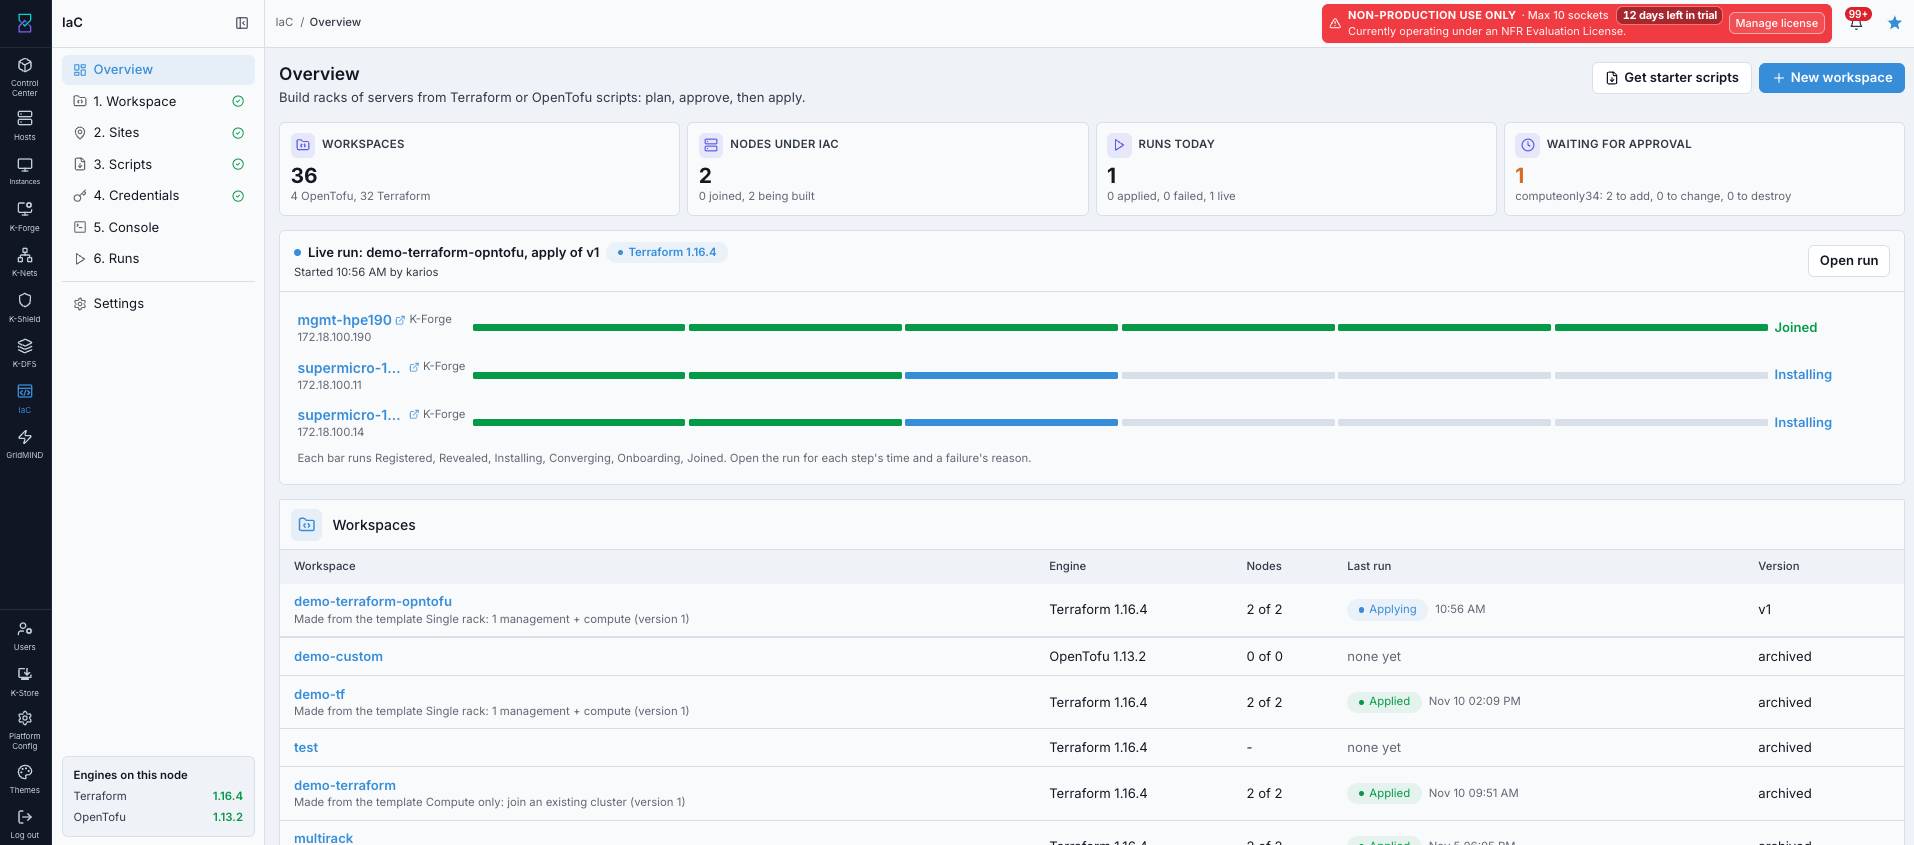
IaC -> Overview: workspace and run totals, the live run with one progress
bar per server, and the list of workspaces with each one’s last run.
The cards at the top count Workspaces, Nodes under IaC, Runs today
and Waiting for approval. While a run is live, each server has a bar with six
stages: Registered, Revealed, Installing, Converging,
Onboarding and Joined. Select Open run for each step’s time and, on a
failure, its reason.
Warning
Every server IaC creates has its operating-system disks wiped and reinstalled. Check the servers named in your scripts before you approve a plan.
Install IaC From K-Store
Open Control Center -> K-Store -> Plugins. Use this once per cluster: IaC is an optional plugin, so it is not present until it is installed and enabled.
Open
K-Storefrom the left rail, then open thePluginstab.Find the
IaCcard.Select
Download. The cluster pulls the signed.kbundlefrom the configured update source and verifies it.Note
If the cluster is air-gapped, download the
.kbundlefrom the download portal on a connected machine and useImport .kbundleon thePluginspage instead. See K-Store for both routes.When the download finishes, select
Installon the same card.When the card shows the
Enabledtoggle, switch it on.Wait for the card to settle. The cluster reconciles its nodes to match, which can take a little time on a larger cluster.
IaC appears in the left rail. Open it: you land on Overview and the
sidebar shows the six steps. At the bottom left, Engines on this node lists
the Terraform and OpenTofu versions that are ready to use.
Note
Installing the plugin puts both tools on the node, together with the Karios provider they use. You do not install Terraform or OpenTofu yourself, and the Karios provider is installed from the node itself, not from the internet. You choose which tool a workspace uses when you create it.
Note
Disabling the plugin hides the IaC section again. Its workspaces and run
history are kept, so enabling it later restores them.
Create A Workspace
A workspace is the folder IaC keeps for one build: your scripts, every version of them, the run history and the servers it manages. Open IaC -> Overview -> New workspace.
Open
IaC. OnOverviewselectNew workspace.Under
How do you want to start?choose a starting point.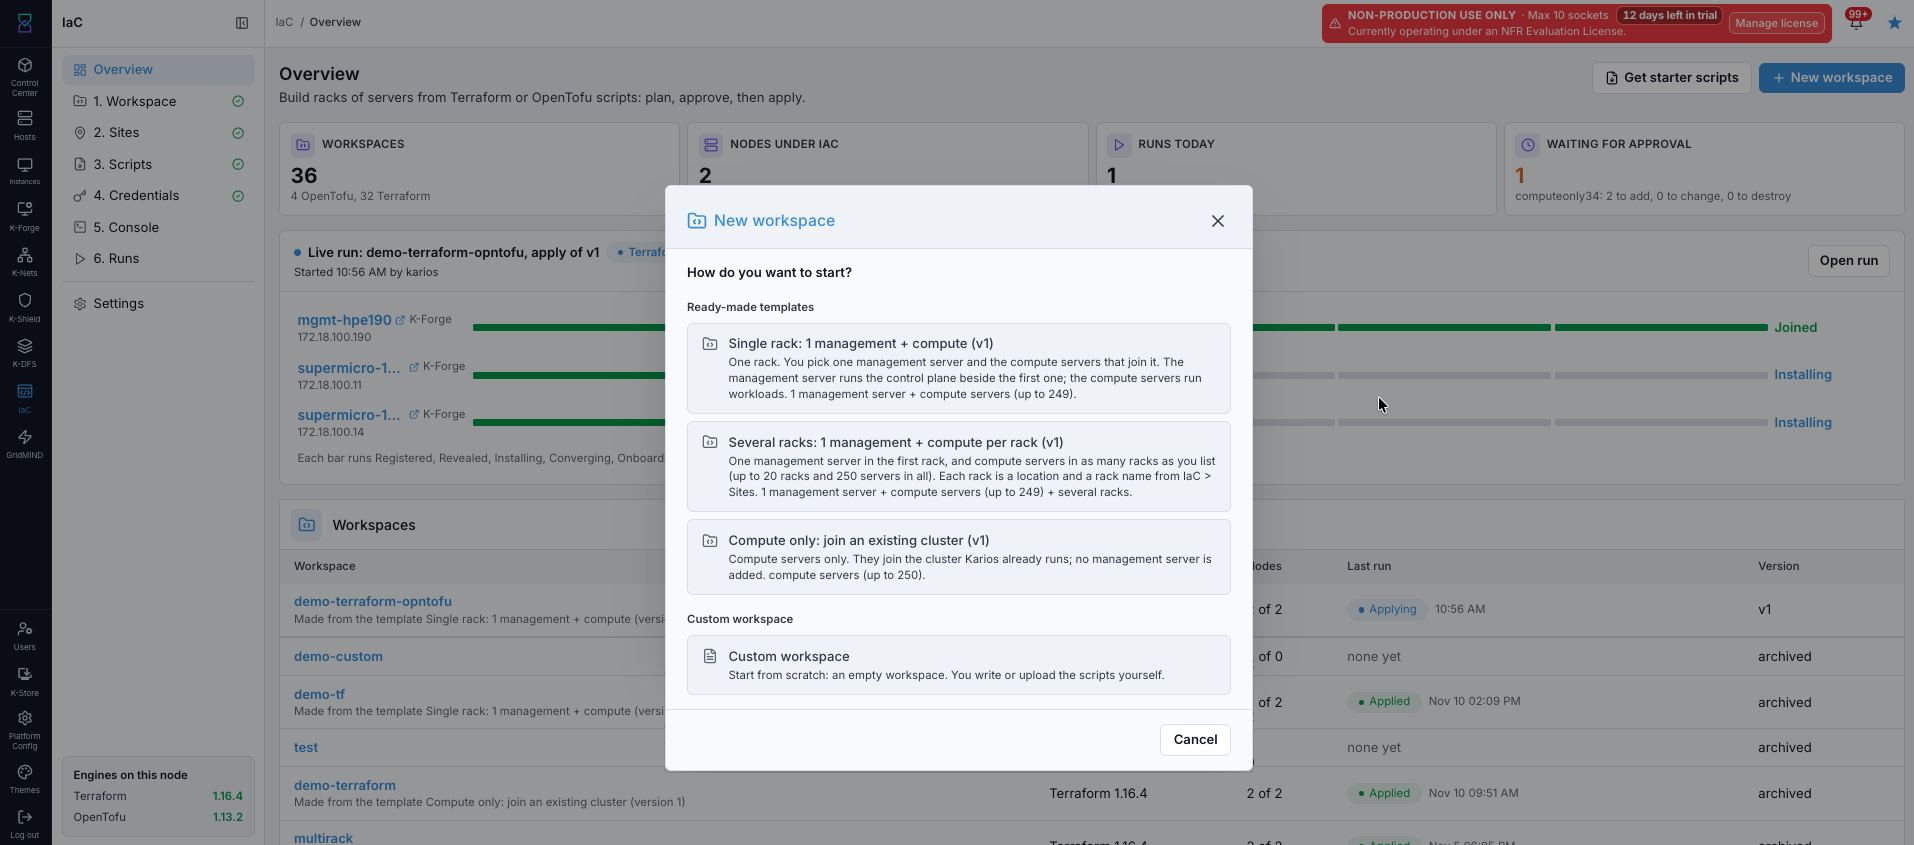
Step 1 of 3: choose a ready-made template, or
Custom workspace.Starting point
What it builds
Single rack: 1 management + computeOne rack. You pick one management server and the compute servers that join it, up to 249. The management server runs the control plane beside the first one; the compute servers run workloads.
Several racks: 1 management + compute per rackOne management server in the first rack, and compute servers in as many racks as you list, up to 20 racks and 250 servers in all. Each rack is a location and rack name taken from
IaC -> Sites.Compute only: join an existing clusterCompute servers only, up to 250. They join the cluster Karios already runs; no management server is added.
Custom workspaceAn empty workspace. You write or upload the scripts yourself.
For a template, fill in the form.
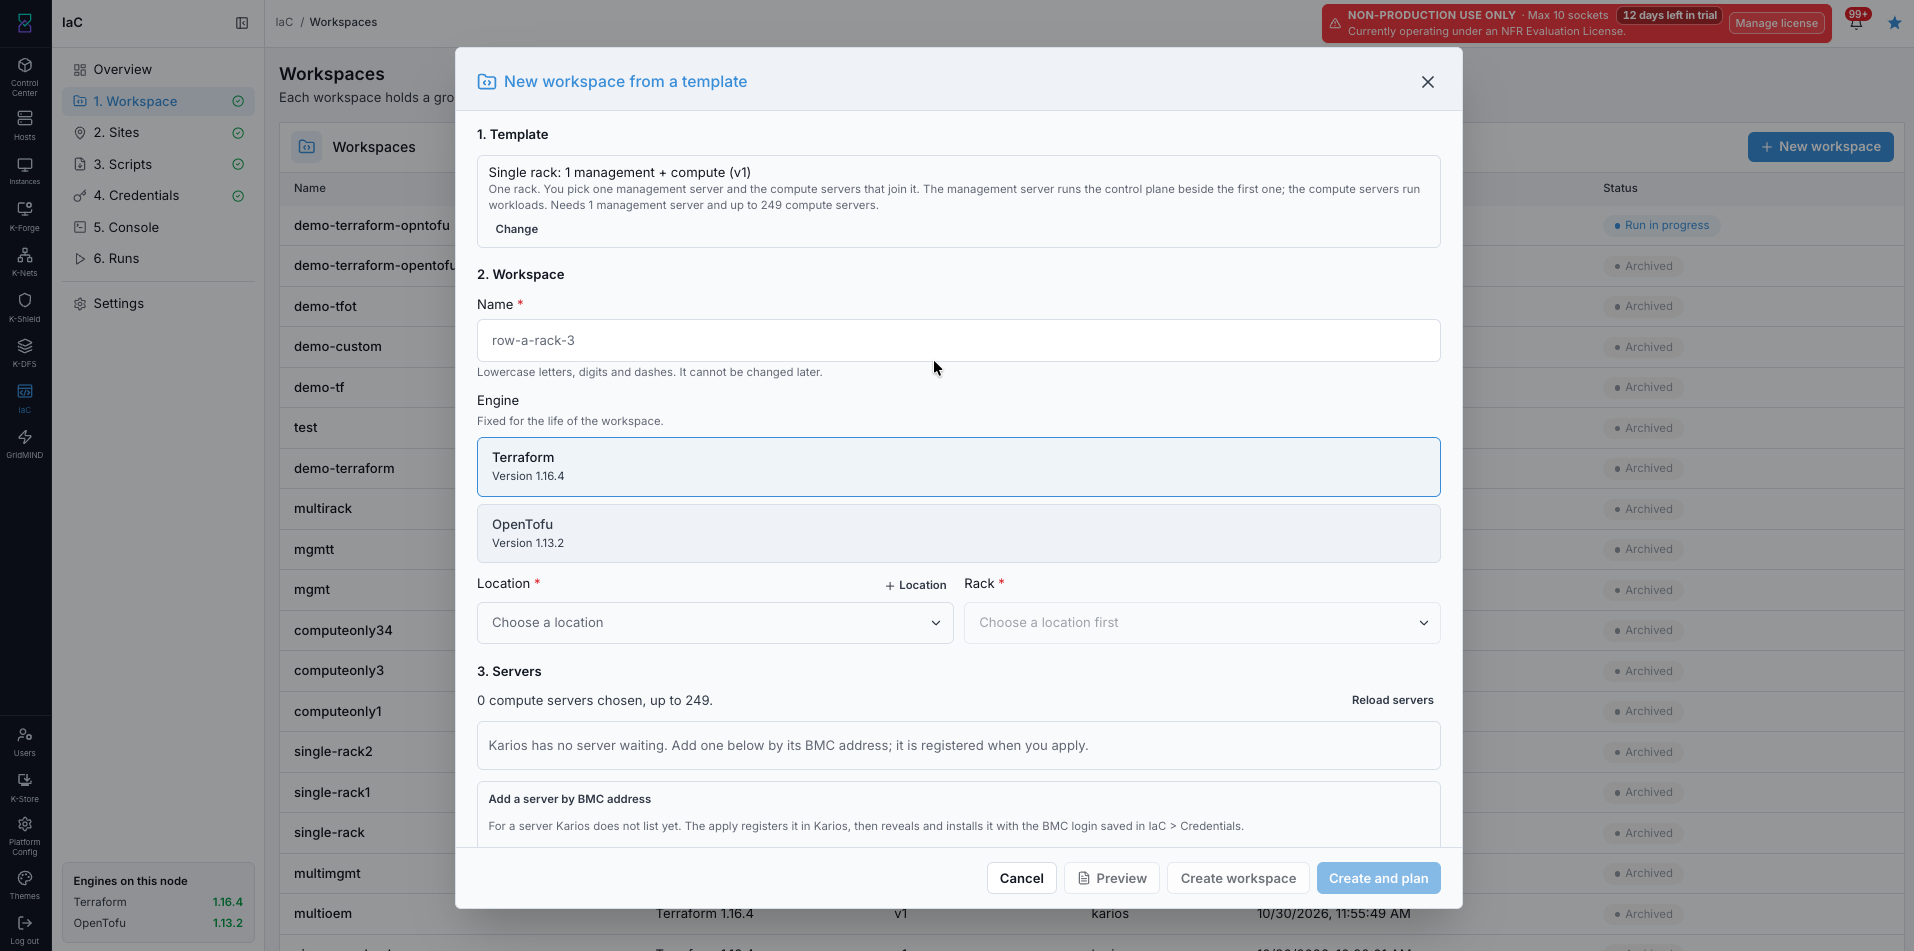
Step 2 of 3: name the workspace, choose an engine, a location and a rack, and pick the servers.
Field
What to enter
NameLowercase letters, digits and dashes, for example
row-a-rack-3. It cannot be changed later.EngineTerraformorOpenTofu, with the version installed on the node. It is fixed for the life of the workspace.LocationandRackWhere the servers go. Choose a location first; the rack list then shows that location’s racks. Select
+ Locationto add a location that is missing.ServersThe servers K-Forge holds. Tick
Computefor each compute server and select oneManagementradio button for the management server. The line above the table counts the compute servers you have chosen. SelectReload serversif you added one in K-Forge meanwhile.Select one of the buttons at the bottom.
Button
What it does
PreviewShows what the template would create from your choices, without creating the workspace.
Create workspaceCreates the workspace and stops. You continue from the workspace pages.
Create and planCreates the workspace, opens its
Consoleand starts the plan.CancelCloses the form and creates nothing.
Note
A server you add by address, instead of picking it from the list, needs a BMC login before the workspace can be created. The form lists any that are missing.
The workspace appears in the Workspaces table on Overview with its
engine, its node count and its last run. Open it to see its pages. Settings
shows the workspace details and your access, and is where you archive a
workspace you no longer need.
Important
The engine cannot be changed after the workspace exists. If you need the other engine, create a new workspace.
Sites, Scripts And Credentials
These three pages come after you create a workspace and before you plan. They tell IaC where the servers go, which servers to build, and how to sign in to each one.
Step 2: Sites
IaC -> Sites shows where the servers go: the locations and racks Karios holds,
and the pods of each zone.
Your scripts name a location and a rack, for example location = "DC2" and
rack = "RACK-07". A plan stops on a name that does not exist here, and the
message says which server and which name.
Steps:
Open
IaC -> Sites.Check that every location and rack your servers use is listed.
To add one, select
+ Locationfor a new location, or+ Rackon a location for a new rack.
Note
Pods are shown for reference only. They are set up in Control Center, not
here.
Step 3: Scripts
IaC -> Scripts is three steps: download the starter, edit one file, upload
it. Every upload is kept as a version.
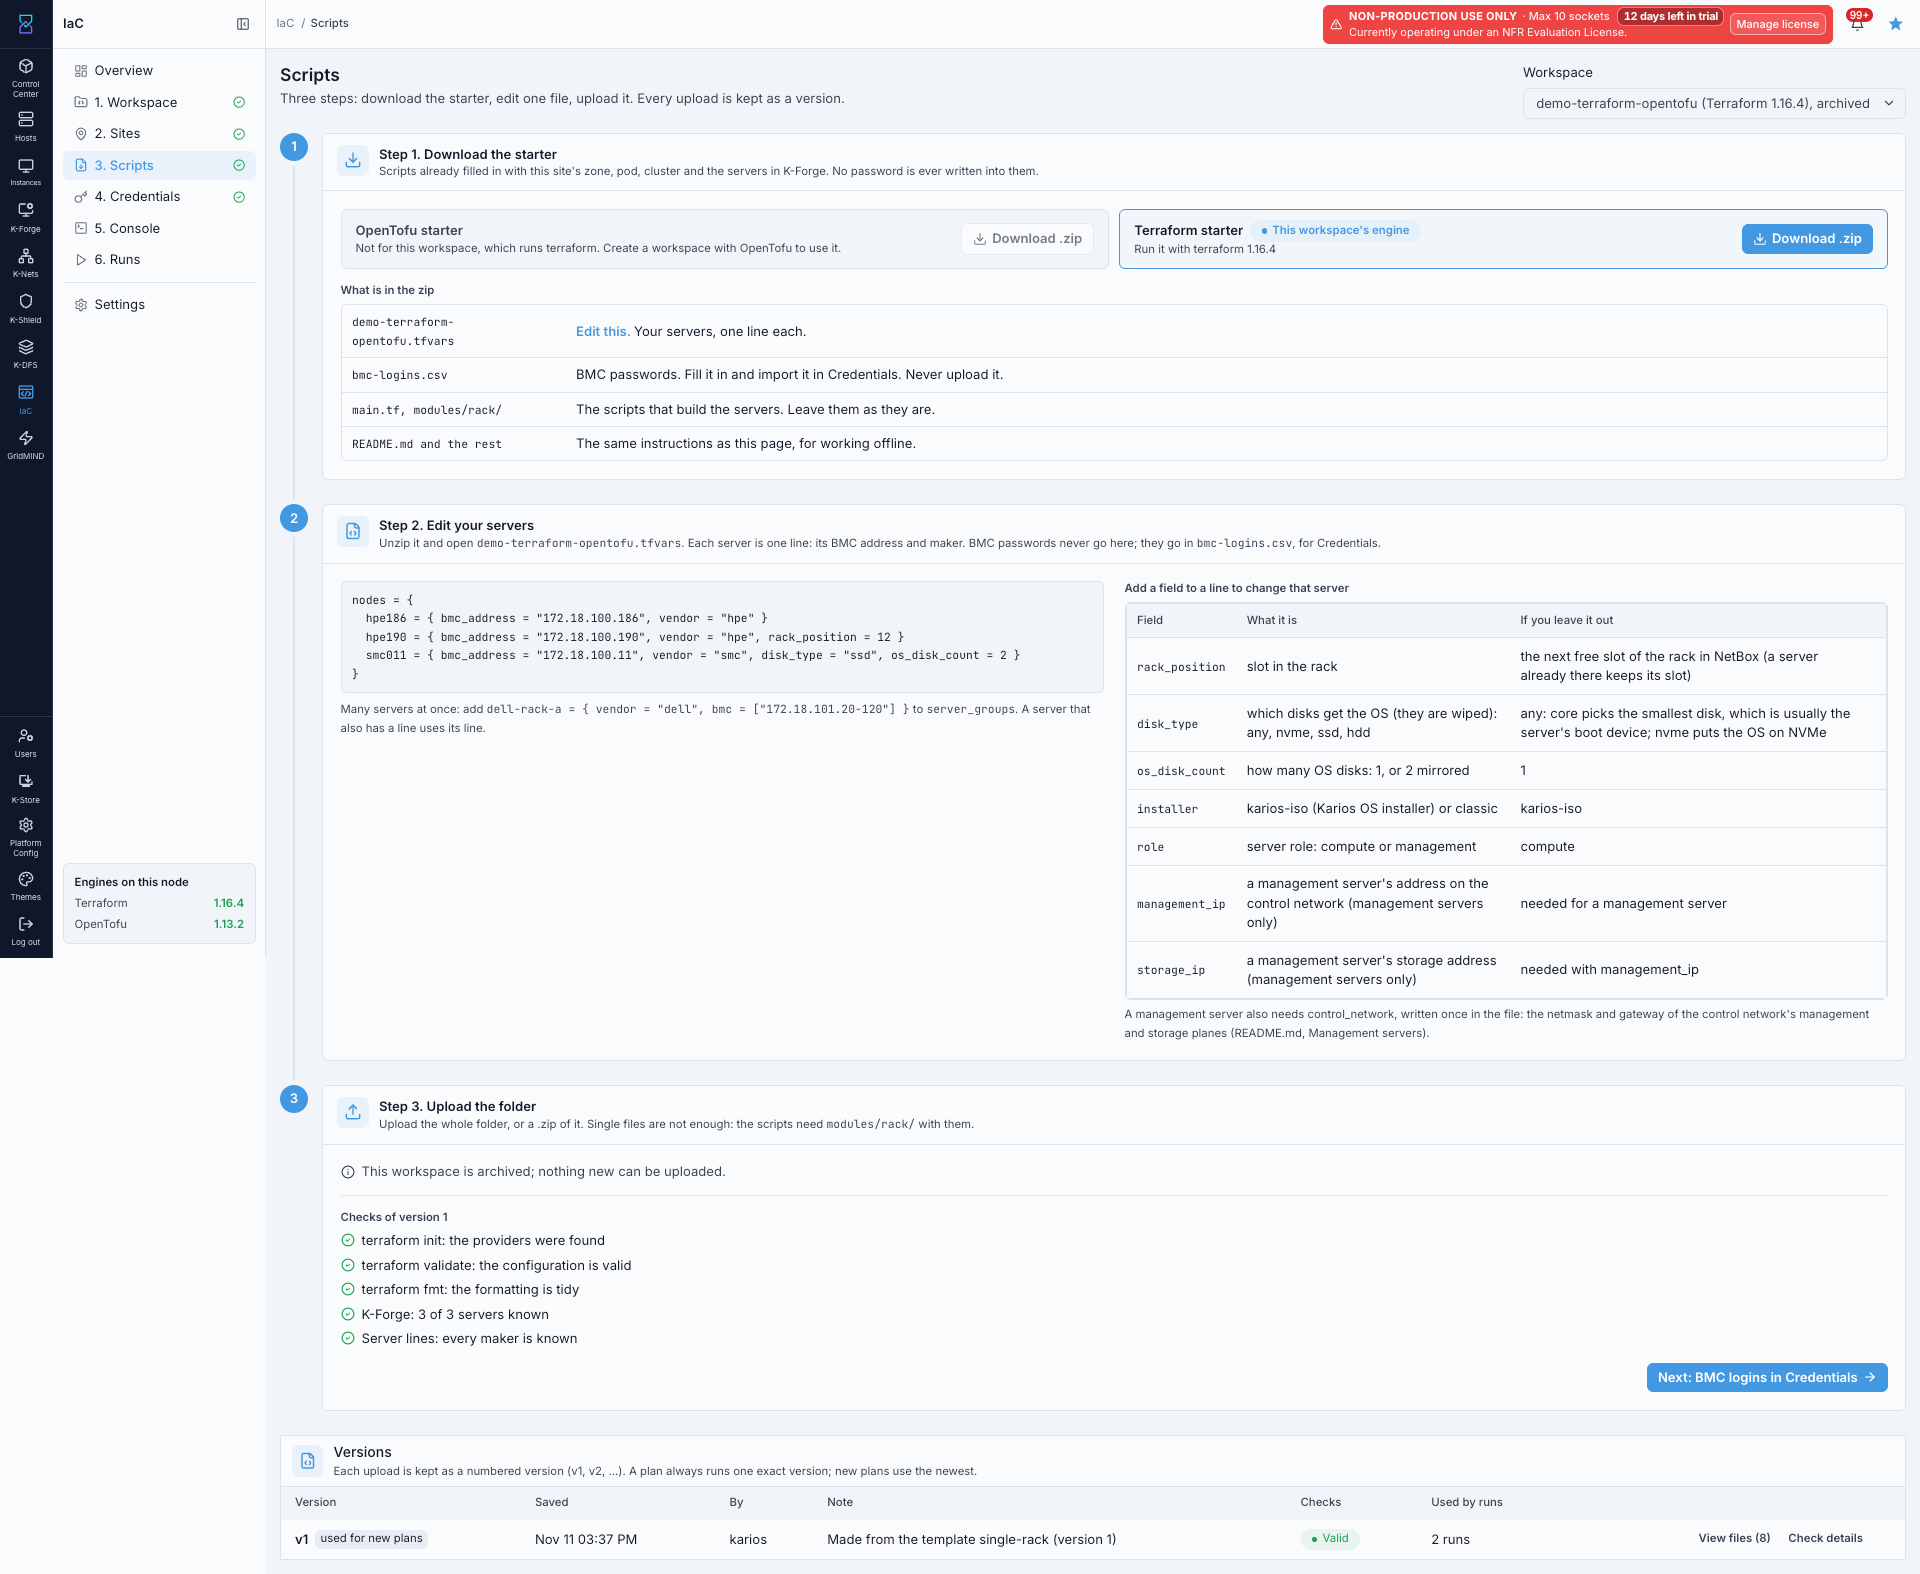
IaC -> Scripts: download the starter, then edit your servers.
Step 1. Download the starter. Pick the workspace at the top right. Select
Download .zip on the starter card for the workspace’s engine. The starter is
already filled in with this site’s zone, pod, cluster and the servers in K-Forge.
No password is ever written into it.
File in the zip |
What it is |
|---|---|
|
Edit this. Your servers, one line each. |
|
BMC passwords. Fill it in and import it in |
|
The scripts that build the servers. Leave them as they are. |
|
The same instructions as the page, for working offline. |
Step 2. Edit your servers. Unzip the file and open the .tfvars file. Each
server is one line: its BMC address and its maker. BMC passwords never go here.
nodes = {
  hpe186 = { bmc_address = "198.51.100.186", vendor = "hpe" }
  hpe190 = { bmc_address = "198.51.100.190", vendor = "hpe", rack_position = 12 }
  smc011 = { bmc_address = "198.51.100.11", vendor = "smc", disk_type = "ssd", os_disk_count = 2 }
}
Only the address and the maker are required. Add a field to a line to change that one server; leave it out and IaC fills it in.
Field |
What it is |
If you leave it out |
|---|---|---|
|
The server’s BMC IP |
Required |
|
The maker: |
Required |
|
Slot in the rack |
The next free slot of the rack (a server already there keeps its slot) |
|
Which disks get the OS (they are wiped): |
|
|
How many OS disks: 1, or 2 (mirrored) |
1 |
|
|
|
|
One exact disk by its WWN, instead of |
Not used |
|
|
|
|
A management server’s addresses on the control network |
Needed for a management server |
|
A management server only: the VLAN (1 to 4094) if storage shares the management card, tagged |
Storage has a card of its own |
|
Names as |
The file’s |
Warning
The OS disks are wiped. With disk_type = "any" IaC picks the smallest
disk after it has looked at the server, whatever its media, because a
dedicated boot device is usually the smallest. To put the OS on NVMe, write
disk_type = "nvme".
Many servers at once. For a rack of new servers, add a maker and its
addresses or ranges to server_groups:
dell-rack-a = { vendor = "dell", bmc = ["192.0.2.20-192.0.2.120"] }
Each server of a group gets a name from the maker and the last two parts of its address, and is filled in like a line.
Management servers. A management server runs the control plane beside the
first one. Most servers are compute, which is the default. Write a management
server on a line of its own with role = "management", management_ip and
storage_ip. Only an administrator can add one. Management servers are
installed first, one at a time, then the compute servers. The plan asks Karios
whether the two addresses fit the control network and are free before any disk
is wiped.
Step 3. Upload. Upload the edited .tfvars file. IaC checks it and keeps it
as the next version of the workspace.
Step 4: Credentials
A plan needs a BMC login for every server in the scripts. IaC -> Credentials
imports them and checks each one against the BMC itself.
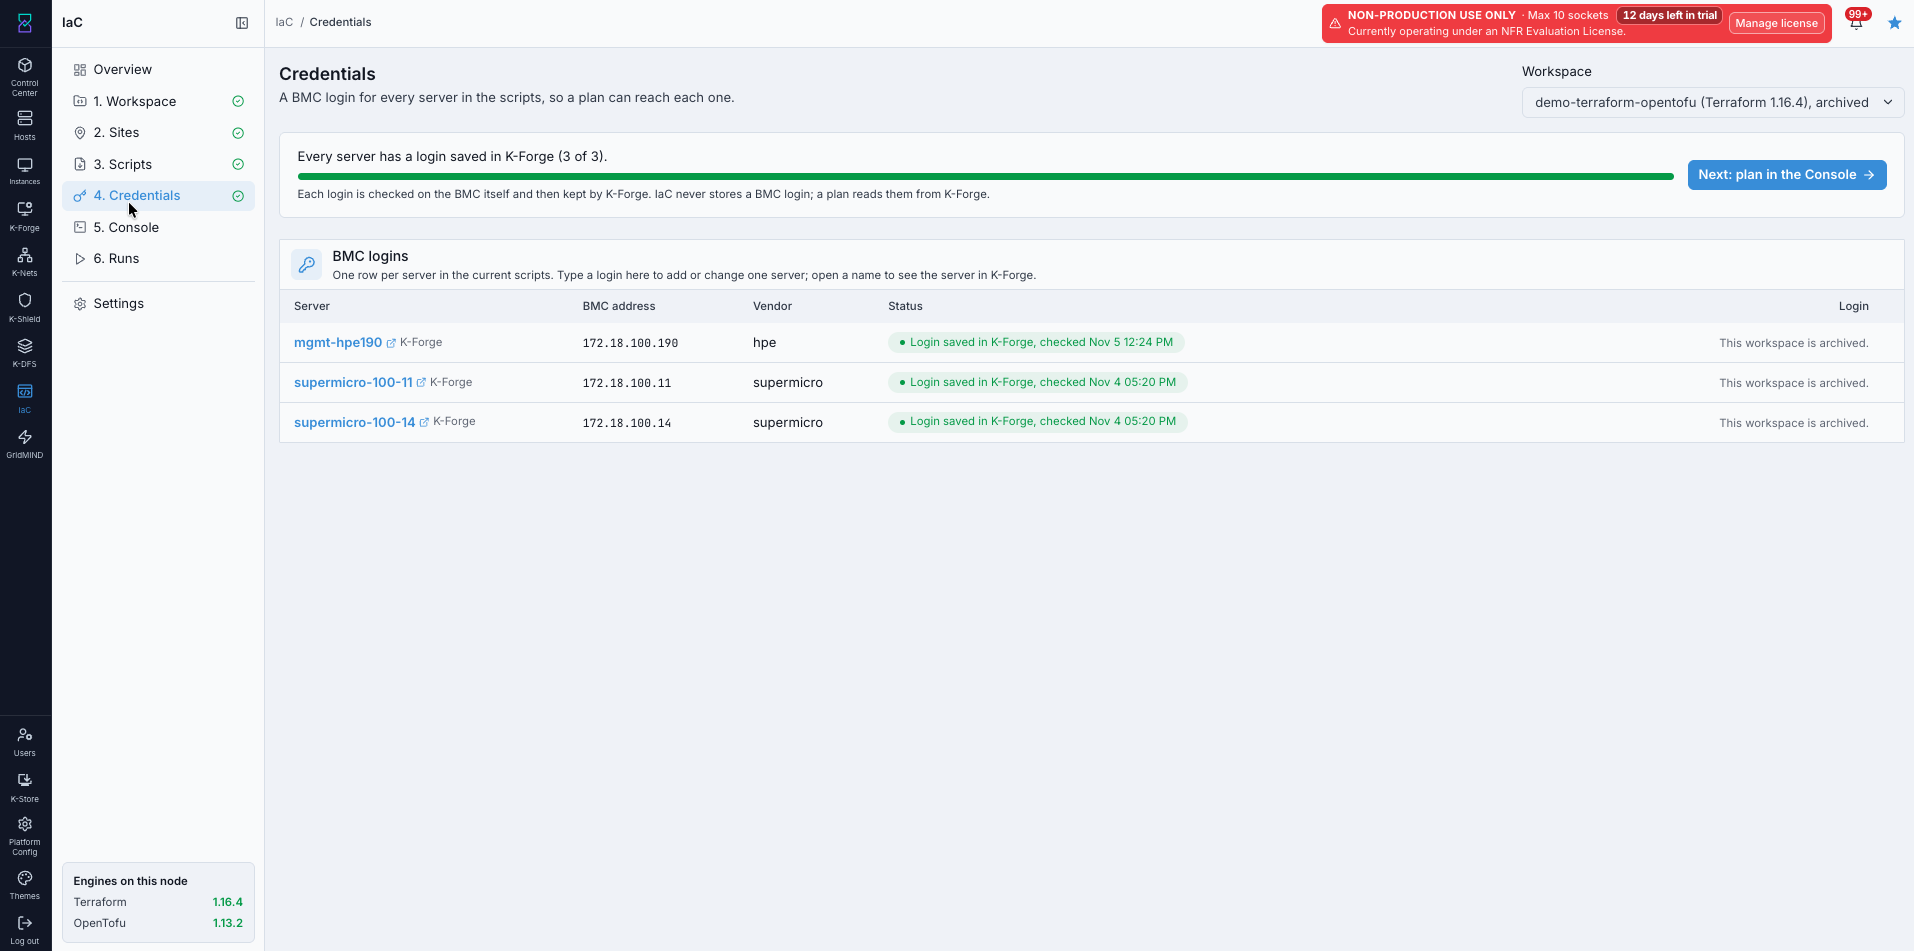
IaC -> Credentials: import bmc-logins.csv, then check each server’s
login in the table.
Steps:
Open
bmc-logins.csvfrom the starter folder. Each line already has the server’s address and user.Type each server’s BMC password at the end of its line. The format is
bmc_address,username,password, one line per server; the header is optional.On
Credentials, selectChoose bmc-logins.csv(or drop the file on the box) and import it.Delete the file from your computer.
Check the
BMC loginstable. To add or change one server, selectChange login.
The file is read in your browser. Each login goes straight to K-Forge, and the file is never uploaded. IaC never stores a BMC login; a plan reads them from K-Forge.
When every server has a login, the page shows Every server has a login saved
in K-Forge with a full bar, and Next: plan in the Console takes you on.
Plan, Approve And Apply
This is where the servers are built. Open IaC -> Console. Use it when your scripts are uploaded and every server has a saved BMC login.
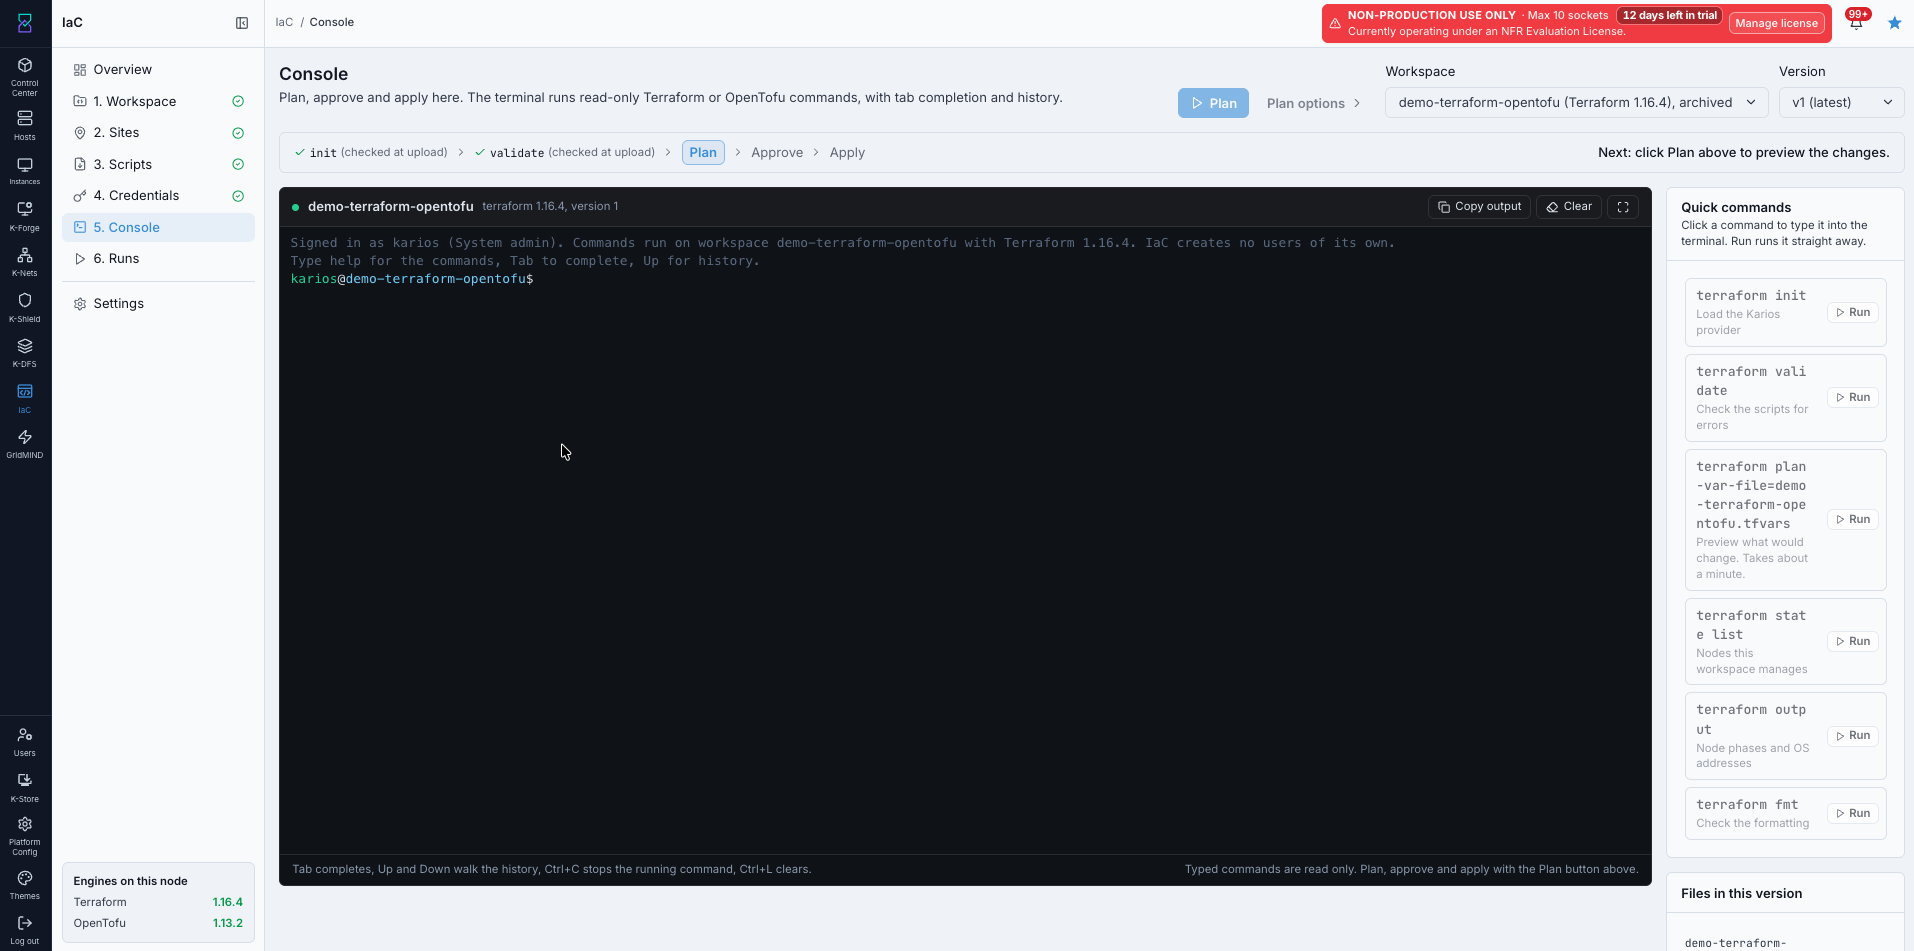
IaC -> Console before a plan: the stage bar at the top, the read-only
terminal, and the quick commands on the right.
How a run works
A run always moves through the same stages. The bar under the page title shows where you are.
Stage |
What it means |
|---|---|
|
The scripts are prepared. It is checked when you upload them. |
|
The scripts are checked for mistakes. It is also checked at upload. |
|
IaC works out what would change and shows it. Nothing is changed yet. |
|
You read the plan and confirm it. |
|
IaC builds the servers. |
Nothing is built until you approve the plan.
Steps
Open
IaC -> Console. Choose theWorkspaceand theVersionat the top right.v1 (latest)is the newest upload.Select
Plan. The plan takes about a minute.Read the plan. It lists what would be added, changed or destroyed, and which servers are affected.
Warning
Each
createwipes the OS disks it names.Destroyonly removes a node from IaC; it never wipes it. Check every server before you approve.If the plan is what you expect, select
Approve. If it is not, change the scripts, upload a new version and plan again.Select
Apply. Follow each server below; nothing else is needed.
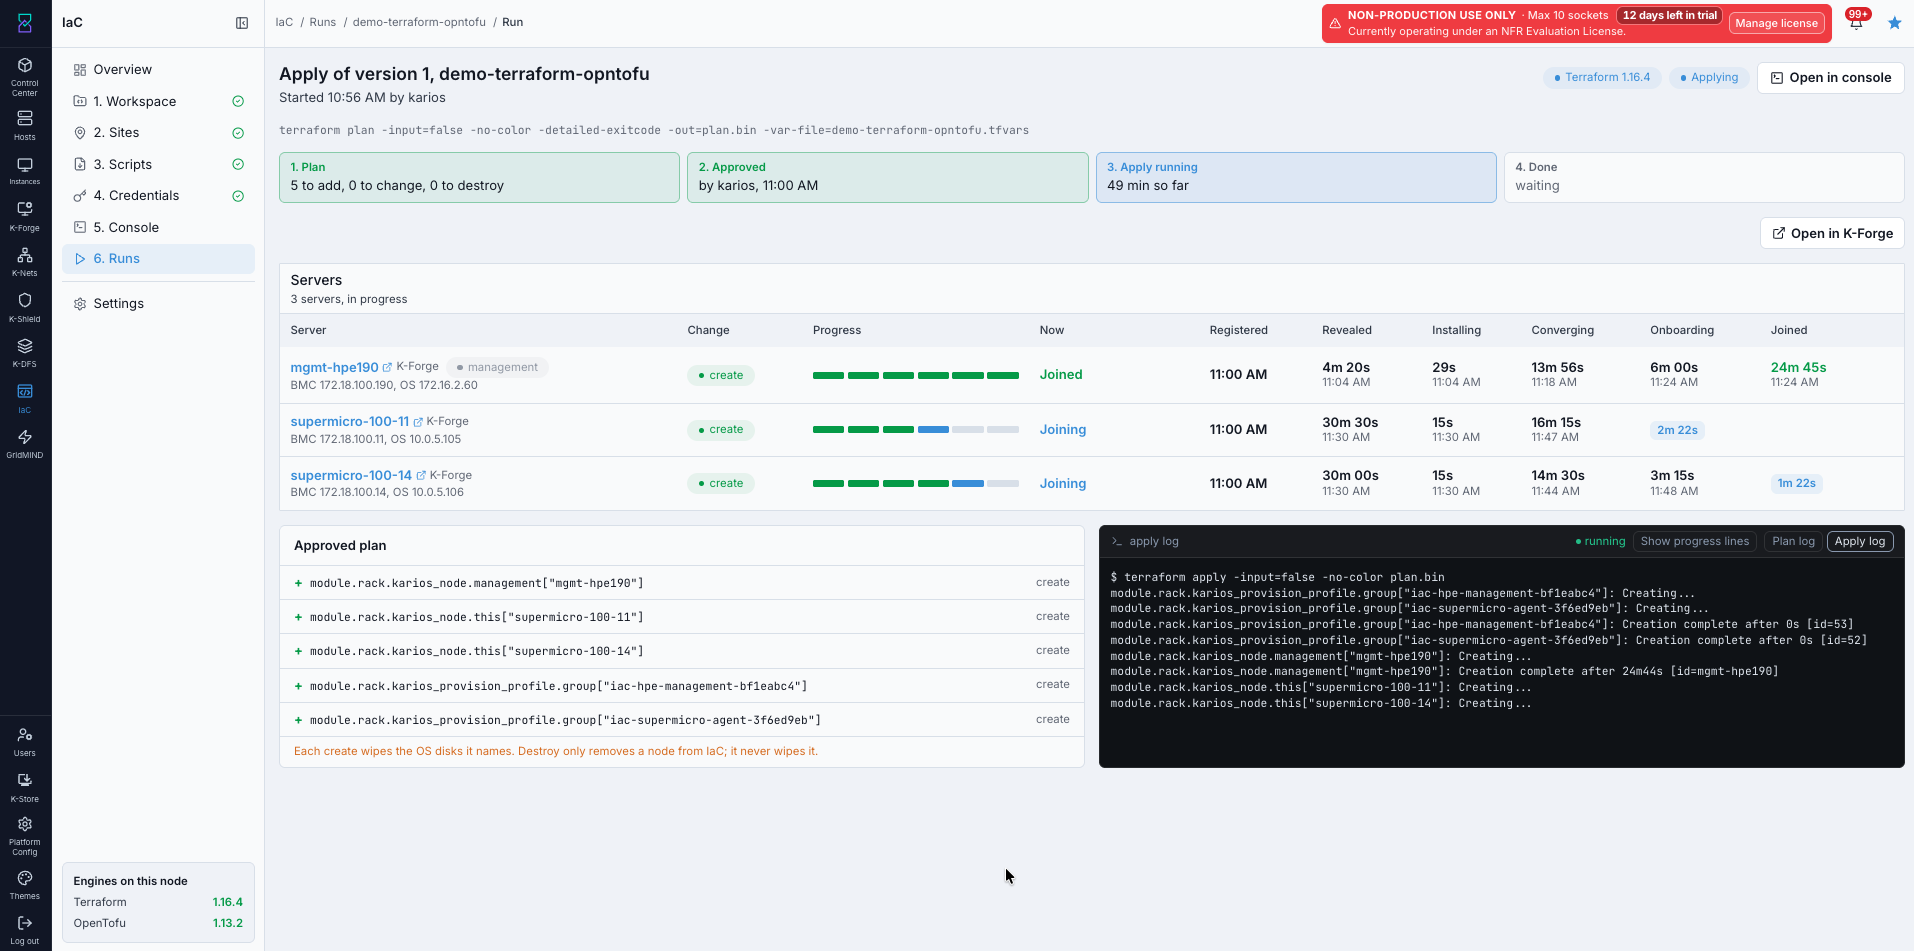
An apply in progress: the four stages, one row per server with its progress bar, the approved plan, and the apply log.
Watch the servers in K-Forge
Every server IaC builds is an ordinary K-Forge node. Open K-Forge to see them
move through the same stages.
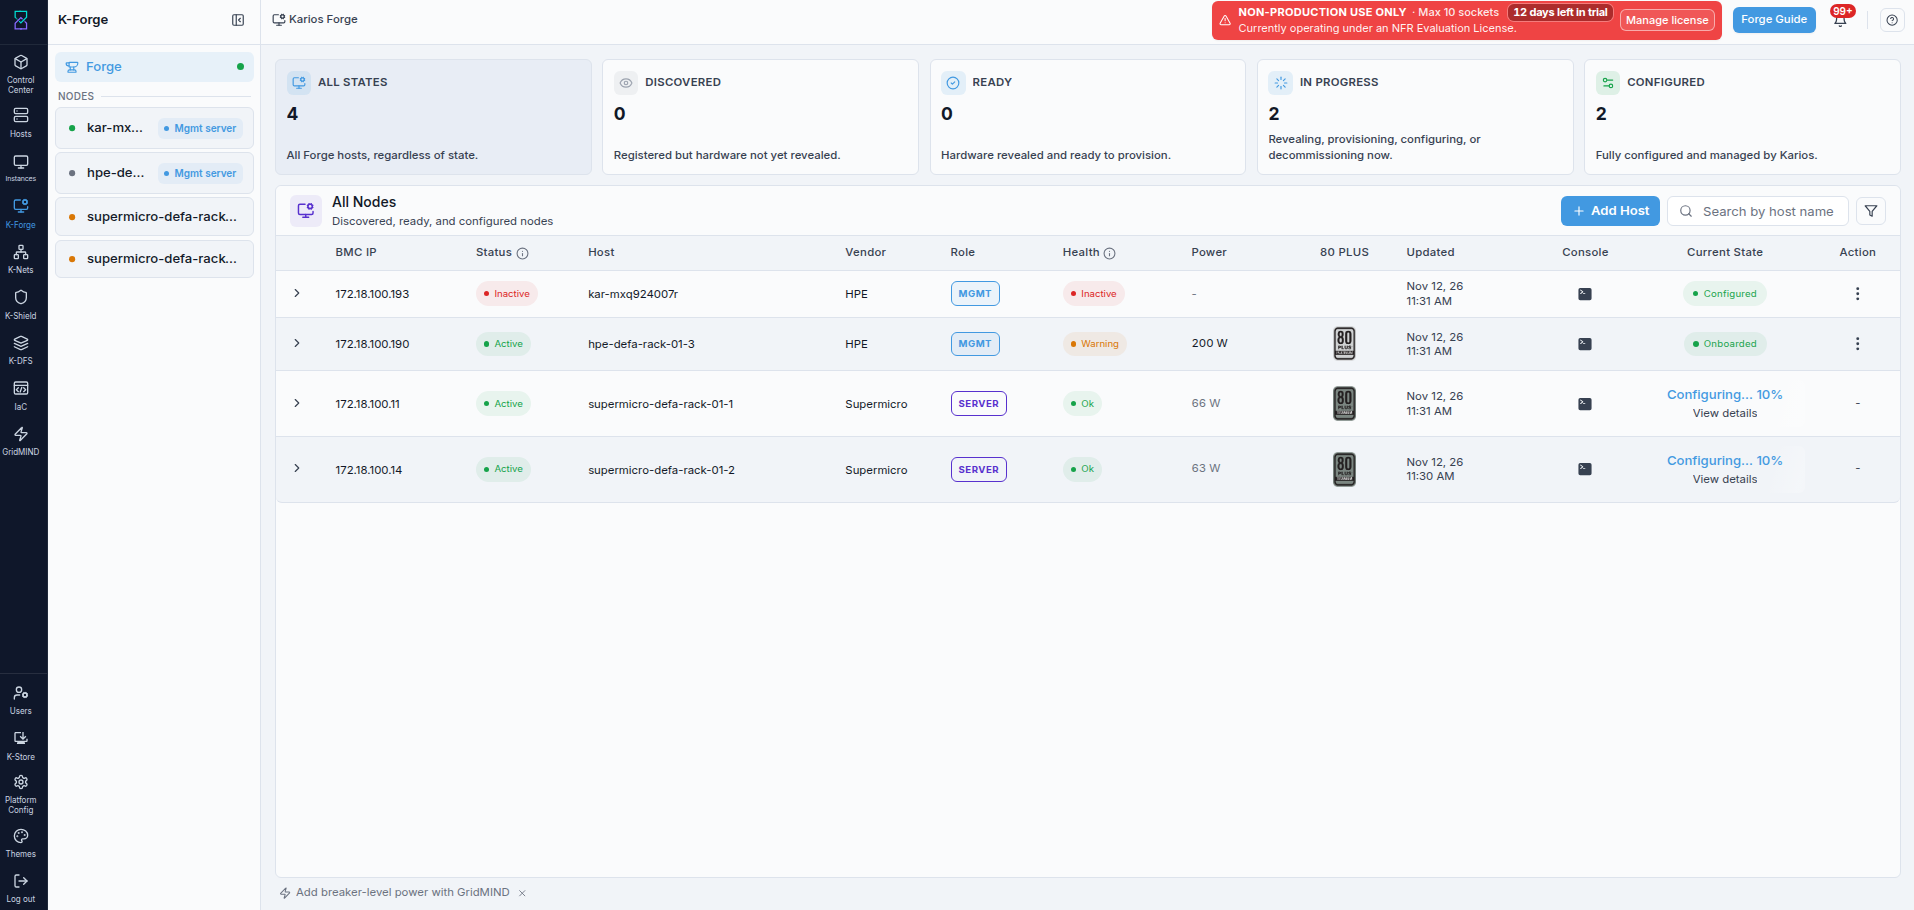
K-Forge during an apply: the management node shows Onboarded and the
compute servers show Configuring with a percentage.
The cards at the top count the servers Discovered, Ready,
In Progress and Configured. A server that is still installing shows
Configuring and a percentage; select View details for the steps.
Important
Do not power-cycle, reset or decommission a server while an apply is running. The apply reboots servers on purpose; interrupting one can leave it half-built.
Review a run later
IaC -> Runs lists every run of every workspace. Open a run for each step’s
time and, if a step failed, the reason. Overview shows runs that are
Waiting for approval so a plan someone else started is not forgotten.
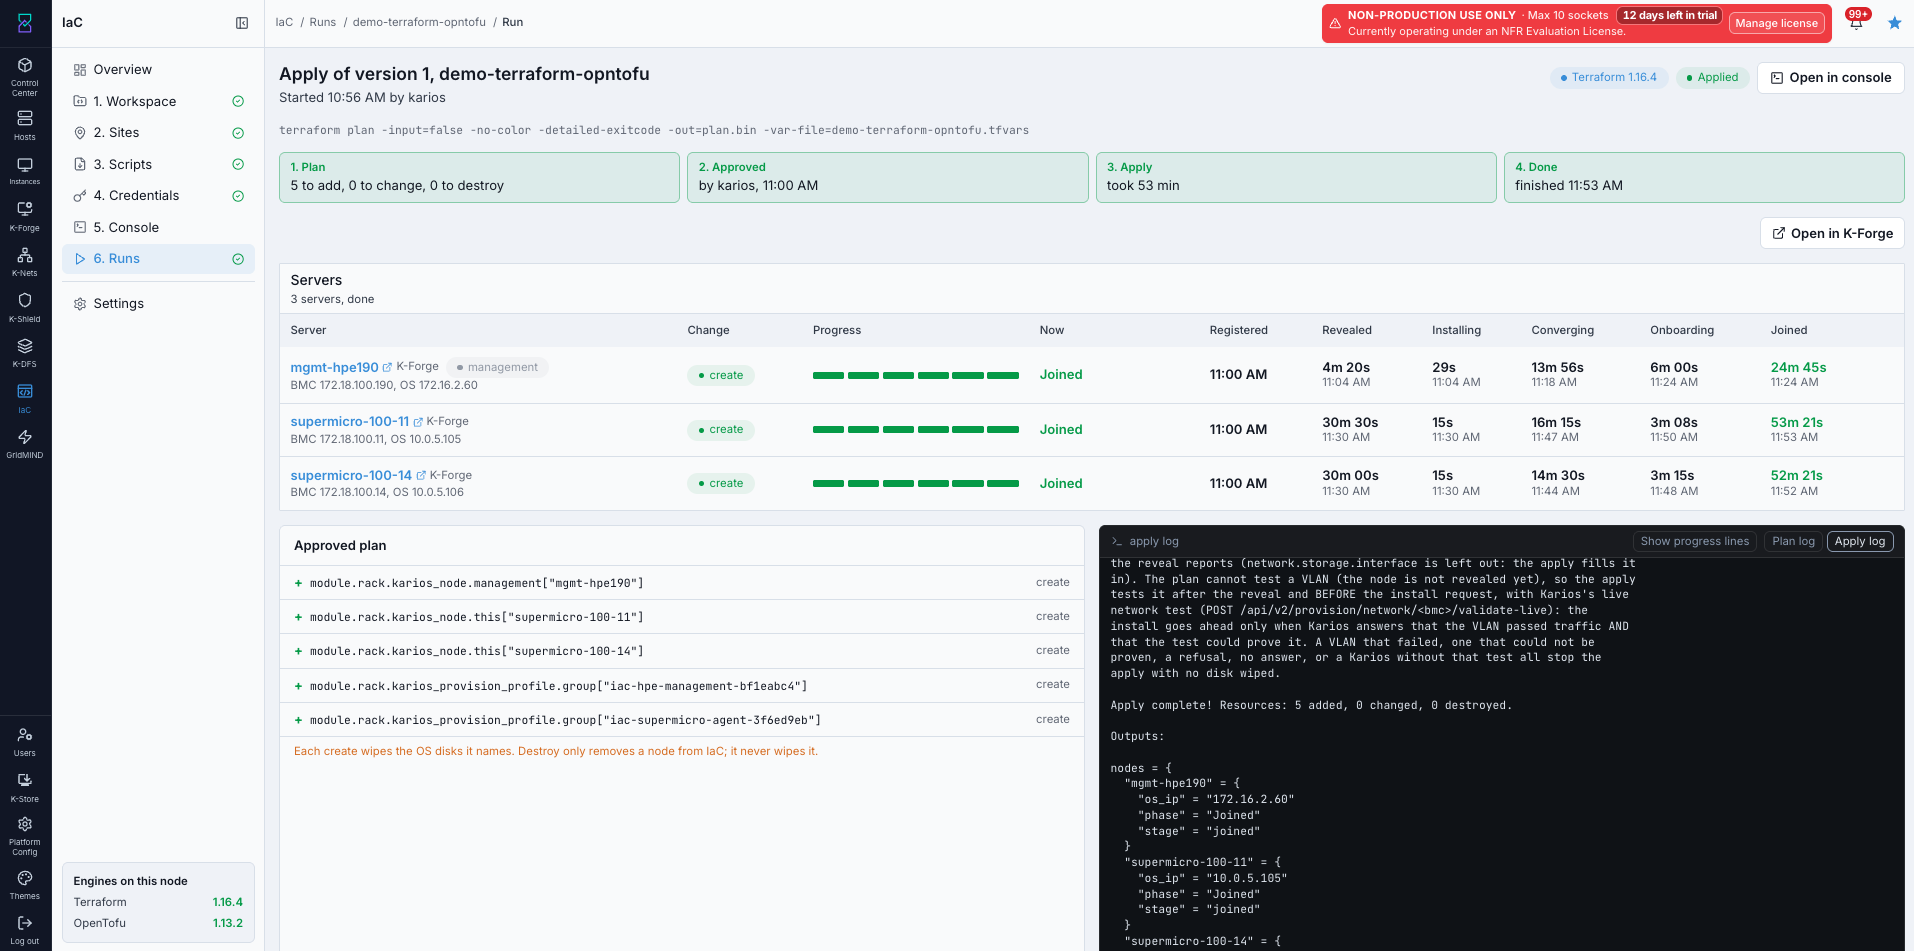
A finished run: every server is Joined and the apply log ends with
Apply complete!.
Expected outcome
The apply finishes, the run shows Applied and every server shows Joined.
In K-Forge, each server is Configured and managed by Karios.
If A Server Fails Partway
A run can stop on one server while the others finish: the reveal can fail, or the install can fail after it has started. You do not start again from a new workspace. Stay in the same workspace, fix the cause, then plan and apply again.
What IaC does with the servers
Each server is built on its own, so one failure does not stop the others. A
server that is already Joined is not touched again when you re-run.
Steps
Open
IaC -> Runsand open the failed run. The failed server and stage are marked, with the reason.Fix the cause. The usual ones are in the table below.
Open
IaC -> Consolein the same workspace and selectPlan.Read the plan. It shows only the servers that are not built yet.
Select
Approve, thenApply.
What the next plan does, by where it stopped
Where the server stopped |
What to do |
|---|---|
Before anything was changed (the BMC could not be reached, the login was refused, the plan was refused) |
Fix it and plan again. Nothing was started, so there is nothing else to do. |
During the reveal, or before the install wrote to the disks |
Plan and apply again. The server is revealed again and gets one new install. |
The install is still running |
Wait. Do not apply again while an install is running; IaC waits for it. |
The install failed after it wrote to the disks |
The plan stops and names the failed attempt, for example |
The server reached |
Run |
Warning
An install that is repeated wipes the OS disks again. Read the plan before you approve it.
Why a server fails
Reason shown |
What to check |
|---|---|
The BMC cannot be reached |
The BMC address, the network between the control node and the BMC, and that the BMC is switched on. |
The login is refused |
The saved login under |
The reveal does not start or never finishes |
Open the server in |
The install does not find the disks it was told to use |
The disk type, the number of OS disks and the disk names in the plan. The reveal shows the disks the server really has. |
The server does not become |
The management and storage addresses and VLANs, and that the server can reach the management network. |
Start a new workspace only when you want different servers or settings, not to recover from a failure.
If This Fails
What you see |
What to check |
|---|---|
No |
Your update source does not publish it yet, or the cluster cannot reach the source. Use the air-gapped route. |
|
Wait for the card to finish its transitional state, then refresh the page. |
The server table in the new-workspace form is empty |
No server is |
|
A required field is empty, the name is invalid, or a server needs a BMC login. |
A plan stops on a name |
The location or rack in the script does not exist in |
A server shows no saved login |
Import |
The upload is refused |
Read the message: it names the line and the field. |
|
Open the run: the failed server and stage are marked, with the reason. Fix the cause, then plan and apply again. See If A Server Fails Partway. |
A server is stuck at |
Open that server in |
The bar does not move for a while |
Installing and converging take time on real hardware. Wait, and read the apply log for the latest line. |
→ Next: K-Nets